一、口罩识别简介
口罩规范佩戴识别是基于人脸口罩检测结果进行的,该部分的输入是人脸口罩检测的输出且是有佩戴口罩的人脸。首先,将人脸部分的图像提取出来;然后映射到YCrCb颜色空间并进行非线性变换,经过椭圆肤色模型检测后输出一张灰度图,其中皮肤部分像素点为255(白色),非皮肤部分像素点为0(黑色);最后再通过遍历人脸中鼻和嘴周围的像素点,得到皮肤暴露状况,从而判断是否规范佩戴口罩了。识别模型结构如图3所示。本节具体介绍了YCrCb椭圆肤色模型、人脸中鼻和嘴部分的划分、以及通过肤色状况判断是否规范佩戴口罩的逻辑关系。
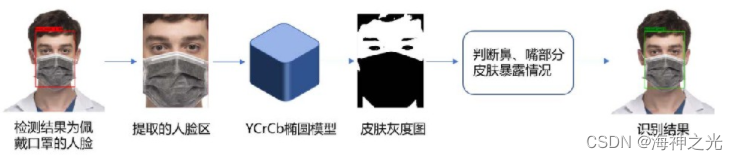
图3 口罩规范佩戴识别模型框架
1 YCrCb椭圆肤色模型
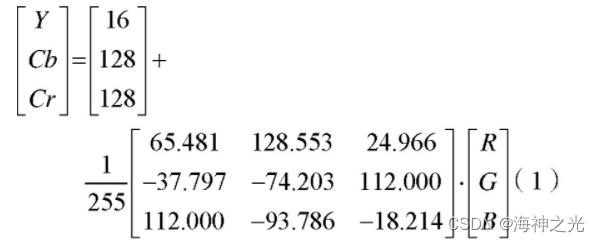
YCrCb椭圆肤色模型[11]是Hsu等人所提出的,它能够很好地利用皮肤在YCrCb颜色空间聚类的特点进行皮肤检测,并且降低光线亮度对检测的影响。构建该模型,首先需要将肤色检测的图片从RGB颜色空间转换到YCrCb颜色空间,具体转换公式如下:
得到了原始图片在YCrCb颜色空间的映射之后,还需要对其中Cr和Cb色度进行一系列非线性变换,得到Cr′和Cb′,即得到新的YCr′Cb′颜色空间。与此同时,还要去掉高光阴影部分,采用四个边界限制肤色聚类区域,以此适应原始图片中亮度过明或过暗的区域。皮肤信息在YCr′Cb′颜色空间中会产生聚类现象,其分布近似为一个椭圆形状,如图4所示。
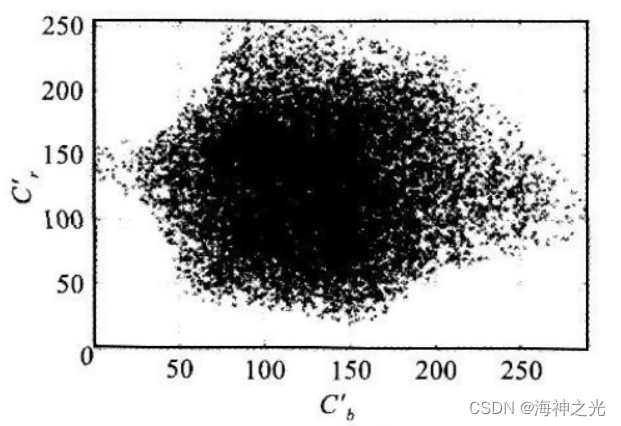
图4 椭圆肤色模型
该椭圆区域即为椭圆肤色模型,其计算公式如公式(2)所示,x、y的取值如公式(3)所示。
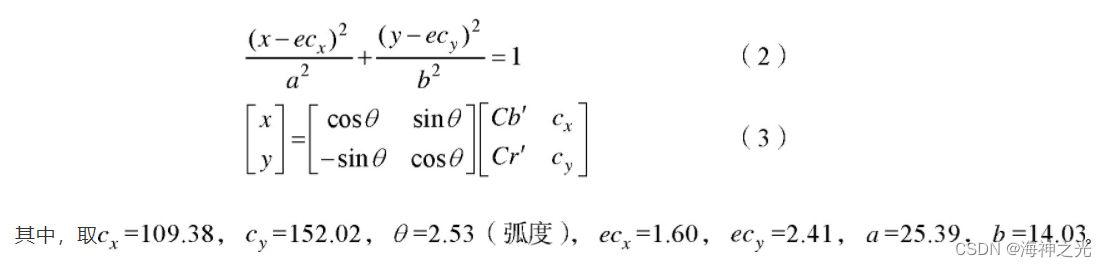
对于皮肤的检测,只需要求出原始图片中某个像素点在YCr′Cb′颜色空间中的映射Cr′和Cb′,然后根据公式(3)求出对应坐标(x,y),再依据公式(2)判断该点是否落在该椭圆区域内即可。如果是,则该像素点判断为皮肤,否则判断为非皮肤。
2 人脸区域划分及识别判断
一般来说,人们佩戴口罩不规范的情况可能是将鼻子露出,或是嘴巴露出,或是鼻子嘴巴都露出。所以,识别一张佩戴有口罩的人脸是否将口罩佩戴规范了,可以通过检测其鼻子周围和嘴巴周围的皮肤情况,来判断这些部位是否暴露在外面。要完成该过程,就涉及到鼻子和嘴巴部分的区域划分。经过大量观察并测量人脸口罩检测结果的检测框发现,人脸中,鼻子周围部分所在位置大约在47%~67%的高度,嘴巴周围部分所在位置大约在67%~95%的高度。这两部分的宽度与检测框的宽度相同。如图5(a)所示。
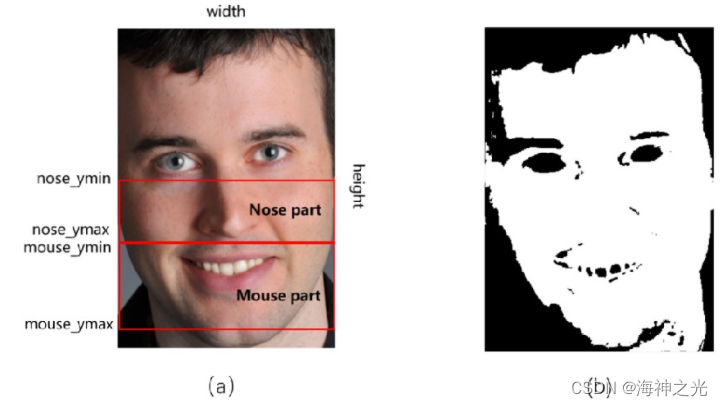
图5 鼻、嘴区域划分及肤色检测效果
其中
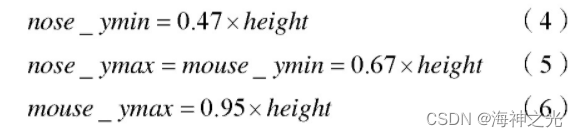
nose_ymin、nose_ymax分别表示Nose part框的最小纵坐标和最大纵坐标。mouse_ymin、mouse_ymax分别表示Mouse part框的最小纵坐标和最大纵坐标。width、height分别表示整个人脸图像的宽度和高度。
将人脸口罩检测框部分的图片经过YCrCb椭圆肤色模型处理后,得到一张对应的灰度图,如图5(b)所示。检测为皮肤的像素点设为255(白色),检测为非皮肤的像素点设为0(黑色)。在该灰度图上,遍历鼻和嘴周围部分的所有像素点,得出在对应部分范围里皮肤所占的面积百分比。经过反复的实验测试发现鼻子部分阈值设置为30%,嘴巴部分阈值设置为25%时合理性最高。在进行口罩佩戴规范情况识别时,如果鼻子和嘴巴部分皮肤所占百分比超过对应的阈值,就说明该部分暴露在外面,再基于下面的命题逻辑表达式进行整体判定。

其中,P表示佩戴口罩,Q表示鼻子暴露在外面,R表示嘴巴暴露在外面。由于该识别是在已佩戴口罩人脸的基础上,所以P一直为true。当表达式(7)真值为true时,识别结果为口罩未规范佩戴;真值为false时,识别结果为口罩已规范佩戴。
二、部分源代码
function varargout = UI(varargin)
% UI MATLAB code for UI.fig
%      UI, by itself, creates a new UI or raises the existing
%      singleton*.
%
%      H = UI returns the handle to a new UI or the handle to
%      the existing singleton*.
%
%      UI('CALLBACK',hObject,eventData,handles,...) calls the local
%      function named CALLBACK in UI.M with the given input arguments.
%
%      UI('Property','Value',...) creates a new UI or raises the
%      existing singleton*.  Starting from the left, property value pairs are
%      applied to the GUI before UI_OpeningFcn gets called.  An
%      unrecognized property name or invalid value makes property application
%      stop.  All inputs are passed to UI_OpeningFcn via varargin.
%
%      *See GUI Options on GUIDE's Tools menu.  Choose "GUI allows only one
%      instance to run (singleton)".
%
% See also: GUIDE, GUIDATA, GUIHANDLES

% Edit the above text to modify the response to help UI

% Last Modified by GUIDE v2.5 30-Mar-2022 21:14:15

% Begin initialization code - DO NOT EDIT
gui_Singleton = 1;
gui_State = struct('gui_Name',       mfilename, ...
    'gui_Singleton',  gui_Singleton, ...
    'gui_OpeningFcn', @UI_OpeningFcn, ...
    'gui_OutputFcn',  @UI_OutputFcn, ...
    'gui_LayoutFcn',  [] , ...
    'gui_Callback',   []);
if nargin && ischar(varargin{

    1})
    gui_State.gui_Callback = str2func(varargin{

    1});
end

if nargout
    [varargout{

    1:nargout}] = gui_mainfcn(gui_State, varargin{

    :});
else
    gui_mainfcn(gui_State, varargin{

    :});
end
% End initialization code - DO NOT EDIT

% global image
% --- Executes just before UI is made visible.
function UI_OpeningFcn(hObject, eventdata, handles, varargin)
% This function has no output args, see OutputFcn.
% hObject    handle to figure
% eventdata  reserved - to be defined in a future version of MATLAB
% handles    structure with handles and user data (see GUIDATA)
% varargin   command line arguments to UI (see VARARGIN)

% Choose default command line output for UI
handles.output = hObject;

% Update handles structure
guidata(hObject, handles);

% UIWAIT makes UI wait for user response (see UIRESUME)
% uiwait(handles.figure1);


% --- Outputs from this function are returned to the command line.
function varargout = UI_OutputFcn(hObject, eventdata, handles)
% varargout  cell array for returning output args (see VARARGOUT);
% hObject    handle to figure
% eventdata  reserved - to be defined in a future version of MATLAB
% handles    structure with handles and user data (see GUIDATA)

% Get default command line output from handles structure
varargout{

    1} = handles.output;

clear all

% --- Executes on button press in read_image.
function read_image_Callback(hObject, eventdata, handles)
% hObject    handle to read_image (see GCBO)
% eventdata  reserved - to be defined in a future version of MATLAB
% handles    structure with handles and user data (see GUIDATA)
global image;
axes(handles.axes1); %获取句柄
[fname,pname] = uigetfile({

    '*.jpg';'*.jpeg';'*.bmp';'*.png'},'选择图片');
file=[pname fname];
image=imread(file);
%image(img_src);
imshow(image)
title('测试图像');
handles.img=image;
guidata(hObject,handles);
whos('image');
三、运行结果

四、matlab版本及参考文献
1 matlab版本
2014a
2 参考文献
[1] 蔡利梅.MATLAB图像处理——理论、算法与实例分析[M].清华大学出版社,2020.
[2]杨丹,赵海滨,龙哲.MATLAB图像处理实例详解[M].清华大学出版社,2013.
[3]周品.MATLAB图像处理与图形用户界面设计[M].清华大学出版社,2013.
[4]刘成龙.精通MATLAB图像处理[M].清华大学出版社,2015.
[5]肖俊杰.基于YOLOv3和YCrCb的人脸口罩检测与规范佩戴识别[J].软件. 2020,41(07)
3 备注
简介此部分摘自互联网,仅供参考,若侵权,联系删除