1. 鸭子类型和多态
1.1 鸭子类型: 当看到一只鸟走起来像鸭子,游泳起来像鸭子,叫起来像鸭子,那么这只鸟就可以被称为鸭子。 鸭子类型是python中实现多态的简单方式。
例子:
>>> class Cat(object):
>>>     def say(self):
>>>         print('i am a cat')


>>> class Dog(object):
>>>     def say(self):
>>>         print('i am a dog')


>>> class Duck(object):
>>>     def say(self):
>>>         print('i am a duck')


# 多态

>>> animal_list = [Cat, Dog, Duck]
>>> for animal in animal_list:
>>>     animal().say()      # animal并没有实例化,所以要加()

i am a cat
i am a dog
i am a duck
Cat, Dog, Duck 三个类 并不需要继承同一个父类, 只要他们有共同的 函数say 就可以实现多态了。
1.2 list类型的extend方法,传入的参数,并不一定是list, 可以是可迭代的对象 如set
代码举例:
>>> a = ['cannon1', 'cannon2']
>>> b = ['cannon2', 'cannon']
>>> name_tuple = ['cannon3', 'cannon4']
>>> name_set = set()
>>> name_set.add('cannon5')
>>> name_set.add('cannon6')
>>> a.extend(name_set)    # list的extend方法可以传b  也可以传name_set
>>> print(a)

['cannon1', 'cannon2', 'cannon6', 'cannon5']
2. 抽象基类(abc模块)
情况:父类作为抽象类,起到框架作用。要求子类在继承父类时,必须重写父类中的方法
# 默认会抛异常, 只有子类重写了才不会抛异常
>>> class CacheBase():
>>>     def get(self, key):
>>>         raise NotImplementedError

>>>     def set(self, key, value):
>>>         raise NotImplementedError

>>> class RedisCache(CacheBase):
>>>     pass
>>> redis_cache = RedisCache()
>>> redis_cache.set()

Traceback (most recent call last):
  File "2_abc.py", line 48, in <module>
    redis_cache = RedisCache()
TypeError: Can't instantiate abstract class RedisCache with abstract methods set
需求: 以上例子中在继承时,只有调用set或get的时候才会报错,上面代码中没有调用get就没有报get没重写的错误。 而我想让子类在继承以后 get和set函数必须立即重写好。即 如果没重写,在初始化的时候就需要报错。
这里需要使用abc模块来实现了
实现:
>>> import abc


>>> class CacheBase(metaclass=abc.ABCMeta):
>>>     @abc.abstractmethod
>>>     def get(self):
>>>         pass

>>>     @abc.abstractmethod
>>>     def set(self, key, value):
>>>         pass

>>> class RedisCache(CacheBase):
>>>     pass


>>> redis_cache = RedisCache()

Traceback (most recent call last):
  File "2_abc.py", line 61, in <module>
    redis_cache = RedisCache()
TypeError: Can't instantiate abstract class RedisCache with abstract methods get, set
没有调用set或get 方法就报错, 达到了想要的效果。
3. isinstance
isinstance的应用举例:
判断是否可以对一个类使用len方法
>>> class Company(object):
>>>     def __init__(self, employee_list):
>>>         self.employee = employee_list

>>>     def __len__(self):
>>>         return len(self.employee)


>>> com = Company(['cannon1', 'cannon2'])

# 方法1   通过hasattr函数判断类是否有__len__方法
>>> print(hasattr(com, '__len__'))
True
>>> print(len(com))
2

# 方法2   通过 isinstance 判定类或者对象 是否是指定的类型
>>> from collections.abc import Sized
>>> print(isinstance(com, Sized))
True
isinstance 与 type的区别:
>>> class A:
>>>     pass


>>> class B(A):
>>>     pass


>>> b = B()
>>> print(isinstance(b, B))
True
>>> print(isinstance(b, A))
True

>>> print(type(b) == B)    # is 判断是不是一个对象即是否id相同   而 == 判断值是否相等   这里更适合用is
True
>>> print(type(b) == A)
False
>>> print(type(b) is B)
True
>>> print(type(b) is A)
False
从结果看type并不适合用在判断类与类之间的关系上。
以上两种情况都应使用isinstance
4. 类变量和实例变量(或称对象变量)
代码例子1:
>>> class A:
>>>     aa = 1   # 类变量

>>>     def __init__(self, x, y):   # self是该类的实例
>>>         self.x = x        # 实例变量
>>>         self.y = y


>>> a = A(2, 3)
>>> print(a.x, a.y, a.aa)
2 2 1
>>> print(A.aa)
1
>>> print(A.x)
Traceback (most recent call last):
  File "4_class_var.py", line 12, in <module>
    print(A.x)
AttributeError: type object 'A' has no attribute 'x'
x是实例变量 通过类变量的方法调用A.aa会报错
代码例子2:(承接1)
>>> A.aa = 11
>>> print(A.aa)
11

>>> a.aa = 100   # 会赋值给实例, 即会自动新建一个self.aa 并赋值100
>>> print(a.x, a.y, a.aa)
2 3 100

>>> print(A.aa)   # a.aa没有对A.aa的结果造成影响
11
上面代码中a.aa = 100 是赋值给自动新建的实例变量aa 不影响A.aa 即类变量的值.
5. 类属性和实例属性以及查找顺序
5.1 类属性和实例属性 先查询 实例属性
代码例子:
>>> class A:
>>>     name = 'A'

>>>     def __init__(self):
>>>         self.name = 'obj'


>>> a = A()
>>> print(a.name)   # 会先查找实例属性的值,找不到才会找类属性的值
obj
5.2 当有继承关系时, 问题就会变复杂
python3中属性搜索算法 是C3算法(公式复杂,自行百度)
C3算法在不同情况下,会视情况来决定是选择 深度优先还是广度优先
情况1下C3算法的顺序: A->B->C->D 广度优先BFS

代码:
# 模拟情况1
>>> class D:
>>>     pass

>>> class C(D):
>>>     pass

>>> class B(D):
>>>     pass

>>> class A(B, C):
>>>     pass

>>> print(A.__mro__)
(<class '__main__.A'>, <class '__main__.B'>, <class '__main__.C'>,
<class '__main__.D'>, <class 'object'>)
情况2下C3算法的顺序: A->B->D->C->E 深度优先DFS
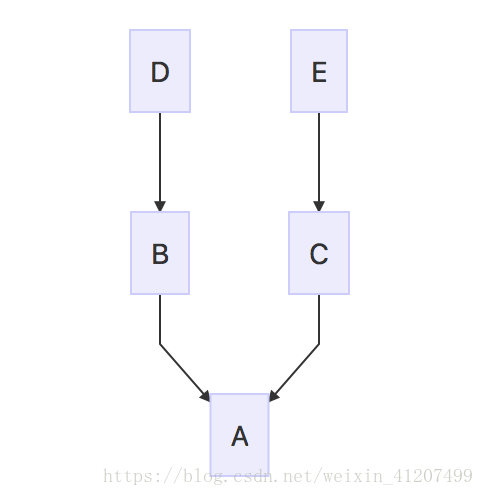
代码:
# 模拟情况2
>>> class D:
>>>     pass

>>> class E:
>>>     pass

>>> class C(E):
>>>     pass

>>> class B(D):
>>>     pass

>>> class A(B, C):
>>>     pass

>>> print(A.__mro__)
(<class '__main__.A'>, <class '__main__.B'>, <class '__main__.D'>,
<class '__main__.C'>, <class '__main__.E'>, <class 'object'>)
6. 类方法、静态方法和对象方法以及参数
对象方法比较简单普遍 例子:
#  代码块1
class Date:
    def __init__(self, year, month, day):
        self.year = year
        self.month = month
        self.day = day

    def tomorrow(self):  # 对象方法
        self.day += 1

    def __str__(self):
        return '{year}/{month}/{day}'.format(year=self.year, month=self.month, day=self.day)

# 代码块2
if __name__ == '__main__':
    new_day=Date(2018, 12, 31)
    new_day.tomorrow()
    print(new_day)
结果 2018/12/32
需求: 现在我有字符串“2018-12-31”但不符合格式要求
可以在代码块1中这样写
if __name__ == '__main__':
    # 2018-12-31
    date_str='2018-12-31'
    year, month, day=tuple(date_str.split('-'))
    new_day=Date(int(year), int(month), int(day))
    print(new_day)
结果 2018/12/31
但每次都 写这些代码太麻烦了, 我们可以使用staticmethod静态方法 写入Date类内部
# 代码块1
class Date:
    def __init__(self, year, month, day):
        self.year = year
        self.month = month
        self.day = day

    def tomorrow(self):
        self.day += 1

    @staticmethod
    def staticmethod_parse_from_string(date_str):
        year, month, day=tuple(date_str.split('-'))
        # 采用硬编码   如果类名突然改成NewDate  那就麻烦了。就得用classmethod
        return Date(int(year), int(month), int(day))

# 代码块2
if __name__ == '__main__':
    # 用staticmethod完成初始化
    date_str='2018-12-31'
    new_day=Date.staticmethod_parse_from_string(date_str)
    print(new_day)
结果 2018/12/31
staticmethod的缺点:
staticmethod 采用硬编码 如果Date类的名字突然改成NewDate 那就麻烦了。
解决办法 用classmethod
# 代码块1
class Date:
    def __init__(self, year, month, day):
        self.year = year
        self.month = month
        self.day = day

    def tomorrow(self):
        self.day += 1

    @classmethod
    def classmethod_parse_from_string(cls, date_str):
        year, month, day=tuple(date_str.split('-'))
        return cls(int(year), int(month), int(day))


# 代码块2
if __name__ == '__main__':
    # 用classmethod完成初始化
    date_str='2018-12-31'
    new_day=Date.classmethod_parse_from_string(date_str)
    print(new_day)
结果 2018/12/31
问题: 既然classmethod解决的staticmethod硬编码的缺陷,那一直用classmethod就好了,staticmethod还有存在必要吗?
答: 如果函数执行过程 和 Date类没有一点关系时,用staticmethod显然更合适
举例:我只想检查字符串是否符合我的要求(并不需要调用Date的本身方法或属性)
class Date:
    def __init__(self, year, month, day):
        self.year = year
        self.month = month
        self.day = day

    def tomorrow(self):
        self.day += 1

    @staticmethod    # 判断字符串是否符合 要求
    def valid_str(date_str):
        year, month, day = tuple(date_str.split('-')
        if int(year) > 0 and int(month) > 0 and int(day) > 0:
            return True
        else:
            return False

    def __str__(self):
        return '{year}/{month}/{day}'.format(year=self.year, month=self.month, day=self.day)


if __name__ == '__main__':
    date_str='2018-12-31'
    # 我只想检查字符串是否符合我的要求,并不需要返回对象
    print(Date.valid_str('2018-12-31'))
结果 True
7. 数据封装和私有属性
在java c++等静态语言中,private定义私有属性,那么在python中如何定义私有属性呢?
>>> class User:
>>>     def __init__(self, birthyear):
>>>         self.__birthyear = birthyear

>>>     def get_age(self):
>>>         return 2018 - self.__birthyear


>>> if __name__ == "__main__":
>>>     user = User(1993)
>>>     print(user.get_age())
25
>>>     birthyear = user.__birthyear
Traceback (most recent call last):
  File "7_private_method.py", line 13, in <module>
    user.__birthyear
AttributeError: 'User' object has no attribute '__birthyear'
代码中我们看到,python中定义私有属性或方法 只要在前面加'__'即可
但这种方法其实也依然可以访问的,方法如下:
>>> if __name__ == "__main__":
>>>     user = User(1993)
>>>     birthyear = user._User__birthyear
>>>     print(birthyear)

1993
用_User__birthyear 依然访问,
python用__来定义私有属性或方法更多的是规范作用。(java中的私有属性也是可以访问的,只是比python麻烦。)
8. python对象的自省机制
自省是通过一定的机制查询到对象的内部结构
__dict__方法:得到属性名和值构成的字典
>>> class Person:
>>>     name = 'user'


>>> class Student(Person):
>>>     def __init__(self, school_name):
>>>         self.school_name = school_name


>>> if __name__ == '__main__':
>>>     user = Student('school1')

   # 通过__dict__查询实例的属性
>>>     print(user.__dict__)
{'school_name': 'school1'}

    # __dict__查询类的属性,会得到比实例更多的属性
>>>     print(Person.__dict__)
{'__module__': '__main__', 'name': 'user', '__dict__': <attribute '__dict__' of 'Person' objects>, '__weakref__': <attribute '__weakref__' of 'Person' objects>, '__doc__': None}
dir方法:会得到详尽的属性列表,但不会得到对应属性的值
>>> if __name__ == '__main__':
>>>     user = Student('school1')
>>>     print(dir(user))
['__class__', '__delattr__', '__dict__', '__dir__', '__doc__', '__eq__', '__format__', '__ge__', '__getattribute__', '__gt__', '__hash__', '__init__', '__init_subclass__', '__le__', '__lt__', '__module__', '__ne__', '__new__', '__reduce__', '__reduce_ex__', '__repr__', '__setattr__', '__sizeof__', '__str__', '__subclasshook__', '__weakref__', 'name', 'school_name']
对于非类的实例, 如list等, 不能用__dict__方法, 但可以用dir方法:
>>> if __name__ == '__main__':
>>>     user = Student('school1')
>>>     print(dir(a))
['__add__', '__class__', '__contains__', '__delattr__', '__delitem__', '__dir__', '__doc__', '__eq__', '__format__', '__ge__', '__getattribute__', '__getitem__', '__gt__', '__hash__', '__iadd__', '__imul__', '__init__', '__init_subclass__', '__iter__', '__le__', '__len__', '__lt__', '__mul__', '__ne__', '__new__', '__reduce__', '__reduce_ex__', '__repr__', '__reversed__', '__rmul__', '__setattr__', '__setitem__', '__sizeof__', '__str__', '__subclasshook__', 'append', 'clear', 'copy', 'count', 'extend', 'index', 'insert', 'pop', 'remove', 'reverse', 'sort']


>>>     print(a.__dict__)   # 对list用__dict__会报错

Traceback (most recent call last):
  File "8_self_ex.py", line 25, in <module>
    print(a.__dict__)
AttributeError: 'list' object has no attribute '__dict__'
9. super函数
super函数 的多继承关系和python3 的c3 算法相对应,我们可以通过__mro__方法查看继承顺序:
>>> class A:
>>>     def __init__(self):
>>>         print("A")


>>> class B(A):
>>>     def __init__(self):
>>>         print('B')
>>>         super().__init__()  # 或 super(B, self).__init__()


>>> class C(A):
>>>     def __init__(self):
>>>         print('C')
>>>         super().__init__()


>>> class D(B, C):
>>>     def __init__(self):
>>>         print('D')
>>>         super(D, self).__init__()


# 牵扯到mro的算法的执行顺序

>>> if __name__ == '__main__':
>>>     b = D()
D
B
C
A

>>>     print(D.__mro__)
(<class '__main__.D'>, <class '__main__.B'>, <class '__main__.C'>, <class '__main__.A'>, <class 'object'>)
10. python中的with语句(上下文管理器协议)
在__enter__获取资源,在__exit__中释放资源。这样我们就可以自定义自己的类的with上下文管理器了
代码:
# 上下文管理器协议
>>> class Sample:
>>>     def __enter__(self):
>>>         print('enter')   # 获取资源
>>>         return self

>>>     def __exit__(self, exc_type, exc_val, exc_tb):
>>>         print('exit')    # 释放资源

>>>     def do_something(self):
>>>         print('doing something')

# 在上下文管理器中使用我们自定义的类
>>> with Sample() as sample:
>>>     sample.do_something()

enter
doing something
exit
11. contextlib简化上下文管理器
自定义上下文管理器需要 在类中自定义两个魔法方法__enter__和__exit__,有没有更简单的方法呢??
使用contextlib,可以把with上下文管理器的自定义方式变为顺序的
代码:
>>> import contextlib

>>> @contextlib.contextmanager
>>> def file_open(file_name):
>>>     print('file open')    # yield前面的代码 相当于__enter__中的代码
>>>     yield {}
>>>     print('file end')    # yield后面的代码 相当于__exit__中的代码


>>> with file_open('name') as fopen:
>>>     print('working')

file open
working
file end