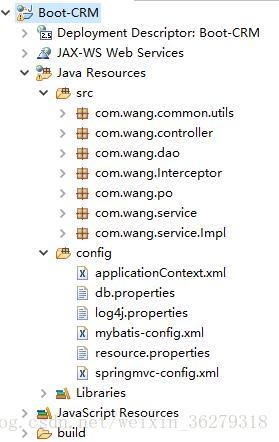
(一)系统开发及运行环境
- 操作系统:Windows10
- Web服务器:Tomcat8.5
- Java开发包:JDK8
- 开发工具:Eclipse
- 数据库:MySQL5.7
- 浏览器:Firefox或Chrome
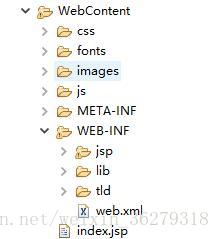
(二)项目结构示意图
如图所示:
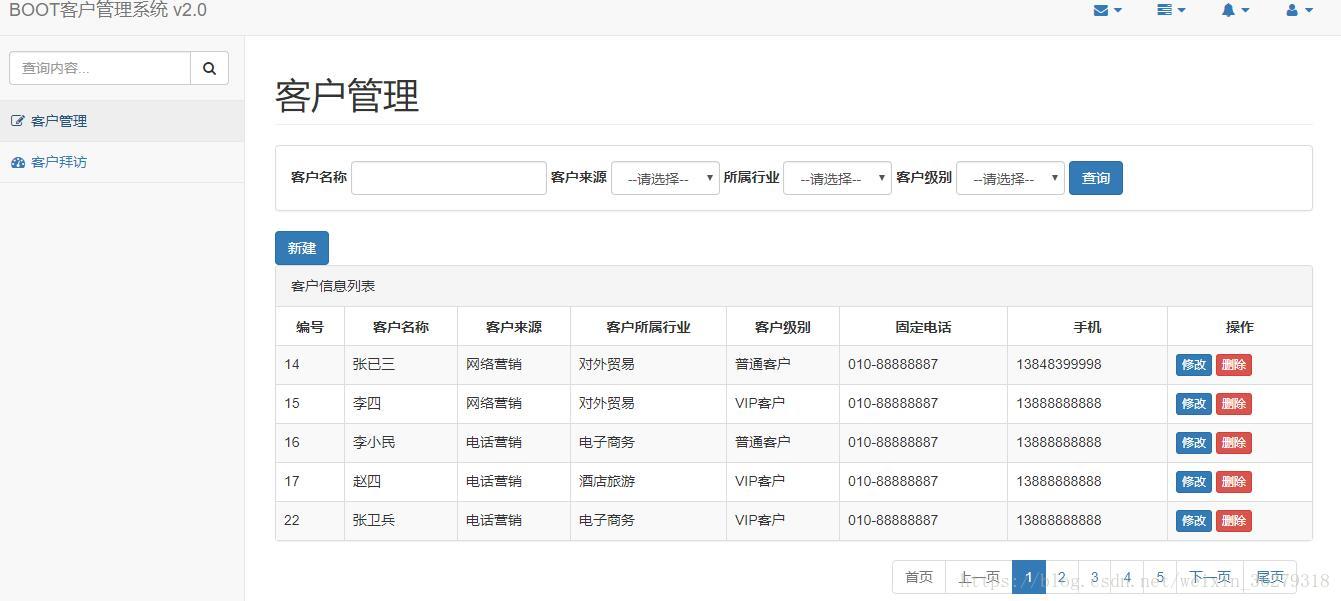
实现CRUD操作界面:
项目源码下载
(三)项目实现步骤
1.编写配置文件
01.applicationContext.xml
<beans xmlns="http://www.springframework.org/schema/beans"
    xmlns:xsi="http://www.w3.org/2001/XMLSchema-instance"
    xmlns:mvc="http://www.springframework.org/schema/mvc"
    xmlns:context="http://www.springframework.org/schema/context"
    xmlns:aop="http://www.springframework.org/schema/aop"
    xmlns:tx="http://www.springframework.org/schema/tx"
    xsi:schemaLocation="http://www.springframework.org/schema/beans
    http://www.springframework.org/schema/beans/spring-beans-4.3.xsd
    http://www.springframework.org/schema/mvc
    http://www.springframework.org/schema/mvc/spring-mvc-4.3.xsd
    http://www.springframework.org/schema/context
    http://www.springframework.org/schema/context/spring-context-4.3.xsd
    http://www.springframework.org/schema/aop
    http://www.springframework.org/schema/aop/spring-aop-4.3.xsd
    http://www.springframework.org/schema/tx
    http://www.springframework.org/schema/tx/spring-tx-4.3.xsd">
    <!--读取db.properties -->
    <context:property-placeholder location="classpath:db.properties"/>
    <!-- 配置数据源 -->
    <bean id="dataSource"
         class="org.apache.commons.dbcp2.BasicDataSource">
         <!--数据库驱动 -->
         <property name="driverClassName" value="${jdbc.driver}" />
         <!--连接数据库的url -->
         <property name="url" value="${jdbc.url}" />
         <!--连接数据库的用户名 -->
         <property name="username" value="${jdbc.username}" />
         <!--连接数据库的密码 -->
         <property name="password" value="${jdbc.password}" />
         <!--最大连接数 -->
         <property name="maxTotal" value="${jdbc.maxTotal}" />
         <!--最大空闲连接  -->
         <property name="maxIdle" value="${jdbc.maxIdle}" />
         <!--初始化连接数  -->
         <property name="initialSize" value="${jdbc.initialSize}" />
    </bean>
    <!-- 事务管理器 -->
    <bean id="transactionManager" class=
    "org.springframework.jdbc.datasource.DataSourceTransactionManager">
        <!-- 数据源 -->
        <property name="dataSource" ref="dataSource" />
    </bean>
    <!-- 通知 -->
    <tx:advice id="txAdvice" transaction-manager="transactionManager">
        <tx:attributes>
            <!-- 传播行为 -->
            <tx:method name="save*" propagation="REQUIRED" />
            <tx:method name="insert*" propagation="REQUIRED" />
            <tx:method name="add*" propagation="REQUIRED" />
            <tx:method name="create*" propagation="REQUIRED" />
            <tx:method name="delete*" propagation="REQUIRED" />
            <tx:method name="update*" propagation="REQUIRED" />
            <tx:method name="find*" propagation="SUPPORTS"
                                           read-only="true" />
            <tx:method name="select*" propagation="SUPPORTS"
                                           read-only="true" />
            <tx:method name="get*" propagation="SUPPORTS"
                                           read-only="true" />
        </tx:attributes>
    </tx:advice>
    <!-- 切面 -->
    <aop:config>
        <aop:advisor advice-ref="txAdvice"
             pointcut="execution(* com.wang.service.*.*(..))" />
    </aop:config>
    <!-- 配置 MyBatis的工厂 -->
    <bean class="org.mybatis.spring.SqlSessionFactoryBean">
        <!-- 数据源 -->
        <property name="dataSource" ref="dataSource" />
        <!-- 配置MyBatis的核心配置文件所在位置 -->
        <property name="configLocation"
                     value="classpath:mybatis-config.xml" />
    </bean>
    <!-- 接口开发,扫描 com.wang.dao包 ,写在此包下的接口即可被扫描到 -->
    <bean class="org.mybatis.spring.mapper.MapperScannerConfigurer">
        <property name="basePackage" value="com.wang.dao" />
    </bean>
    <!-- 配置扫描@Service注解 -->
    <context:component-scan base-package="com.wang.service"/>
</beans>
02.db.properties
jdbc.driver=com.mysql.jdbc.Driver
jdbc.url=jdbc:mysql://localhost:3306/boot_crm
jdbc.username=root
jdbc.password=root
jdbc.maxTotal=30
jdbc.maxIdle=10
jdbc.initialSize=5
03.log4j.properties
# Global logging configuration
log4j.rootLogger=ERROR, stdout
# MyBatis logging configuration...
log4j.logger.com.itheima.core=DEBUG
# Console output...
log4j.appender.stdout=org.apache.log4j.ConsoleAppender
log4j.appender.stdout.layout=org.apache.log4j.PatternLayout
log4j.appender.stdout.layout.ConversionPattern=%5p [%t] - %m%n
04.mybatis-config.xml
<?xml version="1.0" encoding="UTF-8" ?>
<!DOCTYPE configuration PUBLIC "-//mybatis.org//DTD Config 3.0//EN"
"http://mybatis.org/dtd/mybatis-3-config.dtd">
<configuration>
    <!-- 别名定义 -->
    <typeAliases>
        <package name="com.wang.po" />
    </typeAliases>
</configuration>
05.resource.properties
customer.from.type=002
customer.industry.type=001
customer.level.type=006
06.springmvc-config.xml
<?xml version="1.0" encoding="UTF-8"?>
<beans xmlns="http://www.springframework.org/schema/beans"
    xmlns:xsi="http://www.w3.org/2001/XMLSchema-instance"
    xmlns:mvc="http://www.springframework.org/schema/mvc"
    xmlns:context="http://www.springframework.org/schema/context"
    xmlns:aop="http://www.springframework.org/schema/aop"
    xmlns:tx="http://www.springframework.org/schema/tx"
    xsi:schemaLocation="http://www.springframework.org/schema/beans
    http://www.springframework.org/schema/beans/spring-beans-4.3.xsd
    http://www.springframework.org/schema/mvc
    http://www.springframework.org/schema/mvc/spring-mvc-4.3.xsd
    http://www.springframework.org/schema/context
    http://www.springframework.org/schema/context/spring-context-4.3.xsd
    http://www.springframework.org/schema/aop
    http://www.springframework.org/schema/aop/spring-aop-4.3.xsd
    http://www.springframework.org/schema/tx
    http://www.springframework.org/schema/tx/spring-tx-4.3.xsd">
     <!-- 加载属性文件 -->
    <context:property-placeholder
               location="classpath:resource.properties" />
    <!-- 定义组件扫描器,指定需要扫描的包 -->
    <context:component-scan base-package="com.wang.controller" />
     <!-- 注解驱动:配置处理器映射器和适配器 -->
    <mvc:annotation-driven />
    <!--配置静态资源的访问映射,此配置中的文件,将不被前端控制器拦截 -->
    <mvc:resources location="/js/" mapping="/js/**" />
    <mvc:resources location="/css/" mapping="/css/**" />
    <mvc:resources location="/fonts/" mapping="/fonts/**" />
    <mvc:resources location="/images/" mapping="/images/**" />
    <!-- 定义视图解析器 -->
    <bean id="viewResolver" class=
    "org.springframework.web.servlet.view.InternalResourceViewResolver">
         <!-- 设置前缀 -->
         <property name="prefix" value="/WEB-INF/jsp/" />
         <!-- 设置后缀 -->
         <property name="suffix" value=".jsp" />
    </bean>
   <mvc:interceptors>
       <!--拦截所有请求-->
       <mvc:interceptor>
           <mvc:mapping path="/**"/>
           <bean class="com.wang.Interceptor.LoginInterceptor"/>
       </mvc:interceptor>

   </mvc:interceptors>
</beans>
07.web.xml
<?xml version="1.0" encoding="UTF-8"?>
<web-app xmlns:xsi="http://www.w3.org/2001/XMLSchema-instance" xmlns="http://java.sun.com/xml/ns/j2ee" xmlns:web="http://xmlns.jcp.org/xml/ns/javaee" xsi:schemaLocation="http://java.sun.com/xml/ns/j2ee http://java.sun.com/xml/ns/j2ee/web-app_2_4.xsd" id="WebApp_ID" version="2.4">
  <display-name>Spring MVC Application</display-name>
  <context-param>
    <param-name>contextConfigLocation</param-name>
    <param-value>classpath:applicationContext.xml</param-value>
  </context-param>
  <listener>
    <listener-class>
         org.springframework.web.context.ContextLoaderListener
      </listener-class>
  </listener>
  <filter>
    <filter-name>characterEncodingFilter</filter-name>
    <filter-class>org.springframework.web.filter.CharacterEncodingFilter</filter-class>
    <init-param>
      <param-name>encoding</param-name>
      <param-value>UTF-8</param-value>
    </init-param>
  </filter>
  <filter-mapping>
    <filter-name>characterEncodingFilter</filter-name>
    <url-pattern>*.action</url-pattern>
  </filter-mapping>
  <servlet>
    <servlet-name>Boot</servlet-name>
    <servlet-class>
         org.springframework.web.servlet.DispatcherServlet
    </servlet-class>
    <init-param>
      <param-name>contextConfigLocation</param-name>
      <param-value>classpath:springmvc-config.xml</param-value>
    </init-param>
    <load-on-startup>1</load-on-startup>
  </servlet>
  <servlet-mapping>
    <servlet-name>Boot</servlet-name>
    <url-pattern>*.action</url-pattern>
  </servlet-mapping>
  <welcome-file-list>
    <welcome-file>index.jsp</welcome-file>
  </welcome-file-list>
</web-app>
2.添加客户的实现步骤
如图所示:
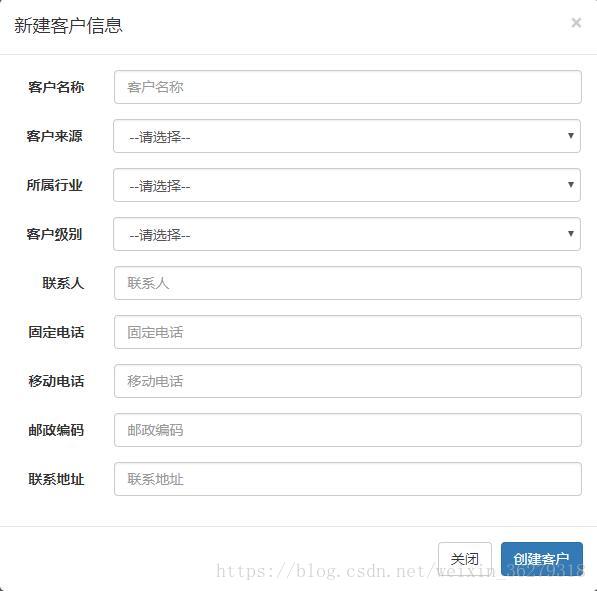
1.弹出输入框的实现
01.customer.jsp中点击新建链接
<a href="#" class="btn btn-primary" data-toggle="modal"
data-target="#newCustomerDialog" onclick="clearCustomer()">新建</a>
02.创建客户信息输入窗口
<!-- 创建客户模态框 -->
<div class="modal fade" id="newCustomerDialog" tabindex="-1" role="dialog"
aria-labelledby="myModalLabel">
<div class="modal-dialog" role="document">
<div class="modal-content">
<div class="modal-header">
<button type="button" class="close" data-dismiss="modal" aria-label="Close">
<span aria-hidden="true">×</span>
</button>
<h4 class="modal-title" id="myModalLabel">新建客户信息</h4>
</div>
<div class="modal-body">
<form class="form-horizontal" id="new_customer_form">
<div class="form-group">
<label for="new_customerName" class="col-sm-2 control-label">
客户名称
</label>
<div class="col-sm-10">
<input type="text" class="form-control" id="new_customerName" placeholder="客户名称" name="cust_name" />
</div>
</div>
<div class="form-group">
<label for="new_customerFrom" style="float:left;padding:7px 15px 0 27px;">客户来源</label>
<div class="col-sm-10">
<select class="form-control" id="new_customerFrom" name="cust_source">
<option value="">--请选择--</option>
<c:forEach items="${fromType}" var="item">
<option value="${item.dict_id}"<c:if test="${item.dict_id == custSource}">selected</c:if>>
${item.dict_item_name }
</option>
</c:forEach>
</select>
</div>
</div>
<div class="form-group">
<label for="new_custIndustry" style="float:left;padding:7px 15px 0 27px;">所属行业</label>
<div class="col-sm-10">
<select class="form-control" id="new_custIndustry" name="cust_industry">
<option value="">--请选择--</option>
<c:forEach items="${industryType}" var="item">
<option value="${item.dict_id}"<c:if test="${item.dict_id == custIndustry}"> selected</c:if>>
${item.dict_item_name }
</option>
</c:forEach>
</select>
</div>
</div>
<div class="form-group">
<label for="new_custLevel" style="float:left;padding:7px 15px 0 27px;">客户级别</label>
<div class="col-sm-10">
<select class="form-control" id="new_custLevel" name="cust_level">
<option value="">--请选择--</option>
<c:forEach items="${levelType}" var="item">
<option value="${item.dict_id}"<c:if test="${item.dict_id == custLevel}"> selected</c:if>>${item.dict_item_name }</option>
</c:forEach>
</select>
</div>
</div>
<div class="form-group">
<label for="new_linkMan" class="col-sm-2 control-label">联系人</label>
<div class="col-sm-10">
<input type="text" class="form-control" id="new_linkMan" placeholder="联系人" name="cust_linkman" />
</div>
</div>
<div class="form-group">
<label for="new_phone" class="col-sm-2 control-label">固定电话</label>
<div class="col-sm-10">
<input type="text" class="form-control" id="new_phone" placeholder="固定电话" name="cust_phone" />
</div>
</div>
<div class="form-group">
<label for="new_mobile" class="col-sm-2 control-label">移动电话</label>
<div class="col-sm-10">
<input type="text" class="form-control" id="new_mobile" placeholder="移动电话" name="cust_mobile" />
</div>
</div>
<div class="form-group">
<label for="new_zipcode" class="col-sm-2 control-label">邮政编码</label>
<div class="col-sm-10">
<input type="text" class="form-control" id="new_zipcode" placeholder="邮政编码" name="cust_zipcode" />
</div>
</div>
<div class="form-group">
<label for="new_address" class="col-sm-2 control-label">联系地址</label>
<div class="col-sm-10">
<input type="text" class="form-control" id="new_address" placeholder="联系地址" name="cust_address" />
</div>
</div>
</form>
</div>
<div class="modal-footer">
<button type="button" class="btn btn-default" data-dismiss="modal">关闭</button>
<button type="button" class="btn btn-primary" onclick="createCustomer()">创建客户</button>
</div>
</div>
</div>
</div>03.弹出新建窗口必须清除窗口中的数据
    //清空新建客户窗口中的数据
    function clearCustomer() {
    /**
      1.$("#new_customerName")是id选择器,获得id为ew_customerName的标签,
      通过.val(),获得这个标签的value的值,赋值给你声明的变量。
      2.val(""):清空标签value属性的值。
    */
        $("#new_customerName").val("");
        $("#new_customerFrom").val("")
        $("#new_custIndustry").val("")
        $("#new_custLevel").val("")
        $("#new_linkMan").val("");
        $("#new_phone").val("");
        $("#new_mobile").val("");
        $("#new_zipcode").val("");
        $("#new_address").val("");
    }
2.将窗口中输入的数据保存到数据库
01.点击创建客户按钮执行以下代码
1.1customer.jsp中的JS代码如下:
    // 创建客户
    function createCustomer() {
    //发送post请求
    $.post("<%=basePath%>customer/create.action",
    //通过id选择器获取表单数据并序列化,data表示CustomerControlle处理方法返回的结果
    //serialize() 方法通过序列化表单值,创建 URL 编码文本字符串。
    $("#new_customer_form").serialize(),function(data){
            if(data =="OK"){
                alert("客户创建成功!");
                window.location.reload();
            }else{
                alert("客户创建失败!");
                window.location.reload();
            }
        });
    }
02.通过Ajax的POST请求将id为new_customer_form的表单序列化,并提交给”/create.action”对应的方法处理,如果处理返回结果为OK表示客户创建成功!否则创建失败!
2.1实现DAO层添加客户方法
CustomerDao接口
package com.wang.dao;
import java.util.List;
import com.wang.po.Customer;
//Customer接口
public interface CustomerDao {

    // 创建客户
    public int createCustomer(Customer customer);

}
CustomerDao.xml
<?xml version="1.0" encoding="UTF-8" ?>
<!DOCTYPE mapper PUBLIC "-//mybatis.org//DTD Mapper 3.0//EN"
     "http://mybatis.org/dtd/mybatis-3-mapper.dtd" >
<mapper namespace="com.wang.dao.CustomerDao">
        <!-- 添加客户 -->
    <insert id="createCustomer" parameterType="customer">
        insert into customer(
                         cust_name,
                         cust_user_id,
                         cust_create_id,
                         cust_source,
                         cust_industry,
                         cust_level,
                         cust_linkman,
                         cust_phone,
                         cust_mobile,
                         cust_zipcode,
                         cust_address,
                         cust_createtime
                 )
                 <!--添加Customer类的属性 -->
                 values(#{cust_name},
                        #{cust_user_id},
                        #{cust_create_id},
                        #{cust_source},
                        #{cust_industry},
                        #{cust_level},
                        #{cust_linkman},
                        #{cust_phone},
                        #{cust_mobile},
                        #{cust_zipcode},
                        #{cust_address},
                        #{cust_createtime}
                )
    </insert>
</mapper>
2.2实现Service层的创建客户的方法
CustomerService接口
public interface CustomerService {
    //添加客户
    public int createCustomer(Customer customer);

}
CustomerServiceImpl
package com.wang.service.Impl;
import java.util.List;
import org.apache.commons.lang3.StringUtils;
import org.springframework.beans.factory.annotation.Autowired;
import org.springframework.stereotype.Service;
import org.springframework.transaction.annotation.Transactional;
import com.wang.common.utils.Page;
import com.wang.dao.CustomerDao;
import com.wang.po.Customer;
import com.wang.service.CustomerService;

/**
 * 客户管理
 */
@Service("customerService")
@Transactional
public class CustomerServiceImpl implements CustomerService {
    // 声明DAO属性并注入
    @Autowired
    private CustomerDao customerDao;
    //创建客户
    @Override
    public int createCustomer(Customer customer) {
        return customerDao.createCustomer(customer);
    }

}
2.3实现Controller层创建客户的方法
       //创建客户
    @RequestMapping("/customer/create.action")
    @ResponseBody
    public String customerCreate(Customer customer,HttpSession session) {
        // 获取Session中的当前用户信息
        User user = (User) session.getAttribute("USER_SESSION");
        // 将当前用户id存储在客户对象中
        customer.setCust_create_id(user.getUser_id());
        // 创建Date对象
        Date date = new Date();
        // 得到一个Timestamp格式的时间,存入mysql中的时间格式“yyyy/MM/dd HH:mm:ss”
        Timestamp timeStamp = new Timestamp(date.getTime());
        customer.setCust_createtime(timeStamp);
        // 执行Service层中的创建方法,返回的是受影响的行数
        int rows = customerService.createCustomer(customer);
        if(rows > 0){
            //注意:返回的不是逻辑视图
            //js中的data=OK,表示成功创建
            return "OK";
        }else{
           //js中的data=FAIL,表示失败创建
            return "FAIL";
        }
    }
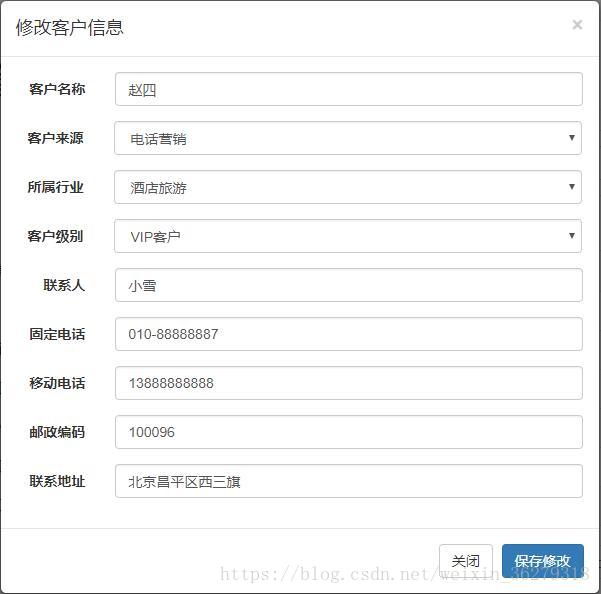
3.修改客户信息的实现步骤
1.弹出页面修改窗口链接
customer.jsp
<a href="#" class="btn btn-primary btn-xs" data-toggle="modal"
data-target="#customerEditDialog" onclick= "editCustomer(${row.cust_id})">
修改</a>
2.创建弹出窗口代码
customer.jsp
<!-- 修改客户模态框 -->
<div class="modal fade" id="customerEditDialog" tabindex="-1"
role="dialog" aria-labelledby="myModalLabel">
<div class="modal-dialog" role="document">
<div class="modal-content">
<div class="modal-header">
<button type="button" class="close" data-dismiss="modal"
aria-label="Close">
<span aria-hidden="true">×</span>
</button>
<h4 class="modal-title" id="myModalLabel">修改客户信息</h4>
</div>
<div class="modal-body">
<form class="form-horizontal" id="edit_customer_form">
<input type="hidden" id="edit_cust_id" name="cust_id" />
<div class="form-group">
<label for="edit_customerName" class="col-sm-2 control-label">客户名称</label>
<div class="col-sm-10">
<input type="text" class="form-control" id="edit_customerName"
placeholder="客户名称" name="cust_name" />
</div>
</div>
<div class="form-group">
<label for="edit_customerFrom"
style="float: left; padding: 7px 15px 0 27px;">客户来源</label>
<div class="col-sm-10">
<select class="form-control" id="edit_customerFrom"
name="cust_source">
<option value="">--请选择--</option>
<c:forEach items="${fromType}" var="item">
<option value="${item.dict_id}"
<c:if test="${item.dict_id == custSource}"> selected</c:if>>${item.dict_item_name }</option>
</c:forEach>
</select>
</div>
</div>
<div class="form-group">
<label for="edit_custIndustry"
style="float: left; padding: 7px 15px 0 27px;">所属行业</label>
<div class="col-sm-10">
<select class="form-control" id="edit_custIndustry"
name="cust_industry">
<option value="">--请选择--</option>
<c:forEach items="${industryType}" var="item">
<option value="${item.dict_id}"
<c:if test="${item.dict_id == custIndustry}"> selected</c:if>>${item.dict_item_name }</option>
</c:forEach>
</select>
</div>
</div>
<div class="form-group">
<label for="edit_custLevel"
style="float: left; padding: 7px 15px 0 27px;">客户级别</label>
<div class="col-sm-10">
<select class="form-control" id="edit_custLevel"
name="cust_level">
<option value="">--请选择--</option>
<c:forEach items="${levelType}" var="item">
<option value="${item.dict_id}"
<c:if test="${item.dict_id == custLevel}"> selected</c:if>>${item.dict_item_name }</option>
</c:forEach>
</select>
</div>
</div>
<div class="form-group">
<label for="edit_linkMan" class="col-sm-2 control-label">联系人</label>
<div class="col-sm-10">
<input type="text" class="form-control" id="edit_linkMan"
placeholder="联系人" name="cust_linkman" />
</div>
</div>
<div class="form-group">
<label for="edit_phone" class="col-sm-2 control-label">固定电话</label>
<div class="col-sm-10">
<input type="text" class="form-control" id="edit_phone"
placeholder="固定电话" name="cust_phone" />
</div>
</div>
<div class="form-group">
<label for="edit_mobile" class="col-sm-2 control-label">移动电话</label>
<div class="col-sm-10">
<input type="text" class="form-control" id="edit_mobile"
placeholder="移动电话" name="cust_mobile" />
</div>
</div>
<div class="form-group">
<label for="edit_zipcode" class="col-sm-2 control-label">邮政编码</label>
<div class="col-sm-10">
<input type="text" class="form-control" id="edit_zipcode"
placeholder="邮政编码" name="cust_zipcode" />
</div>
</div>
<div class="form-group">
<label for="edit_address" class="col-sm-2 control-label">联系地址</label>
<div class="col-sm-10">
<input type="text" class="form-control" id="edit_address"
placeholder="联系地址" name="cust_address" />
</div>
</div>
</form>
</div>
<div class="modal-footer">
<button type="button" class="btn btn-default" data-dismiss="modal">关闭</button>
<button type="button" class="btn btn-primary"
onclick="updateCustomer()">保存修改</button>
</div>
</div>
</div>
</div>3.获取要修改的客户信息并显示在弹出修改窗口中
// 通过id获取修改的客户信息
    function editCustomer(id) {
        $.ajax({
            type:"get",
            url:"<%=basePath%>customer/getCustomerById.action",
            //请求参数
            data:{"id":id},
            //success指的是请求后台并返回的数据,data是JSON格式数据类型
            success:function(data) {
                //通过id选择器定位文本框,并设值返回的JSON数据
                //获取JSON对象中的数据:JSON对象.属性(比如:data.cust_id)
                $("#edit_cust_id").val(data.cust_id);
                $("#edit_customerName").val(data.cust_name);
                $("#edit_customerFrom").val(data.cust_source)
                $("#edit_custIndustry").val(data.cust_industry)
                $("#edit_custLevel").val(data.cust_level)
                $("#edit_linkMan").val(data.cust_linkman);
                $("#edit_phone").val(data.cust_phone);
                $("#edit_mobile").val(data.cust_mobile);
                $("#edit_zipcode").val(data.cust_zipcode);
                $("#edit_address").val(data.cust_address);

            }
        });
    }
3.1在CustomerController类中添加通过id获取客户信息的方法
    // 通过id获取客户信息
    @RequestMapping("/customer/getCustomerById.action")
    @ResponseBody
    public Customer getCustomerById(Integer id) {
        Customer customer = customerService.getCustomerById(id);
        //注意:返回的不是逻辑视图,而是从数据库查询出来的对象
        return customer;
    }
3.2实现Service层方法
CustomerService接口
    // 通过id查询客户
    public Customer getCustomerById(Integer id);
3.3CustomerServiceImpl实现类
//通过id查询客户
public Customer getCustomerById(Integer id) {
        Customer customer = customerDao.getCustomerById(id);
        return customer;
    }
3.4CustomerDao接口中根据id查询客户的方法
// 通过id查询客户
    public Customer getCustomerById(Integer id);
3.5CustomerDao.xml配置根据id查询客户的方法
<!-- 根据id获取客户信息 -->
    <select id="getCustomerById" parameterType="Integer"
    resultType="customer">
        select * from customer where cust_id = #{id}
    </select>
4.将修改数据保存带数据库的操作步骤
如图所示
4.1点击修改保存按钮执行以下JS代码
 // 执行修改客户操作
    function updateCustomer() {
      //以post方式提交表单数据
        $.post("<%=basePath%>customer/update.action",
        //通过id选择器获取表单数据并序列化(序列化就是转换为JSON格式数据)
        //注意:此处data表示CustomerController处理方法返回的结果数据
        $("#edit_customer_form").serialize(),function(data){
            if(data =="OK"){
                alert("客户信息更新成功!");
                //窗口刷新
                window.location.reload();
            }else{
                alert("客户信息更新失败!");
                window.location.reload();
            }
        });
    }
4.2CustomerController类中的方法接收并处理请求
/**
     * 更新客户
     */
    @RequestMapping("/customer/update.action")
    @ResponseBody
    public String customerUpdate(Customer customer) {
        int rows = customerService.updateCustomer(customer);
        if(rows > 0){
            return "OK";
        }else{
            return "FAIL";
        }
    }
4.3实现Service层方法
CustomerService接口
// 更新客户
public int updateCustomer(Customer customer);
4.4 CustomerServiceImpl实现类
//更新用户
public int updateCustomer(Customer customer) {
        return customerDao.updateCustomer(customer);
    }
4.5CustomerDao接口中定义更新客户的方法
// 更新客户信息
public int updateCustomer(Customer customer);
4.6CustomerDao.xml配置中定义更新新SQL语句
<!-- 更新客户 -->
    <update id="updateCustomer" parameterType="customer">
        update customer
        <set>
            <if test="cust_name!=null">
                cust_name=#{cust_name},
            </if>
            <if test="cust_user_id!=null">
                cust_user_id=#{cust_user_id},
            </if>
            <if test="cust_create_id!=null">
                cust_create_id=#{cust_create_id},
            </if>
            <if test="cust_source!=null">
                cust_source=#{cust_source},
            </if>
            <if test="cust_industry!=null">
                cust_industry=#{cust_industry},
            </if>
            <if test="cust_level!=null">
                cust_level=#{cust_level},
            </if>
            <if test="cust_linkman!=null">
                cust_linkman=#{cust_linkman},
            </if>
            <if test="cust_phone!=null">
                cust_phone=#{cust_phone},
            </if>
            <if test="cust_mobile!=null">
                cust_mobile=#{cust_mobile},
            </if>
            <if test="cust_zipcode!=null">
                cust_zipcode=#{cust_zipcode},
            </if>
            <if test="cust_address!=null">
                cust_address=#{cust_address},
            </if>
            <if test="cust_createtime!=null">
                cust_createtime=#{cust_createtime},
            </if>
        </set>
        where cust_id=#{cust_id}
    </update>
5.删除一条客户记录的操作步骤如下
5.1点击删除客户链接
<-- 通过EL表达式获取表中某一条记录的id值。-->
<a href="#" class="btn btn-danger btn-xs"
onclick="deleteCustomer(${row.cust_id})">删除</a>
5.2编写一个JS删除客户的方法
// 删除客户
    function deleteCustomer(id) {
        if(confirm('确实要删除该客户吗?')) {
    $.post("<%=basePath%>customer/delete.action",{"id":id},
    //data仍然表示处理类方法返回的结果数据
    function(data){
                if(data =="OK"){
                    alert("客户删除成功!");
                    window.location.reload();
                }else{
                    alert("删除客户失败!");
                    window.location.reload();
                }
            });
        }
    }
5.2实现Service层方法
CustomerService接口
// 删除客户
public int deleteCustomer(Integer id);
5.3 CustomerServiceImpl实现类
//删除一条客户记录
public int deleteCustomer(Integer id) {
        return customerDao.deleteCustomer(id);
    }
4.4CustomerDao接口中定义删除方法
// 删除客户
int deleteCustomer (Integer id);
4.5CustomerDao.xml配置中定义删除SQL语句
<!-- 删除客户 -->
    <delete id="deleteCustomer" parameterType="Integer">
        delete from customer where cust_id=#{id}
    </delete>