初学vue
组件自定义事件实现组件间通信
前面学习了props配置项可以轻松实现父子级组件间的通信,但同级组件的通信稍微麻烦点,同级组件通信的前提是父组件要传给子组件一在这里插入代码片个方法,然后子组件调用这个方法来将自身的数据传给父组件,组组件接收到数据后,将数据继续传给需要该数据的组件,同样用props接收。
下面讲的通过$emit实现组件间通信就简单一点。
例如,我们要让父组件接收从子组件传来的数据并打印出来。
1、使用props实现方式如下:
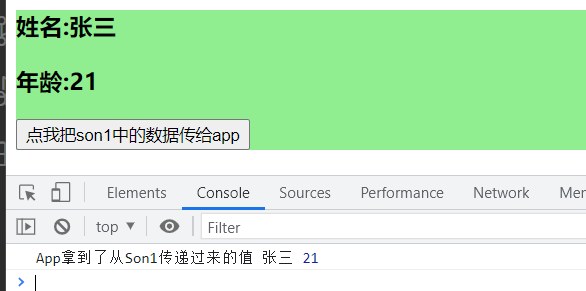
App.vue
<template>
  <div id="app">
    <Son1 :getNameOfSon1="getNameOfSon1"></Son1>
  </div>
</template>

<script>
import Son1 from "./components/Son1.vue"

export default {


  name:"App",
  components:{

      Son1},
  methods:{


    getNameOfSon1(name,age){


      console.log("App拿到了从Son1传递过来的值",name,age);
    }
  }
}
</script>

<style>
  #app{


    background-color: grey;
  }
</style>
son1.vue
<template>
  <div class="son1">
      <h3>姓名:{

   {name}}</h3>
      <h3>年龄:{

   {age}}</h3>
      <button @click="sendMsgToApp">点我把son1中的数据传给app</button>
  </div>
</template>

<script>
export default {


    name:"Son1",
    props:['getNameOfSon1'],
    data(){


        return {


            name:"张三",
            age:21
        }
    },
    methods:{


        sendMsgToApp(){


            this.getNameOfSon1(this.name,this.age)
        }
    }
}
</script>

<style>
    .son1{


        background-color: lightgreen;
    }
</style>
这种方式的主要思路是:父组件中定义一个方法,在组件标签中将这个方法传给子组件,子组件利用props接收后,受某个事件触发后可以通过this调用传过来的这个方法,实现子组件传递数据给父组件。
2、组件自定义事件实现组件间通信
2.1 第一种形式:在组件标签中使用@或者v-on绑定事件
- App.vue
<template>
<div id="app">
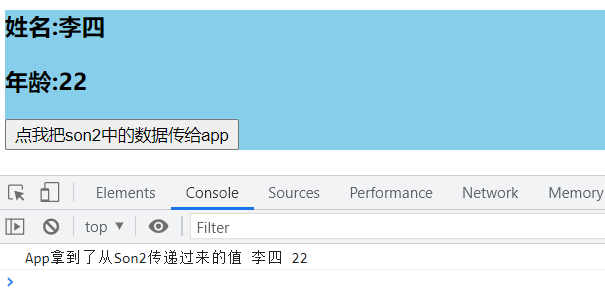
<Son2 @event1="getNameOfSon2"></Son2>
</div>
</template>
<script>
import Son2 from "./components/Son2.vue"
export default {
name:"App",
components:{
Son2},
methods:{
getNameOfSon2(name,age){
console.log("App拿到了从Son2传递过来的值",name,age);
}
}
}
</script>
<style>
#app{
background-color: grey;
}
</style>
- son2.vue
<template>
  <div class="son2">
      <h3>姓名:{

   {name}}</h3>
      <h3>年龄:{

   {age}}</h3>
      <button @click="sendMsgToApp">点我把son2中的数据传给app</button>
  </div>
</template>

<script>
export default {


    name:"son2",
    data(){


        return {


            name:"李四",
            age:"22"
        }
    },
    methods:{


        sendMsgToApp(){


            this.$emit("event1",this.name,this.age)
        }
    }
}
</script>

<style>
    .son2{


        background-color: skyblue;
    }
</style>
这种方式的主要思路是:子组件中的事件被触发后,通过this.$emit触发父组件中对应组件标签上绑定的自定义事件,该事件上绑定了调用的方法。其实相当于子组件间接触发了父组件标签元素上绑定的事件。
2.2 第二种形式:通过$refs+$on实现进行绑定
- App.vue
<template>
<div id="app">
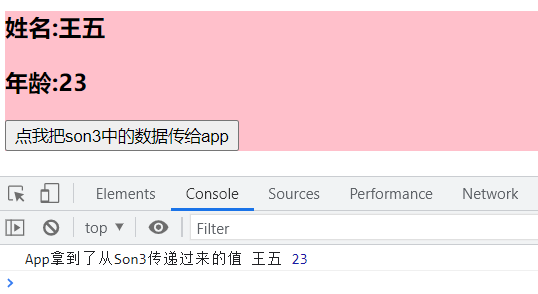
<Son3 ref="son3"></Son3>
</div>
</template>
<script>
import Son3 from "./components/Son3.vue"
export default {
name:"App",
components:{
Son3},
methods:{
getNameOfSon3(name,age){
console.log("App拿到了从Son3传递过来的值",name,age);
}
},
mounted(){
// 通过this.$refs.son3拿到组件实例vc,通过$on绑定到vc上
this.$refs.son3.$on("event2",this.getNameOfSon3)
}
}
</script>
<style>
#app{
background-color: grey;
}
</style>
- son3.vue
<template>
  <div class="son3">
    <h3>姓名:{

   { name }}</h3>
    <h3>年龄:{

   { age }}</h3>
    <button @click="sendMsgToApp">点我把son3中的数据传给app</button>
  </div>
</template>

<script>
export default {


  name: "son3",
  data() {


    return {


        name:"王五",
        age:23
    }
  },
  methods:{


      sendMsgToApp(){


          this.$emit("event2",this.name,this.age);
      }
  }

};
</script>

<style>
.son3 {


  background-color: pink;
}
</style>
这种方式的主要思路和上面的那种方式差不多,不过这种方式并不是直接在组件标签上进行事件绑定,而是通过
this.\$refs.ref.xxx.\$on给对象绑定事件,同时给事件绑定回调方法。
这两种形式的区别就是,方式一在模板加载完成后就固定好了,可以触发事件调用方法,而方式二更加灵活,例如在mounted()函数中可以添加定时器,让模板加载完成3s后绑定事件(模板加载完成的3s内点击都无效),如下。
  mounted(){


    setTimeout(()=>{


      this.$refs.son3.$on("event2",this.getNameOfSon3)
    },3000);
  }
3、解绑组件自定义事件
$off解绑事件
this.$emit("事件名"); // 解绑一个事件
this.$emit(['事件名1','事件名2']); // 解绑多个事件
this.$emit(); // 解绑所有事件
总结
(1)组件的自定义事件是一种组件间通信的方式,适用于:子组件传递数据给父组件
(2)使用场景:A是父组件,B是子组件,B想给A传数据,那么就i要在A中给B绑定自定义事件(事件的回调在A中)
(3)绑定自定义事件:
1、第一种方式:在父组件中的组件标签中<Son @eventName="event"/>或者<Son v-on:eventName="event"/>
2、第二种方式:在父组件中:<Demo ref="demo"/> .... mounted(){ this.$refs.demo.$on('eventName',参数) }3、如果只想让自定义事件触发一次,可以使用once修饰符,或者$once方法
4、触发自定义事件:this.\$emit('eventName‘,数据)
5、解绑自定义事件:this.$off('eventName')
6、组件上绑定原生DOM事件,例如click时,需要在事件名后面使用native修饰符,否则会将该事件当成自定义事件
7、注意:通过this.$refs.xxx.$on('eventName',回调)绑定事件时,回调用要么配置在methods中,要么用箭头函数,否则this指向会出问题。(直接将普通函数形式配置在methods中和在$on中回调使用箭头函数都是指向vc示例对象,而在$on中使用普通函数形式时,this指向触发事件的对象,可能是别的vc实例)