 https://aws.amazon.com/cn/blogs/china/scaling-eda-workloads-using-scale-out-computing-on-aws/
Original URL: Scaling EDA Workloads using Scale-Out Computing on AWS | AWS for Industries
简介
使用电子设计自动化 (EDA) 应用程序的半导体和电子产品公司可以通过利用 AWS 上近乎无限的计算、存储和其他可用资源,大大加快其产品开发生命周期和上市时间。在这篇工作负载支持的博客文章中,我将提供架构和系统级指导,以构建能够将 EDA 应用程序扩展到 30000 个或以上核心的环境。
EDA 工作负载通常需要一个计算集群、一个将作业分发编排到计算节点的进程计划程序和一个高性能共享文件系统。通常需要共享文件系统来维持从 500MB/秒到 10GB/秒不等的吞吐量需求,具体取决于 EDA 工作负载使用案例、设计大小和核心总数。EDA 基础设施堆栈的其他重要组件包括许可证管理、远程桌面和可视化,以及包括身份和访问控制、预算编制和监控在内的用户管理。
服务和解决方案概述
为帮助在 AWS 上快速启动 EDA 环境,我使用正式的 AWS 解决方案 Scale-Out Computing on AWS。此解决方案利用很多 AWS 服务,包括 Amazon Elastic Compute Cloud(EC2 Spot 和 EC2 按需实例)、Amazon Simple Storage Service (S3)、Amazon Elastic File System (EFS) 和 Amazon FSx for Lustre。
Scale-Out Computing on AWS
Scale-Out Computing on AWS是一项正式的 AWS 解决方案,可帮助客户更加轻松地部署和运营一个多用户环境,以执行计算密集型工作流。该解决方案部署集群、提供自动化集群预置编排,并且具有大量计算资源可供选择,包括快速的网络主干;近乎无限的存储空间;以及直接与 AWS 集成的预算和成本管理。
Amazon Elastic Compute Cloud (Amazon EC2)
Amazon EC2 是一项在云中提供安全、可调整大小的计算能力的 Web 服务。Amazon EC2 提供最广泛且最深入的实例选择,这些实例均构建在最新的计算、存储和网络技术之上,并为高性能和安全性而设计。运行容错型 EDA 工作负载时,Amazon EC2 Spot 实例可让您利用 AWS 云中未使用的 EC2 容量。与按需实例价格相比,Spot 实例最多可提供 90% 的折扣。AWS 还提供 Amazon EC2 预留实例和 Savings Plans,与按需实例价格相比,它们可提供大幅折扣,但需要 1 年或 3 年的使用承诺。
Amazon Simple Storage Service (Amazon S3)
对于持久数据,如库、工具和设计规范,EDA 工作流可以利用 Amazon S3。Amazon S3 是一种对象存储服务,可提供行业领先的可扩展性、数据可用性、安全性和性能。Amazon S3 的设计持久性为 99.999999999%(11 个 9),可为来自世界各地的公司的数百万个应用程序存储数据。Amazon EC2 与 Amazon S3 之间的流量最多可以利用 25 Gbps 的带宽,并且可以使用跨区域复制和数据分层(有关更多信息,请参阅 Amazon S3 功能和 Amazon S3 常见问题)。
Amazon Elastic File System (Amazon EFS)
Amazon EFS 提供一个简单、可扩展、完全托管的弹性 NFS 文件系统,可与 AWS 云服务和本地资源结合使用。Amazon EFS 是文件系统,在 AWS 上构建环境时,该系统可用于主目录和自动化脚本。它可以按需扩展到 PB 级容量,而不会中断应用程序,并随着文件的添加和移除自动增长和缩减,无需您预置和管理容量来适应增长。
Amazon FSx for Lustre (Amazon FSx for Lustre)
如果您的 EDA 工具需要一个高性能共享文件系统,可以使用 FSx for Lustre,它是一个完全托管的高性能文件系统,针对高性能计算 (HPC) 和 EDA 工作负载进行了优化。FSx for Lustre 提供与 Amazon S3 的无缝集成,从而可以轻松且经济高效地将数据永久存储在 Amazon S3 中,并且可以用高性能的 POSIX 文件系统展示数据,POSIX 文件系统可以挂载在计算实例上进行数据处理,它具有亚毫秒级的延迟、最高达每秒数百 GB 的吞吐量和数百万个 IOPS。
解决方案部署
我通过下面的步骤进行步骤:
- 使用 Scale-Out Computing on AWS 启动并配置支持 EDA 的基础设施堆栈
- 自定义 Amazon 系统映像 (AMI)
- 使用设置多个许可证服务器的选项设置许可证服务器
- 创建 Amazon S3 存储桶以上传测试案例和设置共享文件系统
- 连接到 NICE DCV 远程桌面会话
- 安装 EDA 应用程序
步骤 1:使用 Scale-Out Computing on AWS 启动并配置基础设施
可以使用一键式安装程序从 AWS 解决方案页面 <a href=”https://amazonaws-china.com
/solutions/scale-out-computing-on-aws”>https://aws.amazon.com/solutions/scale-out-computing-on-aws 中部署 Scale-Out Computing on AWS,从而开始在 AWS CloudFormation 中的部署。该解决方案高度可定制,核心功能與调度器通过 EC2 实例上运行,利用 AWS CloudFormation 和 Amazon EC2 Auto Scaling 通过 NICE DCV 自动预置执行横向扩展计算作业和远程可视化会话等用户任务的资源。
在 AWS CloudFormation 参数屏幕上,您需要提供以下项目:
CloudFormation 堆栈将需要大约 20 分钟完成部署,然后调度器节点再需要 20 分钟来完成配置。当配置完成后,您应该能够使用 CloudFormation Stack(CloudFormation 堆栈)-> Outputs(输出)-> WebUserInterface(Web 用户界面)下的 HTTPS 链接访问 Scale-Out Computing on AWS Web 界面。
有关部署 Scale-Out Computing on AWS 解决方案的详细说明及屏幕截图,请访问: https://awslabs.github.io/scale-out-computing-on-aws/install-soca-cluster/
步骤 2:自定义 Amazon 系统映像 (AMI)
对于大型集群,建议从 AWS Marketplace 提供的操作系统开始,然后根据应用程序要求对其进行自定义。在本示例中,我从 CentOS 7.7 基础 AMI 开始,然后通过安装 Scale-Out Computing on AWS 解决方案所需的系统软件包对其进行自定义,以减少计算节点启动时间。有关为此解决方案自定义 AMI 的步骤的详细说明,请参见此处:Import custom AMI to provision capacity faster - Scale-Out Computing on AWS Knowledge Base
然而,创建自定义 AMI 之前,我还需要安装 EDA 应用程序所需的系统软件包。下面是特定工作负载所需的软件包示例:
# yum install -y \
	vim vim-X11 xterm compat-db47 glibc glibc.i686 openssl098e \
	compat-expat1.i686 dstat epel-release motif libXp\
	libXaw libICE.i686 libpng.i686 libXau.i686 libuuid.i686 libSM.i686 \
	libxcb.i686 plotutils libXext.i686 libXt.i686 libXmu.i686 \
	libXp.i686 libXrender.i686 bzip2-libs.i686 freetype.i686 \
	fontconfig.i686 libXft.i686 libjpeg-turbo.i686 motif.i686 \
	apr.i686 libdb libdb.i686 libdb-utils apr-util.i686 libXp.i686 \
	qt apr-util gnuplot
检查应用程序所需的所有系统库是否都已预安装在 AMI 上。您可以到应用程序的二进制文件目录发布此命令来进行检查:
# ldd <application_path>/linux64/bin/<binary_name> | grep 'not found'
命令应返回未在操作系统库路径中找到的任何库依赖项列表。然后您可以使用此命令识别提供缺失库的软件包名称,并安装该软件包:
# yum whatprovides */libname.*
# yum install -y packagename
接下来,我需要通过编辑 /etc/selinux/config和将 SELINUX=enforcing更改为 SELINUX=disabled 来关闭 SELinux。
接下来还建议提高系统限制,特别是当应用程序要处理大量文件时,而这是很多 EDA 应用程序的常见操作。可以通过编辑下面的文件和添加后续条目来完成此操作:
/etc/sysctl.conf:
	net.core.somaxconn=65535
	net.ipv4.tcp_max_syn_backlog=163840
	net.core.rmem_default=31457280
	net.core.rmem_max=67108864
	net.core.wmem_default = 31457280
	net.core.wmem_max = 67108864
	fs.file-max=1048576
	fs.nr_open=1048576

/etc/security/limits.conf:
	*		hard 	memlock 	unlimited
	*		soft 	memlock 	unlimited
	*		soft 	maxproc 	3061780
	*		hard 	maxproc 	3061780
	*		soft	maxsignal	3061780
	*		hard	maxsignal	3061780
	*		soft	nofile		1048576
	*		hard	nofile		1048576

/opt/pbs/lib/init.d/limits.pbs_mom:
	ulimit -l unlimited
	ulimit -u 3061780
	ulimit -i 3061780
	ulimit -n 1048576
接下来,我在基础映像中安装 Amazon FSx for Lustre client。对于 CentOS 7.7,您可以遵照 Installing the Lustre client - FSx for Lustre 中的步骤。由于在本部分的第一个步骤中,我们在安装 Scale-Out Computing on AWS 所需的系统软件包以减少计算节点启动时间时更新了内核并重启了实例,我们不需要限制 aws-fsx.repo 停留在版本 7.7。
现在,我已经完成所有的 AMI 自定义操作,我可以创建将在启动实例时使用的新 AMI。为完成此操作,我将转到 Amazon EC2 控制台,选择我已经自定义的实例,点击 Actions(操作)-> Image(映像)-> Create Image(创建映像)并记下 AMI ID。
最后,我编辑了 /apps/soca/<CLUSTER_ID>/cluster_manager/settings/queue_mapping.yml ,按下面所述更新 AMI ID。这样一来,可以使我的计算集群将此映像用于所有的计算和桌面节点。
queue_type:
  compute:
    queues: ["high", "normal", "low"]
    instance_ami: "<YOUR_AMI_ID>" # <- Add your new AMI ID
    base_os: "centos7"
    root_size: "10" 		 # <- Add the size corresponding to your AMI
    instance_type: ...
...
  desktop:
    queues: ["desktop"]
    instance_ami: "<YOUR_AMI_ID>" # <- Add your new AMI ID
    base_os: "centos7"
	root_size: "10" 		 # <- Add the size corresponding to your AMI
	instance_type: ...
步骤 3:设置许可证服务器,并可以选择设置多个
在 AWS 中运行 EDA 工作负载时,可以使用本地许可证服务器,但这需要本地网络与 Amazon VPC 之间有一个稳定的网络连接。可以使用 AWS Site-to-Site VPN 连接或通过使用 AWS Direct Connect 建立专用的网络连接来建立此连接。然而,对于大规模测试,计算节点与许可证服务器之间的延迟越小越好。因此,我决定在我的 Amazon VPC 中部署一个许可证服务器。
对于许可证服务器,我在私有子网中预置了一个运行 CentOS 7.7 的 c5.2xlarge 实例,该私有子网对应于 Scale-Out Computing on AWS 解决方案调度器实例部署的相同可用区。
您应该咨询 EDA 供应商,了解他们在 AWS 上设置许可证服务器的具体要求。撰写本博客时,我了解 EDA 供应商有两个不同的要求,因此我同时满足了这两个要求。
EDA 供应商可能要求您使用附加到 EC2 实例的弹性网络接口 (ENI) 来生成许可证文件。您必须在相同子网中创建网络接口,然后将其附加到 EC2 实例中。有关创建和附加弹性网络接口的逐步详细信息,请访问:Elastic network interfaces - Amazon Elastic Compute Cloud
或者,EDA 供应商可能会要求您基于虚拟机通用唯一标识符 (VM UUID)(该标识符已转化为 EC2 实例 ID,且格式为 VM_UUID=<AWS EC2 实例 ID>,例如VM_UUID=i-0af01c0123456789a)请求许可证文件。您可能想要复查基于 VM UUID 支持许可证生成的许可证守护程序所需的最低版本。
在这两种情况下,都建议将 Scale-Out Computing on AWS 创建名为 ComputeNodeSecurityGroup 的安全组附加到许可证 EC2 实例,因为它开放了已附加相同安全组的实例之间的所有 TCP 流量。
现在,我登录我的许可证服务器实例,并配置和启动许可软件。必须将下面的系统软件包安装在许可证服务器上,因为 FlexLM 需要它们:
# yum install -y \
	vim glibc.i686 \
	glibc-devel.i686 \
	redhat-lsb
接下来,我需要通过编辑 /etc/selinux/config 和将 SELINUX=enforcing更改为 SELINUX=disabled 来关闭 SELinux。
接下来,我需要安装 EDA 供应商提供的许可证应用程序,并遵照说明来识别主机 ID,以生成许可证。
收到许可证文件后,我编辑了 /etc/rc.local 来启用许可证守护程序,从而在我通过添加下面的行启动许可证服务器实例时自动启动:
/etc/rc.local:
	su centos -c "/vendor/version/linux64/bin/lmgrd -c /vendor/license/license.lic
	-l /vendor/logs/license.log - reuseaddr"
然后,调用这些命令以禁用防火墙守护程序,并在实例重启时启用 /etc/rc.local 的执行:
systemctl stop firewalld
systemctl disable firewalld
chmod +x /etc/rc.d/rc.local
systemctl enable rc-local
systemctl start rc-local
接下来,我增加了一些系统限制,特别是因为我计划使用 30000 多个核心进行一次大规模活动,这需要额外的文件处理和网络连接。可以通过编辑下面的文件和添加后续条目来完成此操作:
/etc/sysctl.conf:
	net.core.somaxconn=65535
	net.ipv4.tcp_max_syn_backlog=163840
	net.ipv4.tcp_keepalive_time=300
	net.ipv4.tcp_keepalive_intvl=60
	net.ipv4.tcp_keepalive_probes=5
	net.ipv4.tcp_retries2=3
	net.core.rmem_default=10485760
	net.core.rmem_max=10485760
	fs.file-max=1048576
	fs.nr_open=1048576


/etc/security/limits.conf:
	*		soft	nofile		1048576
	*		hard	nofile		1048576
最后,我重启许可证服务器实例,以便启用所有的更改。
注:如果许可证服务器将提供超过 10000 个许可证功能,EDA 供应商建议在更多的许可证服务器上分割许可证,因此您可能需要通过在另一个 EC2 实例上重复步骤 3 的部分来部署另一个许可证服务器。
步骤 4:创建 Amazon S3 存储桶以上传测试案例和设置共享文件系统
我创建 S3 存储桶以用作永久存储,然后再将 EDA 应用程序软件和所需的测试案例文件上传到存储桶中。从这里开始,我执行设置 FSx for Lustre 文件系统的步骤。尽管超出了本博客文章的范围,还可以通过其他文件系统选项在 AWS 运行 EDA 工具。有关更多的信息,请联系您的解决方案架构师。
创建 S3 存储桶之前,您必须安装 AWS CLI。要安装 AWS CLI,请遵照下面显示的步骤:安装 AWS CLI。
接下来,通过提供凭证让您创建 S3 存储桶和将数据上传到存储桶来配置 AWS CLI。
$ aws configure
AWS Access Key ID [None]:
AWS Secret Access Key [None]:
Default region name [None]:
Default output format [None]:
步骤 4.1:创建 S3 存储桶
接下来,通过创建 S3 存储桶来验证 AWS CLI 工作正常:
$ aws s3 mb s3://app-testcases-<unique_id>make_bucket: app-testcases-<unique_id>
注:作为示例,我创建了名为 app-testcases-<unique_id> 的 S3 存储桶。需要 <unique id> 来确保 S3 存储桶名称是全局唯一的。
接下来,假设您使用的是 AWS 以外的笔记本电脑或服务器,且它们已经有了 EDA 应用程序安装文件和所需的测试案例,那么您可以像下面这样轻松地将它们上传到 S3 存储桶:
$ aws s3 cp Installer.bin s3://app-testcases-<unique_id>/
$ aws s3 cp App-version-common.ext s3://app-testcases-<unique_id>/
$ aws s3 cp App-version-linux64.ext s3://app-testcases-<unique_id>/
$ aws s3 cp design-testcases.tar.gz s3://app-testcases-<unique_id>/
注:我将 .bin 和 .ext 用作供应商安装文件的通用文件扩展。
如果您使用的机器没有接入公共互联网,您可以在 AWS 中创建一个 EC2 实例,然后用它从供应商的 FTP 服务器下载软件。
步骤 4.2:创建 Amazon FSx for Lustre 文件系统
创建 Amazon FSx for Lustre 文件系统之前,您必须了解几个注意事项。FSx for Lustre 文件系统的吞吐量容量取决于存储容量。在此部署中,我将使用“Scratch 2” Amazon FSx 部署类型文件系统,该系统将驱动 200MB/秒/TiB,且我的测试案例需要 1.5GB/秒的总吞吐量,因此我需要创建一个 9.6TiB 或更大的文件系统。如果您不确定测试案例总吞吐量要求,建议先使用适度大的 FSx for Lustre 文件系统,然后用初始数量的 EC2 实例进行试验,收集总吞吐量要求,并根据所需的完整实例数量,为文件系统选择适当的大小。要支持具有高元数据操作的工作负载,建议采用更大的文件系统。
使用 AWS 管理控制台,在 Services(服务)下,转到 Amazon FSx -> Create File System(创建文件系统)。然后,选择“Amazon FSx for Lustre”,在下一个屏幕中,提供文件系统的名称,选择 Scratch, SSD,对于存储容量,键入 45.6,吞吐量容量将计算为 8906MB/s。
在 Network & security(网络和安全)部分中,
- 在 VPC 下,选择
soca-<stack name>-VPC, - 在 VPC Security Groups(VPC 安全组)下,选择与
soca-<stack-name>-ComputeNodeSG对应的安全组, - 在 Subnet(子网)下,选择与
soca-<stack-name>-Private1对应的子网
在 Data repository integration(数据存储库集成)部分中,将数据存储库类型更改为 Amazon S3,并在 Import Bucket(导入存储库)下键入 s3://app-testcases-<unique_id>,然后在 Export prefix(导出前缀)下选择 “The same prefix that you imported from (replace existing objects with updated ones)”(您从中进行导入的相同前缀 [将现有对象替换为更新对象])。您可以提供任何标签,点击 Next(下一步)以查看设置,然后点击 “Create file system”(创建文件系统)。
文件系统应在 5 分钟内准备好,AWS 管理控制台将在文件系统创建好并准备好使用后指示状态。
最后,登录调度器实例(如果尚未登录),编辑 /apps/soca/<CLUSTER_ID>/cluster_manager/settings/queue_mapping.yml 并在计算和桌面队列设置下使用 fsx_lustre选项以包含 Amazon FSx for Lustre DNSName:
fsx_lustre: "fs-xxxxxxxxxxxxxxxxx.fsx.<region>.amazonaws.com"


queue_type:
  compute:
    queues: ["queue1", "queue2", "queue3"]
    fsx_lustre: "fs-xxxxxxxxxxxxxxxxx.fsx.<region>.amazonaws.com" # <- Add your Amazon FSx for Lustre DNSName

  desktop:
    queues: ["desktop"]
    fsx_lustre: "fs-xxxxxxxxxxxxxxxxx.fsx.<region>.amazonaws.com" # <- Add your Amazon FSx for Lustre DNSName
步骤 5:使用 NICE DCV 连接远程桌面会话
使用步骤 1 中的用户名/密码登录 Scale-Out Computing on AWS Web 用户界面,点击左侧边栏上的 “Graphical Access”(图形访问)。在 Your Session #1(您的会话 1)下,您可以选择会话有效性和虚拟机的 CPU 和内存大小,然后点击 “Launch my Session #1”(启动我的会话 1)。新的“桌面”作业将发送到队列,从而基于特定要求创建新实例。
您将看到一条信息型消息,要求您等待 20 分钟后才能访问您的远程桌面。您可以通过点击左侧边栏上的 “My Job Queue”(我的作业队列)来检查桌面作业的状态。当会话准备好后,“Graphical Access”(图形访问)->“Your session #1”(您的会话 1)上的信息消息将更新使用连接信息。
您可以直接从浏览器访问会话,或者为 Mac / Linux / Windows 下载 NICE DCV 本机客户端,并通过本机客户端访问您的会话。
有关图形访问的更多详细信息,请访问 https://awslabs.github.io/scale-out-computing-on-aws/access-soca-cluster/#graphical-access-using-dcv
步骤 6:安装 EDA 应用程序
当您登录到远程桌面会话后,您应该能够查看您上传到 Amazon S3 存储桶中的文件自动显示在 FSx for Lustre 文件系统(安装在 /fsx 下面)上。
$ cd /fsx
$ ls
Installer.bin App-version-common.ext App-version-linux64.ext design-testcases.tar.gz
下一步将是设置 EDA 供应商安装应用程序:
$ chmod 755 Installer.bin
$ ./Installer.bin
当提示输入安装目录时,键入/fsx/<vendor_name>/安装程序,然后等到安装完成。
下一步是使用供应商安装应用程序安装 EDA 应用程序:
$ /fsx/<vendor_name>/installer/installer
安装程序将提示输入包含下载的 EFT 文件的源目录的路径,请输入包含 App-version-*.ext 的 /fsx。然后,安装程序将提示输入我们希望在其中安装 EDA 供应商应用程序的完整路径,因此我们将键入/fsx/<vendor_name>。安装程序将验证 *.ext 文件的完整性并继续进行安装。
安装完成后,我编辑了 ~/.bash_profile 以添加下列内容:
export EDATOOL_HOME=/fsx/<vendor_name>/<app_name>/<version>
source $EDATOOL_HOME/setup.sh
export LM_LICENSE_FILE=27020@ip-a-b-c-d 	# <- Modify to point to the license
                                              # sever(s) created in step 3
结论
在此篇博客文章中,我使用了 Scale-Out Computing on AWS 设置能够运行整个半导体设计工作流的 EDA 环境。在即将发布的博文中,我将使用此基础设施将示例 EDA 工作负载扩展到超过 30000 个核心。敬请随时关注!
本篇作者
Ahmed Elzeftawi
Ahmed Elzeftawi 是 Amazon Web Services 的一位半导体和 EDA 合作伙伴解决方案架构师。在加入 AWS 之前,他曾任 Cadence Design Systems 的云产品管理总监,他在该公司为 AWS 上的 Cadence EDA 工作负载架构并部署了多个计算集群。他拥有超过 18 年的电子设计自动化、芯片设计和高性能计算集群经验。Ahmed 拥有开罗大学电子与通信工程学士学位和圣塔克拉拉大学工商管理硕士学位。
本篇译者
黄振维
半導體行業解決方案架構師, 目前專注於以AWS well-architected 策略協助客戶在雲上建構安全且高可靠系統滿足需求.
丁杰
AWS 解决方案架构师,8年以上大型移动互联网研发及技术管理经验,资深云计算行业从业者。对EDA行业上云以及针对云上架构进行优化设计有深入理解。了解云计算及半导体行业技术发展变革方向,能针对云服务特点在行业解决方案上有前瞻性布局。
English Edition
Scaling EDA Workloads using Scale-Out Computing on AWS
by Ahmed Elzeftawi | on 13 JUL 2020 | in Semiconductor | Permalink | Share
Introduction
Semiconductor and electronics companies using electronic design automation (EDA) applications can significantly accelerate their product development lifecycle and time to market by taking advantage of the near infinite compute, storage, and other resources available on AWS. In this workload enablement blog post, I provide architectural and system-level guidance to build out an environment capable of scaling EDA applications to 30,000 cores or more.
EDA workloads often require a compute cluster, a process scheduler that orchestrates job distribution to compute nodes, and a high-performance shared file system. The shared file system is typically required to sustain throughput requirements that vary anywhere from 500 MB/sec to 10 GB/sec depending on the EDA workload use case, design size, and total number of cores. Other important components of the EDA infrastructure stack include license management, remote desktops and visualizations, as well as user management including identity and access controls, budgeting, and monitoring.
Service and solution overview
To help me quickly launch an EDA environment on AWS, I use the official AWS Solution Scale-Out Computing on AWS. This Solution leverages many AWS services, including Amazon Elastic Compute Cloud (EC2 Spot and EC2 On-Demand Instances), Amazon Simple Storage Service (S3), Amazon Elastic File System (EFS), and Amazon FSx for Lustre.
Scale-Out Computing on AWS
Scale-Out Computing on AWS is an official AWS Solution that helps customers more easily deploy and operate a multiuser environment for computationally intensive workflows. The Solution deploys a cluster, provides automated cluster provisioning orchestration, and features a large selection of compute resources, to include a fast network backbone; nearly unlimited storage; and budget and cost management directly integrated with AWS.
Amazon Elastic Compute Cloud (Amazon EC2)
Amazon EC2 is a web service that provides secure, resizable compute capacity in the cloud. Amazon EC2 offers the broadest and deepest choice of instances, built on the latest compute, storage, and networking technologies and engineered for high performance and security. When running fault tolerant EDA workloads, Amazon EC2 Spot Instances let you take advantage of unused EC2 capacity in the AWS Cloud. Spot Instances are available at up to a 90% discount compared to On-Demand Instance prices. AWS also offers Amazon EC2 Reserved Instances and Savings Plans, which provide significant discount compared to On-Demand Instance prices in exchange for a commitment of usage for a 1 or 3 year term.
Amazon Simple Storage Service (Amazon S3)
For persistent data, such as libraries, tools, and design specifications, EDA workflows can leverage Amazon S3. Amazon S3 is an object storage service that offers industry-leading scalability, data availability, security, and performance. Amazon S3 is designed for 99.999999999% (11 9’s) of durability, and stores data for millions of applications for companies all around the world. Traffic between Amazon EC2 and Amazon S3 can leverage up to 25 Gbps of bandwidth, as wells as use Cross-Region Replication, and data tiering (see Amazon S3 Features and Amazon S3 FAQs for more info).
Amazon Elastic File System (Amazon EFS)
Amazon EFS provides a simple, scalable, fully managed elastic NFS file system for use with AWS Cloud services and on-premises resources. Amazon EFS is the file system used for home directories and automation scripts when building the environment on AWS. It is built to scale on demand to petabytes without disrupting applications, growing and shrinking automatically as you add and remove files, eliminating the need to provision and manage capacity to accommodate growth.
Amazon FSx for Lustre (Amazon FSx for Lustre)
If your EDA tools require a high-performance shared file system, FSx for Lustre is a fully managed, high-performance file system, optimized for high performance computing (HPC) and EDA workloads. FSx for Lustre provides seamless integration with Amazon S3 making it easy and cost effective to persistently store the data in Amazon S3 and present it with a high-performance POSIX file system that can be mounted on compute instances for data processing with sub-millisecond latencies, up to hundreds of gigabytes per second of throughput, and millions of IOPS.
Solution Deployment
For deployment, I go through the following steps:
- Launch and configure an EDA capable infrastructure stack using Scale-Out Computing on AWS
- Customize an Amazon Machine Image (AMI)
- Setup a license server, with the option to setup multiple license servers
- Create an Amazon S3 bucket to upload the test cases and setup a shared file system
- Connect to a NICE DCV remote desktop session
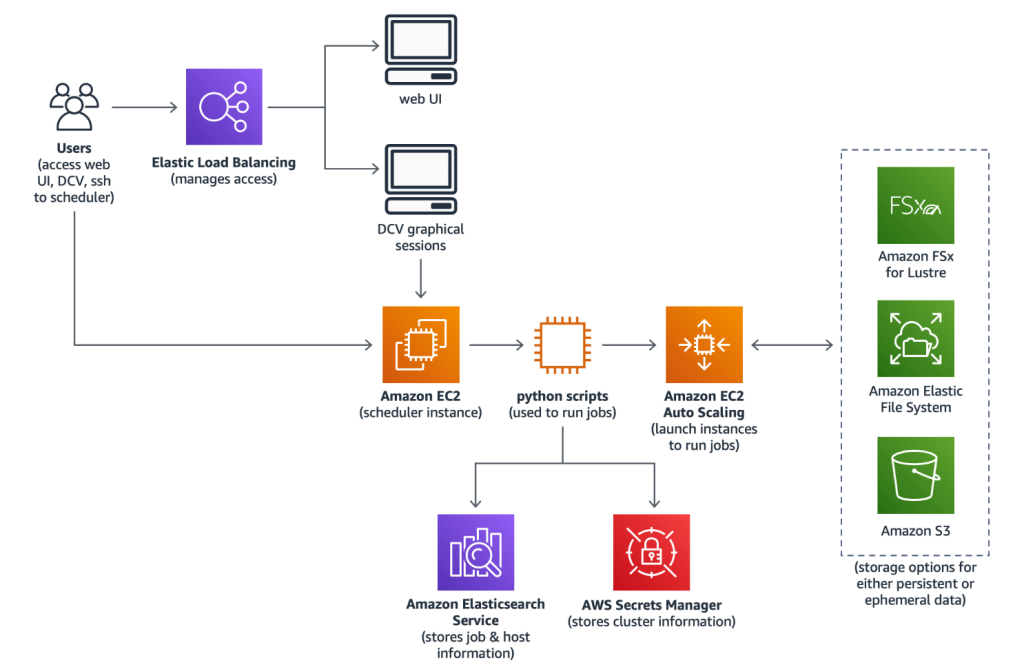
- Install the EDA application
Step 1: Launch and configure infrastructure using Scale-Out Computing on AWS
Scale-Out Computing on AWS can be deployed using the 1-click installer from the official AWS Solutions page https://aws.amazon.com/solutions/scale-out-computing-on-aws, which starts the deployment in AWS CloudFormation. The Solution is highly customizable, and core functionality is enabled with a scheduler running on an EC2 instance, which then leverages AWS CloudFormation and Amazon EC2 Auto Scaling to automatically provision resources necessary to execute user tasks such as scale-out compute jobs and remote visualization sessions using NICE DCV.
(缺图)
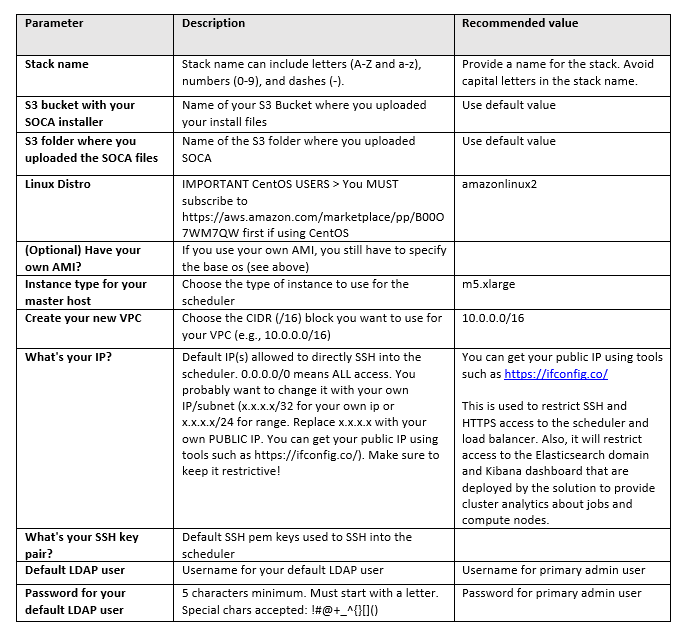
On the AWS CloudFormation parameter screen, you need to provide the following items:
(缺图)
The CloudFormation stack will take about 20 minutes to deploy then an additional 20 minutes are needed for the scheduler node to complete configuration. Once the configuration is complete, you should be able to access the Scale-Out Computing on AWS web interface using the HTTPS link under CloudFormation Stack -> Outputs -> WebUserInterface.
Detailed instructions for deploying Scale-Out Computing on AWS Solution with screenshots are available at: https://awslabs.github.io/scale-out-computing-on-aws/install-soca-cluster/
Step 2: Customize the Amazon Machine Image (AMI)
For a large cluster, it is recommended to start with a modern operating system image from AWS Marketplace then customize it per the application requirements. In this example, I started with a CentOS 7.7 base AMI and customized it by installing system packages needed for Scale-Out Computing on AWS solution to reduce compute node launch time. The steps to customize an AMI for the Solution are detailed here: Import custom AMI to provision capacity faster - Scale-Out Computing on AWS Knowledge Base
However, before creating the custom AMI, I also needed to install system packages required for the EDA application. Here is an example of packages required for a certain workload:
# yum install -y \
	vim vim-X11 xterm compat-db47 glibc glibc.i686 openssl098e \
	compat-expat1.i686 dstat epel-release motif libXp\
	libXaw libICE.i686 libpng.i686 libXau.i686 libuuid.i686 libSM.i686 \
	libxcb.i686 plotutils libXext.i686 libXt.i686 libXmu.i686 \
	libXp.i686 libXrender.i686 bzip2-libs.i686 freetype.i686 \
	fontconfig.i686 libXft.i686 libjpeg-turbo.i686 motif.i686 \
	apr.i686 libdb libdb.i686 libdb-utils apr-util.i686 libXp.i686 \
	qt apr-util gnuplot
Bash
You’ll want to check that all system libraries needed for your application are preinstalled on the AMI. You can check by going to the binaries directory of the application, then issue this command:
# ldd <application_path>/linux64/bin/<binary_name> | grep 'not found'Bash
The command should return a list of any library dependencies that are not found on the operating system library paths. Then you can use this command to identify the name of the package that provides the missing library and install it:
# yum whatprovides */libname.*
# yum install -y packagename
Bash
Next, I needed to turn off SELinux by editing /etc/selinux/config and changing SELINUX=enforcingto SELINUX=disabled.
Next, it is also recommended to increase system limits specially if the application deals with a large number of files, which is common for many EDA applications. This can be accomplished by editing the following files and adding the subsequent entries:
/etc/sysctl.conf:
	net.core.somaxconn=65535
	net.ipv4.tcp_max_syn_backlog=163840
	net.core.rmem_default=31457280
	net.core.rmem_max=67108864
	net.core.wmem_default = 31457280
	net.core.wmem_max = 67108864
	fs.file-max=1048576
	fs.nr_open=1048576
Bash
/etc/security/limits.conf:
	*		hard 	memlock 	unlimited
	*		soft 	memlock 	unlimited
	*		soft 	nproc 	 	3061780
	*		hard 	nproc 		3061780
	*		soft	sigpending	3061780
	*		hard	sigpending	3061780
	*		soft	nofile		1048576
	*		hard	nofile		1048576
Bash
/opt/pbs/lib/init.d/limits.pbs_mom:
	ulimit -l unlimited
	ulimit -u 3061780
	ulimit -i 3061780
	ulimit -n 1048576
Bash
Next, I installed Amazon FSx for Lustre client in the base image. You can follow the steps at: Installing the Lustre client - FSx for Lustre for CentOS 7.7. Since we’ve updated the kernel and rebooted the instance in the first step in this section while we were installing the system packages needed for Scale-Out Computing on AWS to reduce compute node launch time, we don’t need to restrict the aws-fsx.repo to stay on version 7.7.
Now that I have completed all of the AMI customizations, I can create the new AMI to be used when launching instances. I do this by going to the Amazon EC2 console, select the instance I have customized, click on Actions -> Image -> Create Image and note the AMI ID.
Finally, I edited /apps/soca/<CLUSTER_ID>/cluster_manager/settings/queue_mapping.yml to update the AMI ID as indicated below. This would enable my compute cluster to use this image for all compute and desktop nodes.
queue_type:
  compute:
    queues: ["high", "normal", "low"]
    instance_ami: "<YOUR_AMI_ID>" # <- Add your new AMI ID
    base_os: "centos7"
    root_size: "10" 		 # <- Add the size corresponding to your AMI
    instance_type: ...
...
  desktop:
    queues: ["desktop"]
    instance_ami: "<YOUR_AMI_ID>" # <- Add your new AMI ID
    base_os: "centos7"
	root_size: "10" 		 # <- Add the size corresponding to your AMI
	instance_type: ...
Bash
Step 3: Setup a license server, with the option to setup multiple
It is possible to use on-premises license server(s) when running EDA workloads in AWS but this requires a stable network connection between the on-premises network and the Amazon VPC. This can be established using AWS Site-to-Site VPN connection or by establishing a dedicated network connection using AWS Direct Connect. However, for large scale testing smaller latencies between compute nodes and the license server(s) is preferred. So, I decided to deploy a license server in my Amazon VPC.
For the license server, I provisioned a c5.2xlarge instance running CentOS 7.7 in the private subnet corresponding to the same Availability Zone deployed by the Scale-Out Computing on AWS Solution for the scheduler instance.
You should check with your EDA vendor on their specific requirements for setting-up a license server on AWS. At the time of writing this blog, I’m aware of two different requirements from EDA vendors so I’ll cover both.
An EDA vendor might require that you use an Elastic Network Interface (ENI) attached to the EC2 instance to generate a license file. You must create the network interface in the same subnet then attach it to the EC2 instance. Step by step details about creating and attaching an elastic network interface are available at: Elastic network interfaces - Amazon Elastic Compute Cloud
Alternatively, an EDA vendor might require that you request a license file based on virtual machine universal unique identifier (VM UUID) which translates to an EC2 instance ID and the format is VM_UUID=<AWS EC2 Instance ID> For example, VM_UUID=i-0af01c0123456789a. You might want to double check the minimum version needed for the license daemon that supports license generation based on VM UUID.
For both cases, it is recommended to attach the Security Group named ComputeNodeSecurityGroup created by Scale-Out Computing on AWS to the license EC2 instance, as it opens all TCP traffic between instances that have the same security group attached.
Now I login to my license server instance, and configure and launch the licensing software. The following system packages must be installed on the license server, as they are required for FlexLM:
# yum install -y \
	vim glibc.i686 \
	glibc-devel.i686 \
	redhat-lsb
Bash
Next, I needed to turn off SELinux by editing /etc/selinux/configand changing SELINUX=enforcing to SELINUX=disabled.
Next, you need to install the license application provided by the EDA vendor and follow the instructions to identify the host ID to generate the license.
After receiving a license file, I edited /etc/rc.local to enable the license daemon to start automatically whenever I start the license server instance by adding the following line:
/etc/rc.local:
	su centos -c "/vendor/version/linux64/bin/lmgrd -c /vendor/license/license.lic
	-l /vendor/logs/license.log - reuseaddr"
Bash
Then invoked these commands to disable firewall daemon and enable execution of /etc/rc.local upon instance reboot:
systemctl stop firewalld
systemctl disable firewalld
chmod +x /etc/rc.d/rc.local
systemctl enable rc-local
systemctl start rc-local
Bash
Next, I increased some system limits, especially because I’m planning to do a large scale activity with more than 30,000 cores, which requires additional file handles and network connections. This can be accomplished by editing the following files and adding the subsequent entries:
/etc/sysctl.conf:
	net.core.somaxconn=65535
	net.ipv4.tcp_max_syn_backlog=163840
	net.ipv4.tcp_keepalive_time=300
	net.ipv4.tcp_keepalive_intvl=60
	net.ipv4.tcp_keepalive_probes=5
	net.ipv4.tcp_retries2=3
	net.core.rmem_default=10485760
	net.core.rmem_max=10485760
	fs.file-max=1048576
	fs.nr_open=1048576


/etc/security/limits.conf:
	*		soft	nofile		1048576
	*		hard	nofile		1048576
Bash
Finally, I reboot the license server instance so that all changes are applied.
Note: if the license server will be serving more than 10,000 license features, the EDA vendors recommend splitting the licenses on more license servers, so you might need to deploy another license server by repeating the Step 3 section again on another EC2 instance.
Step 4: Create an Amazon S3 bucket to upload the test cases and Setting-up a shared file system
I create an S3 bucket to serve as our persistent storage, then upload the EDA application software and the required test case files to the bucket. From there, I go through the steps for setting up an FSx for Lustre file system. Although beyond the scope of this blog post, there are alternate file system options for running EDA tools on AWS. For more information, please reach out to your Solutions Architect.
Before creating an S3 bucket, you must install the AWS CLI. To install the AWS CLI, follow the steps shown here: Installing the AWS CLI.
Next, configure the AWS CLI by providing credentials that allow you to create an S3 bucket and upload data to the bucket.
$ aws configure
AWS Access Key ID [None]:
AWS Secret Access Key [None]:
Default region name [None]:
Default output format [None]:
Bash
Step 4.1: Create an S3 bucket
Next, verify that AWS CLI is working by creating an S3 bucket:
$ aws s3 mb s3://app-testcases-<unique_id>
make_bucket: app-testcases-<unique_id>
Bash
Note: As an example, I created an S3 bucket called app-testcases-<unique_id>. The <unique id> is required to make sure that the S3 bucket name is globally unique.
Next, assuming you’re using a laptop or a server outside AWS that already has the EDA application installation files, and the required test cases, then you can easily upload them to the S3 bucket as follows:
$ aws s3 cp Installer.bin s3://app-testcases-<unique_id>/
$ aws s3 cp App-version-common.ext s3://app-testcases-<unique_id>/
$ aws s3 cp App-version-linux64.ext s3://app-testcases-<unique_id>/
$ aws s3 cp design-testcases.tar.gz s3://app-testcases-<unique_id>/
Bash
Note: I’m using .bin and .ext as a generic file extensions for the vendor installation files.
If the machine you’re using doesn’t have public internet access, you can create an EC2 instance in AWS, then use it to download the software from the vendor’s FTP server.
Step 4.2: Create Amazon FSx for Lustre file system
There are a few considerations that you must be aware of before creating an Amazon FSx for Lustre file system. The throughput capacity of FSx for Lustre file system is dependent on storage capacity. In this deployment, I’ll be using the “Scratch 2” Amazon FSx deployment type file system, which drives 200 MB/sec/TiB and my test cases require an aggregate throughput 1.5 GB/sec, so I need to create a 9.6 TiB file system or larger. If you’re not sure about test case aggregate throughput requirement, it is recommended to start with a reasonably large FSx for Lustre file system then experiment with an initial number of EC2 instances, collect aggregate throughput requirements, and choose proper size for the file system as needed for the required number of instances at full scale. To support workloads with high metadata operations, it is recommended to have an even larger file system.
Using the AWS Management Console, under Services go to Amazon FSx -> Create File System. Then select “Amazon FSx for Lustre”, then on the next screen, provide a name for the file system, select Scratch, keep Scratch 2 selected, for Storage capacity, type 45.6 and notice that Throughput Capacity will be calculated as 8906 MB/s.
In the Network & security section,
- under VPC select
soca-<stack name>-VPC, - under VPC Security Groups, select the security group that corresponds to
soca-<stack-name>-ComputeNodeSG, - under Subnet, select the subnet that corresponds to
soca-<stack-name>-Private1
In the Data repository integration section, change Data repository type to: Amazon S3, and type s3://app-testcases-<unique_id> under Import Bucket, and select “The same prefix that you imported from (replace existing objects with updated ones)” under Export prefix. You can provide any tags then click Next to review the settings, then click on “Create file system”.
The file system should be ready within 5 mins and the AWS Management Console will indicate the status once the file system is created and ready for use.
Finally, login to the scheduler instance (if not already) and edit /apps/soca/<CLUSTER_ID>/cluster_manager/settings/queue_mapping.yml to include the Amazon FSx for Lustre DNSName using fsx_lustre option under compute and desktop queues:
fsx_lustre: "fs-xxxxxxxxxxxxxxxxx.fsx.<region>.amazonaws.com"
queue_type:
  compute:
    queues: ["queue1", "queue2", "queue3"]
    fsx_lustre: "fs-xxxxxxxxxxxxxxxxx.fsx.<region>.amazonaws.com" # <- Add your Amazon FSx for Lustre DNSName

  desktop:
    queues: ["desktop"]
    fsx_lustre: "fs-xxxxxxxxxxxxxxxxx.fsx.<region>.amazonaws.com" # <- Add your Amazon FSx for Lustre DNSName
Bash
Step 5: Connecting to a remote desktop session using NICE DCV
Login to the Scale-Out Computing on AWS web user interface using the username/password used in Step 1 then click on “Graphical Access” on the left sidebar. Under Your Session #1, you can select the session validity and the size of the virtual machine in terms of CPUs and memory then click on “Launch my Session #1”. A new “desktop” job is sent to the queue, which creates a new instance based on the specified requirements.
You will see an informational message asking you to wait up to 20 minutes before being able to access your remote desktop. You can check the status of the desktop job by clicking on “My Job Queue” on the left sidebar. Once the session is ready, the information message on “Graphical Access” -> “Your session #1” will be updated with the connection information.
You can access the session directly from your browser or download the NICE DCV native client for Mac / Linux / Windows and access your session through the native client.
More details for Graphical Access are available at: https://awslabs.github.io/scale-out-computing-on-aws/access-soca-cluster/#graphical-access-using-dcv
Step 6: Installing the EDA application
After you’ve logged into the remote desktop session, you should be able to see the files you uploaded to the Amazon S3 bucket automatically visible on the FSx for Lustre file system, which is mounted under /fsx.
$ cd /fsx
$ ls
Installer.bin App-version-common.ext App-version-linux64.ext design-testcases.tar.gz
Bash
Next step would be to setup the EDA vendor installer application:
$ chmod 755 Installer.bin
$ ./Installer.bin
Bash
When prompted for an installation directory, type /fsx/<vendor_name>/installer then wait until the installation completes.
Next step would be to use the vendor installer application to install the EDA application:
$ /fsx/<vendor_name>/installer/installer
The installer will prompt for the path to the source directory containing the downloaded EFT file(s), enter /fsx which contains App-version-*.ext . Then the installer will prompt for the full path where we want to install the EDA vendor application, so we’ll type /fsx/<vendor_name>. The installer verifies the integrity of the *.ext files and proceed with the installation.
Once the installation completes, I edited ~/.bash_profile to add the following:
export EDATOOL_HOME=/fsx/<vendor_name>/<app_name>/<version>
source $EDATOOL_HOME/setup.sh
export LM_LICENSE_FILE=27020@ip-a-b-c-d 	# <- Modify to point to the license
                                              # sever(s) created in step 3
Bash
Conclusion
In this blog post, I’ve used Scale-Out Computing on AWS to setup an EDA environment capable of running the entire semiconductor design workflow. In an upcoming post, I’ll use this infrastructure to scale-up an example EDA workload to more than 30,000 cores. Stay tuned!
TAGS: EDA, Electronic design automation, semiconductor
Ahmed Elzeftawi
Ahmed Elzeftawi is a Semiconductor and EDA Partner Solutions Architect at Amazon Web Services. Prior to joining AWS, he was a Cloud Product Management Director at Cadence Design Systems where he architected and deployed multiple compute clusters for EDA workloads on AWS. He has 20 years of experience in Electronic Design Automation, chip design, and High Performance Compute clusters. Ahmed holds a Bachelor of Science in electrical and communications engineering from Cairo University and an MBA from Santa Clara University.