一、【全局】路由组件“切换”前设置“权限控制”
注意:全局就是对【所有】路由组件切换时的权限控制,只要组件切换,就会调用此事件。
1、在app.vue中设置一下全局变量username,以方便判断

在index.js路由组件中设置
 【前置 - 切换打开前】在index.js路由配置中增加beforeEach
【后置 - 切换打开后】在index.js路由配置中增加afterEach 
App.vue
<template>
  <div id="myapp">
    <!-- 第1行 -->

    <div class="left">
      <!-- 路由跳转链接 -->
      <router-link class="box_1" to="/Box_1" active-class="active">
        Box1组件>
      </router-link>
      <!-- 路由跳转链接 -->
      <router-link class="box_2" to="/Box_2" active-class="active">
        Box2组件>
      </router-link>
    </div>
    <div class="right">
      <!-- 显示路由组件 -->
      <router-view> </router-view>
    </div>
  </div>
</template>

<script>
2、index.js中增加路由守卫,设置路由切换事件
index.js
// 引入路由
// eslint-disable-next-line no-unused-vars
import Vue from 'vue'
import VueRouter from 'vue-router'
import Box_1 from '../pages/Box_1.vue'
import Box_2 from '../pages/Box_2.vue'
import Menu_1 from '../pages/Menu_1.vue'
import Menu_2 from '../pages/Menu_2.vue'
Vue.use(VueRouter)
const originalPush = VueRouter.prototype.push
VueRouter.prototype.push = function push(location) {
return originalPush.call(this, location).catch(err => err)
}
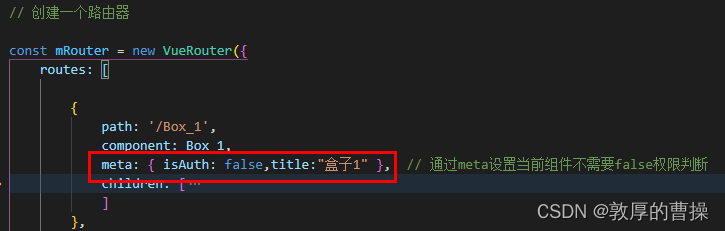
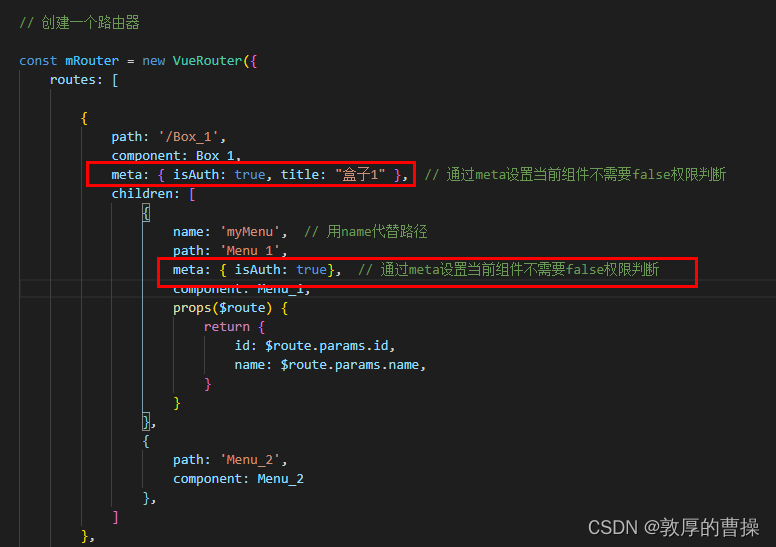
// 创建一个路由器
const mRouter = new VueRouter({
routes: [
{
path: '/Box_1',
component: Box_1,
meta: { isAuth: false, title: "盒子1" }, // 通过meta设置当前组件不需要false权限判断
children: [
{
name: 'myMenu', // 用name代替路径
path: 'Menu_1',
component: Menu_1,
props($route) {
return {
id: $route.params.id,
name: $route.params.name,
}
}
},
{
path: 'Menu_2',
component: Menu_2
},
]
},
{
path: '/Box_2',
component: Box_2,
meta: { isAuth: true, title: "盒子2" }, // 通过meta设置当前组件需要true权限判断
children: [
{
path: 'Menu_1',
component: Menu_1
},
{
path: 'Menu_2',
component: Menu_2
},
]
},
]
})
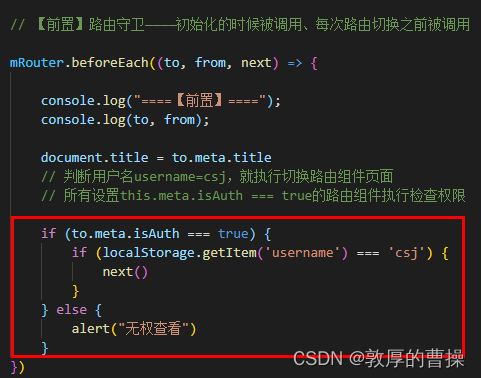
// 【前置】路由守卫————初始化的时候被调用、每次路由切换之前被调用
mRouter.beforeEach((to, from, next) => {
console.log("====【前置】====");
console.log(to, from);
// 判断用户名username=csj,就执行切换路由组件页面
// 所有设置this.meta.isAuth === true的路由组件执行检查权限
if (to.meta.isAuth === true) {
if (localStorage.getItem('username') === 'csj') {
next()
}
} else {
alert("无权查看")
}
})
// 【后置】路由守卫————初始化的时候被调用、路由切换进入后被调用
mRouter.afterEach((to, from) => {
console.log("====【后置】====");
console.log(to, from);
document.title = to.meta.title // 把网页标题改为路由组件设置的标题 meta: { isAuth: false, title: "盒子1" }
})
export default mRouter
二、【独享守卫】路由组件“切换”前设置“权限控制”
index.js
Menu_1.vue
<template>
<div class="m_box">
{
{ id }}.{
{ name }}
<br />
<input type="text" />
</div>
</template>
<script>
export default {
name: "Menu_1",
props: ["id", "name"],
mounted() {
console.log("=============");
console.log(this);
},
activated() {
// alert("进来了");
},
deactivated() {
// alert("离开了");
},
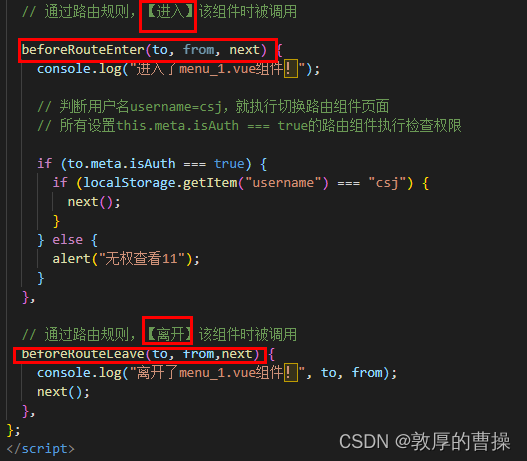
// 通过路由规则,【进入】该组件时被调用
beforeRouteEnter(to, from, next) {
console.log("进入了menu_1.vue组件!");
// 判断用户名username=csj,就执行切换路由组件页面
// 所有设置this.meta.isAuth === true的路由组件执行检查权限
if (to.meta.isAuth === true) {
if (localStorage.getItem("username") === "csj") {
next();
}
} else {
alert("无权查看11");
}
},
// 通过路由规则,【离开】该组件时被调用
beforeRouteLeave(to, from,next) {
console.log("离开了menu_1.vue组件!", to, from);
next();
},
};
</script>
<style scoped>
.m_box {
width: 95%;
height: 68px;
border: 1px rgb(253, 211, 211) solid;
margin-top: 5px;
text-align: center;
line-height: 28px;
overflow: hidden;
background-color: rgb(248, 248, 248);
}
</style>