环境配置:python=3.8,opencv-python=4.5.1,pyqt5=5.15,numpy=1.19.5
功能:实现选择视频文件(没有设置图片选择),播放,中止,暂停,继续播放
代码文件:见文章尾部
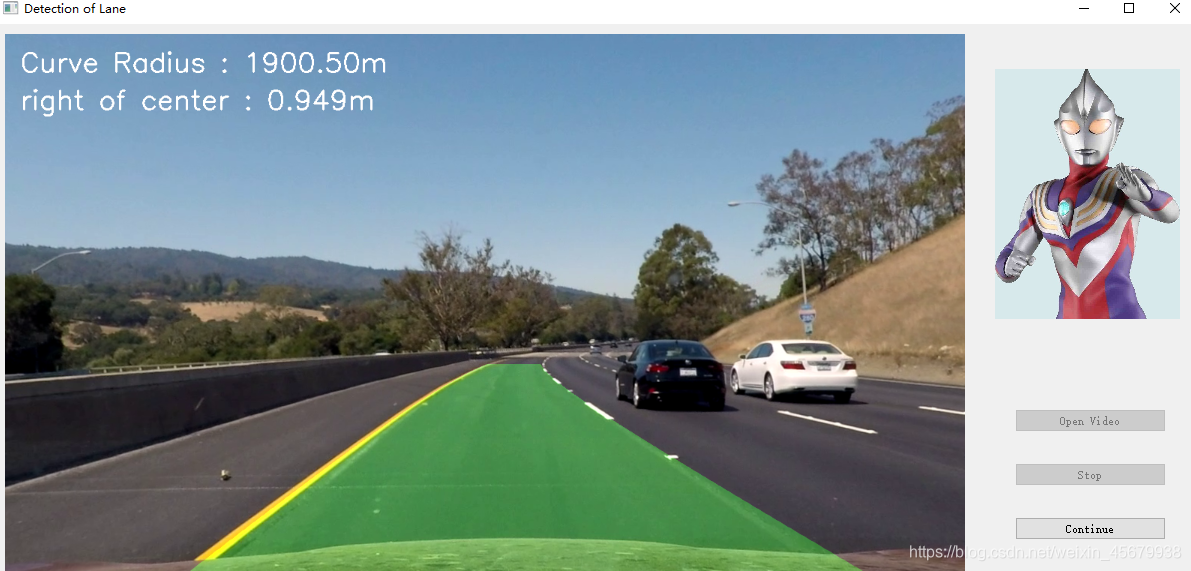
效果展示(高级车道线检测):
一、文件目录

1、camera_cal文件夹为相机标定文件(高级测试场景使用,如果更换为初级场景,如直线,需要在counter.py函数进行注释和更改)
2、文件2.jpg为自定义图片,可更换
3、counter.py实现播放-停止-暂停-继续播放的关系连接(在同一个视频中)
4、detect_def_1与2分别为初级车道线检测(直线)与高级车道线检测(弯道,更换场景需要重新标定)
5、gui.py实现GUI界面的制作
6、main.py为主函数,包括一些选择文件夹-播放-停止-暂停-继续逻辑
二、程序代码如下
代码文件:gui.py
# -*- coding: utf-8 -*-

from PyQt5 import QtCore, QtGui, QtWidgets
from PyQt5.QtGui import QPixmap


class Ui_mainWindow(object):
    def setupUi(self, mainWindow):
        mainWindow.setObjectName("mainWindow")
        mainWindow.resize(1203, 554)

        # 窗口部件,在mainWindow叠加矩形子窗口(后一个可以遮挡前一个)
        self.centralwidget = QtWidgets.QWidget(mainWindow)
        self.centralwidget.setObjectName("centralwidget")

        # 实现加载图片,在主函数中调用
        self.label_image = QtWidgets.QLabel(self.centralwidget)
        self.label_image.setGeometry(QtCore.QRect(10, 10, 960, 540))  # QtCore.QRect(左上角的点、宽和高)
        self.label_image.setStyleSheet("background-color: rgb(233, 185, 110);")
        self.label_image.setText("")

        # 自己添加的一个新窗口,可以自定义贴图
        pix = QPixmap('2.jpg')
        scaredPixmap = pix.scaled(185, 300, QtCore.Qt.KeepAspectRatio)  # 调整大小
        self.label_image_0 = QtWidgets.QLabel(self.centralwidget)
        self.label_image_0.setGeometry(QtCore.QRect(1000, 45, 185, 250))  # QtCore.QRect(左上角的点、宽和高)
        self.label_image_0.setStyleSheet("background-color: rgb(255, 255, 255);")  # 白色背景
        self.label_image_0.setPixmap(scaredPixmap)

        # 对齐方式:居中
        self.label_image.setAlignment(QtCore.Qt.AlignCenter)
        self.label_image.setObjectName("label_image")

        # 在self.centralwidget窗口上叠加新的子窗口self.widget
        self.widget = QtWidgets.QWidget(self.centralwidget)
        self.widget.setGeometry(QtCore.QRect(1020, 360, 151, 181))
        self.widget.setObjectName("widget")

        # QVBoxLayout可以在垂直方向上排列控件
        self.verticalLayout = QtWidgets.QVBoxLayout(self.widget)
        self.verticalLayout.setContentsMargins(0, 0, 0, 0)
        self.verticalLayout.setObjectName("verticalLayout")

        # 设置按键openVideo
        self.pushButton_openVideo = QtWidgets.QPushButton(self.widget)
        self.pushButton_openVideo.setObjectName("pushButton_openVideo")
        self.verticalLayout.addWidget(self.pushButton_openVideo)

        # 设置按键start
        self.pushButton_start = QtWidgets.QPushButton(self.widget)
        self.pushButton_start.setObjectName("pushButton_start")
        self.verticalLayout.addWidget(self.pushButton_start)

        # 设置按键pause
        self.pushButton_pause = QtWidgets.QPushButton(self.widget)
        self.pushButton_pause.setObjectName("pushButton_pause")
        self.verticalLayout.addWidget(self.pushButton_pause)

        mainWindow.setCentralWidget(self.centralwidget)
        self.retranslateUi(mainWindow)
        QtCore.QMetaObject.connectSlotsByName(mainWindow)

    def retranslateUi(self, mainWindow):
        _translate = QtCore.QCoreApplication.translate
        mainWindow.setWindowTitle(_translate("mainWindow", "Detection of Lane"))
        self.pushButton_openVideo.setText(_translate("mainWindow", "Open Video"))
        self.pushButton_start.setText(_translate("mainWindow", "Start"))
        self.pushButton_pause.setText(_translate("mainWindow", "Pause"))
代码文件:counter.py
# coding:utf-8
# 可自己在run()进行修改,得到自己想要的函数

import cv2
from PyQt5.QtCore import QThread, pyqtSignal
import time
import numpy as np
# from detect_def_1 import detection_line_1  # 初级车道线检测函数
from detect_def_2 import detection_line_2, getCameraCalibrationCoefficients  # 高级车道线检测函数


class CounterThread(QThread):
    sin_Result = pyqtSignal(np.ndarray)
    sin_runningFlag = pyqtSignal(int)
    sin_videoList = pyqtSignal(list)
    sin_done = pyqtSignal(int)
    sin_pauseFlag = pyqtSignal(int)

    def __init__(self):
        super(CounterThread, self).__init__()

        self.running_flag = 0
        self.pause_flag = 0
        self.videoList = []

        self.sin_runningFlag.connect(self.update_flag)
        self.sin_videoList.connect(self.update_videoList)
        self.sin_pauseFlag.connect(self.update_pauseFlag)

        # 高级车道线检测函数调用
        self.nx = 9
        self.ny = 6
        self.rets, self.mtx, self.dist, self.rvecs, self.tvecs = getCameraCalibrationCoefficients('camera_cal/calibration*.jpg', self.nx, self.ny)

    def run(self):
        for video in self.videoList:
            cap = cv2.VideoCapture(video)
            frame_count = 0
            while cap.isOpened():
                if self.running_flag:
                    if not self.pause_flag:
                        ret, frame = cap.read()
                        if ret:
                            if frame_count % 1 == 0:
                                a1 = time.time()

                                # 初级车道线检测函数
                                # frame = detection_line_1(frame)

                                # 高级级车道线检测函数
                                frame = detection_line_2(frame, self.mtx, self.dist)

                                self.sin_Result.emit(frame)
                                # out.write(frame)
                                a2 = time.time()
                                # a2与a1差值太小也报错
                                # print(f"fps: {1 / (a2 - a1):.2f}")  # 代码运行帧率
                            frame_count += 1
                        else:
                            break
                    else:
                        time.sleep(0.1)
                else:
                    break

            cap.release()
            # out.release()

            if not self.running_flag:
                break

        if self.running_flag:
            self.sin_done.emit(1)

    def update_pauseFlag(self, flag):
        self.pause_flag = flag

    def update_flag(self, flag):
        self.running_flag = flag

    def update_videoList(self, videoList):
        print("Update videoList!")
        self.videoList = videoList
代码文件:detect_def_1.py
import cv2
from PIL import Image, ImageTk
import numpy as np


##################
# 检测部分
#################
# 定义一个感兴趣区域
def region_interest(img, region):
    # 创立一个掩码
    mask = np.zeros_like(img)

    # 多通道
    if len(img.shape) > 2:
        channel_count = img.shape[2]
        ignore_mask_color = (255,)*channel_count
    # 单通道
    else:
        ignore_mask_color = 255

    # 图像填充,全白
    cv2.fillPoly(mask, region, ignore_mask_color)

    # 进行与操作
    mask_img = cv2.bitwise_and(img, mask)
    return mask_img


# 计算左右车道线直线方程,计算左右车道线的上下边界
def draw_lines(img, lines, color, thickness):
    left_lines_x = []
    left_lines_y = []
    right_lines_x = []
    right_lines_y = []
    line_y_max = 0
    line_y_min = 999
    for line in lines:
        for x1, y1, x2, y2 in line:
            if y1 > line_y_max:
                line_y_max = y1
            if y2 > line_y_max:
                line_y_max = y2
            if y1 < line_y_min:
                line_y_min = y1
            if y2 < line_y_min:
                line_y_min = y2
            k = (y2 - y1)/(x2 - x1)
            if k < -0.3:
                left_lines_x.append(x1)
                left_lines_y.append(y1)
                left_lines_x.append(x2)
                left_lines_y.append(y2)
            elif k > 0.3:
                right_lines_x.append(x1)
                right_lines_y.append(y1)
                right_lines_x.append(x2)
                right_lines_y.append(y2)
    # 最小二乘直线拟合
    left_line_k, left_line_b = np.polyfit(left_lines_x, left_lines_y, 1)
    right_line_k, right_line_b = np.polyfit(right_lines_x, right_lines_y, 1)

    # 根据直线方程和最大、最小的y值反算对应的x
    cv2.line(img,
             (int((line_y_max - left_line_b)/left_line_k), line_y_max),
             (int((line_y_min - left_line_b)/left_line_k), line_y_min),
             color, thickness)
    cv2.line(img,
             (int((line_y_max - right_line_b)/right_line_k), line_y_max),
             (int((line_y_min - right_line_b)/right_line_k), line_y_min),

             color, thickness)


# 车道线检测总函数
def detection_line_1(img):
    # BGR转换灰度图,opencv中为BGR格式
    gray_img = cv2.cvtColor(img, cv2.COLOR_BGR2GRAY)

    # canny算子进行边缘提取,"有横线遗留"加大low_threshold的值,40->100
    low_threshold = 100
    high_threshold = 150
    eager_img = cv2.Canny(gray_img, low_threshold, high_threshold)

    # 感兴趣区域选择,报TypeError: expected non-empty vector for x错,将apex的第二个值降低,310->300
    left_bottom = [0, img.shape[0]]
    right_bottom = [img.shape[1], img.shape[0]]
    apex = [img.shape[1]/2, 305]

    # 一个多边形为2维数组,多个多边形为3维数组
    region = np.array([[left_bottom, right_bottom, apex]], dtype=np.int32)
    mask_img = region_interest(eager_img, region)

    # 霍夫变换->检测直线
    rho = 2  # distance resolution in pixels of the Hough grid
    theta = np.pi/180  # angular resolution in radians of the Hough grid
    threshold = 15     # minimum number of votes (intersections in Hough grid cell)
    min_line_length = 40  # minimum number of pixels making up a line
    max_line_gap = 20    # maximum gap in pixels between connectable line segments

    # Hough Transform 检测线段,线段两个端点的坐标存在lines中
    lines = cv2.HoughLinesP(mask_img, rho, theta, threshold, np.array([]),
                                min_line_length, max_line_gap)

    # 复制一个原图
    img_copy = np.copy(img)
    # 绘制变换后的线(霍夫变换)
    for line in lines:
        for x1, y1, x2, y2 in line:
            cv2.line(img_copy, (x1, y1), (x2, y2), color=[255, 0, 0], thickness=6)  # 将线段绘制在img上

    # 拟合左右车道线方程
    draw_lines(img_copy, lines, color=[255, 0, 0], thickness=6)
    return img_copy
代码文件:detect_def_2.py
import cv2
import numpy as np
import glob

#################
# Step 1 读入图片、预处理图片、检测交点、标定相机的一系列操作
#################################################################
def getCameraCalibrationCoefficients(chessboardname, nx, ny):
    # prepare object points, like (0,0,0), (1,0,0), (2,0,0) ....,(6,5,0)
    objp = np.zeros((ny * nx, 3), np.float32)
    objp[:, :2] = np.mgrid[0:nx, 0:ny].T.reshape(-1, 2)

    # Arrays to store object points and image points from all the images.
    objpoints = []  # 3d points in real world space
    imgpoints = []  # 2d points in image plane.
    images = glob.glob(chessboardname)
    if len(images) > 0:
        print("images num for calibration : ", len(images))
    else:
        print("No image for calibration.")
        return

    ret_count = 0
    for idx, fname in enumerate(images):
        img = cv2.imread(fname)
        gray = cv2.cvtColor(img, cv2.COLOR_BGR2GRAY)
        img_size = (img.shape[1], img.shape[0])
        # Finde the chessboard corners
        ret, corners = cv2.findChessboardCorners(gray, (nx, ny), None)

        # If found, add object points, image points
        if ret == True:
            ret_count += 1
            objpoints.append(objp)
            imgpoints.append(corners)

    ret, mtx, dist, rvecs, tvecs = cv2.calibrateCamera(objpoints, imgpoints, img_size, None, None)
    print('Do calibration successfully')
    return ret, mtx, dist, rvecs, tvecs


# Step 2 传入计算得到的畸变参数,即可将畸变的图像进行畸变修正处理
def undistortImage(distortImage, mtx, dist):
    return cv2.undistort(distortImage, mtx, dist, None, mtx)


# Step 3 透视变换 : Warp image based on src_points and dst_points
#################################################################
# The type of src_points & dst_points should be like
# np.float32([ [0,0], [100,200], [200, 300], [300,400]])
def warpImage(image, src_points, dst_points):
    image_size = (image.shape[1], image.shape[0])
    # rows = img.shape[0] 720
    # cols = img.shape[1] 1280
    M = cv2.getPerspectiveTransform(src_points, dst_points)
    Minv = cv2.getPerspectiveTransform(dst_points, src_points)
    warped_image = cv2.warpPerspective(image, M, image_size, flags=cv2.INTER_LINEAR)

    return warped_image, M, Minv


# Step 4 : Create a thresholded binary image
#################################################################
# 亮度划分函数
def hlsLSelect(img, thresh=(220, 255)):
    hls = cv2.cvtColor(img, cv2.COLOR_BGR2HLS)
    l_channel = hls[:, :, 1]
    l_channel = l_channel*(255/np.max(l_channel))
    binary_output = np.zeros_like(l_channel)
    binary_output[(l_channel > thresh[0]) & (l_channel <= thresh[1])] = 255
    return binary_output


# 亮度划分函数
def hlsSSelect(img, thresh=(125, 255)):
    hls = cv2.cvtColor(img, cv2.COLOR_BGR2HLS)
    s_channel = hls[:, :, 2]
    s_channel = s_channel*(255/np.max(s_channel))
    binary_output = np.zeros_like(s_channel)
    binary_output[(s_channel > thresh[0]) & (s_channel <= thresh[1])] = 255
    return binary_output


def dirThreshold(img, sobel_kernel=3, thresh=(0, np.pi/2)):
    # 1) Convert to grayscale
    gray = cv2.cvtColor(img, cv2.COLOR_BGR2GRAY)
    # 2) Take the gradient in x and y separately
    sobelx = cv2.Sobel(gray, cv2.CV_64F, 1, 0, ksize=sobel_kernel)
    sobely = cv2.Sobel(gray, cv2.CV_64F, 0, 1, ksize=sobel_kernel)
    # 3) Take the absolute value of the x and y gradients
    abs_sobelx = np.absolute(sobelx)
    abs_sobely = np.absolute(sobely)
    # 4) Use np.arctan2(abs_sobely, abs_sobelx) to calculate the direction of the gradient
    direction_sobelxy = np.arctan2(abs_sobely, abs_sobelx)
    # 5) Create a binary mask where direction thresholds are met
    binary_output = np.zeros_like(direction_sobelxy)
    binary_output[(direction_sobelxy >= thresh[0]) & (direction_sobelxy <= thresh[1])] = 1
    # 6) Return the binary image
    return binary_output


def magThreshold(img, sobel_kernel=3, mag_thresh=(0, 255)):
    # Apply the following steps to img
    # 1) Convert to grayscale
    gray = cv2.cvtColor(img, cv2.COLOR_RGB2GRAY)
    # 2) Take the gradient in x and y separately
    sobelx = cv2.Sobel(gray, cv2.CV_64F, 1, 0, sobel_kernel)
    sobely = cv2.Sobel(gray, cv2.CV_64F, 0, 1, sobel_kernel)
    # 3) Calculate the magnitude
    # abs_sobelx = np.absolute(sobelx)
    # abs_sobely = np.absolute(sobely)
    abs_sobelxy = np.sqrt(sobelx * sobelx + sobely * sobely)
    # 4) Scale to 8-bit (0 - 255) and convert to type = np.uint8
    scaled_sobelxy = np.uint8(abs_sobelxy/np.max(abs_sobelxy) * 255)
    # 5) Create a binary mask where mag thresholds are met
    binary_output = np.zeros_like(scaled_sobelxy)
    binary_output[(scaled_sobelxy >= mag_thresh[0]) & (scaled_sobelxy <= mag_thresh[1])] = 1
    # 6) Return this mask as your binary_output image
    return binary_output


def absSobelThreshold(img, orient='x', thresh_min=0, thresh_max=255):
    # Convert to grayscale
    gray = cv2.cvtColor(img, cv2.COLOR_RGB2GRAY)
    # Apply x or y gradient with the OpenCV Sobel() function
    # and take the absolute value
    if orient == 'x':
        abs_sobel = np.absolute(cv2.Sobel(gray, cv2.CV_64F, 1, 0))
    if orient == 'y':
        abs_sobel = np.absolute(cv2.Sobel(gray, cv2.CV_64F, 0, 1))
    # Rescale back to 8 bit integer
    scaled_sobel = np.uint8(255*abs_sobel/np.max(abs_sobel))
    # Create a copy and apply the threshold
    # binary_output = np.zeros_like(scaled_sobel)
    # Here I'm using inclusive (>=, <=) thresholds, but exclusive is ok too
    # binary_output[(scaled_sobel >= thresh_min) & (scaled_sobel <= thresh_max)] = 1

    # Return the result
    return scaled_sobel


# Lab蓝黄通道划分函数
def labBSelect(img, thresh=(215, 255)):
    # 1) Convert to LAB color space
    lab = cv2.cvtColor(img, cv2.COLOR_BGR2Lab)
    lab_b = lab[:, :, 2]
    # don't normalize if there are no yellows in the image
    if np.max(lab_b) > 100:
        lab_b = lab_b*(255/np.max(lab_b))
    # 2) Apply a threshold to the L channel
    binary_output = np.zeros_like(lab_b)
    binary_output[((lab_b > thresh[0]) & (lab_b <= thresh[1]))] = 255
    # 3) Return a binary image of threshold result
    return binary_output


# Step 5 : 矩形滑窗 Detect lane lines through moving window
# Step 5 : Detect lane lines through moving window
#################################################################
def find_lane_pixels(binary_warped, nwindows, margin, minpix):
    # Take a histogram of the bottom half of the image
    histogram = np.sum(binary_warped[binary_warped.shape[0]//2:, :], axis=0)
    # Create an output image to draw on and visualize the result
    out_img = np.dstack((binary_warped, binary_warped, binary_warped))
    # Find the peak of the left and right halves of the histogram
    # These will be the starting point for the left and right lines
    midpoint = np.int(histogram.shape[0]//2)
    leftx_base = np.argmax(histogram[:midpoint])
    rightx_base = np.argmax(histogram[midpoint:]) + midpoint

    # Set height of windows - based on nwindows above and image shape
    window_height = np.int(binary_warped.shape[0]//nwindows)
    # Identify the x and y positions of all nonzero pixels in the image
    nonzero = binary_warped.nonzero()
    nonzeroy = np.array(nonzero[0])
    nonzerox = np.array(nonzero[1])
    # Current positions to be updated later for each window in nwindows
    leftx_current = leftx_base
    rightx_current = rightx_base

    # Create empty lists to receive left and right lane pixel indices
    left_lane_inds = []
    right_lane_inds = []

    # Step through the windows one by one
    for window in range(nwindows):
        # Identify window boundaries in x and y (and right and left)
        win_y_low = binary_warped.shape[0] - (window+1)*window_height
        win_y_high = binary_warped.shape[0] - window*window_height
        win_xleft_low = leftx_current - margin
        win_xleft_high = leftx_current + margin
        win_xright_low = rightx_current - margin
        win_xright_high = rightx_current + margin

        # Draw the windows on the visualization image
        cv2.rectangle(out_img, (win_xleft_low, win_y_low),
        (win_xleft_high, win_y_high), (0, 255, 0), 2)
        cv2.rectangle(out_img, (win_xright_low, win_y_low),
        (win_xright_high, win_y_high), (0, 255, 0), 2)

        # Identify the nonzero pixels in x and y within the window #
        good_left_inds = ((nonzeroy >= win_y_low) & (nonzeroy < win_y_high) &
        (nonzerox >= win_xleft_low) & (nonzerox < win_xleft_high)).nonzero()[0]
        good_right_inds = ((nonzeroy >= win_y_low) & (nonzeroy < win_y_high) &
        (nonzerox >= win_xright_low) & (nonzerox < win_xright_high)).nonzero()[0]

        # Append these indices to the lists
        left_lane_inds.append(good_left_inds)
        right_lane_inds.append(good_right_inds)

        # If you found > minpix pixels, recenter next window on their mean position
        if len(good_left_inds) > minpix:
            leftx_current = np.int(np.mean(nonzerox[good_left_inds]))
        if len(good_right_inds) > minpix:
            rightx_current = np.int(np.mean(nonzerox[good_right_inds]))

    # Concatenate the arrays of indices (previously was a list of lists of pixels)
    try:
        left_lane_inds = np.concatenate(left_lane_inds)
        right_lane_inds = np.concatenate(right_lane_inds)
    except ValueError:
        # Avoids an error if the above is not implemented fully
        pass

    # Extract left and right line pixel positions
    leftx = nonzerox[left_lane_inds]
    lefty = nonzeroy[left_lane_inds]
    rightx = nonzerox[right_lane_inds]
    righty = nonzeroy[right_lane_inds]

    return leftx, lefty, rightx, righty, out_img


def fit_polynomial(binary_warped, nwindows=9, margin=100, minpix=50):
    # Find our lane pixels first
    leftx, lefty, rightx, righty, out_img = find_lane_pixels(
        binary_warped, nwindows, margin, minpix)

    # Fit a second order polynomial to each using `np.polyfit`
    left_fit = np.polyfit(lefty, leftx, 2)
    right_fit = np.polyfit(righty, rightx, 2)

    # Generate x and y values for plotting
    ploty = np.linspace(0, binary_warped.shape[0]-1, binary_warped.shape[0])
    try:
        left_fitx = left_fit[0]*ploty**2 + left_fit[1]*ploty + left_fit[2]
        right_fitx = right_fit[0]*ploty**2 + right_fit[1]*ploty + right_fit[2]
    except TypeError:
        # Avoids an error if `left` and `right_fit` are still none or incorrect
        print('The function failed to fit a line!')
        left_fitx = 1*ploty**2 + 1*ploty
        right_fitx = 1*ploty**2 + 1*ploty

    # Visualization #
    # Colors in the left and right lane regions
    out_img[lefty, leftx] = [255, 0, 0]
    out_img[righty, rightx] = [0, 0, 255]

    # Plots the left and right polynomials on the lane lines
    # plt.plot(left_fitx, ploty, color='yellow')
    # plt.plot(right_fitx, ploty, color='yellow')

    return out_img, left_fit, right_fit, ploty


# Step 6 : Track lane lines based latest lane line result
#################################################################
def fit_poly(img_shape, leftx, lefty, rightx, righty):
    # ## TO-DO: Fit a second order polynomial to each with np.polyfit() ###
    left_fit = np.polyfit(lefty, leftx, 2)
    right_fit = np.polyfit(righty, rightx, 2)
    # Generate x and y values for plotting
    ploty = np.linspace(0, img_shape[0]-1, img_shape[0])
    # ## TO-DO: Calc both polynomials using ploty, left_fit and right_fit ###
    left_fitx = left_fit[0]*ploty**2 + left_fit[1]*ploty + left_fit[2]
    right_fitx = right_fit[0]*ploty**2 + right_fit[1]*ploty + right_fit[2]

    return left_fitx, right_fitx, ploty, left_fit, right_fit


def search_around_poly(binary_warped, left_fit, right_fit):
    # HYPERPARAMETER
    # Choose the width of the margin around the previous polynomial to search
    # The quiz grader expects 100 here, but feel free to tune on your own!
    margin = 60

    # Grab activated pixels
    nonzero = binary_warped.nonzero()
    nonzeroy = np.array(nonzero[0])
    nonzerox = np.array(nonzero[1])

    # ## TO-DO: Set the area of search based on activated x-values ###
    # ## within the +/- margin of our polynomial function ###
    # ## Hint: consider the window areas for the similarly named variables ###
    # ## in the previous quiz, but change the windows to our new search area ###
    left_lane_inds = ((nonzerox > (left_fit[0]*(nonzeroy**2) + left_fit[1]*nonzeroy +
                    left_fit[2] - margin)) & (nonzerox < (left_fit[0]*(nonzeroy**2) +
                    left_fit[1]*nonzeroy + left_fit[2] + margin)))
    right_lane_inds = ((nonzerox > (right_fit[0]*(nonzeroy**2) + right_fit[1]*nonzeroy +
                    right_fit[2] - margin)) & (nonzerox < (right_fit[0]*(nonzeroy**2) +
                    right_fit[1]*nonzeroy + right_fit[2] + margin)))

    # Again, extract left and right line pixel positions
    leftx = nonzerox[left_lane_inds]
    lefty = nonzeroy[left_lane_inds]
    rightx = nonzerox[right_lane_inds]
    righty = nonzeroy[right_lane_inds]

    # Fit new polynomials
    left_fitx, right_fitx, ploty, left_fit, right_fit = fit_poly(binary_warped.shape, leftx, lefty, rightx, righty)

    # # Visualization # #
    # Create an image to draw on and an image to show the selection window
    out_img = np.dstack((binary_warped, binary_warped, binary_warped))*255
    window_img = np.zeros_like(out_img)
    # Color in left and right line pixels
    out_img[nonzeroy[left_lane_inds], nonzerox[left_lane_inds]] = [255, 0, 0]
    out_img[nonzeroy[right_lane_inds], nonzerox[right_lane_inds]] = [0, 0, 255]

    # 根据每条拟合曲线偏移得到左右两条拟合曲线,随后进行填充 right_line_pts维度为(1,1440,2)
    # Generate a polygon to illustrate the search window area
    # And recast the x and y points into usable format for cv2.fillPoly()
    left_line_window1 = np.array([np.transpose(np.vstack([left_fitx-margin, ploty]))])
    left_line_window2 = np.array([np.flipud(np.transpose(np.vstack([left_fitx+margin,
                              ploty])))])
    left_line_pts = np.hstack((left_line_window1, left_line_window2))
    right_line_window1 = np.array([np.transpose(np.vstack([right_fitx-margin, ploty]))])
    right_line_window2 = np.array([np.flipud(np.transpose(np.vstack([right_fitx+margin,
                              ploty])))])
    right_line_pts = np.hstack((right_line_window1, right_line_window2))

    # 将曲线围成的区域画出来,window_img为绿色阴影
    cv2.fillPoly(window_img, np.int_([left_line_pts]), (0, 255, 0))
    cv2.fillPoly(window_img, np.int_([right_line_pts]), (0, 255, 0))
    result = cv2.addWeighted(out_img, 1, window_img, 0.3, 0)

    # 绘制拟合曲线 Plot the polynomial lines onto the image
    # plt.plot(left_fitx, ploty, color='yellow')
    # plt.plot(right_fitx, ploty, color='yellow')
    # plt.show()
    # # End visualization steps # #

    return result, left_fit, right_fit, ploty


# Step 7 : 曲率与偏移量计算
#################################################################
def measure_curvature_real(
    left_fit_cr, right_fit_cr, ploty,
    ym_per_pix=30/720, xm_per_pix=3.7/700):
    '''
    Calculates the curvature of polynomial functions in meters.
    '''
    # Define y-value where we want radius of curvature
    # We'll choose the maximum y-value, corresponding to the bottom of the image
    y_eval = np.max(ploty)

    # Calculation of R_curve (radius of curvature)
    left_curverad = ((1 + (2*left_fit_cr[0]*y_eval*ym_per_pix + left_fit_cr[1])**2)**1.5) / np.absolute(2*left_fit_cr[0])
    right_curverad = ((1 + (2*right_fit_cr[0]*y_eval*ym_per_pix + right_fit_cr[1])**2)**1.5) / np.absolute(2*right_fit_cr[0])

    left_position = left_fit_cr[0]*720 + left_fit_cr[1]*720 + left_fit_cr[2]
    right_position = right_fit_cr[0]*720 + right_fit_cr[1]*720 + right_fit_cr[2]
    midpoint = 1280/2
    lane_center =(left_position + right_position)/2
    offset = (midpoint - lane_center) * xm_per_pix

    return left_curverad, right_curverad, offset


# Step 8 : Draw lane line result on undistorted image
#################################################################
# 不同于step7的左右线2个填充,这里只有一个填充,并逆投影到原图
def drawing(undist, bin_warped, color_warp, left_fitx, right_fitx, ploty, Minv):
    # Create an image to draw the lines on
    warp_zero = np.zeros_like(bin_warped).astype(np.uint8)
    color_warp = np.dstack((warp_zero, warp_zero, warp_zero))

    # Recast the x and y points into usable format for cv2.fillPoly()
    pts_left = np.array([np.transpose(np.vstack([left_fitx, ploty]))])
    pts_right = np.array([np.flipud(np.transpose(np.vstack([right_fitx, ploty])))])
    pts = np.hstack((pts_left, pts_right))

    # Draw the lane onto the warped blank image
    cv2.fillPoly(color_warp, np.int_([pts]), (0, 255, 0))

    # Warp the blank back to original image space using inverse perspective matrix (Minv)
    newwarp = cv2.warpPerspective(color_warp, Minv, (undist.shape[1], undist.shape[0]))
    # Combine the result with the original image
    result = cv2.addWeighted(undist, 1, newwarp, 0.3, 0)
    return result


def draw_text(image, curverad, offset):
    result = np.copy(image)
    font = cv2.FONT_HERSHEY_SIMPLEX  # 使用默认字体
    text = 'Curve Radius : ' + '{:04.2f}'.format(curverad) + 'm'
    cv2.putText(result, text, (20, 50), font, 1.2, (255, 255, 255), 2)
    if offset > 0:
        text = 'right of center : ' + '{:04.3f}'.format(abs(offset)) + 'm '
    else:
        text = 'left  of center : ' + '{:04.3f}'.format(abs(offset)) + 'm '
    cv2.putText(result, text, (20, 100), font, 1.2, (255, 255, 255), 2)
    return result


# 车道线检测总函数(调用以上函数进行车道线检测)
def detection_line_2(img, mtx, dist):
    test_distort_image = img

    # Step 2 畸变修正
    test_undistort_image = undistortImage(test_distort_image, mtx, dist)

    # Step 3 透视变换
    # “不断调整src和dst的值,确保在直线道路上,能够调试出满意的透视变换图像”
    # 左图梯形区域的四个端点
    src = np.float32([[580, 440], [700, 440], [1100, 720], [200, 720]])
    # 右图矩形区域的四个端点
    dst = np.float32([[300, 0], [950, 0], [950, 720], [300, 720]])

    # 变换,得到变换后的结果图,类似俯视图
    test_warp_image, M, Minv = warpImage(test_undistort_image, src, dst)

    # Step 4 提取车道线
    hlsL_binary = hlsLSelect(test_warp_image)
    labB_binary = labBSelect(test_warp_image)
    combined_line_img = np.zeros_like(hlsL_binary)
    combined_line_img[(hlsL_binary == 255) | (labB_binary == 255)] = 255

    # Step 5 矩形滑窗
    out_img, left_fit, right_fit, ploty = fit_polynomial(combined_line_img, nwindows=9, margin=80, minpix=40)

    # Step 6 跟踪车道线
    track_result, track_left_fit, track_right_fit, plotys,  = search_around_poly(combined_line_img, left_fit, right_fit)

    # Step 7 求取曲率与偏移量
    left_curverad, right_curverad, offset = measure_curvature_real(track_left_fit, track_right_fit, plotys)
    average_curverad = (left_curverad + right_curverad)/2
    # print(left_curverad, 'm', right_curverad, 'm', average_curverad, 'm')
    # print('offset : ', offset, 'm')

    # Step 8 逆投影到原图
    left_fitx = track_left_fit[0]*ploty**2 + track_left_fit[1]*ploty + track_left_fit[2]
    right_fitx = track_right_fit[0]*ploty**2 + track_right_fit[1]*ploty + track_right_fit[2]
    result = drawing(test_undistort_image, combined_line_img, test_warp_image, left_fitx, right_fitx, ploty, Minv)
    text_result = draw_text(result, average_curverad, offset)
    return text_result
代码文件:main.py
import cv2
import sys
from PyQt5.QtWidgets import QApplication, QMainWindow, QFileDialog
from PyQt5.QtGui import QImage, QPixmap
from gui import *
from counter import CounterThread


class App(QMainWindow, Ui_mainWindow):
    def __init__(self):
        super(App, self).__init__()
        self.setupUi(self)
        self.label_image_size = (self.label_image.geometry().width(), self.label_image.geometry().height())
        self.video = None

        # button function
        self.pushButton_openVideo.clicked.connect(self.open_video)
        self.pushButton_start.clicked.connect(self.start_stop)
        self.pushButton_pause.clicked.connect(self.pause)
        self.pushButton_start.setEnabled(False)
        self.pushButton_pause.setEnabled(False)

        # some flags
        self.running_flag = 0
        self.pause_flag = 0

        #
        self.counterThread = CounterThread()
        self.counterThread.sin_Result.connect(self.show_image_label)

    # 打开视频文件
    def open_video(self):
        openfile_name = QFileDialog.getOpenFileName(self, 'Open video', '', 'Video files(*.avi , *.mp4)')
        self.videoList = [openfile_name[0]]
        vid = cv2.VideoCapture(self.videoList[0])

        # 只显示,不进行视频播放
        while vid.isOpened():
            ret, frame = vid.read()
            if ret:
                self.show_image_label(frame)
                vid.release()
                break

        # 启动Start和Pause按键
        self.pushButton_start.setText("Start")
        self.pushButton_start.setEnabled(True)
        self.pushButton_pause.setText("Pause")
        self.pushButton_pause.setEnabled(True)

    # 开始播放与停止按键
    def start_stop(self):
        # 播放
        if self.running_flag == 0:
            # start
            self.running_flag = 1
            self.pause_flag = 0
            self.pushButton_start.setText("Stop")
            self.pushButton_openVideo.setEnabled(False)

            # emit new parameter to counter thread
            self.counterThread.sin_runningFlag.emit(self.running_flag)
            self.counterThread.sin_videoList.emit(self.videoList)
            # start counter thread
            self.counterThread.start()
            self.pushButton_pause.setEnabled(True)

        # 停止
        elif self.running_flag == 1:  # push pause button
            # stop system
            self.running_flag = 0
            self.counterThread.sin_runningFlag.emit(self.running_flag)
            self.pushButton_openVideo.setEnabled(True)
            self.pushButton_start.setText("Start")

    # 暂停播放与继续按键
    def pause(self):
        if self.pause_flag == 0:
            self.pause_flag = 1
            self.pushButton_pause.setText("Continue")
            self.pushButton_start.setEnabled(False)

        else:
            self.pause_flag = 0
            self.pushButton_pause.setText("Pause")
            self.pushButton_start.setEnabled(True)

        self.counterThread.sin_pauseFlag.emit(self.pause_flag)

    # 画面显示
    def show_image_label(self, img_np):
        img_np = cv2.cvtColor(img_np, cv2.COLOR_BGR2RGB)
        img_np = cv2.resize(img_np, self.label_image_size)
        frame = QImage(img_np, self.label_image_size[0], self.label_image_size[1], QImage.Format_RGB888)
        pix = QPixmap.fromImage(frame)
        self.label_image.setPixmap(pix)
        self.label_image.repaint()


if __name__ == '__main__':
    app = QApplication(sys.argv)
    myWin = App()
    myWin.show()
    sys.exit(app.exec_())
代码资源链接:
链接:https://pan.baidu.com/s/179T1XQ8IS0TwY1BmvDch0Q
提取码:i2wh
代码参考:https://github.com/wsh122333/Multi-type_vehicles_flow_statistics