文章目录
一、列表渲染
1. v-for 指令:用于循环。
- 用于展示列表数据。
- 语法:
v-for="(item, index) in xxx" :key="yyy"。- 可遍历:数组、对象、字符串(用得少)、指定次数(用得少)。
遍历数组
- p.id:遍历出所有人员的 id
- index:索引。
	<div id="root">
        <h3>人员列表(遍历数组)</h3>
        <ul>
            <li v-for="(p, index) in persons" :key="index">{

    {

    p.id}} - {

    {

    p.name}} - {

    {

    p.age}}</li>
        </ul>
    </div>

	const vm = new Vue({


        el: '#root',
        data: function () {


            return {


                persons: [
                    {

    id: 1, name: '张三', age: 18},
                    {

    id: 2, name: '李四', age: 19},
                    {

    id: 3, name: '王五', age: 20}
                ]
            }
        }
    })

遍历对象:注意遍历时的写法
(value, k) in xxx
- value:值。
- k:键。
	<div id="root">
        <h3>汽车信息(遍历对象)</h3>
        <ul>
            <li v-for="(value, k) in car" :key="k">{

    {

    k}} - {

    {

    value}}</li>
        </ul>
    </div>

	const vm = new Vue({


        el: '#root',
        data: function () {


            return {


                car:{


                    name: 'BMW',
                    price: '60w',
                    color: 'skyblue'
                }
            }
        }
    })

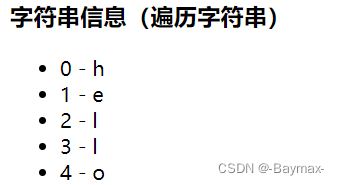
遍历字符串(很少用)
- char:每个字符。
- index:索引。
	<div id="root">
        <h3>字符串信息(遍历字符串)</h3>
        <ul>
            <li v-for="(char, index) in str" :key="index">{

    {

    index}} - {

    {

    char}}</li>
        </ul>
    </div>

	const vm = new Vue({


        el: '#root',
        data: function () {


            return {


                str: 'hello'
            }
        }
    })
遍历指定次数(很少用)
- number:每一个数字。
- index:索引。
	<div id="root">
        <h3>遍历指定次数(很少用)</h3>
        <ul>
            <li v-for="(number, index) in 4" :key="index">{

    {

    index}} - {

    {

    number}}</li>
        </ul>
    </div>

	const vm = new Vue({


        el: '#root',
        data: function () {


            return {


            }
        }
    })

2. key 的原理
- key 的作用:
- key 是虚拟 DOM 对象的标识,当数据发生变化时,Vue 会根据【新数据】生成【新的虚拟DOM】。
- 随后Vue进行【新虚拟DOM】与【旧虚拟DOM】的差异比较。
- 对比规则:
- 旧虚拟 DOM 中找到了与新虚拟 DOM 相同的 key:
(1)若虚拟 DOM 中内容没变,直接使用之前的真实 DOM。
(2)若虚拟 DOM 中内容改变了,则生成新的真实 DOM,随后替换掉页面中之前的真实 DOM。- 旧虚拟 DOM 中未找到与新虚拟 DOM 相同的 key:
(1)创建新的真实DOM,随后渲染到页面。
- 用 index 作为 key 可能会引发的问题。
- 若对数据进行:逆序添加、逆序删除等破坏顺序操作:会产生没有必要的真实DOM更新 ==>界面效果没问题,但效率低。
- 如果结构中还包含输入类的DOM:会产生错误DOM更新 ==> 界面有问题。
- 开发中如何选择 key?
- 最好使用每条数据的唯一表示作为 key,比如 id、手机号、身份证号、学号等唯一值。
- 如果不存在对数据的逆序添加、逆序删除等破坏顺序操作,仅用于渲染列表用于展示, 使用 index 作为 key 是没有问题的。
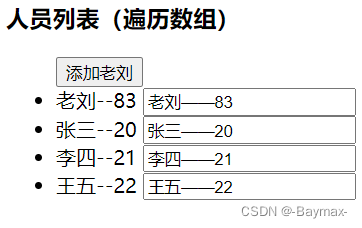
实例:通过 id 唯一标识符,添加成员
扫描二维码关注公众号,回复: 14248989 查看本文章
	<div id="root">
        <h3>人员列表(遍历数组)</h3>
        <ul>
            <button @click.once="add">添加老刘</button>
            <li v-for="(p, index) in persons" :key="p.id">
                {

    {

    p.name}}--{

    {

    p.age}}
                <input type="text" :value=`${

      p.name}——${

      p.age}`>
            </li>
        </ul>
    </div>

	const vm = new Vue({


        el: '#root',
        data: function () {


            return {


                persons:[
                    {

    id: 1, name: '张三', age: 20},
                    {

    id: 2, name: '李四', age: 21},
                    {

    id: 3, name: '王五', age: 22},
                ]
            }
        },
        methods:{


            add(){


                const p = {

    id: 4, name: '老刘', age: 83}
                this.persons.unshift(p)
            }
        }
    })
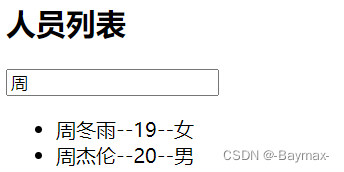
3. 列表过滤
实例:输入框输入信息,过滤出有其中关键字的人员信息。
(计算属性实现)
- 在计算属性中
filPersons是一个函数,返回出来过滤的结果。
	<div id="root">
        <h2>人员列表</h2>
        <input type="text" placeholder="请输入名字" v-model="keyWord">
        <ul>
            <li v-for="(p, index) in filPersons" :key="index">
                {

    {

    p.name}}--{

    {

    p.age}}--{

    {

    p.sex}}
            </li>
        </ul>
    </div>

	const vm = new Vue({


        el:'#root',
        data:{


            keyWord:'',
            persons:[
                {

    id:'001',name:'马冬梅',age:18,sex:'女'},
                {

    id:'002',name:'周冬雨',age:19,sex:'女'},
                {

    id:'003',name:'周杰伦',age:20,sex:'男'},
                {

    id:'004',name:'温兆伦',age:21,sex:'男'},
            ],
        },
        computed:{


            filPersons(){


                return this.persons.filter(p => p.name.includes(this.keyWord.trim()))
                })
            }
        }
    })
(监听方法实现)
- 在监听方法中
filPersons是一个数组,把过滤出来的信息放到数组里。
	<div id="root">
        <h3>人员列表(遍历数组)</h3>
        <input type="text" placeholder="请输入名字" v-model="keyWord">
        <ul>
            <li v-for="(p, index) in filPersons">
                {

    {

    p.name}} - {

    {

    p.age}} - {

    {

    p.sex}}
            </li>
        </ul>
    </div>

	const vm = new Vue({


        el: '#root',
        data: function () {


            return {


                keyWord: '',
                persons:[
                    {

    id:'001',name:'马冬梅',age:18,sex:'女'},
                    {

    id:'002',name:'周冬雨',age:19,sex:'女'},
                    {

    id:'003',name:'周杰伦',age:20,sex:'男'},
                    {

    id:'004',name:'温兆伦',age:21,sex:'男'},
                ],
                filPersons:[]
            }
        },
        watch:{


            keyWord:{


                immediate:true, //初次打开页面呈现内容
                handler(val){


                    this.filPersons = this.persons.filter(p => p.name.includes(val.trim()))
                }
            }
        }
    })
初始状态:

查询:
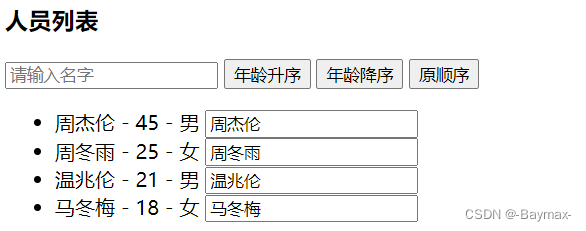
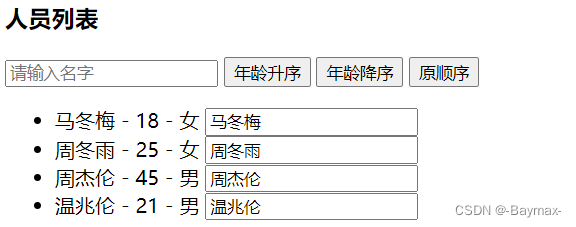
4. 列表排序
对成员按年龄升序、年龄降序和原顺序排序。
- 先把过滤出来的信息放进数组。
- 利用三元表达式,对数组进行按需排序。
- 注意:添加点击事件的条件
'sortType = n'不是===
	<div id="root">
        <h3>人员列表</h3>
        <input type="text" placeholder="请输入名字" v-model="keyWord">
        <button @click="sortType = 2">年龄升序</button>
        <button @click="sortType = 1">年龄降序</button>
        <button @click="sortType = 0">原顺序</button>
        <ul>
            <li v-for="(p, index) in filPersons" :key="p.id">
                {

    {

    p.name}} - {

    {

    p.age}} - {

    {

    p.sex}}
                <input type="text">
            </li>
        </ul>
    </div>

	const vm = new Vue({


        el: '#root',
        data: function () {


            return {


                keyWord: '',
                sortType: 0,
                persons:[
                    {

    id:'001',name:'马冬梅',age:18,sex:'女'},
                    {

    id:'002',name:'周冬雨',age:25,sex:'女'},
                    {

    id:'003',name:'周杰伦',age:45,sex:'男'},
                    {

    id:'004',name:'温兆伦',age:21,sex:'男'},
                ],
            }
        },
        computed:{


            filPersons(){


                const arr = this.persons.filter(p => p.name.includes(this.keyWord))
                if(this.sortType){


                    arr.sort((p1, p2) => {


                        return this.sortType === 2 ? p1.age - p2.age : p2.age - p1.age
                    })
                }
                return arr
            }
        }
    })
年龄升序:
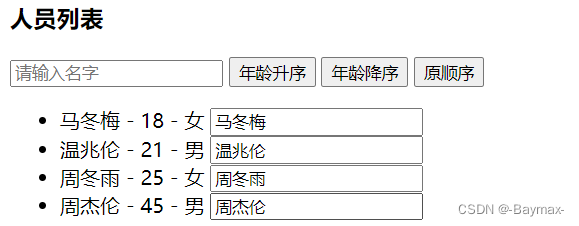
年龄降序:
原顺序:
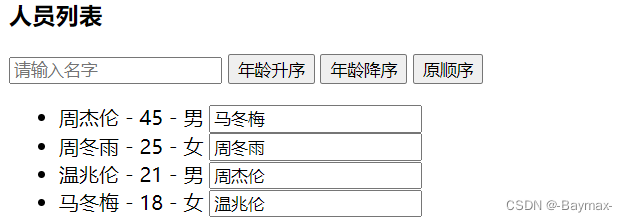
注意:如果
:key='index',即以索引为唯一值的话,就会出现以下情况。(所对应文本框内容不会跟随着前面顺序的变化而变化)
5. 列表更新(两种方法)
方法一:一个个改进来。
注意:如果用以下写法写,不奏效
	this.person[0] = {

    id:'001', name:'马老师', age:50,sex:'男'}
	<div id="root">
        <h3>人员列表</h3>
        <input type="text" placeholder="请输入名字" v-model="keyWord">
        <button @click="updatedMei">更新马冬梅信息</button>
        <ul>
            <li v-for="(p, index) in filPersons" :key="index">
                {

    {

    p.name}} - {

    {

    p.age}} - {

    {

    p.sex}}
            </li>
        </ul>
    </div>

	const vm = new Vue({


        el: '#root',
        data: function () {


            return {


                keyWord: '',
                sortType: 0,
                persons:[
                    {

    id:'001',name:'马冬梅',age:18,sex:'女'},
                    {

    id:'002',name:'周冬雨',age:25,sex:'女'},
                    {

    id:'003',name:'周杰伦',age:45,sex:'男'},
                    {

    id:'004',name:'温兆伦',age:21,sex:'男'},
                ],
            }
        },
        methods:{


            updatedMei(){


                this.persons[0].name = '马老师',
                this.persons[0].age = 50,
                this.persons[0].sex = '男'
            }
        },
        computed:{


            filPersons(){


                return this.persons.filter(p => p.name.includes(this.keyWord))
            }
        }
    })
点击更新马冬梅信息:

方法二:使用
splice()方法,删除添加。
	updateMei(){


        this.persons.splice(0,1,{

    id:'001',name:'马老师',age:50,sex:'男'})
    }
6. Vue.set 的使用
- Vue.set():向响应式对象中添加一个 property,并确保这个新 property 同样是响应式的,且触发视图更新。它必须用于向响应式对象上添加新 property,因为 Vue 无法探测普通的新增 property (比如
this.myObject.newProperty = 'hi')
Vue.set( target, propertyName/index, value )
- target:要更改的数据源(可以是对象或者数组)
- key:要更改的具体数据
- value :重新赋的值
注意:对象不能是 Vue 实例,或者 Vue 实例的根数据对象。
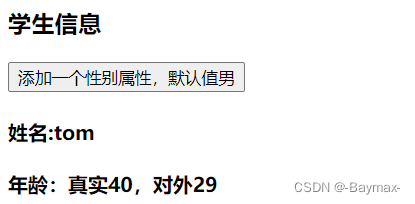
	<div id="root">
        <h1>学生信息</h1>
        <button @click="addSex">添加一个性别属性,默认值男</button>
        <h2>姓名:{

    {

    student.name}}</h2>
        <h2 v-if="student.sex">性别:{

    {

    student.sex}}</h2>
        <h2>年龄:真实{

    {

    student.age.rAge}},对外{

    {

    student.age.sAge}}</h2>
    </div>

	const vm = new Vue({


        el: '#root',
        data: function () {


            return {


                student: {


                    name: 'tom',
                    age: {


                        rAge: 40,
                        sAge: 29,
                    },
                }
            }
        },
        methods: {


            addSex() {


                Vue.set(this.student,'sex','男')
                // this.$set(this.student, 'sex', '男')
            }
        }
    })

7. 总结 vue 监听数据的原理
- vue会监视 data 中所有层次的数据。
- 如何检测对象中的数据?
通过 setter 实现监视,且要在 new Vue 时就传入要检测的数据。
- 对象中后追加的属性,Vue默认不做响应式处理。
- 如需给后添加的属性做响应式,请使用如下API:
(1)Vue.set(target.propertyName/index.value)或
(2)vm.$set(target.propertyName/index.value)
- 如何检测数组中的数据?
通过包裹数组更新元素的方法实现,本质就是做了两件事:
- 调用原生对应的方法对数组进行更新。
- 重新解析模板,进而更新页面。
- 在 Vue 修改数组中的某些元素一定要用如下方法:
- 使用这些API:push()、pop()、shift()、unshift()、splice()、sort()、reverse()
- Vue.set() 或 vm.$set()
- 特别注意:Vue.set() 和 vm.$set 不能给vm 或 vm的根数据对象 添加属性!!
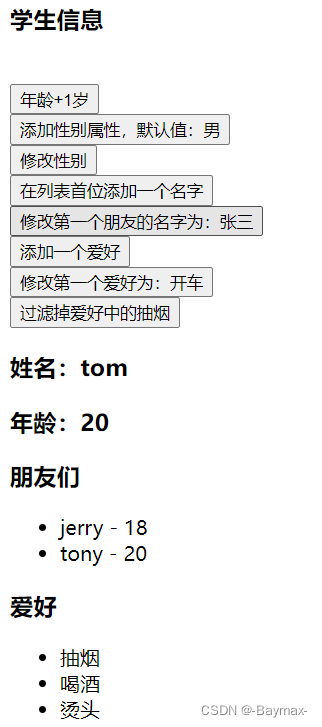
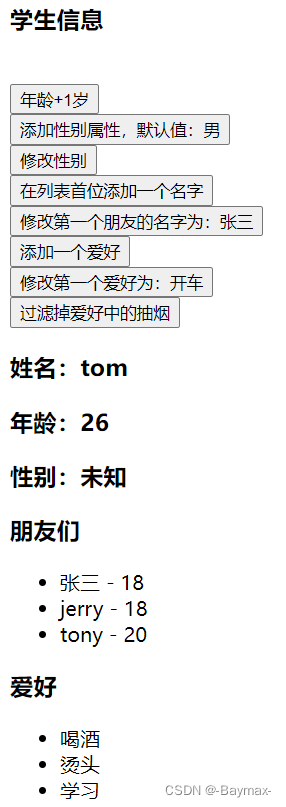
8. 总结练习
	<div id="root">
        <h3>学生信息</h3><br/>
        <button @click="student.age++">年龄+1岁</button><br/>
        <button @click="addSex">添加性别属性,默认值:男</button><br/>
        <button @click="changeSex">修改性别</button><br/>
        <button @click.once="addStudent">在列表首位添加一个名字</button><br/>
        <button @click="updateFirstName">修改第一个朋友的名字为:张三</button><br/>
        <button @click.once="addHobby">添加一个爱好</button><br/>
        <button @click="updateFirstHobby">修改第一个爱好为:开车</button><br/>
        <button @click.once="deleteFirstHobby">过滤掉爱好中的抽烟</button><br/>
        <h3>姓名:{

    {

    student.name}}</h3>
        <h3>年龄:{

    {

    student.age}}</h3>
        <h3 v-if="student.sex">性别:{

    {

    student.sex}}</h3>
        <h3>朋友们</h3>
        <ul>
            <li v-for="(friend) of student.friends" :key="friend.name">
                {

    {

    friend.name}} - {

    {

    friend.age}}
            </li>
        </ul>
        <h3>爱好</h3>
        <ul>
            <li v-for="(hobby) of student.hobbies" :key="hobby">
                {

    {

    hobby}}
            </li>
        </ul>
    </div>

	const vm = new Vue({


        el: '#root',
        data: function () {


            return {


                student:{


                    name: 'tom',
                    age: 20,
                    sex: '',
                    friends: [
                        {

    name: 'jerry', age: 18},
                        {

    name: 'tony', age: 20}
                    ],
                    hobbies: ['抽烟','喝酒','烫头']
                    }
            }
        },
        methods: {


            addSex(){


                Vue.set(this.student,'sex','男')
            },
            changeSex(){


                this.student.sex = '未知'
            },
            addStudent(){


                this.student.friends.unshift({

    name: 'mike', age: 22})
            },
            updateFirstName(){


                this.student.friends.splice(0, 1 , {

    name: '张三', age: 18})
            },
            addHobby(){


                this.student.hobbies.push('学习')
            },
            updateFirstHobby(){


                this.student.hobbies.splice(0, 1, '开车')
            },
            deleteFirstHobby(){


                this.student.hobbies.shift()
            }
        }
    })
初始页面
点击所有按钮后页面:
二、收集表单数据
<input type="text">
v-model收集的是value值,用户输入的就是value值。
<input type="radio">
v-model收集的是value值,且要给标签配置value值。
<input type="checkbox">
- 没有配置
input的value属性,那么收集的就是checked(勾选 or 未勾选,是布尔值)- 配置input的value属性:
(1)v-model的初始值是非数组,那么收集的就是chenked(勾选 or 未勾选,是布尔值)
(2)v-model的初始值是数组,那么收集的就是value组成数组。
- 备注:v-model的三个修饰符:
lazy:失去焦点再收集数据。number:输入字符串转为有效的数字。trim:输入首尾空格过滤。
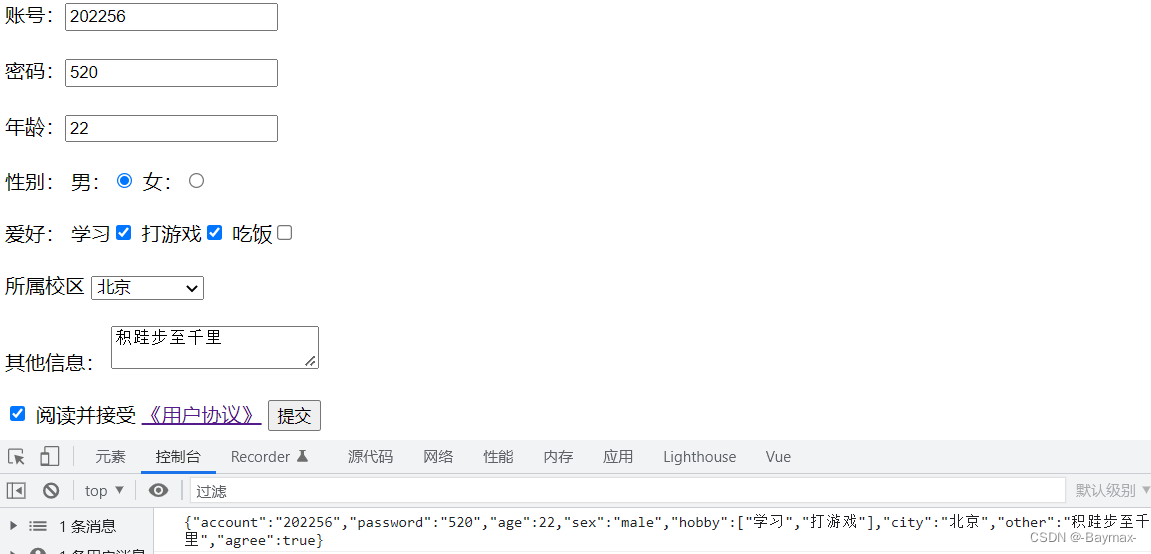
实例:把表单的数据收集起来,并且以 JSON 的形式打印输出。
	<div id="root">
        <form @submit.prevent="demo">
            账号:<input type="text" v-model.trim="userInfo.account"><br /><br />
            密码:<input type="text" v-model="userInfo.password"><br /><br />
            年龄:<input type="number" v-model.number="userInfo.age"><br /><br />
            性别:
            男:<input type="radio" name="sex" v-model="userInfo.sex" value="male">
            女:<input type="radio" name="sex" v-model="userInfo.sex" value="female"><br /><br />
            爱好:
            学习<input type="checkbox" v-model="userInfo.hobby" value="学习">
            打游戏<input type="checkbox" v-model="userInfo.hobby" value="打游戏">
            吃饭<input type="checkbox" v-model="userInfo.hobby" value="吃饭">
            <br /><br />
            所属校区
            <select v-model="userInfo.city">
                <option value="">请选择校区</option>
                <option value="北京">北京</option>
                <option value="上海">上海</option>
                <option value="深圳">深圳</option>
                <option value="青岛">青岛</option>
            </select><br /><br />
            其他信息:
            <textarea v-model.lazy="userInfo.other"></textarea><br /><br />
            <input type="checkbox" v-model="userInfo.agree">
            阅读并接受 <a href="javascript:;">《用户协议》</a>
            <button>提交</button>
        </form>
    </div>

	const vm = new Vue({


        el: '#root',
        data: {


            userInfo: {


                account: '',
                password: '',
                age: '',
                sex: 'female',
                hobby: [],
                city: '北京',
                other: '',
                agree: ''
            }
        },
        methods: {


            demo() {


                console.log(JSON.stringify(this.userInfo))
            }
        }
    })
积跬步至千里,积小流成江海