本专栏将从基础开始,循序渐进的讲解Vue的基本概念以及使用,希望大家都能够从中有所收获,也请大家多多支持。
专栏地址: Vue专栏
相关软件地址: 相关安装包地址
如果文章知识点有错误的地方,请指正!大家一起学习,一起进步。
文章目录
1 组件
1.1 组建的创建
- 新建组件
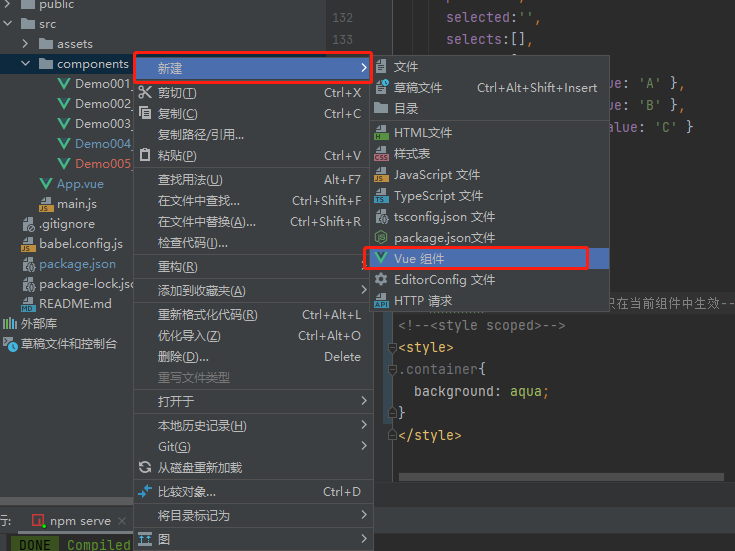
- 编写组件代码
- 使用组件

1.2 组件之间传递数据
1.2.1 通过props,父组件向子组件传递数据
父组件:
<vueTemplate mytitle="123"/>
子组件vueTemplate:
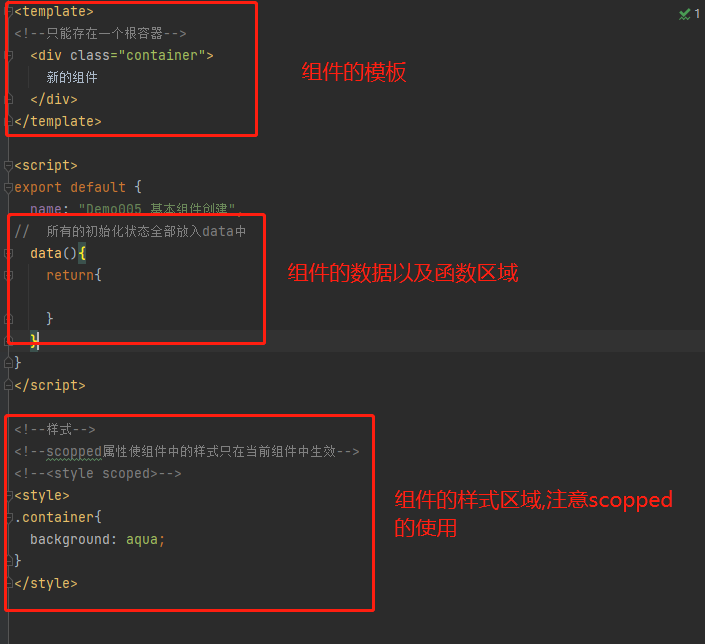
<template>
<!--只能存在一个根容器-->
  <div class="container">
    组件名:{

    {

    mytitle}}
  </div>
</template>

<script>
export default {


  name: "Demo005_基本组件创建",
  //props中的双引号不能少
  props:["mytitle"],
}
</script>
父组件:
    <vueTemplate :mytitle="mytitle"/>
data(){


    return{


      mytitle:{

    name:"父组件名称"}
    }
}
子组件vueTemplate:
<template>
<!--只能存在一个根容器-->
  <div class="container">
    组件名:{

    {

    mytitle}}
  </div>
</template>

<script>
export default {


  name: "Demo005_基本组件创建",
  //props中的双引号不能少
  props:["mytitle"],
}
</script>
- 传递多个属性,并设置属性默认值以及验证
父组件:
扫描二维码关注公众号,回复:
14189573 查看本文章

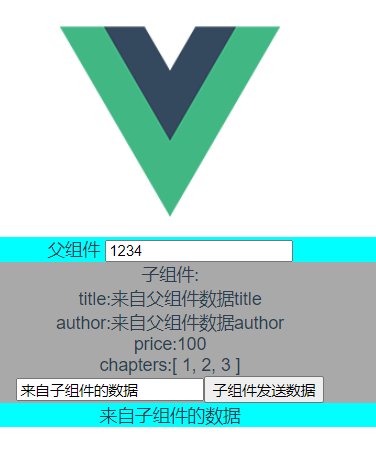
<template>
  <div class="parent">
    父组件
<!--    指定类型-->
<!--    输入与number类型绑定-->
    <input type="number" v-model.number="price"/>
    <!--    没有冒号:,传入的数据都是字符串类型,有冒号传递的是对象类型-->
    <child title="来自父组件数据title" author="来自父组件数据author"  :chapers="[1,2,3]" />
    {

    {

    msgFromChild}}
  </div>
</template>

<script>
import child from "./child";

export default {


  name: "parent",
  components: {


    child
  },
  methods:{


    getChildMsg(data){


      this.msgFromChild = data;
    }
  },
  data(){


    return{


      msgFromChild:"",
      price:0,
    }
  }

}
</script>
<style scoped>
.parent{


  background-color: aqua;
}
</style>
子组件:
<template>
  <div class="child">
    子组件:<br/>
    title:{

    {

    title}}<br/>
    author:{

    {

    author}}<br/>
    price:{

    {

    price}}<br/>
    chapters:{

    {

    chapers}}<br/>
    <input v-model="childMsg">
    <button @click = "sendMsg" type="button" name="button">子组件发送数据</button>
  </div>
</template>

<script>
export default {


  name: "child",
  //不指定类型
  // props:["title","author"],
  //指定类型,开发中一般都要指定类型
  props:{


    //表示title是必选项
    title:{


      type:String,
      required:true
    },
    author:String,
    //设置price的默认值
    price:{


      type:Number,
      default:100
    },
    //注意,默认值如果是数组或者对象,必须返回一个function
    chapers:{


      type:Array,
      default: function (){


        //如果是对象则返回{}
        return ['1','2']
      }
    }
  },
  methods:{


    sendMsg(){


      this.$emit("msg_sig",this.childMsg);
    }
  },
  data(){


    return{


      childMsg:"来自子组件的数据"
    }
  }
}
</script>

<style scoped>
.child{


  background-color: darkgray;
}
</style>
1.2.2 通过emit信号,子组件向父组件传递数据
- 子组件
<template>
<!--只能存在一个根容器-->
  <div class="container">
<!--    vmodel动态传递数据-->
    <input v-model="searchText">
    <button @click = "sendMsg" type="button" name="button">给父组件传递数据</button>
  </div>
</template>

export default {


  name: "Demo005_基本组件创建",
//  所有的初始化状态全部放入data中,data必须是一个函数
  data(){


    return{


      searchText:""
    }
  },
  methods:{


    sendMsg(){


      //第一个参数相当于信号名,第二个参数是发送的参数
      // this.$emit("getMsg","来自子组件的数据")
      //传递动态数据
      this.$emit("getMsg",this.searchText)
    }
  }
}
- 父组件
<template>
  <div id="app">
    <img alt="Vue logo" src="./assets/logo.png">
    {

    {

    msgOfSon}}
<!--    接收子组件的信号,将子组件发出的信号getMsg与父组件的函数getSonMsg绑定-->
    <vueTemplate @getMsg="getSonMsg" :mytitle="mytitle"/>
  </div>
</template>

<script>
import Demo005_基本组件创建 from "./components/Demo005_基本组件创建";

export default {


  name: 'App',
  components: {


    vueTemplate:Demo005_基本组件创建
  },
  methods:{


    getSonMsg(msg){


      this.msgOfSon = msg;
    }
  },
  data(){


    return{


      msgOfSon:"",
    }
  }
}
</script>
运行结果如下图所示:
1.3 使用component加载组件与keep-alive
非keep-alive演示如下图所示,可以看到切换回来时,状态没有保持:
keep-alive演示如下,可以看到切换回来时,状态是保持的:

- 创建A组件
<template>
<div>
  A
  <input/>
</div>
</template>

<script>
export default {


  name: "Demo006_A"
}
</script>

<style scoped>

</style>
- 创建B组件
<template>
<div>
  B
</div>
</template>

<script>
export default {
  name: "Demo006_B"
}
</script>

<style scoped>

</style>
- 加载
<template>
  <div id="app">
    <img alt="Vue logo" src="./assets/logo.png">
<!--    <ClassStyle/>-->
<!--    <ClacDemo/>-->
<!--    <FormDemo/>-->
<!--    基本数据-->
<!--    <vueTemplate mytitle="123"/>-->
<!--    复杂数据,数据可以是动态的-->
<!--    <vueTemplate :mytitle="mytitle"/>-->
<!--    {

    {

    msgOfSon}}-->
<!--    接收子组件的信号,将子组件发出的信号getMsg与父组件的函数getSonMsg绑定-->
<!--    <vueTemplate @getMsg="getSonMsg" :mytitle="mytitle"/>-->

<!--    keep-alive保证组件不重复渲染-->
    <keep-alive>
      <component v-bind:is="mycomponent"/>
    </keep-alive>

    <button @click = "changeComponent" type="button" name="button">改变组件</button>

  </div>
</template>

<script>
import Demo006_A from "./components/Demo006_A";
import Demo006_B from "./components/Demo006_B";

export default {


  name: 'App',
  components: {


  },
  methods:{


    changeComponent(){


      if(this.mycomponent == Demo006_A){


        this.mycomponent = Demo006_B
      }else{


        this.mycomponent = Demo006_A
      }
    }
  },
  data(){


    //注意:使用v-bind:is,组件应该放在data中
    return{


      //mycomponent,默认为Demo006_A
      mycomponent:Demo006_A,
    }
  }
}
</script>
1.4 组件深入
1.4.1 通过main.js添加全局变量
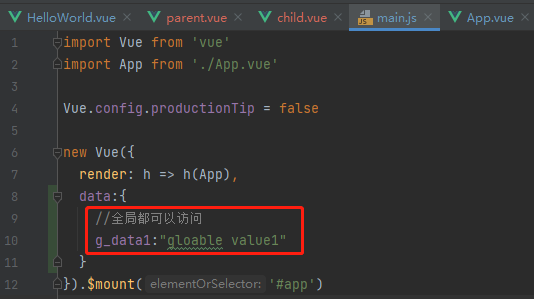
使用全局变量
//全局属性访问得从computed计算属性中读取
  computed:{


    getGData1(){


      return this.$root.g_data1
    }
  },

<br>
    全局变量:{

    {

    getGData1}}
<br>
1.4.2 通过ref标签操作原生HTML
<!--    通过ref获取原生dom-->
<p ref="p1">原生p标签</p>


mounted() {


    this.$refs.p1.innerHTML = "改变原生p标签"
  }
1.5 插槽
1.5.1 简单插槽
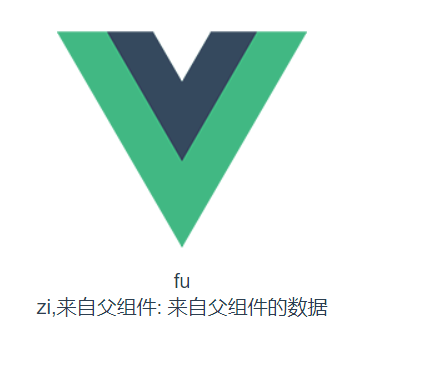
- 父组件
<template>
<div>
  fu
  <ZiElement>
      来自父组件的数据
  </ZiElement>
</div>
</template>

<script>
import ZiElement from "./ZiElement";
export default {


  name: "FuElement",
  components:{


    ZiElement
  }
}
</script>

<style scoped>

</style>
- 子组件
<template>
<div>
  zi,来自父组件:<slot></slot>
</div>
</template>

<script>
export default {


  name: "ZiElement"
}
</script>

<style scoped>

</style>
运行截图:
1.5.2 具名插槽
- 父组件
<slot-demo>

      <!--  具名插槽,如果带有slot=""属性,则在子组件中需要使用<slot name="">的方式才可以使用该组件-->
      <template slot="slot1">
        <div>
          父组件div,slot="slot1"
        </div>
      </template>

    </slot-demo>
- 子组件
<template>
<div>
<!--  具名插槽-->
  <slot name="slot1"></slot>

  <slot name="slot2" >
    没有传递slot2,显示默认值
  </slot>

</div>
</template>
1.5.3 子组件插槽传递数据给父组件,通过父组件改变样式
- 父组件
<template>
  <div id="app">
    <slot-demo>
<!--      使用子组件传递过来的数据   2.1.0版本后 slot-scope可以在template以外的标签上使用-->
      <div slot-scope="slotProps">
        <h1>{

    {

    slotProps.ct}}</h1>
      </div>
    </slot-demo>
  </div>
</template>
- 子组件
<template>
<div>
<!--  传递数据给父组件,这样做的好处是显示的效果可以由父组件决定-->
  <slot ct="来自子组件的数据"></slot>
</div>
</template>
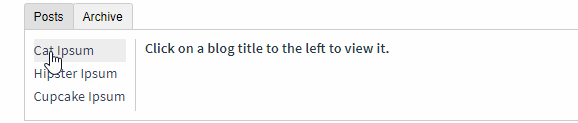
1.6 组件案例1 Tabs标签组件的实现
案例效果:

1.6.1 编写tabs组件
代码如下:
<template>
<div class="tabs">
  <div class="tabs-bar">
<!--    标签页标题,通过v-for实现循环 :class 动态渲染每一个item的label-->
<!--    :key="item.name"  以item.name为键进行遍历,item.name不能有重复的元素-->
    <div :class="tabCls(item)"
         v-for="(item,index) in navList"
         @click = "handleChange(index)" :key="item.name">
<!--      显示label标签-->
      {

    {

    item.label}}
    </div>
  </div>

  <div class="tabs-content">
<!--    slot放置pane组件内容-->
    <slot></slot>
  </div>
</div>

</template>

<script>
export default {


  name: "tabs",
  props: {


    value: [String, Number],
    required: true
  },
  data () {


    return {


      currentValue: this.value,
      navList: []
    }
  },
  methods: {


    //样式
    tabCls(item){


      return [
        'tabs-tab',
        {


          'tabs-tab-active': item.name === this.currentValue
        }
      ]
    },
    //获取tabs标签下的所有pane标签
    getTabs(){


      // this.$children.forEach((value, index, array) => {


      //   console.log(value.$options.name)
      // })
      return this.$children.filter(function (item) {


        return item.$options.name === 'pane'
      })
    },
    //把嵌套的组件放入父组件的navList中
    updateNav(){


      console.log("updateNav()")
      //嵌套的组件调用上一级组件,this指向的是嵌套的组件,所以要想使用上一级组件中的变量,需要使用let _this = this
      //_this表示该组件的this
      let _this = this
      //获取标题,并放置到navList数组中
      _this.navList = []
      //获取tabs标签下的所有pane标签
      _this.getTabs().forEach(function (pane, index) {


        //获取标签pane的label与name属性
        _this.navList.push({


          label: pane.label,
          //如果name的值为null则用index代替name
          name: pane.name || index
        })
        if (!pane.name) pane.name = index
        //如果currentValue的值为null则赋值为第一个pane
        if (index === 0) {


          if (!_this.currentValue) {


            _this.currentValue = pane.name || index
          }
        }
      })
      _this.updateStatus()
    },
    //根据currentValue值来确定哪个嵌套组件pane显示
    updateStatus () {


      let _this = this
      _this.getTabs().forEach(function (tab) {


        //改变嵌套组件pane的show
        tab.show = tab.name === _this.currentValue
      })
    },
    handleChange (index) {


      let nav = this.navList[index]
      let name = nav.name
      this.currentValue = name
      this.$emit('input', name)
      this.$emit('on-click', name)
    }
  },
  watch: {


    value: function (val) {


      this.currentValue = val
    },
    currentValue () {


      this.updateStatus()
    }
  }
}
</script>

<style scoped>

.tabs{


  font-size: 14px;
  color: #657180;
}
.tabs-bar:after{


  content: '';
  display: block;
  width: 100%;
  height: 1px;
  background: #d7dde4;
  margin-top:-1px;
}
.tabs-tab{


  display: inline-block;
  padding: 4px 16px;
  margin-right: 6px;
  background: #fff;
  border: 1px solid #d7dde4;
  cursor: pointer;
  position: relative;
}
.tabs-tab-active{


  color: #3399ff;
  border-top: 1px solid #3399ff;
  border-bottom: 1px solid #3399ff;
}
.tabs-tab-active:before{


  content: '';
  display: block;
  height: 1px;
  background: #3399ff;
  position: absolute;
  top: 0;
  left: 0;
  right: 0;
}
.tabs-content{


  padding: 8px 0;
}
</style>
关键点:
- 通过this. $children.filter(function (item) { return item. $options.name === ‘pane’}),可以获得当前组件下所有类型为pane的子组件
- updateNav()用于把嵌套的pane组件放入父组件的navList中
- updateStatus ()根据currentValue值来确定哪个嵌套组件pane显示
- :class="tabCls(item)"为动态渲染,渲染满足条件的item
1.6.1 编写pane组件(每个tab显示的内容)
<template>
<!--  根据show的值判断是否显示该<slot>-->
  <div class="pane" v-show="show">
    <slot></slot>
  </div>
</template>

<script>
export default {


  name: "pane",
  props: {


    name: {


      type: String
    },
    label: {


      type: String,
      default: ''
    }
  },
  data () {


    return {


      show: true
    }
  },
  methods: {


    updateNav () {


      //调用父组件的updateNav函数
      this.$parent.updateNav()
    }
  },
  watch: {


    label () {


      this.updateNav()
    }
  },
  mounted () {


    this.updateNav()
  },
  computed: {


    active () {


      return false
    }
  }
}
</script>

<style scoped>

</style>
1.6.2 测试组件
<template>
  <div class="tabDemo">
<!--    v-model是双向绑定,tabs标签中的value变化会导致父组件的value变化-->
<!--    v-model="value"的写法相当于v-model:value="value"-->
<!--    <tabs v-model="value">-->
<!--    v-bind是单向数据绑定,父组件会影响到子组件,子组件不能影响到父组件-->
    <tabs :value="value">
      <pane label="标签一" name="1">
        标签一内容
      </pane>
      <pane label="标签二" name="2">
        标签二内容
      </pane>
      <pane label="标签三" name="3">
        标签三内容
      </pane>
    </tabs>

    <tabs :value="value">
      <pane label="标签一" name="1">
        标签一内容
      </pane>

      <pane label="标签二" name="2">
        标签二内容
      </pane>
      <pane label="标签三" name="3">
        标签三内容
      </pane>
    </tabs>

  </div>
</template>

<script>
import Tabs from '../components/tabs/tabs'
import pane from '../components/tabs/pane'

export default {


  name: "tabDemo",
  components: {


    Tabs,
    pane,
  },
  data () {


    return {


      value: "1",
      value2: "2",
    }
  },
  methods:{


  }
}
</script>

<style scoped>

</style>
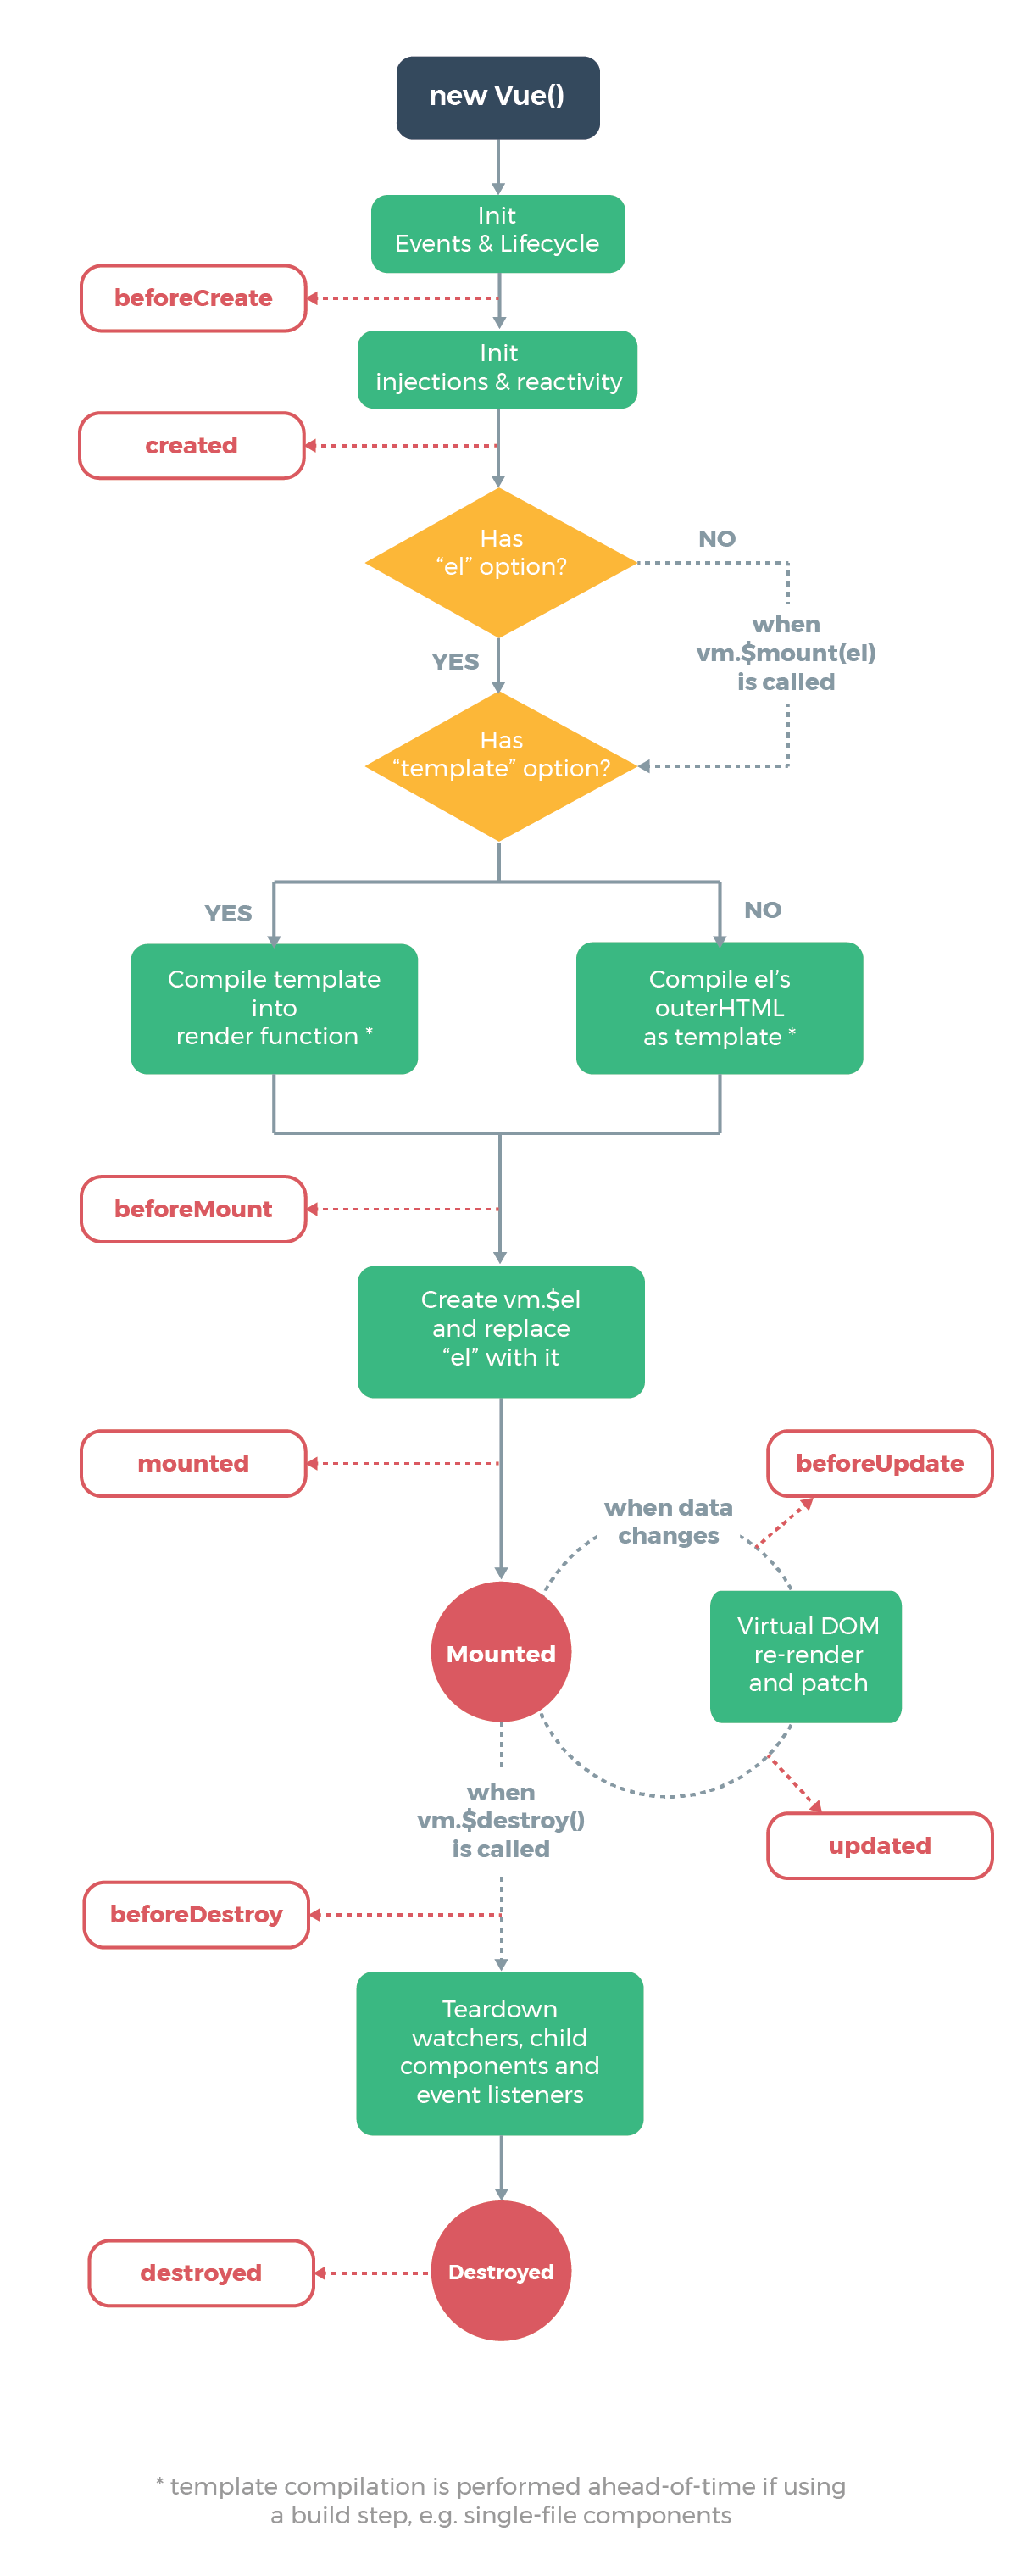
2 生命周期
下图所示,Vue一共有八个生命周期函数,分别是创建之前,创建之后,渲染之前,渲染之后,更新之前,更新之后,销毁之前,销毁之后。