文章目录
前言
继我的上一篇介绍组件间通信方式的博客之后Vue组件间通信,继续分享一个在vue中实现组件通信的技术——Vuex
1、Vuex概述
Vuex是Vue团队打造的用于集中式状态管理的一款插件。它能实现多组件之间的数据共享,并且支持多个组件对于状态的处理。所谓的状态,也就是数据。VueX致力于集中的管理状态,可以很方便的实现多组件的通信。图示即为Vue官方团队提供的Vuex原理图。
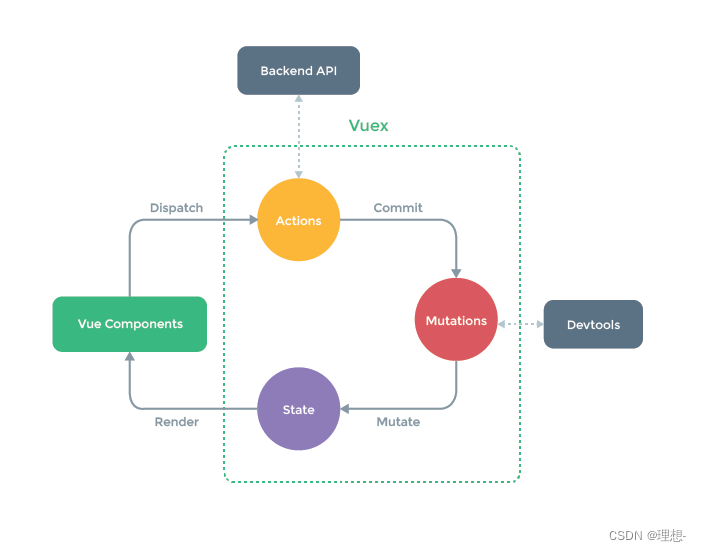
下面来对上方的图示的内容加以描述:
Vue Components: 即不同的组件,组件通过派遣不同的行为来练习Actions。事实上,在不涉及什么复杂的业务时候,组件也可以直接与Mutations对话Actions:本质上是一个对象,对象里用于存放实现业务逻辑的方法。注意:在这里一般我们步用来做数据的处理,只用来写业务逻辑。比如,判断条件是否成立,成立的时候再处理数据,比如数据要通过Ajax请求从服务端获取。Actions处理完毕后,把具体的数据处理的任务commit给Mutations。Actions的特点与service层的特点相似。Mutations:本质上是一个对象,存放用来修改数据的函数。由Actions进行业务处理,数据的处理功能由Mutations来实现,类似于dao层。另外,vue的开发者工具就是监视Mutation的变化。State:本质上是一个对象,用于存放共享的数据,最终这些数据会被渲染到组件上。
图中的actions,mutions,state最终都要被一个store所管理。store还能管理的两个配置项为getters与modules,之后会介绍到。
2、使用Vuex完成求和案例
Vuex是一款插件,因此我们就需要安装Vuex,引入并且使用这个Vuex。值得注意的是,Vue目前的默认版本为3.0, Vuex的默认版本为4.0,如果项目是基于Vue2.0的,那么需要引入版本号为3.0的Vuex,不然会报错。
安装
Vuex
使用npm包管理工具安装,npm i vuex@3
引入Vuex
在src目录下新建一个store的文件夹,再新建一个index.js
//该文件用于创建Vuex中最为核心的store
import Vue from 'vue'
//引入Vuex
import Vuex from 'vuex'
//应用Vuex插件
Vue.use(Vuex)

const actions = {

    }
const mutations = {

    }
const state = {

    }

export default new Vuex.Store({


    actions,
    mutations,
    state,
})
在main.js中引入index.js, 并配置给vue实例
//引入Vue
import Vue from 'vue'
//引入App
import App from './App.vue'
//关闭Vue的生产提示
Vue.config.productionTip = false

import store from './store'

//创建vm
new Vue({


	el:'#app',
	render: h => h(App),
	store,
})
编写Count组件
<template>
  <div>
    <h1>当前求和为:{

   { $store.state.sum }}</h1>
    <select v-model.number="n">
      <option value="1">1</option>
      <option value="2">2</option>
      <option value="3">3</option>
    </select>
    <button @click="increment">+</button>
    <button @click="decrement">-</button>
    <button @click="incrementOdd">当前求和为奇数再加</button>
    <button @click="incrementWait">等一等再加</button>
  </div>
</template>
我们的目的是通过Vuex来管理数据,所以我们应该在state里添加sum
const state = {


    sum: 0
}
Vuex的属性用$store获取。
编写回调函数
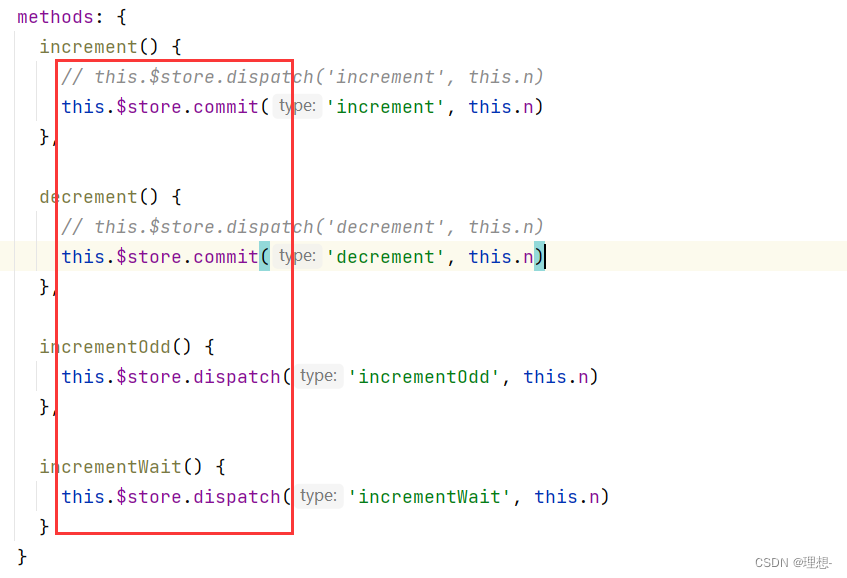
在上面已经介绍到了,组件将不同的行为派遣给actions,因此回调函数里要能够实现这一点,需要用到$store下的dispatch,可以传递数据。
  methods: {


    increment() {


      this.$store.dispatch('increment', this.n)
    },

    decrement() {


      this.$store.dispatch('decrement', this.n)
    },

    incrementOdd() {


      this.$store.dispatch('incrementOdd', this.n)
    },

    incrementWait() {


      this.$store.dispatch('incrementWait', this.n)
    }
  }
配置actions
const actions = {


    increment(context, value) {


        context.commit('increment', value)
    },
    decrement(context, value) {


        context.commit('decrement', value)
    },
    incrementOdd(context, value) {


        if (context.state.sum % 2) {


            context.commit('increment', value)
        }
    },
    incrementWait(context, value) {


        setTimeout(() => {


            context.commit('increment', value)
        }, 500)
    }
}
所有的功能实质上只有加和减两种,因此在mutations操作加和减即可,这样就实现了业务和数据处理的分离,actions专注于业务,mutations专注于处理数据。
const mutations = {


    increment(state, value) {


        state.sum += value
    },
    decrement(state, value) {


        state.sum -= value
    },
}
这样一个简单的加和案例就做好了。
如果想用上getters,可以在加上下面的效果
<h2>放大十倍后:{

   {$store.getters.bigSum}}</h2>
const getters = {


    bigSum(state) {


        return state.sum * 10
    }
}
然后在store中传入getters即可。
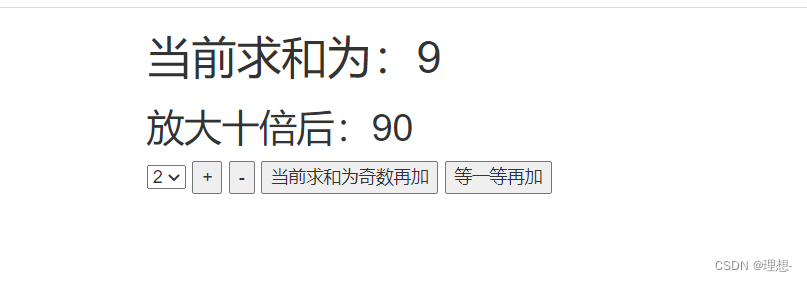
与计算属性很类似。
总结
基本使用
-
初始化数据、配置
actions、配置mutations,操作文件store.js//引入Vue核心库 import Vue from 'vue' //引入Vuex import Vuex from 'vuex' //引用Vuex Vue.use(Vuex) const actions = { //响应组件中加的动作 increment(context,value){ context.commit('increment',value) }, } const mutations = { //执行加 increment(state,value){ state.sum += value } } //初始化数据 const state = { sum:0 } //创建并暴露store export default new Vuex.Store({ actions, mutations, state, }) -
组件中读取vuex中的数据:
$store.state.sum -
组件中修改vuex中的数据:
$store.dispatch('action中的方法名',数据)或$store.commit('mutations中的方法名',数据)备注:若没有网络请求或其他业务逻辑,组件中也可以越过actions,即不写
dispatch,直接编写commit
getters的使用
-
概念:当state中的数据需要经过加工后再使用时,可以使用getters加工。
-
在
store.js中追加getters配置...... const getters = { bigSum(state){ return state.sum * 10 } } //创建并暴露store export default new Vuex.Store({ ...... getters }) -
组件中读取数据:
$store.getters.bigSum
3、mapState mapGetters mapMutations mapActions的使用
    <h1>当前求和为:{

   { $store.state.sum }}</h1>
    <h2>放大十倍后:{

   {$store.getters.bigSum}}</h2>
我们发现,如果当数据很多,就要写很多$store. ...这样的代码,很不方便。我们想要使用数据名直接读取,一种可行的方式就是我们自己配置计算属性,但这也相当麻烦,有什么办法能帮助我们快速的配置计算属性呢?
Vuex给我们提供了一种方式。
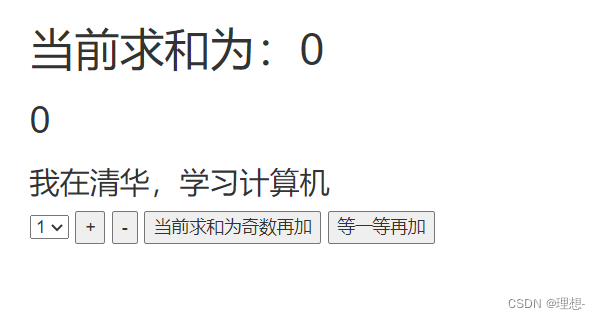
下面我们在多配置几个数据。
const state = {


    sum: 0,
    school: '清华',
    subject: '计算机'
}
    <h1>当前求和为:{

   { sum }}</h1>
    <h2>{

   { bigSum }}</h2>
    <h3>我在{

   { school }},学习{

   { subject }}</h3>
接着我们使用maoState mapGetters,首先需要引入。
import {

    mapState, mapGetters} from 'vuex'
配置方式有两种
//借助mapState生成计算属性,从state中读取数据。(对象写法)
// ...mapState({he:'sum',xuexiao:'school',xueke:'subject'}),

//借助mapState生成计算属性,从state中读取数据。(数组写法)
...mapState(['sum','school','subject']),

//借助mapGetters生成计算属性,从getters中读取数据。(对象写法)
// ...mapGetters({bigSum:'bigSum'})

//借助mapGetters生成计算属性,从getters中读取数据。(数组写法)
...mapGetters(['bigSum'])
''包裹的就是属性名,为了语义化,建议大家还是把计算属性名与state里的属性名配置的一样。
另外,之前配置methods的时候,如下的代码也出现了很多重复项
我们也可以解决。
//借助mapMutations生成对应的方法,方法中会调用commit去联系mutations(对象写法)
// ...mapMutations({increment: 'increment', decrement: 'decrement'})

//借助mapMutations生成对应的方法,方法中会调用commit去联系mutations(数组写法)
...mapMutations(['increment', 'decrement'])

//借助mapActions生成对应的方法,方法中会调用dispatch去联系actions(对象写法)
// ...mapActions({incrementOdd: 'incrementOdd', incrementWait: 'incrementWait'}),

//借助mapActions生成对应的方法,方法中会调用dispatch去联系actions(数组写法)
...mapActions(['incrementOdd', 'incrementWait']),
一般数组写法用的更多。
总结
四个map方法的使用
-
mapState方法:用于帮助我们映射
state中的数据为计算属性computed: { //借助mapState生成计算属性:sum、school、subject(对象写法) ...mapState({ sum:'sum',school:'school',subject:'subject'}), //借助mapState生成计算属性:sum、school、subject(数组写法) ...mapState(['sum','school','subject']), }, -
mapGetters方法:用于帮助我们映射
getters中的数据为计算属性computed: { //借助mapGetters生成计算属性:bigSum(对象写法) ...mapGetters({ bigSum:'bigSum'}), //借助mapGetters生成计算属性:bigSum(数组写法) ...mapGetters(['bigSum']) }, -
mapActions方法:用于帮助我们生成与
actions对话的方法,即:包含$store.dispatch(xxx)的函数methods:{ //靠mapActions生成:incrementOdd、incrementWait(对象形式) ...mapActions({ incrementOdd:'incrementOdd',incrementWait:'incrementWait'}) //靠mapActions生成:incrementOdd、incrementWait(数组形式) ...mapActions(['incrementOdd','incrementWait']) } -
mapMutations方法:用于帮助我们生成与
mutations对话的方法,即:包含$store.commit(xxx)的函数methods:{ //靠mapActions生成:increment、decrement(对象形式) ...mapMutations({ increment:'increment',decrement:'decrement'}), //靠mapMutations生成:increment、decrement(数组形式) ...mapMutations(['increment','decrement']), }
4、多组件共享数据
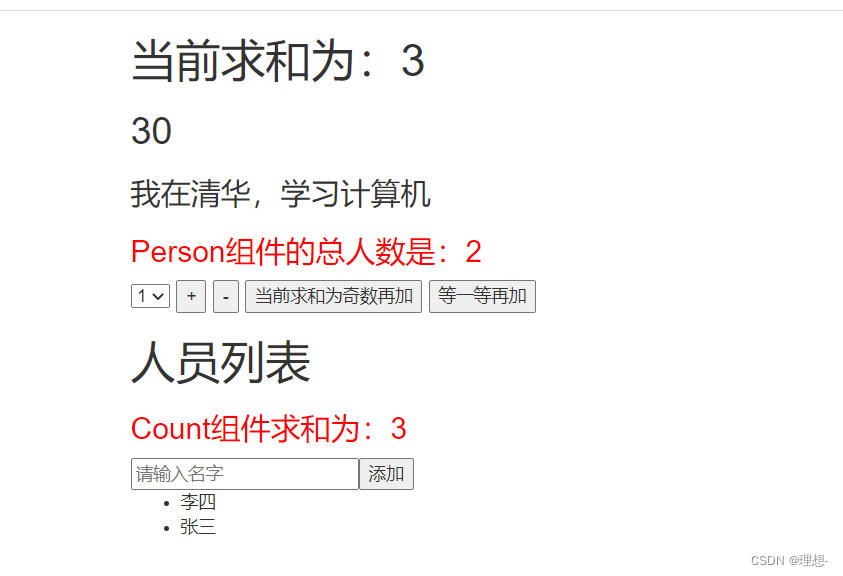
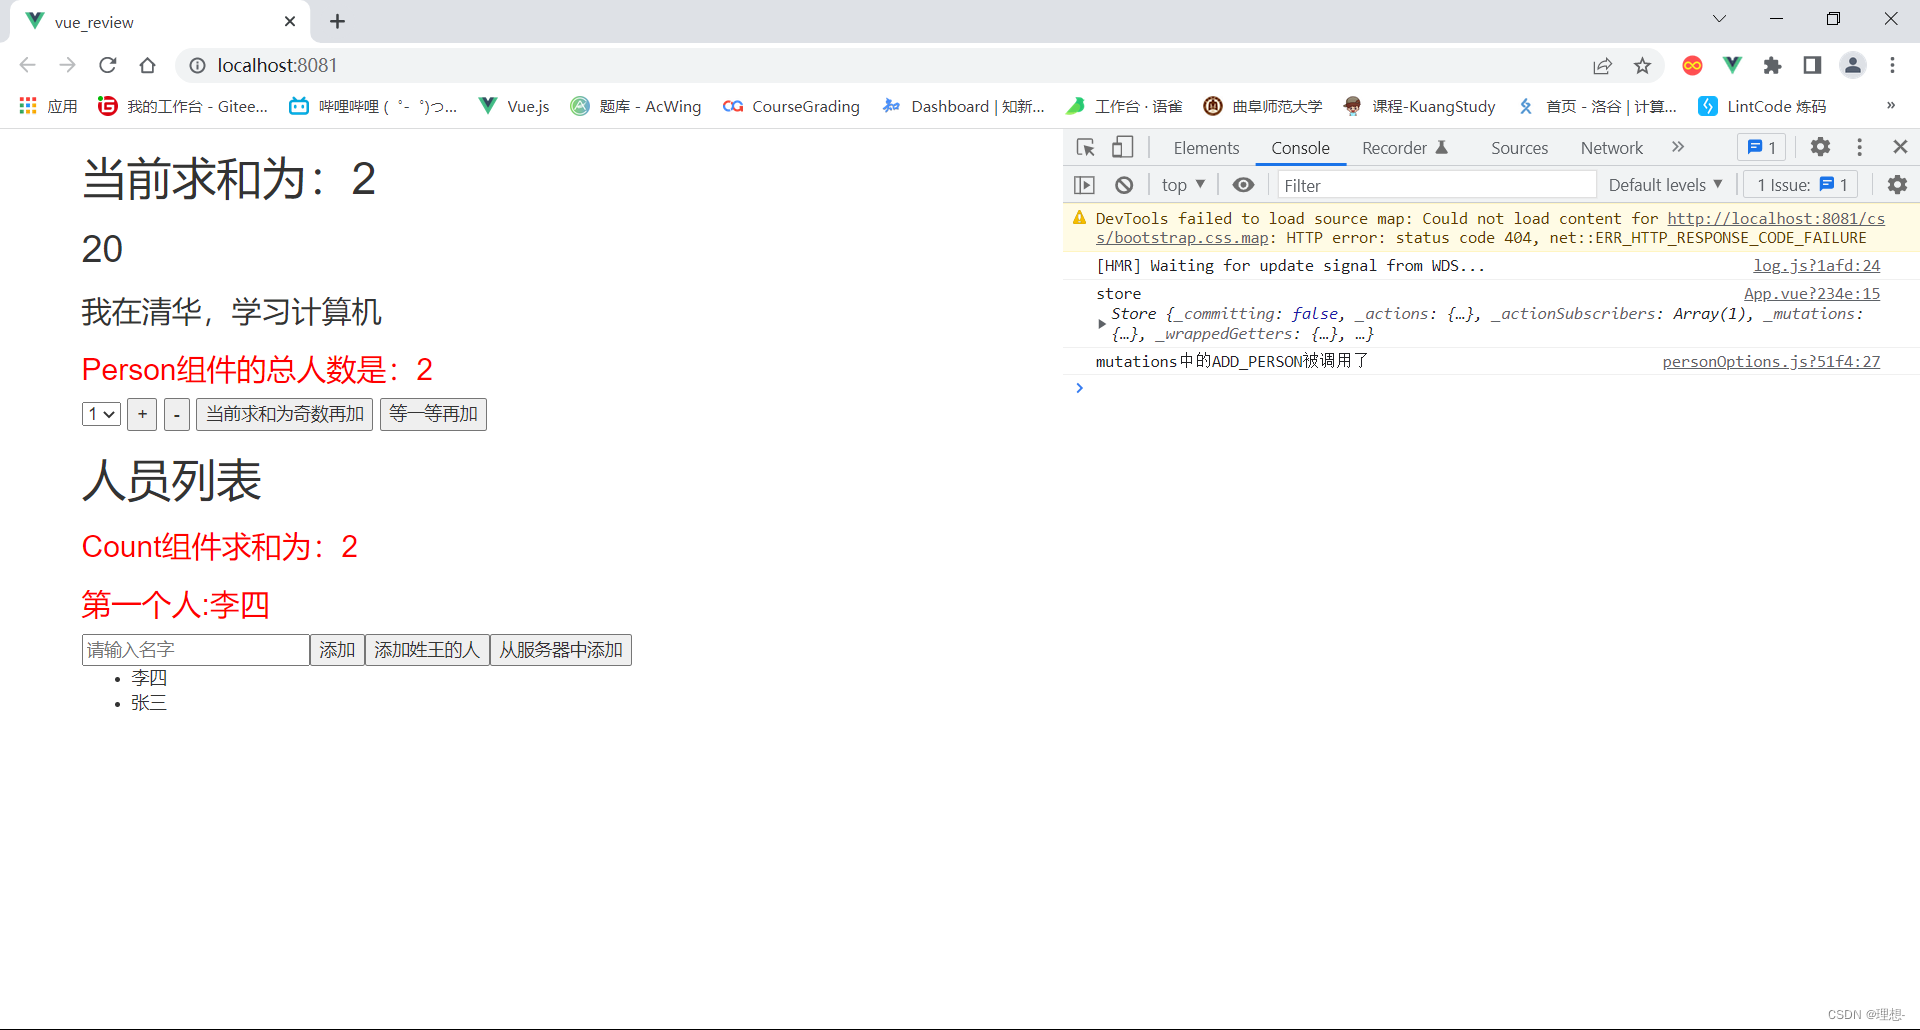
前面的例子只有一个组件使用数据,下面这个案例有多个组件共享数据。

Count组件结构
<template>
  <div>
    <h1>当前求和为:{

   { sum }}</h1>
    <h2>{

   { bigSum }}</h2>
    <h3>我在{

   { school }},学习{

   { subject }}</h3>
    <h3 style="color:red">Person组件的总人数是:{

   {personList.length}}</h3>
    <select v-model.number="n">
      <option value="1">1</option>
      <option value="2">2</option>
      <option value="3">3</option>
    </select>
    <button @click="increment(n)">+</button>
    <button @click="decrement(n)">-</button>
    <button @click="incrementOdd(n)">当前求和为奇数再加</button>
    <button @click="incrementWait(n)">等一等再加</button>
  </div>
</template>
Person组件结构
<template>
  <div>
    <h1>人员列表</h1>
    <h3 style="color:red">Count组件求和为:{

   {sum}}</h3>
    <input type="text" placeholder="请输入名字" v-model="name">
    <button @click="add">添加</button>
    <ul>
      <li v-for="p in personList" :key="p.id">{

   {p.name}}</li>
    </ul>
  </div>
</template>
需要在/store/index.js中添加相应的属性和方法
//mutations
ADD_PERSON(state,value){


    console.log('mutations中的ADD_PERSON被调用了')
    state.personList.unshift(value)
}
//state
const state = {


    sum: 0,
    school: '清华',
    subject: '计算机',
    personList: [{

    id:'001', name:'张三'}]
}
我们在Count组件中使用map...生成计算属性和方法,在Person组件中使用正常写法。
  computed: {


    ...mapState(['sum', 'school', 'subject', 'personList']),
    ...mapGetters(['bigSum'])
  },
  methods: {


    ...mapActions(['incrementOdd', 'incrementWait']),
    ...mapMutations(['increment', 'decrement'])
  }
  computed:{


    personList(){


      return this.$store.state.personList
    },
    sum(){


      return this.$store.state.sum
    }
  },
  methods: {


    add(){


      const personObj = {

    id:nanoid(),name:this.name}
      this.$store.commit('ADD_PERSON',personObj)
      this.name = ''
    }
  },
这样写也为了模块化的时候进行比较。
Count
<template>
  <div>
    <h1>当前求和为:{

   { sum }}</h1>
    <h2>{

   { bigSum }}</h2>
    <h3>我在{

   { school }},学习{

   { subject }}</h3>
    <h3 style="color:red">Person组件的总人数是:{

   {personList.length}}</h3>
    <select v-model.number="n">
      <option value="1">1</option>
      <option value="2">2</option>
      <option value="3">3</option>
    </select>
    <button @click="increment(n)">+</button>
    <button @click="decrement(n)">-</button>
    <button @click="incrementOdd(n)">当前求和为奇数再加</button>
    <button @click="incrementWait(n)">等一等再加</button>
  </div>
</template>

<script>
import {

      mapState, mapGetters, mapActions, mapMutations} from 'vuex'

export default {


  name: "Count",
  data() {


    return {


      n: 1
    }
  },
  computed: {


    ...mapState(['sum', 'school', 'subject', 'personList']),
    ...mapGetters(['bigSum'])
  },
  methods: {


    ...mapActions(['incrementOdd', 'incrementWait']),
    ...mapMutations(['increment', 'decrement'])
  }
}
</script>

<style scoped>
button {


  margin-left: 5px;
}
</style>
Person
<template>
  <div>
    <h1>人员列表</h1>
    <h3 style="color:red">Count组件求和为:{

   {sum}}</h3>
    <input type="text" placeholder="请输入名字" v-model="name">
    <button @click="add">添加</button>
    <ul>
      <li v-for="p in personList" :key="p.id">{

   {p.name}}</li>
    </ul>
  </div>
</template>

<script>
import {

      nanoid} from "nanoid";
export default {


  name: "Person",
  data() {


    return {


      name:''
    }
  },
  computed:{


    personList(){


      return this.$store.state.personList
    },
    sum(){


      return this.$store.state.sum
    }
  },
  methods: {


    add(){


      const personObj = {

      id:nanoid(),name:this.name}
      this.$store.commit('ADD_PERSON',personObj)
      this.name = ''
    }
  },
}
</script>

<style scoped>

</style>
4、Vuex的模块化
上面介绍了多组件共享数据,但这样做等于把不同组件所用的数据封装在了一起,不好维护。理想的状态是具有相关性的数据都统一放在一个文件夹里,便于后期的维护。比如,上面的数据就可以拆分为关于计数 的,关于人员的。因此我们可以这么分层:
4.1、页面结构
Count
<template>
  <div>
    <h1>当前求和为:{

   { sum }}</h1>
    <h2>{

   { bigSum }}</h2>
    <h3>我在{

   { school }},学习{

   { subject }}</h3>
    <h3 style="color:red">Person组件的总人数是:{

   {personList.length}}</h3>
    <select v-model.number="n">
      <option value="1">1</option>
      <option value="2">2</option>
      <option value="3">3</option>
    </select>
    <button @click="increment(n)">+</button>
    <button @click="decrement(n)">-</button>
    <button @click="incrementOdd(n)">当前求和为奇数再加</button>
    <button @click="incrementWait(n)">等一等再加</button>
  </div>
</template>
Person
<template>
  <div>
    <h1>人员列表</h1>
    <h3 style="color:red">Count组件求和为:{

   {sum}}</h3>
    <h3 style="color:red">第一个人:{

   {firstPersonName}}</h3>
    <input type="text" placeholder="请输入名字" v-model="name">
    <button @click="add">添加</button>
    <button @click="addWang">添加姓王的人</button>
    <button @click="addServer">从服务器中添加</button>
    <ul>
      <li v-for="p in personList" :key="p.id">{

   {p.name}}</li>
    </ul>
  </div>
</template>
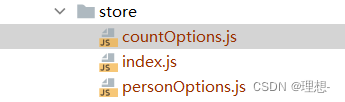
4.2、创建模块
创建并暴露countOptions.js
export default {


    //开启模块化命名空间
    namespaced: true,
    actions: {


        increment(context, value) {


            context.commit('increment', value)
        },
        decrement(context, value) {


            context.commit('decrement', value)
        },
        incrementOdd(context, value) {


            context.commit('incrementOdd', value)
        },
        incrementWait(context, value) {


            context.commit('incrementWait', value)
        }
    },
    mutations: {


        increment(state, value) {


            state.sum += value
        },
        decrement(state, value) {


            state.sum -= value
        },
        incrementOdd(state, value) {


            if (state.sum % 2) {


                state.sum += value
            }
        },
        incrementWait(state, value) {


            setTimeout(() => {


                state.sum += value
            }, 500)
        },
    },
    state: {


        sum: 0,
        school: '清华',
        subject: '计算机',
    },
    getters: {


        bigSum(state) {


            return state.sum * 10
        }
    }
}
创建并暴露personOptions.js
import axios from "axios";
import {

    nanoid} from "nanoid";
export default {


    namespaced: true,
    actions: {


        addPersonWang(context, value) {


            if (value.name.indexOf('王') === 0) {


                context.commit('ADD_PERSON', value)
            }
        },
        //添加这么一个功能主要是为了实现一个具体的业务
        addPersonServer(context) {


            axios.get('https://api.uixsj.cn/hitokoto/get?type=social').then(
                response => {


                    const personObj = {

    id: nanoid(), name: response.data}
                    context.commit('ADD_PERSON', personObj)
                },
                error => {


                    alert(error.message)
                }
            )
        }
    },
    mutations: {


        ADD_PERSON(state, value) {


            console.log('mutations中的ADD_PERSON被调用了')
            state.personList.unshift(value)
        }
    },
    state: {


        personList: [{

    id: '001', name: '张三'}]
    },
    getters: {


        firstPersonName(state) {


            return state.personList[0].name
        }
    }
}
引入模块
//该文件用于创建Vuex中最为核心的store
import Vue from 'vue'
//引入Vuex
import Vuex from 'vuex'
//应用Vuex插件
Vue.use(Vuex)

import countOptions from "./countOptions";
import personOptions from "./personOptions";


export default new Vuex.Store({


    modules: {


        countOptions,
        personOptions
    }
})
4.3、生成计算属性与方法
在Count组件中,我们使用map....,在Person组件中,我们自己写。
有两个模块,就相当于有两个store,在取数据和调用方法的时候,我们要注意取自哪个模块的。
Count组件
  computed: {


    ...mapState('countOptions', ['sum', 'school', 'subject']),
    ...mapState('personOptions', ['personList']),
    ...mapGetters('countOptions', ['bigSum']),
  },
  methods: {


    ...mapActions('countOptions', ['incrementOdd', 'incrementWait']),
    ...mapMutations('countOptions', ['increment', 'decrement'])
  }
只需要添加模块名即可
Person组件
与上面那个不同,先看一下$store的内容

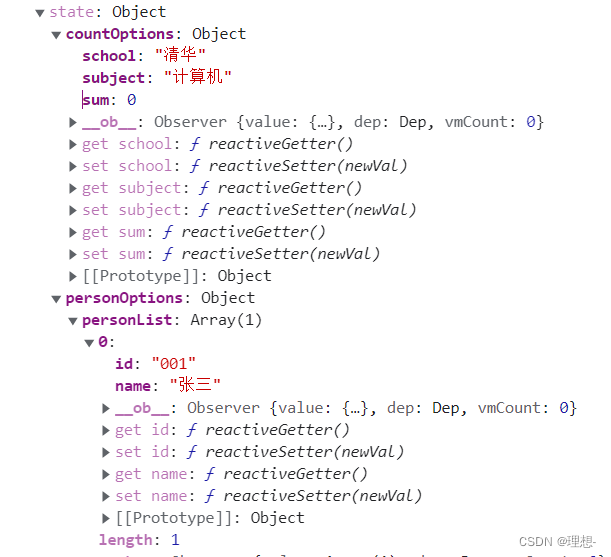
getters与state的组织方式不一样。再往下看
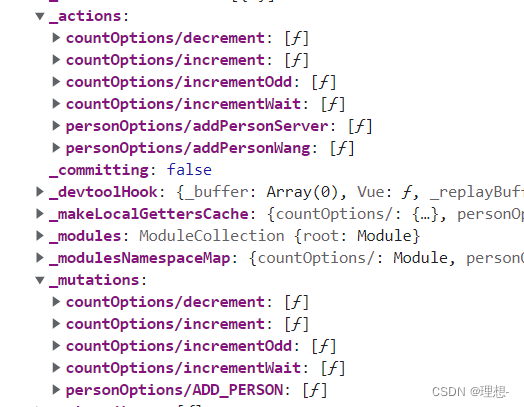
这样,我们就知道该如何写计算属性和方法了。
  computed:{


    personList(){


      return this.$store.state.personOptions.personList
    },
    sum(){


      return this.$store.state.countOptions.sum
    },
    firstPersonName() {


      return this.$store.getters["personOptions/firstPersonName"]
    }
  },
  methods: {


    add(){


      const personObj = {

    id:nanoid(),name:this.name}
      this.$store.commit('personOptions/ADD_PERSON',personObj)
      this.name = ''
    },
    addWang() {


      const personObj = {

    id:nanoid(),name:this.name}
      this.$store.dispatch('personOptions/addPersonWang',personObj)
      this.name = ''
    },
    addServer() {


      this.$store.dispatch('personOptions/addPersonServer')
    }
  },
4.4、模块化+命名空间总结
-
目的:让代码更好维护,让多种数据分类更加明确。
-
修改
store.jsconst countOptions = { namespaced:true,//开启命名空间 state:{ x:1}, mutations: { ... }, actions: { ... }, getters: { bigSum(state){ return state.sum * 10 } } } const personOptions = { namespaced:true,//开启命名空间 state:{ ... }, mutations: { ... }, actions: { ... } } const store = new Vuex.Store({ modules: { countOptions, personOptions } }) -
开启命名空间后,组件中读取state数据:
//方式一:自己直接读取 this.$store.state.personOptions.list //方式二:借助mapState读取: ...mapState('countOptions',['sum','school','subject']), -
开启命名空间后,组件中读取getters数据:
//方式一:自己直接读取 this.$store.getters['personOptions/firstPersonName'] //方式二:借助mapGetters读取: ...mapGetters('countOptions',['bigSum']) -
开启命名空间后,组件中调用dispatch
//方式一:自己直接dispatch this.$store.dispatch('personOptions/addPersonWang',person) //方式二:借助mapActions: ...mapActions('countAbout',{ incrementOdd:'incrementOdd',incrementWait:'incrementWait'}) -
开启命名空间后,组件中调用commit
//方式一:自己直接commit
this.$store.commit('personOptions/ADD_PERSON',person)
//方式二:借助mapMutations:
...mapMutations('countOptions',{

      increment:'increment',decrement:'decrement'}),
5、总结
至此,Vuex的用法就总结完了,希望能帮到看这篇博客的你。