目录
第一节 概述
首先,提个问题,啥是 Fragment ?
Fragment 是一种可以嵌入在 Activity 当中的 UI 片段,它能让程序更加合理和充分地利用大屏幕空间,因在平板上应用的非常广泛。
到这里你可能会有些懵,啥玩意?下面的举个例子:想象我们正在开发一个做一个页面,其中使用 RecyclerView 展示了一组新闻的标题,当点击了其中一个标题时,就打开另一个界面显示新闻的详细内容。如果是在手机中设计,我们可以将新闻标题列表放在一个活动中,将新闻的详细内容放在另一个活动中,如图。


感觉没啥子问题哈,但是我们把源码搬入到平板上,那么新闻的标题就会拉伸整个屏幕(巨丑无比)而且还会有很大的空白区域。如图:

所以在开发时,合理的运用 Fragment 来减少代码成本。
因此,更好的方案是将标题列表界面和详细内容界面分别放在两个 Fragment 中,然后在同一个Activity 里引入这两个 Fragment ,这样就可以将屏幕空间充分地利用起来了。如图:

第二节 样例效果
那么,这 Fragment 怎么用呢?我们先来看看样例的效果:

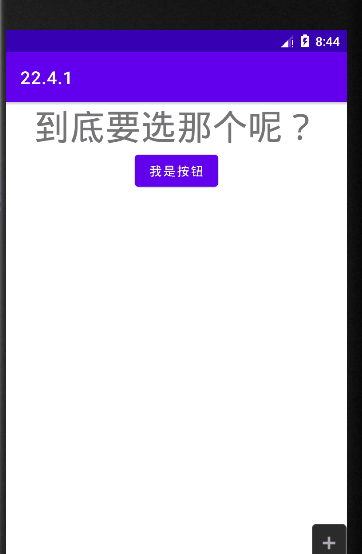
首先先创建一个叫 BlankFragment 的 Fragment (Blank) ,这个时候 AS 会自动创建一个叫 fragment_blank.xml 的文件,在 fragment_blank.xml文件 我们来个文本控件(TextView)和按钮(Button)控件写入:
    <TextView
        android:id="@+id/textview"
        android:layout_width="match_parent"
        android:layout_height="wrap_content"
        android:text="到底要选那个呢?"
        android:gravity="center"
        android:textSize="40sp"/>

    <Button
        android:id="@+id/btn"
        android:layout_width="wrap_content"
        android:layout_height="wrap_content"
        android:text="我是按钮"
        android:layout_gravity="center" />
我们在 BlankFragment.java 文件写入:
package com.example.a2241;

import android.os.Bundle;

import androidx.fragment.app.Fragment;

import android.view.LayoutInflater;
import android.view.View;
import android.view.ViewGroup;
import android.widget.Button;
import android.widget.TextView;

public class BlankFragment extends Fragment {

    private View root;
    private TextView textView;
    private Button button;

    @Override
    public void onCreate(Bundle savedInstanceState) {
        super.onCreate(savedInstanceState);

    }

    @Override
    public View onCreateView(LayoutInflater inflater, ViewGroup container,
                             Bundle savedInstanceState) {
        if (root == null){
            root = inflater.inflate(R.layout.fragment_blank,container,false);
        }// 这里 inflater.inflate 的用法可以看看这位大佬写的讲解
        //  https://www.cnblogs.com/qinaidexin/p/11726296.html
        textView = root.findViewById(R.id.textview);// 得到id  textview
        button = root.findViewById(R.id.btn); // 得到id  btn
        button.setOnClickListener(new View.OnClickListener() {// 设置按钮的点击效果事件
            @Override
            public void onClick(View view) {
                textView.setText("发生什么事了?");
            }
        });
        return root;
    }
}
在 Acticity_main.xml 文件写入:
    <fragment android:name="com.example.a2241.BlankFragment"
        android:layout_width="match_parent"
        android:layout_height="match_parent"
        android:id="@+id/fragment"/>
这里我们可以看到这里只是设置了一个 fragment 而已,怎么会有这样的效果呢? 这里个人理解是把 fragment_blank.xml 引用到 Acticity_main.xml 然后在显示出来(如果有误,欢迎私信来指导)。
第三节 生命周期
通过上面我们知道了 Fragment 用法, 下面的们来看看 Fragment 的生命周期。
Activity生命周期有运行状态、暂停状态、停止状态和销毁状态这4种。
Fragment 的生命周期有运行状态、暂停状态、停止状态、销毁状态。如图:


onAttach() 与 onDetach() 作用: Fragment 的执行一定是依赖于Activity,如果没有Activity的话,就不可能会有Fragment,如何鉴别他两是否绑定在一起呢?onAttach() 的作用就是绑定,onDetach() 作用是解绑。
onCreate() 与onDestroy() 的作用:onCreate() Fragment的创建,onDestroy() Fragment的销毁。
onCreateView() 与 onDestroyView() 的作用:onCreateView() 创建Fragment 的 UI,onDestroyView() 销毁Fragment 的 UI。
onActivityCreate() 作用:意味着activity创建了。
剩下的就是:启动、重启、暂停、停止。
下面我们来看看生命周期:
还是刚刚的项目,我们在 BlankFragment.java 文件继续写入代码:
package com.example.a2241;

import static androidx.constraintlayout.motion.utils.Oscillator.TAG;

import android.content.Context;
import android.nfc.Tag;
import android.os.Bundle;

import androidx.annotation.NonNull;
import androidx.annotation.Nullable;
import androidx.fragment.app.Fragment;

import android.util.Log;
import android.view.LayoutInflater;
import android.view.View;
import android.view.ViewGroup;
import android.widget.Button;
import android.widget.TextView;

public class BlankFragment extends Fragment {

    private View root;
    private TextView textView;
    private Button button;
  //  private String string = "1";

    @Override
    public void onAttach(@NonNull Context context) {
        super.onAttach(context);
    }

    @Override
    public void onCreate(Bundle savedInstanceState) {
        super.onCreate(savedInstanceState);
        Log.d(TAG,"onCreate: ");
    }

    @Override
    public View onCreateView(LayoutInflater inflater, ViewGroup container,
                             Bundle savedInstanceState) {
        if (root == null){
            root = inflater.inflate(R.layout.fragment_blank,container,false);
        }// 这里 inflater.inflate 的用法可以看看这位大佬写的讲解
        //  https://www.cnblogs.com/qinaidexin/p/11726296.html
        textView = root.findViewById(R.id.textview);// 得到id  textview
        button = root.findViewById(R.id.btn); // 得到id  btn
        button.setOnClickListener(new View.OnClickListener() {// 设置按钮的点击效果事件
            @Override
            public void onClick(View view) {
                textView.setText("发生什么事了?");
            }
        });
        Log.d(TAG,"onCreateView: ");
        return root;
    }

    @Override
    public void onActivityCreated(@Nullable Bundle savedInstanceState) {
        super.onActivityCreated(savedInstanceState);
        Log.d(TAG, "onActivityCreated: ");
    }

    @Override
    public void onResume() {
        super.onResume();
        Log.d(TAG, "onResume: ");
    }

    @Override
    public void onStart() {
        super.onStart();
        Log.d(TAG, "onStart: ");
    }

    @Override
    public void onPause() {
        super.onPause();
        Log.d(TAG, "onPause: ");
    }

    @Override
    public void onStop() {
        super.onStop();
        Log.d(TAG, "onStop: ");
    }

    @Override
    public void onDestroyView() {
        super.onDestroyView();
        Log.d(TAG, "onDestroyView: ");
    }

    @Override
    public void onDetach() {
        super.onDetach();
        Log.d(TAG, "onDetach: ");
    }
}
我们点击运行按钮。打开logcat来看看。

一个启动app会调用。onCreate、onCreate、onActivityCreated、onStart、onResume。
直接给出结论(代码就不一一显示了)

第四节 实践效果
下面我们来看看 实践效果(简单的页面切换效果):
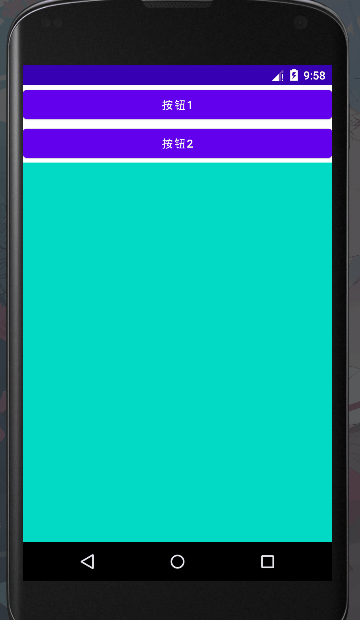
这里我点击顺序是:按钮1两下、按钮2两下、按钮1以下、按钮2一下。
点击返回键的顺序是:按钮1、按钮2、按钮2、按钮2、按钮2。
那么怎么来实现呢?
创建两个 BlankFragment 的 Fragment (Blank),一个叫BlankFragment1,另一个叫BlankFragment2。
BlankFragment1会创建fragment_blank1.xml文件。我们直接写入代码:
    <TextView
        android:layout_width="match_parent"
        android:layout_height="match_parent"
        android:text="我是第一个界面"
        android:textSize="30sp"/>
fragment_blank2.xml 同理:
    <TextView
        android:layout_width="match_parent"
        android:layout_height="match_parent"
        android:text="我是第二个界面"
        android:textSize="30sp" />
在activity_main.xml写入:
    <Button
        android:layout_width="match_parent"
        android:layout_height="wrap_content"
        android:id="@+id/btn1"
        android:text="@string/_1"/>

    <Button
        android:layout_width="match_parent"
        android:layout_height="wrap_content"
        android:id="@+id/btn2"
        android:text="@string/_2"/>

    <FrameLayout
        android:id="@+id/fragme_layout"
        android:layout_width="match_parent"
        android:layout_height="match_parent"
        android:background="@color/teal_200" />
在MainActivity.java里面写入代码:
package com.example.a2022330;

import android.os.Bundle;
import android.view.View;
import android.widget.Button;
import androidx.appcompat.app.AppCompatActivity;
import androidx.fragment.app.Fragment;
import androidx.fragment.app.FragmentManager;
import androidx.fragment.app.FragmentTransaction;

import com.example.a2022330.placeholder.BlankFragment2;

public class MainActivity extends AppCompatActivity implements View.OnClickListener{

    @Override
    protected void onCreate(Bundle savedInstanceState) {
        super.onCreate(savedInstanceState);
        setContentView(R.layout.activity_main);

        Button button = findViewById(R.id.btn1);
        button.setOnClickListener(this);

        Button button1 = findViewById(R.id.btn2);
        button1.setOnClickListener(this);
    }

    public void onClick(View view){
        switch (view.getId()){
            case R.id.btn1:
                replaceFragment(new BlankFragment1());//创建 BlankFragment1()
                break;

            case R.id.btn2:
               replaceFragment(new BlankFragment2());
               break;
        }
    }

    private void replaceFragment(Fragment fragment) {
        FragmentManager fragmentManager = getSupportFragmentManager();
        FragmentTransaction transaction = fragmentManager.beginTransaction();
        transaction.replace(R.id.fragme_layout,fragment);
        transaction.addToBackStack(null);
        transaction.commit();
    }
}
点击运行就好了。
写完了,如果本文章觉得有帮助的话,可以点点关注,
(明天还有一篇),(可能写不完了,呜呜呜)。吃饭去了,hhh~
