文章目录
一,consul概述
1.什么是consul
Consul是HashiCorp公司推出的开源工具,Consul由Go语言开发,部署起来非常容易,只需要极少的可执行程序和配置文件,具有绿色、轻量级的特点。
Consul是分布式的、高可用的、可横向扩展的用于实现分布式系统的服务发现与配置。
2.Consul的作用
- 服务注册与发现(主要功能),提供HTTP和DNS两种发现方式
- 健康检查,支持多种协议,HTTP、TCP等
- Key/Value存储
- 支持多数据中心
- 基于Golong语言,可移植性强
- 支持ACL访问控制
- 与Docker等轻量级容器可无缝配合
二,consul-template概述
Consul-Template是一个守护进程,用于实时查询Consul集群信息
Consul-Template可以更新文件系统上任意数量的指定模板,生成配置文件更新完成以后,可以选择运行shell命令执行更新操作,重新加载Nginx。
Consul-Template可以查询Consul中的服务目录、Key、Key-values等。
这种强大的抽象功能和查询语言模板可以使Consul-Template特别适合动态的创建配置文件。
例如:创建Apache/Nginx Proxy Balancers、Haproxy Backends
三,regisrator的作用
一个由Go语言编写的,针对docker使用的,可以用于检测容器状态,自动注册和注销docker容器的服务到服务配置中心。目前支持Consul、Etcd和SkyDNS2。
四,搭建consul集群环境
架构图如下:
![[外链图片转存失败,源站可能有防盗链机制,建议将图片保存下来直接上传(img-8S6NZpWZ-1647749284653)(C:\Users\zhuquanhao\Desktop\截图命令集合\linux\Docker\consul-template\1.bmp)]](https://img-blog.csdnimg.cn/ccc608ba4d0740969b67d18210c8fac3.bmp?x-oss-process=image/watermark,type_d3F5LXplbmhlaQ,shadow_50,text_Q1NETiBA55av54uC55qE5pav5Zu-5Y2h,size_20,color_FFFFFF,t_70,g_se,x_16)
| 主机 | 操作系统 | ip | 所需软件 |
|---|---|---|---|
| consul | centos7 | 192.168.100.135 | Docker 、Consul、Consul-template |
| registrator | Centos 7 | 192.168.100.142 | Docker、registrator |
需求:
实现单机网络下容器与容器之间互通
使用Docker Compose创建容器
搭建Consul服务实现自动发现和更新
环境准备:关闭防火墙和selinux
systemctl stop firewalld
setenforce 0
1.安装Consul
consul:192.168.100.135
编译安装consul
mkdir /root/consul
cd /root/consul
unzip consul_0.9.2_linux_amd64.zip
mv consul /usr/local/bin/


//设置代理,在后台启动 consul 服务端
consul agent \
-server \
-bootstrap \
-ui \
-data-dir=/var/lib/consul-data \
-bind=192.168.80.15 \
-client=0.0.0.0 \
-node=consul-server01 &> /var/log/consul.log &
##############解释####################

//设置代理,在后台启动 consul 服务端
consul agent \:启动consul集群

-server \: 以server身份启动。默认是client。

-bootstrap \:用来控制一个server是否在bootstrap模式,在一个数据中心中只能有一个server处于bootstrap模式,当一个server处于 bootstrap模式时,可以自己选举为 server-leader。

-ui \:指定开启 UI 界面,这样可以通过 http://localhost:8500/ui 这样的地址访问 consul 自带的 web UI 界面。

-data-dir=/var/lib/consul-data \:指定数据存储目录。

-bind=192.168.80.15 \:指定用来在集群内部的通讯地址,集群内的所有节点到此地址都必须是可达的,默认是0.0.0.0。

-client=0.0.0.0 \:指定 consul 绑定在哪个 client 地址上,这个地址提供 HTTP、DNS、RPC 等服务,默认是 127.0.0.1。

-node=consul-server01 &> /var/log/consul.log & :节点在集群中的名称,在一个集群中必须是唯一的,默认是该节点的主机名。指定数据中心名称,默认是dc1。
[root@bogon consul]# consul members

[root@bogon consul]# consul info | grep leader
![[外链图片转存失败,源站可能有防盗链机制,建议将图片保存下来直接上传(img-P8BHx4Hn-1647749284654)(C:\Users\zhuquanhao\Desktop\截图命令集合\linux\Docker\consul-template\2.bmp)]](https://img-blog.csdnimg.cn/5a977aef421742c8a336aeb593634e17.bmp)
通过 http api获取集群信息
curl 127.0.0.1:8500/v1/status/peers       //查看集群server成员
curl 127.0.0.1:8500/v1/status/leader      //集群Raf leader
curl 127.0.0.1:8500/v1/catalog/services   //注册的所有服务
curl 127.0.0.1:8500/v1/catalog/nginx      //查看nginx服务信息
curl 127.0.0.1:8500/v1/catalog/nodes      //集群节点详细信息
netstat -natp |grep consul
这5个端口的作用:
8300:集群内数据的读写和复制
8301:单个数据中心gossip协议通讯
8302:跨数据中心gossip协议通讯
8500:提供获取服务列表、注册服务、注销服务等HTTP接口;提供UI服务
8600:采用DNS协议提供服务发现功能
![[外链图片转存失败,源站可能有防盗链机制,建议将图片保存下来直接上传(img-Ne3VcbDw-1647749284655)(C:\Users\zhuquanhao\Desktop\截图命令集合\linux\Docker\consul-template\3.bmp)]](https://img-blog.csdnimg.cn/2add42da2643463b94a7a0d3353b56b9.bmp?x-oss-process=image/watermark,type_d3F5LXplbmhlaQ,shadow_50,text_Q1NETiBA55av54uC55qE5pav5Zu-5Y2h,size_20,color_FFFFFF,t_70,g_se,x_16)
2.配置容器服务自动加入nginx集群
registrator:192.168.100.142
(1)安装Gliderlabs/Registrator
docker run -d \
--name=registrator \
--net=host \
-v /var/run/docker.sock:/tmp/docker.sock \
--restart=always \
gliderlabs/registrator:latest \
--ip=192.168.100.142 \
consul://192.168.100.135:8500

-------------------------------------------------------------
--net=host :把运行的docker容器设定为host网络模式。
-v /var/run/docker.sock:/tmp/docker.sock :把宿主机的Docker守护进程(Docker daemon)默认监听的Unix域套接字挂载到容器中。
--restart=always :设置在容器退出时总是重启容器。
--ip :刚才把network指定了host模式,所以我们指定ip为宿主机的ip。
consul :指定consul服务器的IP和端口。
-------------------------------------------------------------
(2) 测试服务发现功能是否正常 创建四个容器
docker run -itd -p:83:80 --name test-01 -h test01 nginx
docker run -itd -p:84:80 --name test-02 -h test02 nginx
docker run -itd -p:88:80 --name test-03 -h test03 httpd
docker run -itd -p:89:80 --name test-04 -h test04 httpd

docker ps -a
![[外链图片转存失败,源站可能有防盗链机制,建议将图片保存下来直接上传(img-Gu2Z3KER-1647749284656)(C:\Users\zhuquanhao\Desktop\截图命令集合\linux\Docker\consul-template\4.bmp)]](https://img-blog.csdnimg.cn/ae5ecafa9bae46109ade837aefb9b744.bmp?x-oss-process=image/watermark,type_d3F5LXplbmhlaQ,shadow_50,text_Q1NETiBA55av54uC55qE5pav5Zu-5Y2h,size_20,color_FFFFFF,t_70,g_se,x_16)
(3)验证http和nginx服务是否注册到 consul
![[外链图片转存失败,源站可能有防盗链机制,建议将图片保存下来直接上传(img-AimsUbJ8-1647749284657)(C:\Users\zhuquanhao\Desktop\截图命令集合\linux\Docker\consul-template\5.bmp)]](https://img-blog.csdnimg.cn/e346f4d33d66471ca988d8ad7faeb190.bmp?x-oss-process=image/watermark,type_d3F5LXplbmhlaQ,shadow_50,text_Q1NETiBA55av54uC55qE5pav5Zu-5Y2h,size_20,color_FFFFFF,t_70,g_se,x_16)
在consul服务器使用curl测试连接服务器
curl 127.0.0.1:8500/v1/catalog/services
{"consul":[],"httpd":[],"nginx":[]}
3.安装consul-template
(1).准备 template nginx 模板文件
在consul服务器上操作(192.168.100.135)
unzip consul-template_0.19.3_linux_amd64.zip
mv consul-template /usr/bin/
![[外链图片转存失败,源站可能有防盗链机制,建议将图片保存下来直接上传(img-SxxhB2zm-1647749284658)(C:\Users\zhuquanhao\Desktop\截图命令集合\linux\Docker\consul-template\7.bmp)]](https://img-blog.csdnimg.cn/9367778caadd490a99764fbf08a2410b.bmp?x-oss-process=image/watermark,type_d3F5LXplbmhlaQ,shadow_50,text_Q1NETiBA55av54uC55qE5pav5Zu-5Y2h,size_20,color_FFFFFF,t_70,g_se,x_16)
4.准备template nginx模板文件
vim /root/consul/nginx.ctmpl

upstream http_backend {
  {

   {range service "nginx"}}
   server {

   {.Address}}:{

   {.Port}};
   {

   {end}}
}


server {
    listen 8000;
    server_name localhost 192.168.100.135;
    access_log /var/log/nginx/kgc.com-access.log;
    index index.html index.php;
    location / {
        proxy_set_header HOST $host;
        proxy_set_header X-Real-IP $remote_addr;
        proxy_set_header Client-IP $remote_addr;
        proxy_set_header X-Forwarded-For $proxy_add_x_forwarded_for;
        proxy_pass http://http_backend;
    }
}
![[外链图片转存失败,源站可能有防盗链机制,建议将图片保存下来直接上传(img-t0YdxF76-1647749284659)(C:\Users\zhuquanhao\Desktop\截图命令集合\linux\Docker\consul-template\8.bmp)]](https://img-blog.csdnimg.cn/037722af9c354c99b8f6ecf92eb0f027.bmp?x-oss-process=image/watermark,type_d3F5LXplbmhlaQ,shadow_50,text_Q1NETiBA55av54uC55qE5pav5Zu-5Y2h,size_20,color_FFFFFF,t_70,g_se,x_16)
5.部署nginx
在consul服务器上操作(192.168.100.135)
我这里就yum安装nginx了
创建nginx yum仓库文件
vim /etc/yum.repos.d/nginx.repo
[nginx-stable]
name=nginx stable repo
baseurl=http://nginx.org/packages/centos/7/$basearch/
gpgcheck=0
enabled=1


yum install nginx -y
nginx -v

systemctl start nginx
systemctl enable nginx
![[外链图片转存失败,源站可能有防盗链机制,建议将图片保存下来直接上传(img-N7GNxXsG-1647749284660)(C:\Users\zhuquanhao\Desktop\截图命令集合\linux\Docker\consul-template\9.bmp)]](https://img-blog.csdnimg.cn/575381c455ce4c7d96a356d181c694ea.bmp?x-oss-process=image/watermark,type_d3F5LXplbmhlaQ,shadow_50,text_Q1NETiBA55av54uC55qE5pav5Zu-5Y2h,size_20,color_FFFFFF,t_70,g_se,x_16)
6.启动 template
 consul-template --consul-addr 192.168.100.135:8500 \
> --template "/root/consul/nginx.ctmpl:/etc/nginx/conf.d/kgc.conf:/usr/sbin/nginx -s reload"
> --log-level=info
![[外链图片转存失败,源站可能有防盗链机制,建议将图片保存下来直接上传(img-cfwBLcZx-1647749284661)(C:\Users\zhuquanhao\Desktop\截图命令集合\linux\Docker\consul-template\10.bmp)]](https://img-blog.csdnimg.cn/53e81d6214124bf9b5253334a01a5c9c.bmp?x-oss-process=image/watermark,type_d3F5LXplbmhlaQ,shadow_50,text_Q1NETiBA55av54uC55qE5pav5Zu-5Y2h,size_20,color_FFFFFF,t_70,g_se,x_16)
重开一个consul终端,查看生成的配置文件
![[外链图片转存失败,源站可能有防盗链机制,建议将图片保存下来直接上传(img-iCZQOW1M-1647749284661)(C:\Users\zhuquanhao\Desktop\截图命令集合\linux\Docker\consul-template\11.bmp)]](https://img-blog.csdnimg.cn/2e863daffc8948c0bd621001e4696238.bmp?x-oss-process=image/watermark,type_d3F5LXplbmhlaQ,shadow_50,text_Q1NETiBA55av54uC55qE5pav5Zu-5Y2h,size_20,color_FFFFFF,t_70,g_se,x_16)
7.访问 template-nginx
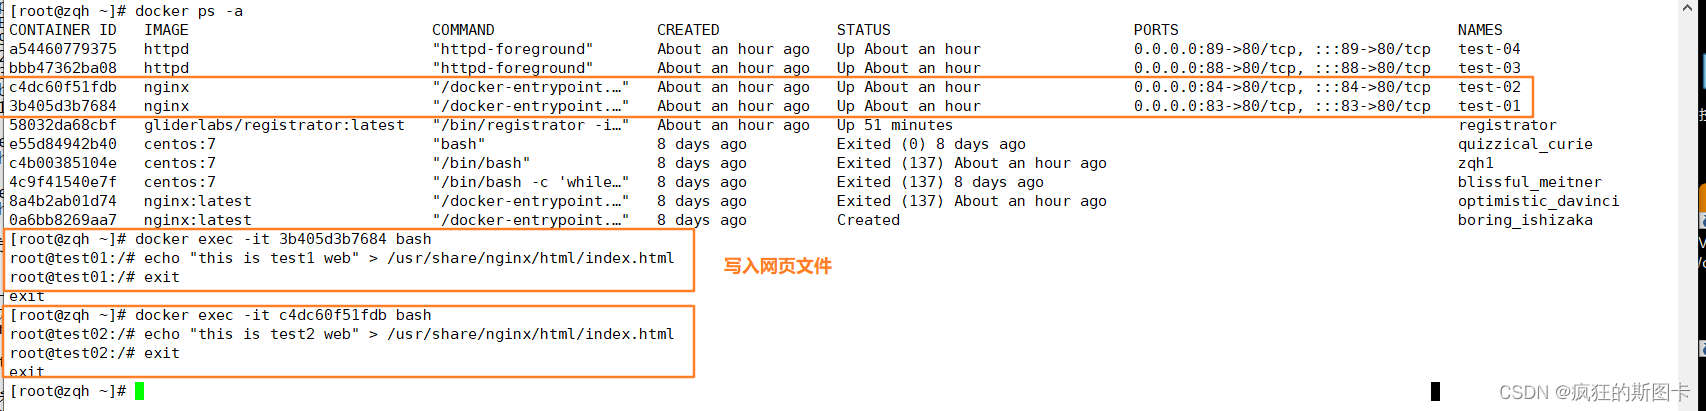
root@test01:/# echo "this is test1 web" > /usr/share/nginx/html/index.html
root@test01:/# exit
exit
[root@zqh ~]# docker exec -it c4dc60f51fdb bash
root@test02:/# echo "this is test2 web" > /usr/share/nginx/html/index.html
root@test02:/# exit
exit
浏览器访问 http://[192.168.100.135:8000并不断刷新
![[外链图片转存失败,源站可能有防盗链机制,建议将图片保存下来直接上传(img-3VdW3mSL-1647749284663)(C:\Users\zhuquanhao\Desktop\截图命令集合\linux\Docker\consul-template\13.bmp)]](https://img-blog.csdnimg.cn/a17ece00a7994cf9beb27a31162f08a7.bmp?x-oss-process=image/watermark,type_d3F5LXplbmhlaQ,shadow_50,text_Q1NETiBA55av54uC55qE5pav5Zu-5Y2h,size_20,color_FFFFFF,t_70,g_se,x_16)
![[外链图片转存失败,源站可能有防盗链机制,建议将图片保存下来直接上传(img-rkXWQwbu-1647749284663)(C:\Users\zhuquanhao\Desktop\截图命令集合\linux\Docker\consul-template\14.bmp)]](https://img-blog.csdnimg.cn/81a1de55ef8446bdbde61020e5b30de5.bmp)
8.增加一个nginx容器节点
(1)增加一个 nginx 容器节点,测试服务发现及配置更新功能。
docker run -itd -p:85:80 --name test-05 -h test05 nginx
观察 template 服务,会从模板更新/usr/local/nginx/conf/vhost/kgc.conf 文件内容,并且重载 nginx 服务
(2)查看/usr/local/nginx/conf/vhost/kgc.conf 文件内容
![[外链图片转存失败,源站可能有防盗链机制,建议将图片保存下来直接上传(img-DlrtTdEe-1647749284664)(C:\Users\zhuquanhao\Desktop\截图命令集合\linux\Docker\consul-template\15.bmp)]](https://img-blog.csdnimg.cn/11dad872ecc7416aa9d188789cb67128.bmp?x-oss-process=image/watermark,type_d3F5LXplbmhlaQ,shadow_50,text_Q1NETiBA55av54uC55qE5pav5Zu-5Y2h,size_17,color_FFFFFF,t_70,g_se,x_16)
9.consul多节点
(1)开一台新的机器(192.168.100.140)加入到已有的群集中
要先安装 consul
运行consul
consul agent \
-server \
-ui \
-data-dir=/var/lib/consul-data \
-bind=192.168.100.140 \
-client=0.0.0.0 \
-node=consul-server02 \
-enable-script-checks=true  \
-datacenter=dc1  \
-join 192.168.100.135 &> /var/log/consul.log &

-enable-script-checks=true :设置检查服务为可用
-datacenter : 数据中心名称
-join :加入到已有的集群中
切换到consul服务器上操作(192.168.100.135)
consul members
consul operator raft list-peers
![[外链图片转存失败,源站可能有防盗链机制,建议将图片保存下来直接上传(img-IZo0hx3g-1647749284664)(C:\Users\zhuquanhao\Desktop\截图命令集合\linux\Docker\consul-template\16.bmp)]](https://img-blog.csdnimg.cn/dc863416b0e446c98274337104373ff0.bmp)