consul consul-template nginx keepalived 搭建高可用负载均衡
搭建准备
两台windows服务器 IP分别为192.168.213.129和192.168.213.130
两台linux服务器(centos7) IP分别为192.168.213.134和192.168.213.135
(这里使用VMware虚拟机搭建该方案)
思路
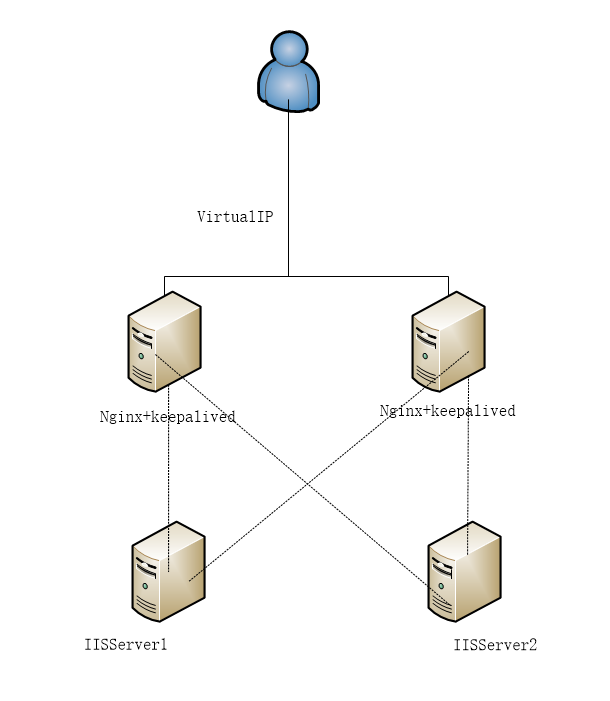
两台windows作为集群中的server提供实际的业务处理功能,在linux上使用nginx作为负载均衡器反向代理,同时两台linux做主备,使用虚拟IP对外提供服务(主备之间只有一台机器对外提供服务),当主nginx意外宕机,或者主机的nginx服务挂掉,备机自动抢占虚拟ip改为由备机提供服务,当主机一切正常时,再抢回虚拟ip。
四台机器之间通过consul搭建集群,两台windows机器作为集群中的server,consul为集群中的client提供服务发现的功能,提供健康检查功能,两台linux机器,使用consultemlate动态更新nginx的配置文件。
架构图如下:
现在开始搭建windows集群
1.安装Fabio
下载地址:https://github.com/fabiolb/fabio/releases
直接运行即可。
2.安装consul
下载地址:https://www.consul.io/downloads.html
新建consul配置文件 config.json
{
    "services": [{
            "ID": "test01",##服务ID,必须唯一
            "name": "test",##服务名称,相同服务名称应一致
            "tags":[ "urlprefix-/test01" ],##Fabio健康检查
            "address": "192.168.213.129",##服务地址
            "port": 80,##服务端口号
            "checks": [{##tcp健康检查
                "id":"test01",
                "name":"testTCP",
                "tcp": "192.168.213.129:80",
                "interval": "10s",
                "timeout":"1s"
            }
]
        },
        {
            "ID": "test02",
            "name": "test",
            "tags": [ "urlprefix-/test02" ],
            "address": "192.168.213.130",
            "port": 80,
            "checks": [{
                "id":"test02",
                "name":"testTCP",
                "tcp": "192.168.213.130:80",
                "interval": "10s",
                "timeout":"1s"
            }
]
        }
    ]
}
解压consul,并进入consul的解压目,将配置好的文件放入consul的解压目录
3.启动consul
consul agent –server –bootstrap-expect 2 -data-dir c:/consul/tmp/consul -node=n1 -bind=192.168.213.129 -dc=dc1 -config-dir=c:/consul/config -ui
-server 为将该节点作为consul server启动
–bootstrap-expect 2 表示以bootstrap模式启动,并且当集群节点小于2时,则集群失效
-data-dir 为生成路径
-config-dir 表示指定加载的配置文件
-ui 表示启动ui界面
ui界面为地址为localhost:8500
*注意:如果使用虚拟机学习搭建,可以关闭防火墙,但是正式环境使用,需要有8500,8301,8300三个端口的出入站规则。
在另一台windows机器上,重复上述步骤。
使用第一台windows机器将第二台机器加入集群
consul join 192.168.213.130
到这里位置windows上的集群搭建就已经ok了。可以在windows中查询集群中的成员。
consul members
现在开始搭建linux上的nginx
由于我不怎么熟悉linux所以很多东西都要看教程,复制粘贴,所以就用了ssh和PuTTY来连接linux
1.安装nginx依赖
sudo yum install gcc
sudo yum -y install pcre-devel
sudo yum install –y zlib-devel
2.下载nginx
下载地址:http://nginx.org/en/download.html 下载nginx(tar文件)
通过ssh将nginx的压缩包方式CentOS7的/usr/local
3.解压nginx
进入/usr/local目录,并解压
cd /usr/local
tar -xzvf nginx-1.13.12.tar.gz
4.安装nginx
cd nginx-1.13.12
./configure
make && make install
检验nginx是否安装成功
cd /usr/local/nginx/sbin
./nginx -v
5.安装consul
下载地址:https://www.consul.io/downloads.html(选择linux版本)
通过ssh将下载好的压缩文件放入/usr/local目录中
解压压缩文件
unzip -o consul_1.1.0_linux_amd64 -d /usr/local/consul
运行consul
cd /usr/local/consul
./consul agent -data-dir /tmp/consul -node=n3 -bind=192.168.213.134 -datacenter=dc1
*注意:-bind 后面的是本机的ip,contos7,可以通过ifconfig查询本机IP地址。
6.安装consul-template
下载地址:https://releases.hashicorp.com/consul-template/
通过ssh将zip放入到/usr/local目录下,并解压
unzip -o consul-template_0.18.3_linux_amd64.zip -d /usr/local/consultemplate
编写模板文件,并放入到/usr/local/consultemplate下
##consulteml.ctmpl
worker_processes auto;

events {
    worker_connections  20480;
}

http {

    include       mime.types;
    default_type  application/octet-stream;
    keepalive_timeout  65;

    upstream test {

    ##主要这里根据服务name test遍历取服务Ip及端口
    {{range service "test"}}server {{.Address}}:{{.Port}};
    ##如果consul集群未取到设定一个默认
    {{else}}server 192.168.213.129:80; # force a 502{{end}}
    }


    server {

        listen 80;

        server_name 192.168.213.129;

        location / {

        proxy_pass http://test;

        proxy_set_header X-Forwarded-For $proxy_add_x_forwarded_for;

        proxy_set_header Host $host:80;

        proxy_set_header X-Real-IP $remote_addr;

        }

    }

}
使用consultemplate更新nginx配置文件
sudo ./consul-template -consul-addr 127.0.0.1:8500 -template /usr/local/consultemplate/consulteml.ctmpl:/usr/local/nginx/conf/nginx.conf:"/usr/local/nginx/sbin/nginx -s reload"
*注意:如果执行该命令报错:
nginx: [error] open() "/usr/local/nginx/logs/nginx.pid" failed (2: No such file or directory)
可以在nginx的sbin目录下输入该命令
./nginx –s stop
/usr/local/nginx/sbin/nginx -c /usr/local/nginx/conf/nginx.conf
搭建linux上的keepalived
1.安装keepalived依赖
yum -y install libnl libnl-devel
yum install -y libnfnetlink-devel
yum install openssl openssl-devel
2.安装keepalived
yum install keepalived -y
3.编辑配置文件
master
## master keepalived.conf
global_defs {
   notification_email {##指定keepalived在发生事件(如切换)需要发送Email的对象,多个写多行##
     923887863@qq.com
   }
   notification_email_from [email protected]
   smtp_server 127.0.0.1##SMTP服务器##
   smtp_connect_timeout 30##链接超时时间##
   router_id localhost ##路由标识,这里用主机名##
}
##nginx检测
vrrp_script chk_nginx {
   script "/etc/keepalived/nginx_check.sh" ## 检测 nginx 状态的脚本路径
   interval 3 ## 检测时间间隔
   weight -20 ## 如果条件成立,权重-20
}

##Master机器定义
vrrp_instance VI_1 {   ##虚拟路由标识##
    state MASTER           ##初始状态,默认,选举产生后才可以升级为Master ,这里明确定义其为Master##
    interface ens33         ##选举通过那个网卡接口,可以用ifconfig查看##
    virtual_router_id 51   ##虚拟路由的ID号,主备要一致,否则会出现脑裂##
    priority 100           ##主机应大于备机##
    advert_int 1           ##检查间隔,默认1s##

    authentication {       ##认证机制##
    auth_type PASS         ##认证方式,PASS为明文##
    auth_pass 1111      ##认证密码##
}
virtual_ipaddress {    ##虚拟地址池##
    192.168.213.150
    }
    track_script {
        chk_nginx ## 执行 Nginx 监控的服务
    }
}
backup
#backup keepalived.conf
! Configuration File for keepalived

global_defs {
   notification_email {
     923887863@qq.com
   }
   notification_email_from [email protected]
   smtp_server 127.0.0.1
   smtp_connect_timeout 30
   router_id nginxNode2
   vrrp_skip_check_adv_addr
   vrrp_strict
   vrrp_garp_interval 0
   vrrp_gna_interval 0
}


vrrp_script chk_nginx {
   script "/etc/keepalived/nginx_check.sh" ## 检测 nginx 状态的脚本路径
   interval 2 ## 检测时间间隔
   weight -20 ## 如果条件成立,权重-20
}


vrrp_instance VI_1 {
    state BACKUP
    interface ens33
    virtual_router_id 51
    priority 98
    advert_int 1
    authentication {
        auth_type PASS
        auth_pass 1111
    }
    track_script {
      chk_nginx ## 执行 Nginx 监控的服务
   }
    virtual_ipaddress {
        192.168.213.150
    }
}
nginx存活检测脚本nginx_check.sh
#!/bin/bash

A=`ps -C nginx --no-header | wc -l`

if [ $A -eq 0 ];then

    /usr/local/nginx/sbin/nginx #尝试重新启动nginx

    sleep 2  #睡眠2秒

    if [ `ps -C nginx --no-header | wc -l` -eq 0 ];then

        killall keepalived #启动失败,将keepalived服务杀死。将vip漂移到其它备份节点

    fi

fi
*nginx_check.sh是脚本需要给权限才能执行 chmod a+x nginx_check.sh
4.将nginx_check.sh和keepalived.conf放入/etc/keepalived 目录下(如果该目录不存在,就自己创建)
5.启动keepalived
systemctl start keepalived
6.查看启动 日志
tail -f /var/log/messages
如果日志无异常的话,可以查看虚拟ip
*虚拟ip用ifconfig是查询不到的,需要用ip addr 查看,也可以用 ip addr sh ens33
现在可以开始搭建另一台Linux机器了,步骤同上,只需要区分主备的keepalived.conf即可。
测试keepalived可以给两台nginx不同的index页面,停掉主的nginx,再访问vip看是否切换到备机的页面。
然后再启动主机的nginx和keepalived,再访问vip是否钱还至主机的页面。