之前写过鲲鹏920 CentOS7 部署安装 Archiconda3 和 Jupyter notebook 的文章
也有朋友说,怎么没有 Anaconda3 呐,当时啊,官方还没出 aarch64 版本(适配鲲鹏920)
近期突然发现,官方发布 Anaconda3 aarch64 版本了
所以,本文带大伙走一波,玩一哈
说真的,这篇文章意义挺大的
-
可以通过此文,直接开启 Python 学习之路,无需任何 IDE 开发工具,直接使用浏览器即刻编程
-
可以通过此文,开启数据分析(Data Analysis)之路(pandas/numpy/…)、数据挖掘(Data Mining)
-
也可通过此文,开启 AI (深度学习 Deep Learning 、机器学习 Machine Learning 、神经网络 TensorFlow)之路
-
…
先贴一下之前写的文章
鲲鹏920 CentOS7 部署安装 Archiconda3 和 Jupyter notebook
文章目录
0. 环境说明
本文所使用的具体环境:(鲲鹏 920,openEuler 操作系统)
[root@oe-20-09 ~]# uname -sr
Linux 4.19.140-2009.4.0.0048.oe1.aarch64
[root@oe-20-09 ~]#
[root@oe-20-09 ~]# cat /etc/system-release
openEuler release 20.09
[root@oe-20-09 ~]#
1. 创建用户
直接在 root 用户下操作
useradd ai1024
添加密码
- 方式 1:
echo "password" | passwd --stdin ai1024
- 方式 2:
echo "ai1024:password" | chpasswd
- 方式 3:
passwd ai1024
2. 下载 Anaconda3 aarch64 一键部署脚本
- 创建数据目录
mkdir -p /datafs/ai1024
- 下载脚本到数据目录
wget https://mirrors.tuna.tsinghua.edu.cn/anaconda/archive/Anaconda3-2021.11-Linux-aarch64.sh -P /datafs/ai1024
- 给脚本授权(普通用户权限)
chown -R ai1024:ai1024 /datafs/ai1024
3. 一键部署 Anaconda3
- 先切换到普通用户
su - ai1024
- 执行一键部署脚本
sh /datafs/ai1024/Anaconda3-2021.11-Linux-aarch64.sh
执行之后,回车即可
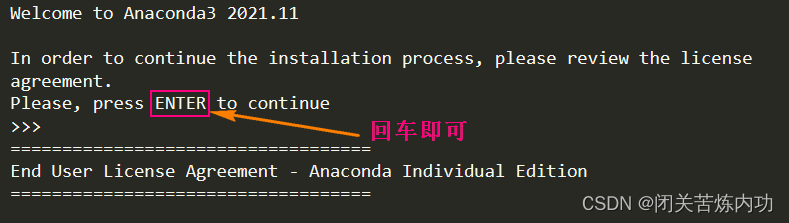
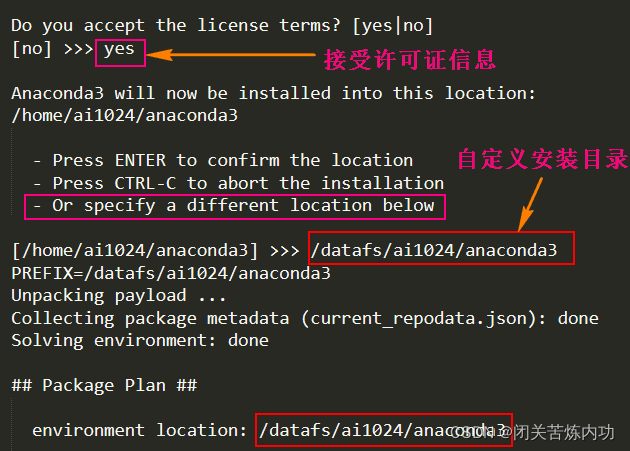
然后,yes 接受许可证
然后自定义 安装目录(懒人也阔以默认,但是默认的话会安装到用户家目录)
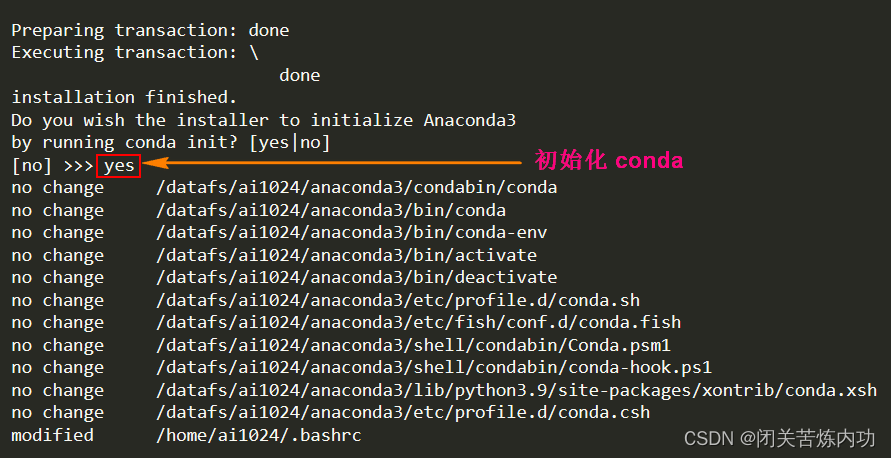
然后,yes 初始化 conda
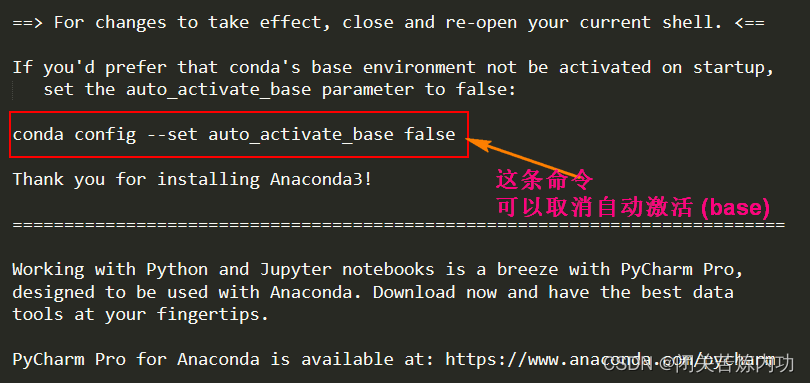
注意:这条命令
conda config --set auto_activate_base false
可以取消自动激活 (base)
待会演示一哈,重新进入终端,默认是激活的伪终端,会在 [ai1024@oe-20-09 ~] 的前面带有 (base)
然后我们关掉终端,重新进入终端,就会发现 带有 伪终端 (base)

然后我们可以设置 一下 取消自动激活伪终端 (base)
conda config --set auto_activate_base false

然后我们退出终端,重新打开终端,发现默认终端没有 再出现 伪终端 (base) 了

然后,这个时候我如果想再进入 伪终端(base)
使用 这条命令
conda activate

然后,这个时候我如果想再退出 伪终端(base)
使用 这条命令
conda deactivate

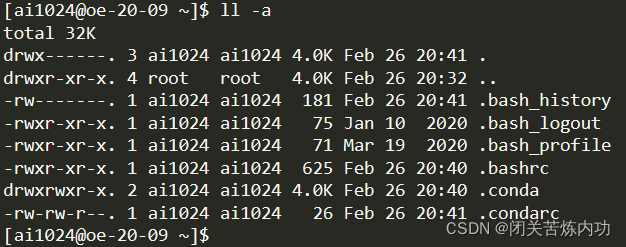
然后我们来查看一下,当前用户家目录生成的隐藏文件
ls -la
然后,我们来生效一下 环境变量
source .bashrc

然后我们再进入 伪终端,因为伪终端有 Anaconda3 环境
[ai1024@oe-20-09 ~]$ conda activate
(base) [ai1024@oe-20-09 ~]$
查看 conda 版本
(base) [ai1024@oe-20-09 ~]$ conda -V
conda 4.10.3
(base) [ai1024@oe-20-09 ~]$
查看 python 版本
(base) [ai1024@oe-20-09 ~]$ python -V
Python 3.9.7
(base) [ai1024@oe-20-09 ~]$
查看 pip 版本
(base) [ai1024@oe-20-09 ~]$ pip -V
pip 21.2.4 from /datafs/ai1024/anaconda3/lib/python3.9/site-packages/pip (python 3.9)
(base) [ai1024@oe-20-09 ~]$
查看 conda 列表个数
(base) [ai1024@oe-20-09 ~]$ conda list|wc -l
402
(base) [ai1024@oe-20-09 ~]$
查看 jupyter 版本(这个安装自带依赖,不用单独安装 jupyter 了)
(base) [ai1024@oe-20-09 ~]$ jupyter --version
Selected Jupyter core packages...
IPython          : 7.29.0
ipykernel        : 6.4.1
ipywidgets       : 7.6.5
jupyter_client   : 6.1.12
jupyter_core     : 4.8.1
jupyter_server   : 1.4.1
jupyterlab       : 3.2.1
nbclient         : 0.5.3
nbconvert        : 6.1.0
nbformat         : 5.1.3
notebook         : 6.4.5
qtconsole        : 5.1.1
traitlets        : 5.1.0
(base) [ai1024@oe-20-09 ~]$
4. 配置 Jupyter Notebook
生成 jupyter notebook 默认配置文件(默认是没有的)
(base) [ai1024@oe-20-09 ~]$ jupyter notebook --generate-config
Writing default config to: /home/ai1024/.jupyter/jupyter_notebook_config.py
(base) [ai1024@oe-20-09 ~]$
然后配置一下 jupyter notebook 默认配置文件
vim /home/ai1024/.jupyter/jupyter_notebook_config.py
c.NotebookApp.allow_root = False
c.NotebookApp.ip = '0.0.0.0'
c.NotebookApp.open_browser = False
c.NotebookApp.port = 8888
涉及到安全问题(浏览器面板可以进入 linux terminal),我们只使用普通用户,所以禁用 root 用户
ip 设置为 0.0.0.0 这样是确保本地和外界都可以访问
port 设置为 8888 是自定义端口
关于端口这块,多说一点,为确保外界访问,要么关掉防火墙 (firewalld)
如果开着防火墙,那就需要放行端口
[root@oe-20-09 ~]# firewall-cmd --zone=public --add-port=8888/tcp --permanent
success
[root@oe-20-09 ~]# firewall-cmd --reload
success
[root@oe-20-09 ~]#
[root@oe-20-09 ~]# firewall-cmd --list-ports
8888/tcp
[root@oe-20-09 ~]#
然后配置 jupyter notebook 密码
(base) [ai1024@oe-20-09 .jupyter]$ jupyter notebook password
Enter password:
Verify password:
[NotebookPasswordApp] Wrote hashed password to /home/ai1024/.jupyter/jupyter_notebook_config.json
(base) [ai1024@oe-20-09 .jupyter]$
5. 启动并使用 Jupyter Notebook
启动前,先创建一个存储目录,以备后用
mkdir -p /datafs/ai1024/notebook
然后确保是在 Anaconda3 的 伪终端 (base) 模式
(base) [ai1024@oe-20-09 notebook]$
然后运行后台启动 jupyter notebook
(base) [ai1024@oe-20-09 notebook]$ nohup jupyter notebook >/tmp/ai1024-jupyter-notebook-20220226.log 2>&1 &
[1] 26022
(base) [ai1024@oe-20-09 notebook]$
然后退出 Anaconda3 的 伪终端 (base) 模式
(base) [ai1024@oe-20-09 notebook]$ conda deactivate
[ai1024@oe-20-09 notebook]$
查看 jupyter 进程
[ai1024@oe-20-09 notebook]$ ps -ef|grep jupyter|grep -v grep
ai1024     26022       1  0 Feb26 ?        00:00:56 /datafs/ai1024/anaconda3/bin/python /datafs/ai1024/anaconda3/bin/jupyter-notebook
ai1024     30077   26022  0 Feb26 ?        00:00:15 /datafs/ai1024/anaconda3/bin/python -m ipykernel_launcher -f /home/ai1024/.local/share/jupyter/runtime/kernel-83982529-e755-4d41-973f-5ed355feea06.json
[ai1024@oe-20-09 notebook]$
查看 8888 端口
[ai1024@oe-20-09 notebook]$ netstat -antp|grep 8888
(Not all processes could be identified, non-owned process info
 will not be shown, you would have to be root to see it all.)
tcp        0      0 0.0.0.0:8888            0.0.0.0:*               LISTEN      26022/python
[ai1024@oe-20-09 notebook]$
查看日志文件
[ai1024@oe-20-09 notebook]$ ls -l /tmp/ai1024-jupyter-notebook-20220226.log
-rw-rw-r--. 1 ai1024 ai1024 14832 Mar  2 21:22 /tmp/ai1024-jupyter-notebook-20220226.log
[ai1024@oe-20-09 notebook]$
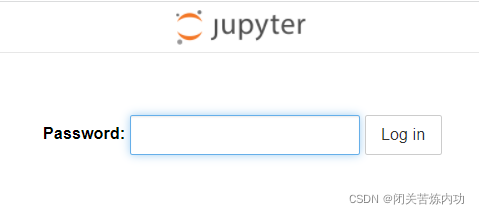
然后,使用 web 浏览器访问 Anaconda3 的 Jupyter Notebook 面板
输入自己设置的密码,即可登入!
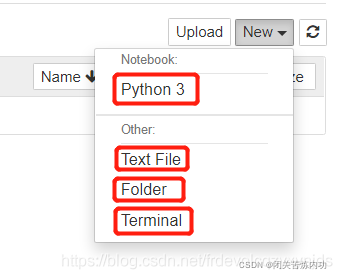
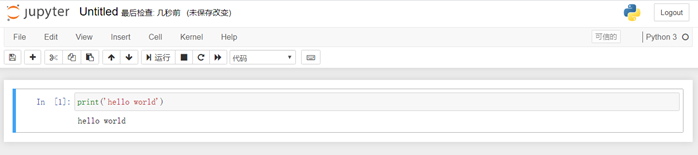
登入以后,即可打开新世界

更多精彩!请持续关注本博主!
肝文不易,各位看官感觉还行的话,点个赞 支持一哈,好不好嘛!
小伙伴们,你学废了么?
我们下期见,拜拜!