本文介绍了kindeditor编辑器与java web进行集成,实现文章内容的上传,查询与修改,由于kindeditor图片默认上传到项目中,一旦项目需要升级,需要将图片文件拷贝出来,在新项目部署完成之后,再将kindeditor的图片放到项目中,而本文在这一点上进行了改进,实现了上传图片与项目路径分开,极大便捷了web版本升级
实例下载
KindEditor使用范例
1 概述
经常上论坛的网友会发现,网页上的内容是由后台类似word的在线编辑工具编辑而成,这样的工具小编在网上搜索了一下,大致有UEditor, KindEditor, eWebEditor等, 今天我们就来体验一下KindEditor的使用, 最后你可以下载精心为您准备的Demo [下载]
Demo中使用的工具可以在百度云下载:
Eclipse: https://pan.baidu.com/s/1ci4Nim
Tomcat: https://pan.baidu.com/s/1eS6JlrO
Maven: https://pan.baidu.com/s/1i4Ud35F
MySql服务器: http://pan.baidu.com/s/1b7ThBg
MySql客户端(sqlyog): http://pan.baidu.com/s/1hs5Vmbq
JDK1.7: http://pan.baidu.com/s/1pLBMCHH
下载demo后需要进行的配置:
-
修改jdbc.properties中连接数据库的用户名与密码
-
将数据库脚本导入到mysql中
-
demo中 FileLocationConfig.properties 中指定了图片文件上传的后台目录,根据自己的需要进行配置
在程序运行前确保图片的目录是存在的
-
在tomcat的server.xml中添加配置
<Context debug="0" docBase="F:\filestore" path="/filestore" reloadable="true"> </Context>
配置完成后,本项目是maven项目,导入eclipse运行即可
2 本文讨论主题
1. KindEditor的概述
2. KindEditor集成到eclipse项目中 并 代码展示使用
3. KindEditor实现上传图片并且将图片保存到项目以外的其它文件系统位置
3 KindEditor概述
3.1 KindEditor官网:http://kindeditor.net/demo.php, 进入网页后,到[下载]->[官方下载] 进行下载, 目前最新版本为: KindEditor 4.1.11
3.2 解压 kindeditor-x.x.x.zip 文件, 你可以根据需要取舍自己使用哪种程序(php,jsp,asp), 本文主要讨论jsp程序的使用
| 1. php - PHP程序 |
| 2. jsp - JSP程序 |
| 3. asp.net - ASP.NET程序 |
| 4. examples - 演示文件 |
| 5. lang – 语言包 |
| 6. plugins – kindeditor中自定义按钮插件 |
| 7. kindeditor-all-min.js kindeditor最主要js文件(压缩) |
| 8. kindeditor-all.js 未压缩 |
4 KindEditor集成到项目
4.1 项目运行效果图
| 4.1.1显示所有添加的文章列表(见下图),点击文章列表后,进入文章详情(4.1.2) 点击”添加文章”进入文章添加页面(4.1.3) |

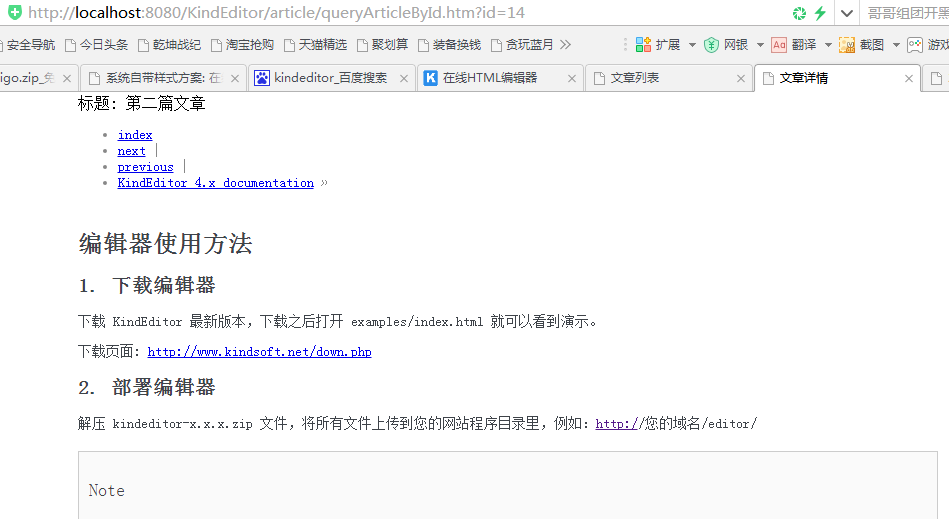
4.1.2 文章详情页面(见下图)
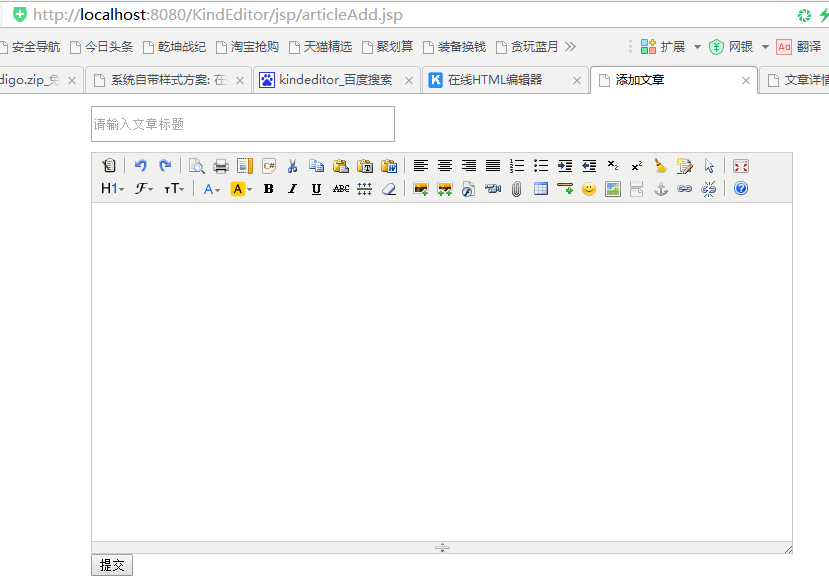
4.1.3 文章添加页面(见下图)
4.2 在eclipse中新建maven项目,项目名称KindEditor,下面列表显示了本项目使用的框架与技术, 下载示例源码查看相关配置与代码
| 4.2.1 SpringMvc:处理前台发往后台的数据请求 |
| 4.2.2 MyBatis: 实现对数据库的ORM操作(存取操作) |
| 4.2.3 MySql: 用于存放数据 |
4.3 数据库实例名称: t_kindedit, 数据库表:t_article
Id: 主键 Title: 文章标题
Content: 用于存放KindEditor编辑生成的内容(注意:Content的数据类型为longtext)
| 4.3.1建表语句 |
CREATE TABLE `t_article` (
  `Id` int(10) NOT NULL   AUTO_INCREMENT COMMENT '文章主键',
  `Title` varchar(100) COLLATE   utf8_unicode_ci NOT NULL COMMENT '文章标题',
  `Content` longtext COLLATE   utf8_unicode_ci COMMENT '文章内容',
  PRIMARY KEY (`Id`)
) ENGINE=InnoDB AUTO_INCREMENT=24 DEFAULT   CHARSET=utf8 COLLATE=utf8_unicode_ci
4.3.2 Jdbc配置: 请配置数据库 用户名与密码

driver=com.mysql.jdbc.Driver
#url=jdbc:mysql://localhost:3306/hctl?characterEncoding=utf-8
url=jdbc\:mysql\://localhost\:3306/t_kindedit?characterEncoding=utf-8&allowMultiQueries=true
#url=jdbc:mysql://www.ad186.com:3306/hctl?characterEncoding=utf-8
username=root
password=root
#username=root
#password=ajqnhwvia

#\u5b9a\u4e49\u521d\u59cb\u8fde\u63a5\u6570
initialSize=0
#\u5b9a\u4e49\u6700\u5927\u8fde\u63a5\u6570
maxActive=20
#\u5b9a\u4e49\u6700\u5927\u7a7a\u95f2
maxIdle=20
#\u5b9a\u4e49\u6700\u5c0f\u7a7a\u95f2
minIdle=1
#\u5b9a\u4e49\u6700\u957f\u7b49\u5f85\u65f6\u95f4
maxWait=6000000
4.3 在项目工程中的 src/main/webapp中新建文件夹jsLib(用于存放js库), 将下载的kindeditor放在jsLib下

4.4 添加文章, 在 src/main/webapp中新建文件夹 jsp,此目录存放应用的jsp文件,添加articleAdd.jsp, 在页面中填写文章标题与内容后,点击”提交”后保存文章

4.4.1 articleAdd.jsp运行效果

4.4.2 articleAdd.jsp片段代码讲解
引入kindeditor库文件以及语言包
<script charset="utf-8"   src="<%=contextPath%>/jsLib/kindeditor/kindeditor-all.js"></script>
<script charset="utf-8"   src="<%=contextPath%>/jsLib/kindeditor/lang/zh-CN.js"></script>
初始化kindeditor
KindEditor.ready(function(K) {
       window.editor   = K.create('#editor_id',{
               uploadJson   : '<%=contextPath%>/jsLib/kindeditor/jsp/upload_json.jsp',
               fileManagerJson   : '<%=contextPath%>/jsLib/kindeditor/jsp/file_manager_json.jsp',
               allowFileManager   : true
  });
将Kindeditor渲染到textarea上
<form id="articleForm">
      <div   style="margin-top: 10px;">
               <input   type="text" name="title" placeholder="请输入文章标题" style="width: 300px; height: 30px;">
               </input>
      </div>
      <div   style="margin-top: 10px;">
               <textarea id="editor_id"   name="content" style="width:700px;height:400px;">
               </textarea>
      </div>
</form>
4.4.3 articleAdd.jsp全部代码(可以添加文章也可以修改文章)
<%@ page language="java" contentType="text/html;   charset=UTF-8" pageEncoding="UTF-8"%>
<%String contextPath = request.getContextPath();%>
<!DOCTYPE html>
<html>
   <head>
       <meta charset="UTF-8">
       <title>添加文章</title>
       <script charset="utf-8"   src="<%=contextPath%>/jsLib/kindeditor/kindeditor-all.js"></script>
            <script   charset="utf-8" src="<%=contextPath%>/jsLib/kindeditor/lang/zh-CN.js"></script>
            <script   type="text/javascript"   src="<%=contextPath%>/jsLib/jquery/jquery-1.10.1.js"   ></script>
            <script>
                    KindEditor.ready(function(K) {
                              window.editor = K.create('#editor_id',{
                                  uploadJson :   '<%=contextPath%>/jsLib/kindeditor/jsp/upload_json.jsp',
                                  fileManagerJson :   '<%=contextPath%>/jsLib/kindeditor/jsp/file_manager_json.jsp',
                                allowFileManager : true
                        });
                    });

                    $(function(){
                         //异步提交文章标题与内容
                         $('#saveBtn').on('click',   function(){
                                   var   title   = $('input[name=title]').val();
                                   //将kindeditor中的内容同步到textarea中
                                   window.editor.sync();
                                   var   content = $('#editor_id').val().trim();
                                   if(title.length   == 0){
                                            alert('请输入标题');
                                            return;
                                   }
                                   if(content.length   == 0){
                                            alert('请输入内容');
                                            return;
                                   }
                                   $.ajax({
                                              url:   '<%=contextPath%>/article/saveArticle.htm',
                                              type: 'post',
                                              data:{
                                                       'title'     : title,
                                                       'content' : content
                                              },
                                              timeout: 1000,
                                              success: function (data, status) {
                                                       if(data.success == true){
                                                                alert(data.msg);
                                                                window.location.href="<%=contextPath%>/article/queryArticle.htm";
                                                       }else if(data.success == false){
                                                                alert(data.msg);
                                                       }

                                              },
                                              fail: function (err, status) {
                                                console.log(err)
                                              }
                                  });
                         });

                         });
            </script>
   </head>
   <body style="width:   860px; margin: 0 auto;">
       <div>
          <form   id="articleForm">
                   <div style="margin-top:   10px;">
                            <input   type="text" name="title" placeholder="请输入文章标题" style="width:   300px; height: 30px;"></input>
                   </div>
                   <div style="margin-top:   10px;">
                            <textarea   id="editor_id" name="content"   style="width:700px;height:400px;">
                                        </textarea>
                   </div>
          </form>
          <div>
                   <input   type="button" value="提交" id="saveBtn" />
          </div>
       </div>
   </body>
</html>
4.5 articleList.jsp, 用于查询文章的列表数
| 4.5.1文章列表前台(articleList.jsp) |
<%@ page language="java"   contentType="text/html; charset=UTF-8"   pageEncoding="UTF-8"%>
<%@ taglib uri="http://java.sun.com/jsp/jstl/core"   prefix="c"%>
<%@ taglib   uri="http://java.sun.com/jsp/jstl/fmt" prefix="fmt"%>
<%@ taglib prefix="fn"   uri="http://java.sun.com/jsp/jstl/functions" %>
<%String contextPath =   request.getContextPath();%>
<!DOCTYPE html>
<html>
         <head>
             <meta charset="UTF-8">
             <title>文章列表</title>
             <link type="text/css"   rel="stylesheet"   href="<%=contextPath%>/css/style.css">
             <script   type="text/javascript"   src="<%=contextPath%>/jsLib/jquery/jquery-1.10.1.js" ></script>
             <script   type="text/javascript">
                //jquery启动入口
                       $(function(){

                       })

                       //跳转到添加文章页面
                          function   addArticle(){
                          window.location.href="<%=contextPath%>/jsp/articleAdd.jsp";
                       }

                       //刷新本页
                       function refresh(){
                          window.location.href="<%=contextPath%>/article/queryArticle.htm";
                       }
                   </script>
         </head>
         <body   style="width: 500px; margin: 0 auto ;">
             <div>
                <a target="_blank"   onclick="addArticle()">添加文章</a>
                <a target="_blank"   onclick="refresh()">刷新列表</a>
             </div>

             <div>
                <c:forEach   items="${lstArtiles}" var="item"   varStatus="index">
                         <p><a target="_blank" href="<%=contextPath%>/article/queryArticleById.htm?id=${item.id}">
                             ${index.count}.${item.title}
                             </a>
                         </p>
                </c:forEach>
             </div>
         </body>
</html>
4.6 查看文章详情,articleDetail.jsp
| 4.6.1 articleDetail.jsp代码, el表达式显示文章内容 |
<%@ page language=”java”   contentType=”text/html; charset=UTF-8” pageEncoding=”UTF-8”%>
<%@ taglib uri=”http://java.sun.com/jsp/jstl/core” prefix=”c”%>
<%@ taglib uri=”http://java.sun.com/jsp/jstl/fmt” prefix=”fmt”%>
<%@ taglib prefix=”fn” uri=”http://java.sun.com/jsp/jstl/functions”   %>
<%String contextPath = request.getContextPath();%>
<!DOCTYPE html>
<html lang=”en”>
   <head>
       <meta charset=”UTF-8”>
       <title>文章详情</title>
   </head>
   <body style=”width: 860px;   margin: 0 auto ;”>
       <div>
          <div>标题: ${article.title}</div>
          <div>   ${article.content} </div>
       </div>
   </body>
  </html>
4.7 后台java代码,用于处理文章的列表查询,保存与查看文章的详情
package com.main.controller;

import java.io.IOException;
import java.io.PrintWriter;
import java.util.List;

import javax.servlet.http.HttpServletResponse;

import org.springframework.beans.factory.annotation.Autowired;
import org.springframework.stereotype.Controller;
import org.springframework.ui.ModelMap;
import   org.springframework.web.bind.annotation.RequestMapping;

import com.main.model.Article;
import com.main.service.ArticleService;

import net.sf.json.JSONObject;

@Controller
@RequestMapping("/article")
public class ArticleController {

         @Autowired
         private   ArticleService articleService;

         public   ArticleController() {
                   System.out.println("Article构造函数");
         }

         /**
          * 查询所有文章页面
          * 访问链接:    http://localhost:8080/KindEditor/article/queryArticle.htm
          */
         @RequestMapping("/queryArticle.htm")
    public String   queryArticle(ModelMap map) {
                   Article   article = new Article();
                   List<Article>   lstArticle = articleService.selectByArticle(article);
                   map.put("lstArtiles",   lstArticle);
       return "articleList";
    }

         /**
          * 根据文章id查看文章详情页面
          * 访问链接:    http://localhost:8080/KindEditor/article/queryArticleById.htm?id=1
          */
         @RequestMapping("/queryArticleById.htm")
    public String   queryArticleById(ModelMap map, Integer id) {
                   Article   article = articleService.queryArticleById(id);
                   map.put("article",   article);
       return "articleDetail";
    }


         /**
          * 保存文章内容
          * 访问链接:  http://localhost:8080/KindEditor/article/saveArticle.htm
          */
         @RequestMapping("/saveArticle.htm")
    public String   saveArticle(ModelMap map, String title, String content, HttpServletResponse   response) {
                   Article   article = new Article();
                   article.setTitle(title);
                   article.setContent(content);
                   int   nResult = articleService.saveArticle(article);

                   //保存文章后,告之前台是否成功
                   JSONObject   json = new JSONObject();
                   if(nResult   > 0){
                            json.put("success",   true);
                            json.put("msg",   "保存文章成功");
                   }else{
                            json.put("success",   false);
                            json.put("msg",   "保存文章失败");
                   }

               response.setCharacterEncoding("UTF-8");
               response.setContentType("application/json; charset=utf-8");
                   PrintWriter   out = null;

             try {
                 out = response.getWriter();
                 out.print(json.toString());
             } catch (IOException e) {
                 e.printStackTrace();
             } finally {
                 if (out != null) {
                     out.close();
                 }
             }
             return null;
    }
}
5 KindEditor实现上传图片并且将图片保存到项目以外的其它文件系统位置
5.1实现上传图片功能,由于默认上传图片的目录内嵌在项目工程的目录下,所以项目打包更新时需要考虑到图片文件,所以使用起来很不方便, 5.2会针对这个问题进行解决
| 5.1.1 在kindeditor中配置上传图片的jsp文件 |
KindEditor.ready(function(K) {
                   window.editor   = K.create('#editor_id',{
                            uploadJson :   '<%=contextPath%>/jsLib/kindeditor/jsp/upload_json.jsp',
                            fileManagerJson :   '<%=contextPath%>/jsLib/kindeditor/jsp/file_manager_json.jsp',
                            allowFileManager   : true
         });
});
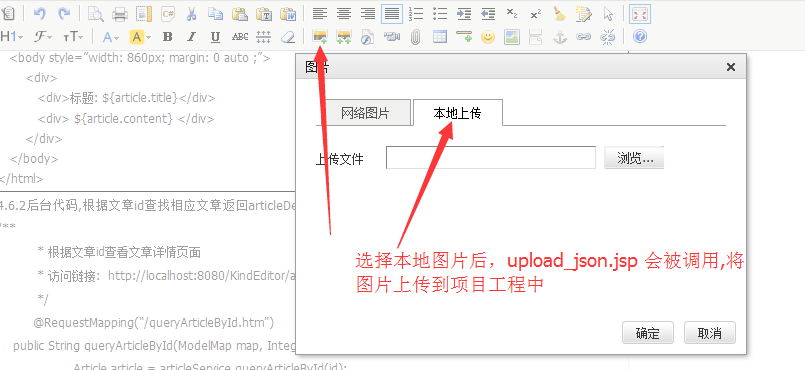
在kindeditor功能按钮上选择本地图片时,upload_json.jsp会被调用,
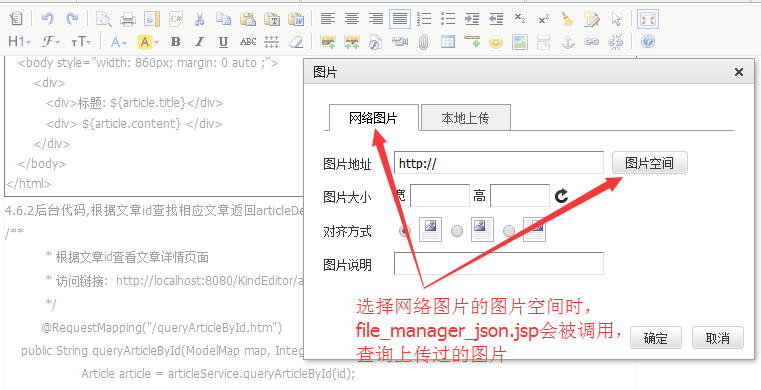
在kindeditor功能按钮上选择网络图片时,file_manager_json.jsp会被调用
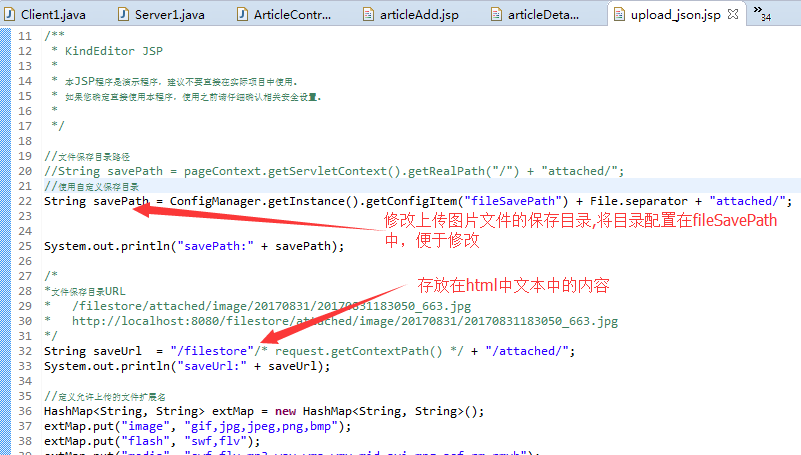
5.2 配置上传图片的目录
| 5.2.1 在upload_json.jsp中修改图片存放目录,将下图原代码注释换成自定义目录 savePath(图片绝对路径): f:/filestore/attached/图片位置+图片名称 saveUrl(图片工程路径): /filestore/attached/图片位置+图片名称 |
5.2.2 file_manager_json.jsp查看上传过图片的路径
rootPath:/filestore/attached/+图片位置+图片名称
rootUrl:/filestore/attached/+图片位置+图片名称

| 5.3 在tomcat的server.xml的Host中配置如下映射路径 <Context debug="0" docBase="F:\filestore" path="/filestore" reloadable="true"> </Context> 注意: 在程序启动之前, “F:/filestore”这个目录必须存在,否则程序启动报错
必须是下面的顺序 <Context debug="0" docBase="F:\filestore" path="/filestore" reloadable="true"> </Context> <Context docBase="KindEditor" path="/KindEditor" reloadable="true" source="org.eclipse.jst.j2ee.server:KindEditor"/></Host> |
| 5.4 试验: 从本地选择一张图片,图片路径为下图所示(将源代码按钮选上) |
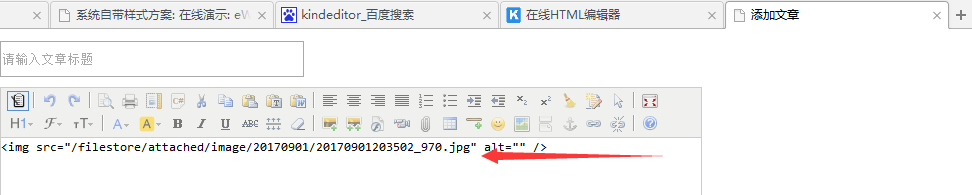
地址栏访问路径: http://localhost:8080/filestore/attached/image/20170901/20170901203502_970.jpg
