GeoServer JMS 集群
共享数据目录的集群同步
环境准备
单机多端口集群
| IP | 系统 | 配置 | 主从 |
|---|---|---|---|
| 192.168.1.251:9091 | centos7 | 4核16g | slave |
| 192.168.1.251:9092 | centos7 | 4核16g | master |
| 192.168.1.253:9093 | centos7 | 4核16g | slave |
软件准备
- jdk1.8
- apache-tomcat-9.0.37.tar.gz
- geoserver-2.18.2-war
插件准备
- geoserver-2.18-SNAPSHOT-activeMQ-broker-plugin.zip
- geoserver-2.18-SNAPSHOT-jms-cluster-plugin.zip
根据自己的版本来下载对应版本的插件
安装
-
预先安装好linux的javajdk,并配置好环境变量
-
安装tomcat
- 创建tomcat文件夹
mkdir /usr/local/tomcat
- 上传tomcat的tar包到文件夹中

- 使用tar命令解压
tar -zxvf apache-tomcat-9.0.37.tar.gz
-
创建三个tomcat程序
tomcat1-9091 tomcat2-9092 tomcat3-9093
-
修改端口避免冲突
修改server.xml


修改这三处端口即可。
为什么是+1,这是为了区分几个tomcat服务器使用的不同端口,同理,node2是+2,node3是+3。
- 设置tomcat允许跨域
请看我的另一个文档
- 启动和关闭命令
cd apache-tomcat-9.0.37/bin
./startup.sh
./shutdown.sh
上传geoserver
上传的war包到webapps下
- 启动tomcat
- 正常启动后tomcat会自动解压war包
- geoserver的访问地址为:http://192.168.1.251:9091/geoserver/web
- 默认的账号密码为 admin geoserver
其他节点一样操作
安装activeMQ
- 解压geoserver-2.18-SNAPSHOT-activeMQ-broker-plugin.zip
- 将其中的war包上传到主节点的tomcat(其他tomcat也行)中
- 启动tomcat后自动解压,将/usr/local/tomcat/apache-tomcat-9.0.37/webapps/activemqBroker-2.18-SNAPSHOT/WEB-INF/classes目录下的standalone-broker.properties和applicationContext.xml删除
- 重启tomcat
geoserver配置jms
- 解压jms的zip包
- 将解压后的所有.jar包复制到tomcat中webapps/geoserver/WEB-INF/lib目录下
- 重启tomcat,等待geoserver启动成功
- 在/usr/local/tomcat/apache-tomcat-9.0.37/webapps/geoserver/data目录下生成cluster目录
- 其中包含以两个文件cluster.properties、embedded-broker.properties
节点配置不同的配置目录
集群各个节点同步需要每个节点配置不同的实例名等,配置文件需要多套,按文档所说,在应用容器上添加JAVA_OPTS参数CLUSTER_CONFIG_DIR指定不同的配置文件夹,例如tomcat在/bin/catalina.sh(linux)和catalina.bat(windows)文件里找到
JAVA_OPTS=“$JAVA_OPTS $JSSE_OPTS"
修改 catalina.sh 修改jvm参数
cluster 1
JAVA_OPTS="$JAVA_OPTS $JSSE_OPTS -DCLUSTER_CONFIG_DIR=/data1/geoserver/data/cluster/clusterConfig1"
cluster 2
JAVA_OPTS="$JAVA_OPTS $JSSE_OPTS -DCLUSTER_CONFIG_DIR=/data1/geoserver/data/cluster/clusterConfig2"
cluster 3
JAVA_OPTS="$JAVA_OPTS $JSSE_OPTS -DCLUSTER_CONFIG_DIR=/data1/geoserver/data/cluster/clusterConfig3"
- 新建broker.xml放入cluster文件内容如下(三个节点均要新建,内容相同)
vim broker.xml
<?xml version="1.0" encoding="UTF-8"?>
<!--DOCTYPE beans PUBLIC "-//ACTIVEMQ//DTD//EN" "http://activemq.org/dtd/activemq.dtd" -->

<beans xmlns="http://www.springframework.org/schema/beans"
    xmlns:xsi="http://www.w3.org/2001/XMLSchema-instance" xmlns:context="http://www.springframework.org/schema/context"
    xmlns:jms="http://www.springframework.org/schema/jms" xmlns:amq="http://activemq.apache.org/schema/core"
    xmlns:task="http://www.springframework.org/schema/task"
    xsi:schemaLocation="http://www.springframework.org/schema/beans
                           http://www.springframework.org/schema/beans/spring-beans.xsd
                           http://www.springframework.org/schema/task http://www.springframework.org/schema/task/spring-task-3.0.xsd
                           http://www.springframework.org/schema/context
                           http://www.springframework.org/schema/context/spring-context.xsd
                           http://www.springframework.org/schema/jms
                           http://www.springframework.org/schema/jms/spring-jms.xsd
                           http://activemq.apache.org/schema/core
                           http://activemq.apache.org/schema/core/activemq-core.xsd">

    <!-- Allows us to use system properties as variables in this configuration
        file -->
    <bean id="activemq.propertyPlaceholderConfigurer"
        class="org.geoserver.cluster.impl.utils.JMSPropertyPlaceholderConfigurer">
        <property name="systemPropertiesModeName" value="SYSTEM_PROPERTIES_MODE_OVERRIDE" />
        <property name="searchSystemEnvironment" value="true" />
        <property name="ignoreUnresolvablePlaceholders" value="false" />
        <property name="ignoreResourceNotFound" value="true" />
        <constructor-arg index="0" type="Resource">
            <value>embedded-broker.properties</value>
        </constructor-arg>
        <constructor-arg index="1" type="JMSConfiguration"
            ref="JMSConfiguration" />

    </bean>

    <broker id="broker" persistent="${activemq.broker.persistent}"
        useJmx="${activemq.jmx.useJmx}" xmlns="http://activemq.apache.org/schema/core"
        dataDirectory="${activemq.base}" tmpDataDirectory="${activemq.base}/tmp"
        startAsync="false" start="false" brokerName="${instanceName}">

        <!-- The managementContext is used to configure how ActiveMQ is exposed
            in JMX. By default, ActiveMQ uses the MBean server that is started by the
            JVM. For more information, see: http://activemq.apache.org/jmx.html -->
        <managementContext>
            <managementContext createConnector="${activemq.jmx.createConnector}"
                connectorPort="${activemq.jmx.port}" connectorHost="${activemq.jmx.host}" />
        </managementContext>

        <!--destinationInterceptors>
            <virtualDestinationInterceptor>
                <virtualDestinations>
                    <virtualTopic name=">" prefix="Consumer.*.VirtualTopic."
                        selectorAware="false" />
                </virtualDestinations>
            </virtualDestinationInterceptor>
        </destinationInterceptors-->

        <!-- Configure message persistence for the broker. The default persistence
            mechanism is the KahaDB store (identified by the kahaDB tag). For more information,
            see: http://activemq.apache.org/persistence.html -->
        <amq:persistenceAdapter>

            <kahaDB directory="${activemq.base}/kahadb"
                lockKeepAlivePeriod="0" />

            <!-- <jdbcPersistenceAdapter dataDirectory="activemq-data" dataSource="#postgres-ds"
                lockKeepAlivePeriod="0" /> -->
        </amq:persistenceAdapter>


        <!-- The systemUsage controls the maximum amount of space the broker will
            use before slowing down producers. For more information, see: http://activemq.apache.org/producer-flow-control.html -->
        <systemUsage>
            <systemUsage>
                <memoryUsage>
                    <memoryUsage limit="${activemq.broker.systemUsage.memoryUsage}" />
                </memoryUsage>
                <storeUsage>
                    <storeUsage limit="${activemq.broker.systemUsage.storeUsage}" />
                </storeUsage>
                <tempUsage>
                    <tempUsage limit="${activemq.broker.systemUsage.tempUsage}" />
                </tempUsage>
            </systemUsage>
        </systemUsage>

        <!-- The transport connectors expose ActiveMQ over a given protocol to
            clients and other brokers. For more information, see: http://activemq.apache.org/configuring-transports.html -->
        <transportConnectors>
            <transportConnector name="openwire"
                uri="${activemq.transportConnectors.server.uri}" discoveryUri="${activemq.transportConnectors.server.discoveryURI}" />
        </transportConnectors>
        <networkConnectors xmlns="http://activemq.apache.org/schema/core">
            <networkConnector
                uri="${activemq.transportConnectors.server.discoveryURI}" />
        </networkConnectors>

        <!-- destroy the spring context on shutdown to stop jetty -->
        <shutdownHooks>
            <bean xmlns="http://www.springframework.org/schema/beans" class="org.apache.activemq.hooks.SpringContextHook" />
        </shutdownHooks>

    </broker>

    <!-- This xbean configuration file supports all the standard spring xml
        configuration options -->

    <!-- <bean id="postgres-ds" class="org.postgresql.ds.PGPoolingDataSource"> -->
    <!-- <property name="serverName" value="localhost" /> -->
    <!-- <property name="databaseName" value="activemq" /> -->
    <!-- <property name="portNumber" value="5432" /> -->
    <!-- <property name="user" value="postgres" /> -->
    <!-- <property name="password" value="postgres" /> -->
    <!-- <property name="dataSourceName" value="postgres" /> -->
    <!-- <property name="initialConnections" value="1" /> -->
    <!-- <property name="maxConnections" value="30" /> -->
    <!-- </bean> -->

    <!-- Oracle DataSource Sample Setup -->
    <!-- <bean id="oracle-ds" class="org.apache.commons.dbcp.BasicDataSource"
        destroy-method="close"> <property name="driverClassName" value="oracle.jdbc.driver.OracleDriver"/>
        <property name="url" value="jdbc:oracle:thin:@localhost:1521:AMQDB"/> <property
        name="username" value="scott"/> <property name="password" value="tiger"/>
        <property name="poolPreparedStatements" value="true"/> </bean> -->

</beans>
集群配置
集群中只有一个节点是主节点,在这个节点新增数据,别的节点会根据activeMQ进行同步
tomcat1-9091
- cluster.properties
toggleSlave=true
topicName=VirtualTopic.geoserver
connection=enabled
brokerURL=tcp\://192.168.1.251\:61616
durable=true
xbeanURL=./broker.xml
toggleMaster=false
embeddedBroker=enabled
CLUSTER_CONFIG_DIR=/data1/geoserver/data/cluster/clusterConfig1
embeddedBrokerProperties=embedded-broker.properties
connection.retry=10
readOnly=disabled
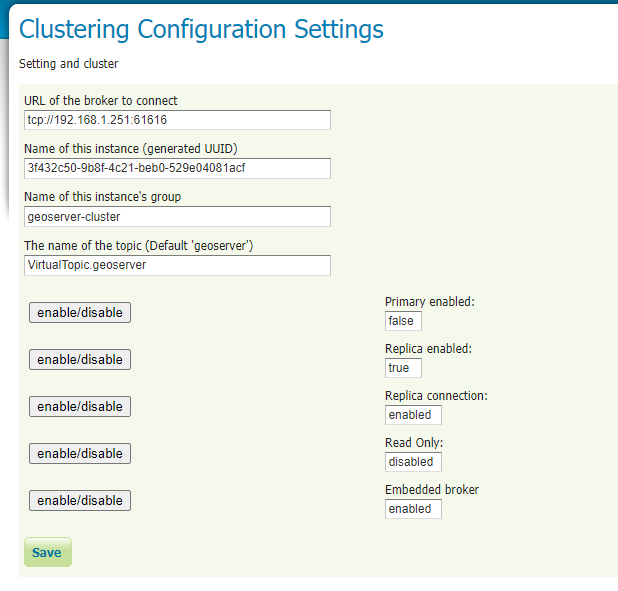
instanceName=3f432c50-9b8f-4c21-beb0-529e04081acf
group=geoserver-cluster
connection.maxwait=10000
- embedded-broker.properties
## JMX settings (can be overridden by env vars)
## For more information, see: http://activemq.apache.org/jmx.html
# enable/disable broker jmx
activemq.jmx.useJmx=false
# set the JMX connector port
activemq.jmx.port=1098
# set the JMX connector host
activemq.jmx.host=192.168.1.251
# enable the JMX connector
activemq.jmx.createConnector=false

## broker settings
# set the base path of the temporary broker dir
# this is also used as persistence base dir
#activemq.base=./

## configuring the embedded broker
# connects the server via native I/O socket to the local network broadcast using an automatic assigned port
# maximumConnections and wireFormat.maxFrameSize are added to avoid ddos attacks
activemq.transportConnectors.server.uri=nio://192.168.1.251:61616?maximumConnections=1000&wireFormat.maxFrameSize=104857600&jms.useAsyncSend=true&transport.daemon=true&trace=true

## the broker performs discovery using the following protocol:
# multicast on default network
activemq.transportConnectors.server.discoveryURI=multicast://224.1.1.3:6255

## persistence settings and system usage
## The systemUsage controls the maximum amount of space the broker will
## use before slowing down producers.
## For more information, see: http://activemq.apache.org/producer-flow-control.html
# enable/disable persistence
activemq.broker.persistent=true
# heap memory usage
activemq.broker.systemUsage.memoryUsage=128 mb
# disk space memory usage
activemq.broker.systemUsage.storeUsage=1 gb
# temp disk space memory usage
activemq.broker.systemUsage.tempUsage=128 mb
需要修改的是第8、20、24行,如上所述
activemq.transportConnectors.server.uri=nio://192.168.1.251:61616?
这里的ip应当是节点的本地ip,如果出现线程错误,则更换端口
修改完重启tomcat
tomcat2-9092
- cluster.properties
toggleSlave=true
topicName=VirtualTopic.geoserver
connection=disabled
brokerURL=tcp\://192.168.1.251\:61616
durable=true
xbeanURL=./broker.xml
toggleMaster=true
embeddedBroker=disabled
CLUSTER_CONFIG_DIR=/data1/geoserver/data/cluster/clusterConfig2
embeddedBrokerProperties=embedded-broker.properties
connection.retry=10
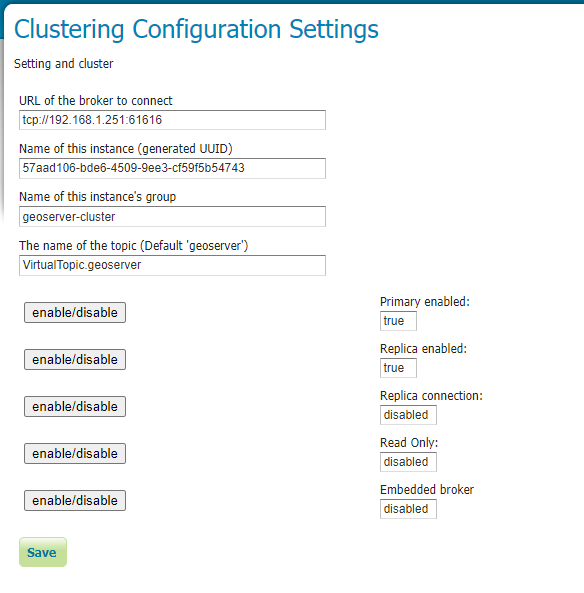
instanceName=57aad106-bde6-4509-9ee3-cf59f5b54743
readOnly=disabled
group=geoserver-cluster
connection.maxwait=10000
- embedded-broker.properties
## JMX settings (can be overridden by env vars)
## For more information, see: http://activemq.apache.org/jmx.html
# enable/disable broker jmx
activemq.jmx.useJmx=false
# set the JMX connector port
activemq.jmx.port=1098
# set the JMX connector host
activemq.jmx.host=192.168.1.251
# enable the JMX connector
activemq.jmx.createConnector=false

## broker settings
# set the base path of the temporary broker dir
# this is also used as persistence base dir
#activemq.base=./

## configuring the embedded broker
# connects the server via native I/O socket to the local network broadcast using an automatic assigned port
# maximumConnections and wireFormat.maxFrameSize are added to avoid ddos attacks
activemq.transportConnectors.server.uri=nio://192.168.1.251:61617?maximumConnections=1000&wireFormat.maxFrameSize=104857600&jms.useAsyncSend=true&transport.daemon=true&trace=true

## the broker performs discovery using the following protocol:
# multicast on default network
activemq.transportConnectors.server.discoveryURI=multicast://224.1.1.3:6255

## persistence settings and system usage
## The systemUsage controls the maximum amount of space the broker will
## use before slowing down producers.
## For more information, see: http://activemq.apache.org/producer-flow-control.html
# enable/disable persistence
activemq.broker.persistent=true
# heap memory usage
activemq.broker.systemUsage.memoryUsage=128 mb
# disk space memory usage
activemq.broker.systemUsage.storeUsage=1 gb
# temp disk space memory usage
activemq.broker.systemUsage.tempUsage=128 mb
tomcat3-9093
- cluster.properties
toggleSlave=true
topicName=VirtualTopic.geoserver
connection=disabled
brokerURL=tcp\://192.168.1.251\:61616
durable=true
xbeanURL=./broker.xml
toggleMaster=false
embeddedBroker=enabled
CLUSTER_CONFIG_DIR=/data1/geoserver/data/cluster/clusterConfig3
embeddedBrokerProperties=embedded-broker.properties
connection.retry=10
instanceName=2e763c16-4224-4710-a1b1-d4271c18db33
readOnly=disabled
group=geoserver-cluster
connection.maxwait=10000
- embedded-broker.properties
## JMX settings (can be overridden by env vars)
## For more information, see: http://activemq.apache.org/jmx.html
# enable/disable broker jmx
activemq.jmx.useJmx=false
# set the JMX connector port
activemq.jmx.port=1098
# set the JMX connector host
activemq.jmx.host=192.168.1.251
# enable the JMX connector
activemq.jmx.createConnector=false

## broker settings
# set the base path of the temporary broker dir
# this is also used as persistence base dir
#activemq.base=./

## configuring the embedded broker
# connects the server via native I/O socket to the local network broadcast using an automatic assigned port
# maximumConnections and wireFormat.maxFrameSize are added to avoid ddos attacks
activemq.transportConnectors.server.uri=nio://192.168.1.251:61618?maximumConnections=1000&wireFormat.maxFrameSize=104857600&jms.useAsyncSend=true&transport.daemon=true&trace=true

## the broker performs discovery using the following protocol:
# multicast on default network
activemq.transportConnectors.server.discoveryURI=multicast://224.1.1.3:6255

## persistence settings and system usage
## The systemUsage controls the maximum amount of space the broker will
## use before slowing down producers.
## For more information, see: http://activemq.apache.org/producer-flow-control.html
# enable/disable persistence
activemq.broker.persistent=true
# heap memory usage
activemq.broker.systemUsage.memoryUsage=128 mb
# disk space memory usage
activemq.broker.systemUsage.storeUsage=1 gb
# temp disk space memory usage
activemq.broker.systemUsage.tempUsage=128 mb
修改完成后重启tomcat
安装完jms插件后,页面会生成如下选项
- http://192.168.1.251:9091/geoserver/web
- http://192.168.1.251:9092/geoserver/web
- http://192.168.1.251:9093/geoserver/web
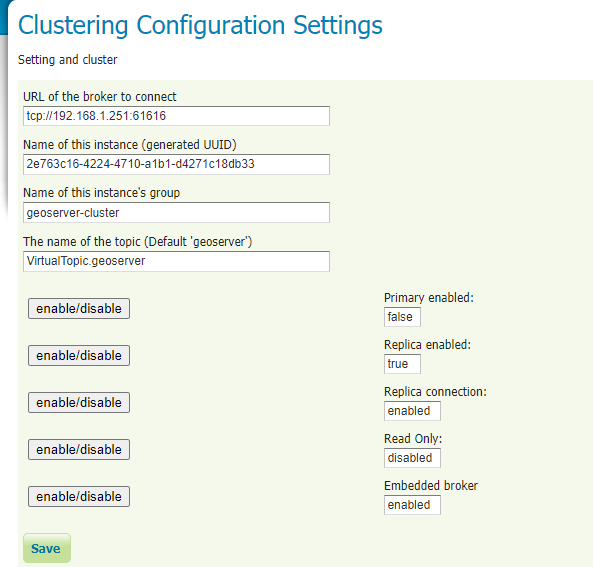
- URL of the broker to connect:broker url用于指示JMS将消息发布到哪里或从哪里消费消息,即在配置ActiveMQ时,设置的tcp://http://192.168.1.XXX:61616;
- Name of this instance (generated UUID):该GeoServer实例的名称,应是唯一的,默认是一个自动生成的UUID;
- Name of this instance’s group:该集群的名字;
- The name of the topic (Default ‘geoserver’):消息主题名称;
- Master enabled:是否作为Master GeoServer;
- Slave enabled:是否作为Slave GeoServer;
- Slave connection:是否启用Slave connection,通常情况下要启用;
- Read Only:是否只读,通常情况下要禁用;
- Embedded broker:是否启用嵌入式broker,通常情况下要启用。
保存后,在Master GeoServer中创建工作区,发现在Slave GeoServer中也会自动生成相同的工作区,则表示部署完成。
共享数据
位置
/data1/geoserver
挂载共享文件夹
mount -t cifs //192.168.1.251/public /data1/geoserver
geoWebCache
geowebCache分为两类,一类是geoserver自己集成的geoWebcache,另一类是独立在tomcat中部署的war
服务地址:
- geoserver集成:http://192.168.1.41:8080/geoserver/gwc/
- 独立部署:http://192.168.1.251:9095/geowebcache/
修改geoWebCache的缓存位置
修改web.xml文件,添加如下类容
<context-param>
<param-name>GEOWEBCACHE_CACHE_DIR</param-name>
<param-value>/test/gwc</param-value>
</context-param>
问题
geoserver集群模式中,内置的geowebcache不能正常使用,官方也证明了这点

待处理
独立使用geoWebcache配合geoserver集群
集群访问
使用nginx进行负载均衡配置
nginx配置
cd /etc/nginx/conf.d

vim geoserver-cluster.conf
upstream geoserver{
    ip_hash;
    server 192.168.1.251:8080 weight=1;
    server 192.168.1.252:8080 weight=1;
    server 192.168.1.253:8080 weight=1;
}
server {
     listen 8282;
     server_name  192.168.1.251;
     location / {
        proxy_pass http://geoserver;
        }
}
参考文档
geoServer集群
GeoServer集群部署(在liunx平台上应用nginx实现)
Geoserver JMS Cluster modules 共享数据目录的集群同步