最近帮朋友基于Python实现了一个构建植物细胞骨架的小程序
原理
程序首先通过监听鼠标点击位置,确定随机种子点的位置,利用 区域生长法 确定胞体的位置和对应的掩码,然后进行骨架提取。
骨架提取是一种可以将一个连通区域细化成一个像素的宽度的算法,该算法是数字图像处理中用于分析物体边界形状的经典算法,广泛用于特征提取和目标拓扑表示。我们采用的是Medial axis skeletonization(中轴骨架提取,以下简称MAS)算法,所求的骨架的严格数学定义为边界所有点的最大内切超球面中心点的并集。形象的说,设想在同一时刻,将目标的边缘线都点燃,火的前沿以匀速向内部蔓延,当前沿相交时火焰熄灭,火焰熄灭点的结合就是骨架。
骨架的结构可以体现胞体的形状上的各种特征,例如断点、交叉点和拐点。
我们所使用的核心函数是morphology.medial_axis,详细使用可参考scikit-image的官方说明文档Medial axis skeletonization — skimage v0.10.0 docs (scikit-image.org)。
程序
# Copyright (c) 2021 Huazhong Agricultural University. All rights reserved.
from skimage import morphology,color
import numpy as np
import matplotlib.pyplot as plt
import cv2

LIST_H = list() #  horizontal coordinates
LIST_V = list() #  vertical coordinates
IMG_PATH = "D:\\pycharm\\image_process\\Sample.png" # FILEPATH

class Point(object):
    def __init__(self,x,y):
        self.x = x
        self.y = y

    def getX(self):
        return self.x

    def getY(self):
        return self.y

def getGrayDiff(img,currentPoint,tmpPoint):
    return abs(int(img[currentPoint.x,currentPoint.y]) - int(img[tmpPoint.x,tmpPoint.y]))

def selectConnects(p):
    if p != 0:
        connects = [Point(-1, -1), Point(0, -1), Point(1, -1), Point(1, 0), Point(1, 1), \
                    Point(0, 1), Point(-1, 1), Point(-1, 0)]
    else:
        connects = [ Point(0, -1),  Point(1, 0),Point(0, 1), Point(-1, 0)]
    return connects

def regionGrow(img,seeds,thresh,p = 1):
    height, weight = img.shape
    seedMark = np.zeros(img.shape)
    seedList = []
    for seed in seeds:
        seedList.append(seed)
    label = 1
    connects = selectConnects(p)
    while(len(seedList)>0):
        currentPoint = seedList.pop(0)
        seedMark[currentPoint.x,currentPoint.y] = label
        for i in range(8):
            tmpX = currentPoint.x + connects[i].x
            tmpY = currentPoint.y + connects[i].y
            if tmpX < 0 or tmpY < 0 or tmpX >= height or tmpY >= weight:
                continue
            grayDiff = getGrayDiff(img,currentPoint,Point(tmpX,tmpY))
            if grayDiff < thresh and seedMark[tmpX,tmpY] == 0:
                seedMark[tmpX,tmpY] = label
                seedList.append(Point(tmpX,tmpY))
    return seedMark


def mask_generator(img,m,n):
    """Returns the mask used to obtain the specified cell"""
    seeds = list()
    for i in range(len(m)):
        h,v = m[i],n[i]
        seeds.append(Point(int(h),int(v)))
    mask = regionGrow(img,seeds,10)
    cv2.imshow("mask",mask)
    cv2.waitKey(0)
    return mask

def on_EVENT_LBUTTONDOWN(event, x, y,flags, param):
    """Listens to where the mouse clicks"""
    img = cv2.imread(IMG_PATH)
    if event == cv2.EVENT_LBUTTONDOWN:
        xy = "%d,%d" % (x, y)
        LIST_H.append(x)
        LIST_V.append(y)
        cv2.circle(img, (x, y), 1, (0, 0, 255), thickness=-1)
        cv2.putText(img, xy, (x, y), cv2.FONT_HERSHEY_PLAIN,
                    1.0, (0, 0, 0), thickness=1)
        cv2.imshow("image", img)

def get_WHERE_PRESS(img):
    cv2.namedWindow("image")
    cv2.setMouseCallback("image", on_EVENT_LBUTTONDOWN)
    cv2.imshow("image", img)
    cv2.waitKey(0)


def main():
    global IMG_PATH
    IMG_PATH = input("Please enter the path of the image: ")

    image = plt.imread(IMG_PATH)
    img = cv2.imread(IMG_PATH,0)

    # Gets the location of the build point
    get_WHERE_PRESS(img)
    image=color.rgb2gray(image)
    image=1-image
    mask = mask_generator(img,LIST_H,LIST_V)
    mask_bool = np.array(mask,dtype=bool)
    skeleton, distance = morphology.medial_axis(image, mask = mask_bool, return_distance=True)
    dist_on_skel = distance * skeleton

    # Show the results
    fig, (ax1, ax2,ax3) = plt.subplots(nrows=1, ncols=3, figsize=(8, 4))

    ax1.imshow(image, cmap=plt.cm.gray)
    ax1.axis('off')
    ax1.set_title('original', fontsize=20)

    ax2.imshow(mask, cmap=plt.cm.gray)
    ax2.axis('off')
    ax2.set_title('mask', fontsize=20)

    ax3.imshow(dist_on_skel, cmap=plt.cm.gray)
    ax3.axis('off')
    ax3.set_title('skeleton', fontsize=20)

    fig.tight_layout()
    plt.show()

if __name__ =="__main__":
    main()
效果
按照提示输入图片的路径(特别注意:不支持tif格式,且使用两个斜杠的地址格式),例如
D:\\pycharm\\image_process\\Sample.png
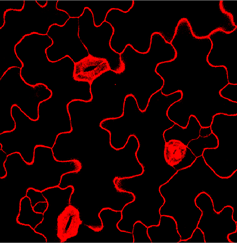
此时会出现待处理的图片,使用鼠标选中胞体,可重复点击选择多个胞体,为便于观察,只点击选中中央的胞体,如下图所示
右上角关闭窗口,稍等片刻后会出现选中胞体所对应的掩码(mask,如下图所示)

确认无误后,右上角关闭窗口,稍等片刻,生成的细胞骨架如下图所示
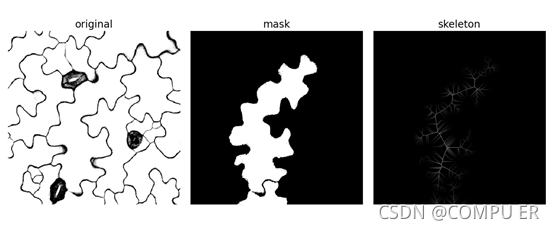
效果还是不错的。