Introduction
MoveItCpp 是一个新的高级接口,一个统一的 C++ API,不需要使用 ROS 动作、服务和消息来访问核心 MoveIt 功能,并且是现有 MoveGroup API 的替代(不是完全替代),我们推荐此接口适用于需要更多实时控制的高级用户或工业应用。该接口是 PickNik Robotics 为我们的许多商业应用程序开发的
按照官方步骤编译的moveit2_tutorials并没有编译该demo。所以需要修改一下才能启动该demo.
第一步:修改CMakeLists.txt
打开:/home/cxy/ws_moveit2/src/moveit2_tutorials/CMakeLists.txt 添加一行:
add_subdirectory(doc/moveit_cpp)
第二步:构建
source ~/ws_moveit2/install/setup.bash
colcon build --mixin release --packages-select moveit2_tutorials
. install/setup.bash

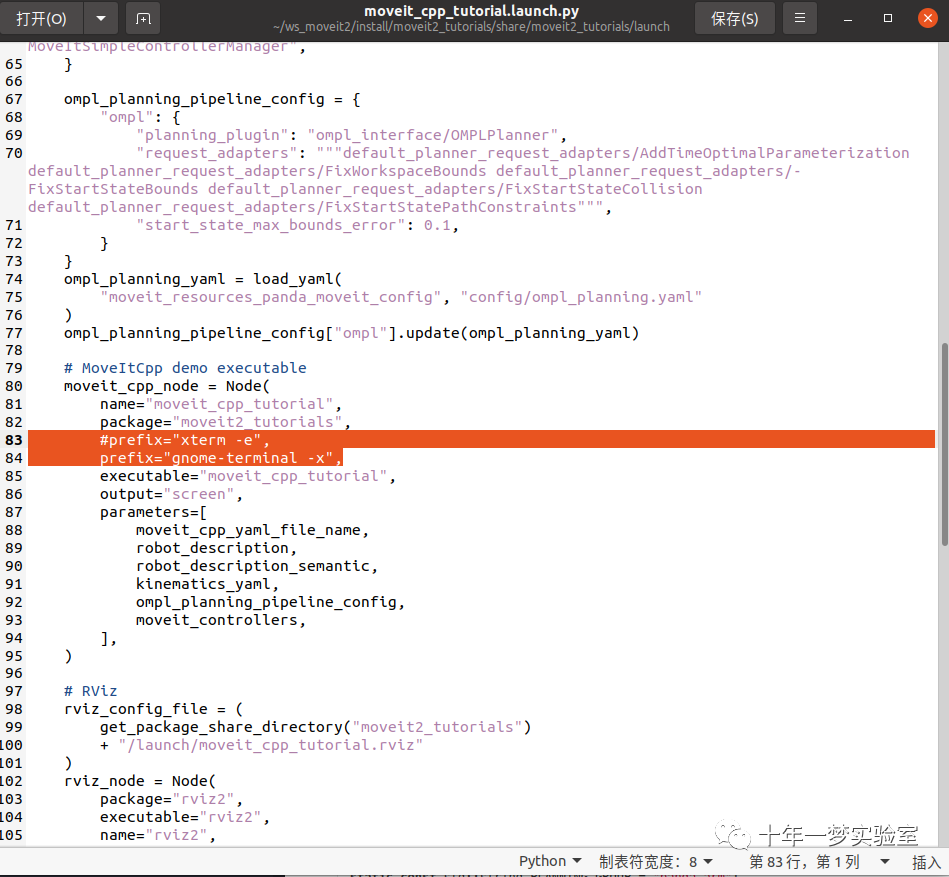
第三步:修改launch文件
#prefix="xterm -e",
prefix="gnome-terminal -x",
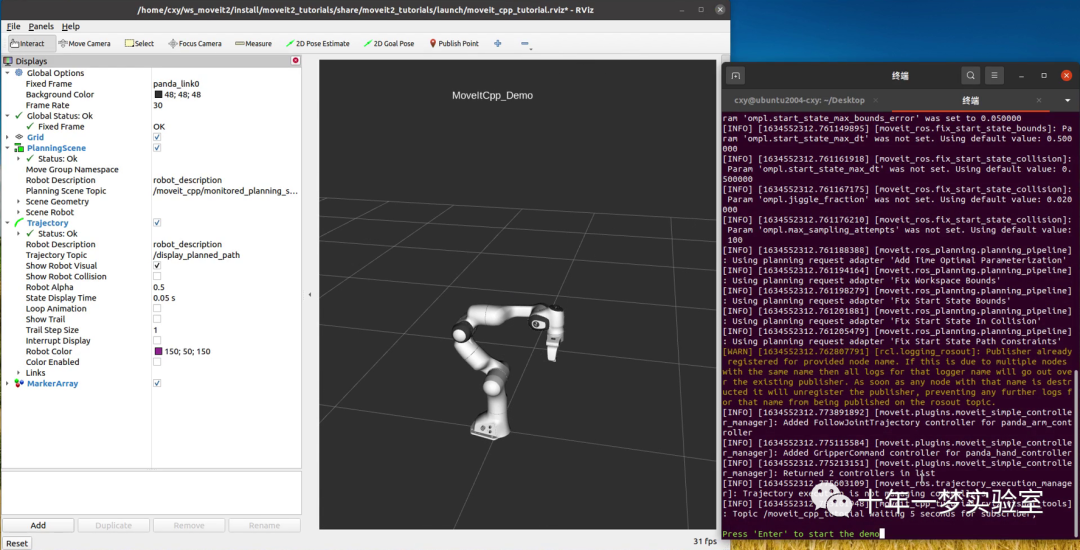
第四步:运行demo
ros2 launch moveit2_tutorials moveit_cpp_tutorial.launch.py
源码:
#include <rclcpp/rclcpp.hpp>
#include <memory>
// MoveitCpp
#include <moveit/moveit_cpp/moveit_cpp.h>
#include <moveit/moveit_cpp/planning_component.h>

#include <geometry_msgs/msg/point_stamped.h>

#include <moveit_visual_tools/moveit_visual_tools.h>

namespace rvt = rviz_visual_tools;

// All source files that use ROS logging should define a file-specific
// static const rclcpp::Logger named LOGGER, located at the top of the file
// and inside the namespace with the narrowest scope (if there is one)
// 所有使用 ROS 日志记录的源文件都应该定义一个特定于文件的静态 const rclcpp::Logger 名为 LOGGER,位于文件顶部和范围最窄的命名空间内(如果有的话)
static const rclcpp::Logger LOGGER = rclcpp::get_logger("moveit_cpp_tutorial");

int main(int argc, char** argv)
{
  rclcpp::init(argc, argv);
  rclcpp::NodeOptions node_options;//声明节点选项
  RCLCPP_INFO(LOGGER, "Initialize node");

  // This enables loading undeclared parameters
  // best practice would be to declare parameters in the corresponding classes
  // and provide descriptions about expected use
  //这允许加载未声明的参数最佳实践是在相应的类中声明参数并提供有关预期用途的描述
  node_options.automatically_declare_parameters_from_overrides(true);//节点选项
  rclcpp::Node::SharedPtr node = rclcpp::Node::make_shared("run_moveit_cpp", "", node_options);//创建节点

  // We spin up a SingleThreadedExecutor for the current state monitor to get information
  // about the robot's state.我们为当前状态监视器启动一个 SingleThreadexecutor 以获取有关机器人状态的信息。
  rclcpp::executors::SingleThreadedExecutor executor;//初始化执行器    单线程执行器
  executor.add_node(node);//将要实时控制的节点添加到Executor  Executor 不维护对节点的强引用(只是一个weak_ptr,所以shared_ptr 计数不会增加)
  std::thread([&executor]() { executor.spin(); }).detach();//spin直到 rclcpp::ok() 返回 false

  // 开始教程
  //
  // 设置
  // ^^^^^
  //
  static const std::string PLANNING_GROUP = "panda_arm";//规划组名称
  static const std::string LOGNAME = "moveit_cpp_tutorial";//日志记录器名称

  /* Otherwise robot with zeros joint_states */
  rclcpp::sleep_for(std::chrono::seconds(1));//等1秒,否则机器人处于关节零位状态

  RCLCPP_INFO(LOGGER, "Starting MoveIt Tutorials...");

  auto moveit_cpp_ptr = std::make_shared<moveit_cpp::MoveItCpp>(node);//创建 moveit_cpp::MoveItCpp 对象实例的共享指针
  moveit_cpp_ptr->getPlanningSceneMonitor()->providePlanningSceneService();//规划场景监视器 提供规划场景服务

  auto planning_components = std::make_shared<moveit_cpp::PlanningComponent>(PLANNING_GROUP, moveit_cpp_ptr);//创建 moveit_cpp::PlanningComponent 对象实例的 共享指针
  auto robot_model_ptr = moveit_cpp_ptr->getRobotModel();//获取机器人模型指针
  auto robot_start_state = planning_components->getStartState();//获取起始状态指针
  auto joint_model_group_ptr = robot_model_ptr->getJointModelGroup(PLANNING_GROUP);//获取规划组的机器人模型组指针

  // 可视化
  // ^^^^^^^^^^^^^
  //
  // The package MoveItVisualTools provides many capabilties for visualizing objects, robots,
  // and trajectories in RViz as well as debugging tools such as step-by-step introspection of a script
  // MoveItVisualTools 包提供了许多功能,用于在 RViz 中可视化对象、机器人和轨迹以及调试工具,例如脚本的逐步内省
  moveit_visual_tools::MoveItVisualTools visual_tools(node, "panda_link0", "moveit_cpp_tutorial",
                                                      moveit_cpp_ptr->getPlanningSceneMonitor());//初始化moveit 可视化工具
  visual_tools.deleteAllMarkers();//删除所有标记
  visual_tools.loadRemoteControl();//加载远程控件

  Eigen::Isometry3d text_pose = Eigen::Isometry3d::Identity();//文本位姿矩阵
  text_pose.translation().z() = 1.75;//文本位置z
  visual_tools.publishText(text_pose, "MoveItCpp_Demo", rvt::WHITE, rvt::XLARGE);//发布文本:位姿,文字,颜色,尺寸
  visual_tools.trigger();//触发显示更新

  // 开始演示
  // ^^^^^^^^^^^^^^^^^^^^^^^^^
  visual_tools.prompt("Press 'next' in the RvizVisualToolsGui window to start the demo");// 提示

  // 使用 MoveItCpp 进行规划
  // ^^^^^^^^^^^^^^^^^^^^^^^
  // 有多种方法可以设置规划的开始和目标状态
  // 它们在以下规划示例中进行了说明
  //
  // Plan #1
  // ^^^^^^^
  //
  // We can set the start state of the plan to the current state of the robot
  planning_components->setStartStateToCurrentState();//将规划的开始状态设置为机器人的当前状态

  // The first way to set the goal of the plan is by using geometry_msgs::PoseStamped ROS message type as follow
  //设置规划目标的第一种方法是使用 geometry_msgs::PoseStamped ROS 消息类型如下
  geometry_msgs::msg::PoseStamped target_pose1;//目标位姿1
  target_pose1.header.frame_id = "panda_link0";//父坐标系
  target_pose1.pose.orientation.w = 1.0;//四元数
  target_pose1.pose.position.x = 0.28;//位置
  target_pose1.pose.position.y = -0.2;
  target_pose1.pose.position.z = 0.5;
  planning_components->setGoal(target_pose1, "panda_link8");//设置目标位姿1

  // 现在,我们调用 PlanningComponents 来计算规划并将其可视化。
  //请注意,我们只是在规划
  auto plan_solution1 = planning_components->plan();//执行规划

  // 检查 PlanningComponents 是否成功找到了规划
  if (plan_solution1)
  {
    // 在 Rviz 中可视化起始位姿
    visual_tools.publishAxisLabeled(robot_start_state->getGlobalLinkTransform("panda_link8"), "start_pose");
    // 在 Rviz 中可视化目标位姿
    visual_tools.publishAxisLabeled(target_pose1.pose, "target_pose");
    visual_tools.publishText(text_pose, "setStartStateToCurrentState", rvt::WHITE, rvt::XLARGE);//显示文本:设置起始状态为当前状态
    //在 Rviz 中可视化轨迹
    visual_tools.publishTrajectoryLine(plan_solution1.trajectory, joint_model_group_ptr);//显示轨迹
    visual_tools.trigger();//触发显示更新

    /* 如果要执行规划,取消注释 */
    /* planning_components->execute(); // 执行规划*/
  }

  // Plan #1 visualization可视化:
  //截图
  // .. image:: images/moveitcpp_plan1.png
  //    :width: 250pt
  //    :align: center
  //
  // 开始下一个规划
  visual_tools.prompt("Press 'next' in the RvizVisualToolsGui window to continue the demo");//提示
  visual_tools.deleteAllMarkers();//删除所有标记
  visual_tools.trigger();//触发更新显示

  // Plan #2
  // ^^^^^^^
  //这里我们将使用 moveit::core::RobotState 设置规划的当前状态
  // Here we will set the current state of the plan using
  // moveit::core::RobotState
  auto start_state = *(moveit_cpp_ptr->getCurrentState());//获取当前状态指针
  geometry_msgs::msg::Pose start_pose;//起始位姿
  start_pose.orientation.w = 1.0;//姿态四元数
  start_pose.position.x = 0.55;//位置
  start_pose.position.y = 0.0;
  start_pose.position.z = 0.6;

  start_state.setFromIK(joint_model_group_ptr, start_pose);//设置起始位姿对应的状态为当前起始状态的值

  planning_components->setStartState(start_state);//更新起始状态设置

  //我们将重用我们已有的旧目标并规划实现它。
  auto plan_solution2 = planning_components->plan();
  if (plan_solution2)
  {//规划成功
    moveit::core::RobotState robot_state(robot_model_ptr);//机器人状态
    moveit::core::robotStateMsgToRobotState(plan_solution2.start_state, robot_state);//机器人状态消息 转换为 机器人状态

    visual_tools.publishAxisLabeled(robot_state.getGlobalLinkTransform("panda_link8"), "start_pose");//显示起始位姿框架及标签
    visual_tools.publishAxisLabeled(target_pose1.pose, "target_pose");//显示目标位姿及标签
    visual_tools.publishText(text_pose, "moveit::core::RobotState_Start_State", rvt::WHITE, rvt::XLARGE);//显示文本
    visual_tools.publishTrajectoryLine(plan_solution2.trajectory, joint_model_group_ptr);
    visual_tools.trigger();

    /* 如果要执行规划,取消注释 */
    /* planning_components->execute(); // 执行规划*/
  }

  // Plan #2 visualization:
  //截图
  // .. image:: images/moveitcpp_plan2.png
  //    :width: 250pt
  //    :align: center
  //
  // Start the next plan
  visual_tools.prompt("Press 'next' in the RvizVisualToolsGui window to continue the demo");//提示
  visual_tools.deleteAllMarkers();//删除标记
  visual_tools.trigger();//触发更新

  // Plan #3
  // ^^^^^^^
  //我们还可以使用 moveit::core::RobotState 设置规划的目标
  // We can also set the goal of the plan using
  // moveit::core::RobotState
  auto target_state = *robot_start_state;//机器人起始状态指针
  geometry_msgs::msg::Pose target_pose2;//机器人目标位姿
  target_pose2.orientation.w = 1.0;
  target_pose2.position.x = 0.55;
  target_pose2.position.y = -0.05;
  target_pose2.position.z = 0.8;

  target_state.setFromIK(joint_model_group_ptr, target_pose2);//根据目标位姿设置目标状态值

  planning_components->setGoal(target_state);//将目标状态值更新到目标

  // 我们将重用我们拥有的旧起始位姿并从中进行规划。
  auto plan_solution3 = planning_components->plan();
  if (plan_solution3)//规划成功
  {
    moveit::core::RobotState robot_state(robot_model_ptr);//声明一个机器人状态对象
    moveit::core::robotStateMsgToRobotState(plan_solution3.start_state, robot_state);//用规划结果中的起始状态消息 初始化机器人状态对象

    visual_tools.publishAxisLabeled(robot_state.getGlobalLinkTransform("panda_link8"), "start_pose");//显示机器人起始位姿及标签
    visual_tools.publishAxisLabeled(target_pose2, "target_pose");//显示机器人目标位姿及标签
    visual_tools.publishText(text_pose, "moveit::core::RobotState_Goal_Pose", rvt::WHITE, rvt::XLARGE);//显示文本标题
    visual_tools.publishTrajectoryLine(plan_solution3.trajectory, joint_model_group_ptr);//显示轨迹
    visual_tools.trigger();//触发显示

    /* 如果要执行规划,取消注释*/
    /* planning_components->execute(); // 执行规划 */
  }

  // Plan #3 visualization:
  //截图
  // .. image:: images/moveitcpp_plan3.png
  //    :width: 250pt
  //    :align: center
  //
  // Start the next plan
  visual_tools.prompt("Press 'next' in the RvizVisualToolsGui window to continue the demo");//提示
  visual_tools.deleteAllMarkers();//删除标记
  visual_tools.trigger();//触发更新

  // Plan #4
  // ^^^^^^^
  //
  // We can set the start state of the plan to the current state of the robot
  // We can set the goal of the plan using the name of a group states
  // for panda robot we have one named robot state for "panda_arm" planning group called "ready"
  // see `panda_arm.xacro
  //我们可以将规划的开始状态设置为机器人的当前状态
  //我们可以使用组状态的名称来设定规划的目标
  //对于panda机器人,我们有一个名为“panda_arm”规划组的名为“ready”的机器人状态,参见`panda_arm.xacro
  // <https://github.com/ros-planning/panda_moveit_config/blob/melodic-devel/config/panda_arm.xacro#L13>`_

  /* //从命名机器人状态设置规划的开始状态 */
  /* planning_components->setStartState("ready"); // 尚未实施 */
  // 从命名的机器人状态设置规划的目标状态Set the goal state of the plan from a named robot state
  planning_components->setGoal("ready");

  // 我们将再次重用我们拥有的旧起始位姿并从中进行规划。
  auto plan_solution4 = planning_components->plan();
  if (plan_solution4)
  {
    moveit::core::RobotState robot_state(robot_model_ptr);
    moveit::core::robotStateMsgToRobotState(plan_solution4.start_state, robot_state);

    visual_tools.publishAxisLabeled(robot_state.getGlobalLinkTransform("panda_link8"), "start_pose");
    visual_tools.publishAxisLabeled(robot_start_state->getGlobalLinkTransform("panda_link8"), "target_pose");
    visual_tools.publishText(text_pose, "Goal_Pose_From_Named_State", rvt::WHITE, rvt::XLARGE);
    visual_tools.publishTrajectoryLine(plan_solution4.trajectory, joint_model_group_ptr);
    visual_tools.trigger();

    /* Uncomment if you want to execute the plan */
    /* planning_components->execute(); // Execute the plan */
  }

  // Plan #4 visualization:
  //
  // .. image:: images/moveitcpp_plan4.png
  //    :width: 250pt
  //    :align: center
  //
  // Start the next plan
  visual_tools.prompt("Press 'next' in the RvizVisualToolsGui window to continue the demo");
  visual_tools.deleteAllMarkers();
  visual_tools.trigger();

  // Plan #5
  // ^^^^^^^
  //
  // We can also generate motion plans around objects in the collision scene.
  //我们还可以围绕碰撞场景中的对象生成运动规划。
  // First we create the collision object首先我们创建碰撞对象
  moveit_msgs::msg::CollisionObject collision_object;//声明 碰撞对象消息
  collision_object.header.frame_id = "panda_link0";//碰撞对向的父坐标系 ID
  collision_object.id = "box";//碰撞对象的ID

  shape_msgs::msg::SolidPrimitive box;//图元box
  box.type = box.BOX;//设置图元的类型 BOX
  box.dimensions = { 0.1, 0.4, 0.1 }; //尺寸

  geometry_msgs::msg::Pose box_pose;//位姿
  box_pose.position.x = 0.4;
  box_pose.position.y = 0.0;
  box_pose.position.z = 1.0;

  collision_object.primitives.push_back(box);//将图元box添加到碰撞对象的图元集合
  collision_object.primitive_poses.push_back(box_pose);//将box位姿添加到碰撞对向的图元位姿集合
  collision_object.operation = collision_object.ADD;//碰撞对向的操作: ADD

  // 将对象添加到规划场景
  {  // 锁定规划场景
    planning_scene_monitor::LockedPlanningSceneRW scene(moveit_cpp_ptr->getPlanningSceneMonitor());//获取规划场景监视器
    scene->processCollisionObjectMsg(collision_object);//监视器处理碰撞对象消息
  }  // 解锁规划场景
  planning_components->setStartStateToCurrentState();//设置起始状态为当前状态
  planning_components->setGoal("extended");//设置目标

  auto plan_solution5 = planning_components->plan();//执行规划
  if (plan_solution5)
  {//规划成功
    visual_tools.publishText(text_pose, "Planning_Around_Collision_Object", rvt::WHITE, rvt::XLARGE);//显示文本
    visual_tools.publishTrajectoryLine(plan_solution5.trajectory, joint_model_group_ptr);//显示轨迹
    visual_tools.trigger();//触发更新

    /* 如果要执行规划,取消注释*/
    /* planning_components->execute(); // 执行规划 */
  }

  // Plan #5 visualization:
  //
  // .. image:: images/moveitcpp_plan5.png
  //    :width: 250pt
  //    :align: center
  //
  // END_TUTORIAL
  visual_tools.prompt("Press 'next' to end the demo");//提示
  visual_tools.deleteAllMarkers();//删除所有标记
  visual_tools.trigger();//触发更新

  RCLCPP_INFO(LOGGER, "Shutting down.");
  rclcpp::shutdown();
  return 0;
}