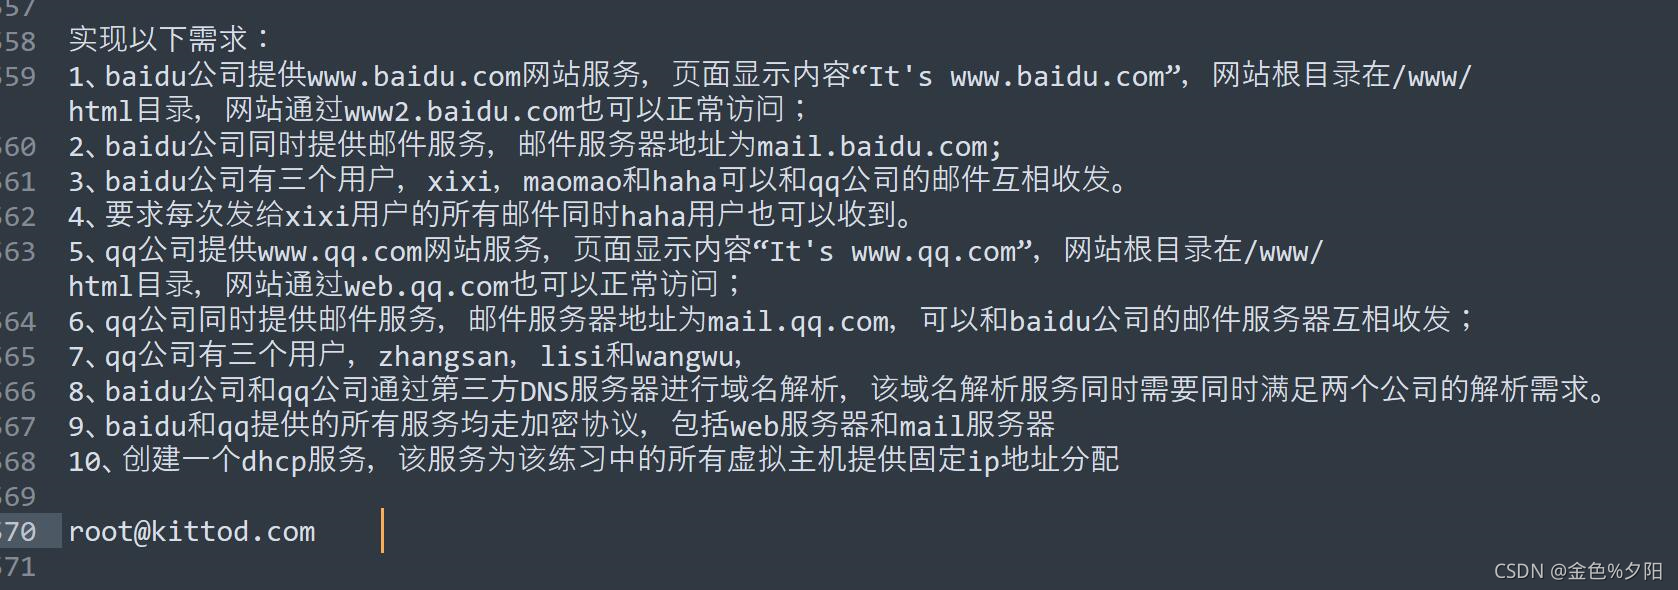
一、要求
二、解答
1、配置百度网站服务
1.1 在虚拟机上建一个库,进入/etc/yum.repos.d/目录,编辑 baser.repo 配置文件
[baseos]
name=baseos
baseurl=/mnt/BaseOS
gpgcheck=0
[appstream]
name=appTream
baseurl=/mnt/AppStream
gpgcheck=0
1.2 在虚拟机上安装 httpd 包,在安装包之前要先进行挂载
mount /dev/sr0 /mnt			#挂载
dnf install httpd -y		#安装 httpd 包
1.3 在/etc/httpd/conf.d/目录下编辑 host.conf 配置文件
<directory /www>
allowoverride none
require all granted
</directory /www>

<virtualhost 192.168.118.136:443>
servername www.baidu.com
documentroot /www/baidu
ErrorLog "logs/error_baidu_log"
CustomLog "logs/error_baidu_log" combined
SSLEngine on
SSLCertificateFile /etc/pki/tls/certs/baidu.crt
SSLCertificateKeyFile /etc/pki/tls/private/baidu.key
</virtualhost>
1.4 新建目录并自定义网站内容
mkdir /www/baidu -p
echo “It’s this www.baidu.com” > /www/baidu/index.html
1.5 制作证书加密服务
进入配置文件所在路径 /etc/pki/tls/certs/
其命令为:
cd /etc/pki/tls/certs		#进入其配置文件
rz		#使用 rz 命令将 MakeFile 文件放在此路径下,若没有 MakeFile 文件可使用wget http://www.kittod.com/Makefile命令即可下载
dnf install make -y		#下载make包
make baidu.crt		#使用 make 命令制作证书
dnf install mod_ssl -y		 #安装 https 模块
mv baidu.key ../private/		#把钥匙移到默认路径
1.6 把本地 ip 地址修改为百度地址
编辑 /etc/hosts 配置文件
192.168.118.136  www.baidu.com		#本地主机IP地址
192.168.118.136  www2.baidu.com
1.7 关闭防火墙和权限并重启服务
setenforce 0		#关闭权限
systemctl stop httpd		#关闭防火墙
systemctl restart httpd			#重启服务
1.8 访问创建的两个网址,查看其是否创建成功
curl -k https://www.baidu.com
curl -k https://www2.baidu.com
2、创建百度邮件服务器
2.1 安装邮件服务器相关软件,并编辑 postfix 服务的主配置文件
dnf install postfix mailx -y		#安装 postfix、mailx包

vim /etc/postfix/main.cf		#编辑 postfix 服务的主配置文件
(1)
92 # other configuration parameters.
93 #
94 #myhostname = virtual.domain.tld
95  myhostname = mail.baidu.com
96 # The mydomain parameter specifies the local internet domain name.
(2)
100 # parameters.
101 #
102 mydomain = baidu.com
104 # SENDING MAIL
105 #
106 # The myorigin parameter specifies the domain that locally-posted
(3)
115 # to recipient addresses that have no @domain part.
116 #
117 #myorigin = $myhostname
118 myorigin = $mydomain
120 # RECEIVING MAIL
(4)
130 # Note: you need to stop/start Postfix when this parameter changes.
131 #
132 inet_interfaces = all
152 # The mydestination parameter specifies the list of domains that this
153 # machine considers itself the final destination for.
(5)
183 mydestination = $myhostname, localhost.$mydomain, localhost, $mydomain
(6)
283 mynetworks = 192.168.118.0/24, 127.0.0.0/8
(7)
315 relay_domains = $mydestination
2.2 编辑邮件认证收发配置
dnf install cyrus-sasl dovecot *sasl* -y		#安装cyrus-sasl dovecot *sasl*包


vim /etc/postfix/main.cf		# 编辑postfix 主配置文件,在末尾追加如下内容
broken_sasl_auth_clients = yes		#启用 SASL 对客户端进行认证
smtpd_sasl_auth_enable = yes		#启用 SASL 认证
smtpd_sasl_security_options = noanonymous		#禁用匿名用户
smtpd_recipient_restrictions = permit_sasl_authenticated,permit_mynetworks,reject_unauth_destination		#定义收件人限定


vim /etc/dovecot/dovecot.conf		# 编辑 dovecot 配置文件
(1)
24 #protocols = imap pop3 lmtp submission
25 protocols = imap pop3 lmtp
45 # Space separated list of trusted network ranges. Connections from these
46 # IPs are allowed to override their IP addresses and ports (for logging and
(2)
48 # these networks. Typically you'd specify your IMAP proxy servers here.
49 #login_trusted_networks =
50 login_trusted_networks = 192.168.118.0/24


vim /etc/dovecot/conf.d/10-mail.conf
26 # mail_location = mbox:/var/mail/%d/%1n/%n:INDEX=/var/indexes/%d/%1n/%n
27 #
28 # <doc/wiki/MailLocation.txt>
29 #
30 #mail_location =
31 mail_location = mbox:~/mail:INBOX=/var/mail/%u
2.3 配置邮件加密
创建密钥
cd /etc/postfix/
openssl req -new -x509 -nodes -out smtpd.pem -keyout
smtpd.pem -days 3650
编辑 foxmail 客户端的服务器配置:
Generating a RSA private key
.+++++
.....................................+++++
writing new private key to 'smtpd.pem'
-----
You are about to be asked to enter information that will be incorporated
into your certificate request.
What you are about to enter is what is called a Distinguished Name or a DN.
There are quite a few fields but you can leave some blank
For some fields there will be a default value,
If you enter '.', the field will be left blank.
-----
Country Name (2 letter code) [XX]:86
State or Province Name (full name) []:chongqing
Locality Name (eg, city) [Default City]:yongchuan
Organization Name (eg, company) [Default Company Ltd]:chengke
Organizational Unit Name (eg, section) []:xuexizhongxin
Common Name (eg, your name or your server's hostname) []:mail.xixi.com
Email Address []:[email protected]
2.4 编辑主配置文件
[root@baidu postfix]# vim /etc/postfix/main.cf		#在末尾添加以下配置
smtp_use_tls = yes
smtpd_use_tls = yes
smtp_tls_note_starttls_offer = yes
smtpd_tls_key_file = /etc/postfix/smtpd.pem
smtpd_tls_cert_file = /etc/postfix/smtpd.pem
smtpd_tls_CAfile = /etc/postfix/smtpd.pem
smtpd_tls_loglevel = 1
smtpd_tls_received_header = yes
smtpd_tls_session_cache_timeout = 3600s
tls_random_source = dev:/dev/urandom
2.5 编辑功能配置文件
[root@baidu postfix]# vim /etc/postfix/master.cf
29 smtps inet n - n - - smtpd
30 # -o syslog_name=postfix/smtps
31 -o smtpd_tls_wrappermode=yes
32 -o smtpd_sasl_auth_enable=yes
2.6 重启服务
[root@baidu postfix]# systemctl restart postfix
[root@baidu postfix]# systemctl restart saslauthd
[root@baidu postfix]# systemctl restart dovecot
2.7 创建用户收发邮件
useadd xixi
passwd 123456
useadd redhat
passwd 123456
useadd haha
passwd 123456

vim /etc/aliases		#修改别名数据库
在最后一行添加  workgroup:xixi,haha,redhat

# 发邮件
[root@baidu ~]# mail [email protected]
Subject: asdwada
awdwda
EOT

# 切换到 haha 用户查看邮件
[root@baidu ~]# su – haha
[haha@baidu ~]$ mail
Heirloom Mail version 12.5 7/5/10. Type ? for help.
"/var/spool/mail/maomao": 1 message
> 1 root Mon Oct 25 17:57 21/624 "test03"
# xixi 和 haha 两个用户会同时收到该邮件
现在第一台虚拟机配置完成
3、新建第二台虚拟机,并对第二台虚拟机进行QQ网站服务配置
可参照之前对百度网站服务的配置
4、编辑百度和QQ的DNS服务配置
4.1 安装相关软件
dnf install bind bind-utils -y
4.2 编辑配置文件
vim /etc/named.conf

options {
listen-on port 53 { 192.168.118.136; };
directory "/var/named";
};
zone "baidu.com" IN {
type master;
file "named.baidu.com";
};
zone "qq.com" IN {
type master;
file "named.qq.com";
};
vim /var/named/named.baidu.com

$TTL 1D
@ IN SOA @ admin.baidu.com. (
		     				0
							4
							2
							8
							12)
 IN NS ns.baidu.com.
 IN MX 10 mail.baidu.com.
ns IN A 192.168.118.136
mail IN A 192.168.118.136
www IN A 192.168.132.164
www IN A 192.168.132.155
ftp IN CNAME www
vim /var/named/named.qq.com

$TTL 1D
@ IN SOA @ admin.qq.com. (
						 0
						 4
						 5
						 8
						 12)
 IN NS ns.qq.com.
 IN MX 10 mail.qq.com.
ns IN A 192.168.118.136
mail IN A 192.168.132.12
www IN A 192.168.132.65
www IN A 192.168.132.99
ftp IN CNAME www
4.3 重启服务
systemctl restart named
4.4 解析
dig -t MX baidu.com @192.168.118.136
4.5 查看本地 DNS服务
nmcli device show | grep DNS
若本地无DNS 则需要新建DNS服务
nmcli connection modify ens160 ipv4.dns 192.168.132.11
nmcli connection modify ens160 ipv4.method manual
nmcli connection up ens160
4.6 配置第二台虚拟机的 DNS服务
nmcli connection modify ens160 ipv4.addresses 192.168.132.22/24
nmcli connection modify ens160 ipv4.method manual
nmcli connection modify ens160 connection.autoconnect yes
nmcli connection modify ens160 ipv4.dns 192.168.132.33
nmcli connection up ens160
5、创建 DHCP 服务固定 ip 地址
host baidu {
			hardware ethernet 00:0C:29:7F:32:06;
			fixed-address 192.168.118.136; }


host qq {
			hardware ethernet 00:0c:29:7f:32:10;
			fixed-address 192.168.132.22; }