七、Spring事务管理
1 Spring事务管理简介
在Spring框架中事务管理有两种方式:一种是传统的编程事务管理,即通过编写代码实现的事务管理;另一种是基于AOP技术实现的声明式事务管理。由于在Spring框架中,编程式事务管理很少使用,所以我们只对Spring的声明式事务管理进行详细讲解。
Spring 的声明式事务管理在底层采用了 AOP 技术,其最大的优点在于无须通过编程的 方式管理事务,只需要在配置文件中进行相关的规则声明,就可以将事务规则应用到业务逻 辑中。
Spring 实现声明式事务管理主要有两种方式:
- 基于 XML 文件方式的声明式事务管理。
- 通过 Annotation 注解方式的事务管理。
2 Spring 声明式事务管理原理

3 数据库事务的特性
3.1什么是事务
事务是作为一个逻辑单元执行的一系列操作。一个事务工作单元必须有四个特性:原子 性、一致性、隔离性、持久性。只有这样才能成为一个事务。
3.2事务的作用
事务对于数据库的作用是对数据的一系列操作 ,要么全部成功,要么全部失败,防止中间状态的出现,以确保数据库中的数据始终处于正确的状态。
3.3事务的 ACID 特性
数据库的事务的 ACID 特性由数据库的事务管理系统来保证的。
原子性(Atomicity):事务中的所有操作作为一个整体像原子一样不可分割,要么全部成功, 要么全部失败。
一致性(Consistency):事务的执行不能破坏数据库数据的完整性和一致性,一个事务在执 行之前和执行之后,数据库都必须处于一致性状态。如果数据库系统在运行过程中发生故障,有些事务尚未完成就被迫中断,这些未完成的事务对数据库所作的修改有一部分已写入物理数据库,这时数据库就处于一种不正确的状态,也就是不一致的状态。
隔离性(Isolation):并发执行的事务不会相互影响,其对数据库的影响和它们串行执行时 一样。比如多个用户同时往一个账户转账,最后账户的结果应该和他们按先后次序转账的结 果一样。
持久性(Durability):事务一旦提交,其对数据库的更新就是持久的。任何事务或系统故障 都不会导致数据丢失。
一致性是事务的最终目的,原子性、隔离性、持久性都是为了实现一致性。
3.4事务的隔离性
3.4.1 不考虑隔离性会导致的三个问题
1、脏读:脏读是指在一个事务处理过程里读取了另一个未提交的事务中的数据。

2、不可重复读:是指 A 事务读取到了 B 事务已经提交的更改数据,在同个时间段内, 两次查询的结果不一致。


3、幻读(虚读):A 事务读取到 B 事务提交的新增数据,幻象读一般发生在数据统计 事务中。

3.4.2 解决办法(四种隔离级别)
1、Read Uncommited(读取未提交内容)
读未提交,顾名思义,就是一个事务可以读取另一个未提交事务的数据。但是,读未提 交产生了脏读,采用 Read Commited 可以解决脏读问题
2、Read Commited(读取提交内容)
读提交,顾名思义,就是一个事务要等另一个事务提交后才能读取数据。读提交,若有 事务对数据进行更新(UPDATE)操作时,读操作事务要等待这个更新操作事务提交后才能 读取数据,可以解决脏读问题。但是,读提交两次查询会产生不同的查询结果,就会造成不 可重复读问题,采用 Repeatable Read 可以解决此问题。
3、Repeatable Read(重复读)
重复读,就是在开始读取数据(事务开启)时,不再允许修改操作。重复读可以解决不 可重复读问题。应该明白的一点就是,不可重复读对应的是修改,即 UPDATE 操作。但是可 能还会有幻读问题。因为幻读问题对应的是插入 INSERT 操作,而不是 UPDATE 操作。采用 Serializable 可以解决幻读问题
4、Serializable(可串行化) Serializable 是最高的事务隔离级别,在该级别下,事务串行化顺序执行,可以避免脏 读、不可重复读与幻读。但是这种事务隔离级别效率低下,比较耗数据库性能,一般不使用。 Yes:可能出现。No:不会出现。

注意:
- 大多数数据库默认的事务隔离级别是 Read committed,比如 Sql Server , Oracle。
- Mysql 的默认隔离级别是 Repeatable read。
- 隔离级别的设置只对当前链接有效。对于使用 MySQL 命令窗口而言,一个窗口就 相当于一个链接,当前窗口设置的隔离级别只对当前窗口中的事务有效;对于 JDBC 操作数据库来说,一个 Connection 对象相当于一个链接,而对于 Connection 对象 设置的隔离级别只对该 Connection 对象有效,与其他链接 Connection 对象无关。
4 Spring 事务管理器
在 Spring 框架中提供了多种事务管理器来进行事务管理。Spring 的事务管理器是基于 AOP 实现的。在 Spring 的事务管理器中包含了配置事务传播行为、隔离级别、只读和超时 属性,这些属性提供了事务应用的方法和描述策略。
在 Java EE 项目开发经常会使用分层模式,Spring 的事务处理位于业务逻辑层,它提供 了针对事务的解决方案。
4.1Spring 事务管理接口
在 Spring 的事务模块(spring-tx-5.2.7.RELEASE.jar)中包括事务管理的三个核心接口。
4.1.1 PlatformTransactionManager 接口
PlatformTransactionManager 接口是 Spring 提供的事务管理器接口,用于管理事务。 Spring 将事务的配置详细信息封装到 TransactionDefinition 对象中,然后通过事务管理器的 getTransaction() 方法获得事务的状态(TransactionStatus),并对事务进行下一步的操作。
该接口中提供了三个事务操作方法,具体如下:
TransactionStatus getTransaction(TransactionDefinition definition):用于获取事务 状态信息。void commit(TransactionStatus status):用于提交事务。void rollback(TransactionStatus status):用于回滚事务。
4.1.2 TransactionDefinition 接口
TransactionDefinition 接口是事务定义(描述)的对象,它提供了事务相关信息获取的 方法,其中包括五个操作,具体如下:
String getName():获取事务对象名称。int getIsolationLevel():获取事务的隔离级别。int getPropagationBehavior():获取事务的传播行为。int getTimeout():获取事务的超时时间。boolean isReadOnly():获取事务是否只读。
4.1.3 TransactionStatus 接口
TransactionStatus 接口是事务的状态,它描述了某一时间点上事务的状态信息。其中包 括六个操作,具体如下:
void flush()刷新事务boolean hasSavepoint()获取是否存在保存点boolean isCompleted()获取事务是否完成boolean isNewTransaction()获取是否是新事务boolean isRollbackOnly()获取是否回滚void setRollbackOnly()设置事务回滚
4.2Spring 中包含的事务管理器

5 事务的传播行为
事务传播行为是指:多个含有事务的方法相互调用时,事务如何在这些方法间传播。

6 Spring 声明式事务管理
Spring 声明式事务管理实现方式:
- 基于 XML 文件方式实现声明式事务管理。
- 通过 Annotation 注解方式实现声明式事务管理。
6.1Jar 包依赖
Spring 核心容器模块
spring-beans-5.2.7.RELEASE.jar
spring-context-5.2.7.RELEASE.jar
spring-core-5.2.7.RELEASE.jar
spring-expression-5.2.7.RELEASE.jar
Spring JDBC 模块
spring-jdbc-5.2.7.RELEASE.jar
Spring 事务模块
spring-tx-5.2.7.RELEASE.jar
Spring AOP 模块
spring-aop-5.2.7.RELEASE.jar
AspectJ 框架
aspectjweaver-1.9.5.jar
Spring 整合 AspectJ 框架模块
spring-aspects-5.2.7.RELEASE.jar
Commons-Loggin 日志
commons-logging-1.2.jar
数据库驱动
mysql-connector-java-5.1.48.jar
6.2使用 XML 文件方式实现声明式事务管理
6.2.1 搭建环境
6.2.1.1 创建项目

6.2.1.2 创建实体类
package com.bjsxt.pojo;

public class Users {


    private int userid;
    private String username;
    private String usersex;

    public int getUserid() {


        return userid;
    }

    public void setUserid(int userid) {


        this.userid = userid;
    }

    public String getUsername() {


        return username;
    }

    public void setUsername(String username) {


        this.username = username;
    }

    public String getUsersex() {


        return usersex;
    }

    public void setUsersex(String usersex) {


        this.usersex = usersex;
    }
}
package com.bjsxt.pojo;

public class Orders {


    private int orderid;
    private double orderprice;

    public int getOrderid() {


        return orderid;
    }

    public void setOrderid(int orderid) {


        this.orderid = orderid;
    }

    public double getOrderprice() {


        return orderprice;
    }

    public void setOrderprice(double orderprice) {


        this.orderprice = orderprice;
    }
}
6.2.1.3 创建持久层
package com.bjsxt.dao;

public interface UsersDao {


}
public class UsersDaoImpl implements UsersDao {


    private JdbcTemplate jdbcTemplate;

    public JdbcTemplate getJdbcTemplate() {


        return jdbcTemplate;
    }

    public void setJdbcTemplate(JdbcTemplate jdbcTemplate) {


        this.jdbcTemplate = jdbcTemplate;
    }
}
6.2.1.4 创建业务层
public interface UsersService {


}
public class UsersServiceImpl implements UsersService {


     private UsersDao usersDao;

    public UsersDao getUsersDao() {


        return usersDao;
    }

    public void setUsersDao(UsersDao usersDao) {


        this.usersDao = usersDao;
    }
}
6.2.1.5 配置 Spring JDBC
<?xml version="1.0" encoding="UTF-8"?>
<beans xmlns="http://www.springframework.org/schema/beans"
       xmlns:xsi="http://www.w3.org/2001/XMLSchema-instance"
       xmlns:context="http://www.springframework.org/schema/context"
       xsi:schemaLocation="http://www.springframework.org/schema/beans http://www.springframework.org/schema/beans/spring-beans.xsd
       http://www.springframework.org/schema/context http://www.springframework.org/schema/context/spring-context.xsd">

    <!--配置解析Properties文件的工具类-->
    <context:property-placeholder location="db.properties"/>

    <!--配置数据源-->
    <bean id="dataSource" class="org.springframework.jdbc.datasource.DriverManagerDataSource">
        <property name="driverClassName" value="${jdbc.driver}"/>
        <property name="url" value="${jdbc.url}"/>
        <property name="username" value="${jdbc.username}"/>
        <property name="password" value="${jdbc.password}"/>
     </bean>

    <!--配置JdbcTemplate-->
    <bean id="jdbcTemplate" class="org.springframework.jdbc.core.JdbcTemplate">
        <property name="dataSource" ref="dataSource"/>
    </bean>

   <!-- 配置持久层-->
    <bean id="usersDao" class="com.bjsxt.dao.impl.UsersDaoImpl">
        <property name="jdbcTemplate" ref="jdbcTemplate"/>
    </bean>

    <!--配置业务层-->
    <bean id="usersService" class="com.bjsxt.service.impl.UsersServiceImpl">
        <property name="usersDao" ref="usersDao"/>
    </bean>
</beans>
6.2.2 实现业务案例
业务案例:添加用户的同时添加一个订单。
6.2.2.1 修改持久层
package com.bjsxt.dao;

import com.bjsxt.pojo.Orders;
import com.bjsxt.pojo.Users;

public interface UsersDao {


    void insertUsers(Users users);
    void insertOrders(Orders orders);
}
package com.bjsxt.dao.impl;

import com.bjsxt.dao.UsersDao;
import com.bjsxt.pojo.Orders;
import com.bjsxt.pojo.Users;
import org.springframework.jdbc.core.JdbcTemplate;

public class UsersDaoImpl implements UsersDao {


    private JdbcTemplate jdbcTemplate;

    public JdbcTemplate getJdbcTemplate() {


        return jdbcTemplate;
    }

    public void setJdbcTemplate(JdbcTemplate jdbcTemplate) {


        this.jdbcTemplate = jdbcTemplate;
    }

    /**
     * 添加用户
     * @param users
     */
    @Override
    public void insertUsers(Users users) {


        String sql = "insert into users values(defaulta,?,?)";
        Object[] args = new Object[]{

    users.getUsername(),users.getUsersex()};
        this.jdbcTemplate.update(sql,args);
    }

    /**
     * 添加订单
     * @param orders
     */
    @Override
    public void insertOrders(Orders orders) {


        String sql = "insert into orders values(default,?,null)";
        Object[] args = new Object[]{

    orders.getOrderprice()};
        this.jdbcTemplate.update(sql,args);
    }
}
6.2.2.2 修改业务层
void addUsersAndOrders(Users users, Orders orders);
   /**
     * 添加用户与订单
     * @param users
     * @param orders
     */
    @Override
    public void addUsersAndOrders(Users users, Orders orders)throws Exception{


              this.usersDao.insertOrders(orders);
              this.usersDao.insertUsers(users);

    }
6.2.2.3 创建测试类
package com.bjsxt.test;

import com.bjsxt.pojo.Orders;
import com.bjsxt.pojo.Users;
import com.bjsxt.service.UsersService;
import org.springframework.context.ApplicationContext;
import org.springframework.context.support.ClassPathXmlApplicationContext;

public class Test {


    public static void main(String[] args)throws Exception{


        ApplicationContext applicationContext = new ClassPathXmlApplicationContext(new String[]{

    "applicationContext-service.xml","applicationContext-service.xml"});
        UsersService usersService = (UsersService)applicationContext.getBean("usersService");
        Users users = new Users();
        users.setUsername("suibian77");
        users.setUsersex("male");
        Orders orders = new Orders();
        orders.setOrderprice(1800);
        usersService.addUsersAndOrders(users,orders);
    }
}
6.2.3 配置 Spring 声明式事务管理
6.2.3.1 开启 aop 命名空间
xmlns:aop="http://www.springframework.org/schema/aop"
http://www.springframework.org/schema/aop
http://www.springframework.org/schema/aop/spring-aop.xsd
6.2.3.2 开启 tx 命名空间
xmlns:tx="http://www.springframework.org/schema/tx"
http://www.springframework.org/schema/tx
http://www.springframework.org/schema/tx/spring-tx.xsd
6.2.3.3 配置声明式事务管理
<?xml version="1.0" encoding="UTF-8"?>
<beans xmlns="http://www.springframework.org/schema/beans"
       xmlns:xsi="http://www.w3.org/2001/XMLSchema-instance"
       xmlns:aop="http://www.springframework.org/schema/aop"
       xmlns:tx="http://www.springframework.org/schema/tx"
       xsi:schemaLocation="http://www.springframework.org/schema/beans http://www.springframework.org/schema/beans/spring-beans.xsd
       http://www.springframework.org/schema/aop http://www.springframework.org/schema/aop/spring-aop.xsd
       http://www.springframework.org/schema/tx http://www.springframework.org/schema/tx/spring-tx.xsd">

    <!--配置事务管理器切面对象-->
    <bean id="transactionManager" class="org.springframework.jdbc.datasource.DataSourceTransactionManager">
        <!--需要注入数据源对象-->
        <property name="dataSource" ref="dataSource"/>
    </bean>

    <!--配置事务管理器属性-->
    <tx:advice id="txAdvice">
        <tx:attributes>
           <!-- name:执行受事务控制的方法。配置方式1,给定完全方法名,通过*统配符指定方法名-->
            <!--propagation:配置事务的传播行为-->
            <tx:method name="add*" propagation="REQUIRED" isolation="DEFAULT" timeout="2" no-rollback-for="NullPointerException"/>
            <tx:method name="find*" read-only="true"/>
        </tx:attributes>
    </tx:advice>

    <!--配置切面-->
    <aop:config>
        <!--配置切点-->
        <aop:pointcut id="txPointcut" expression="execution(* com.bjsxt.service.*.*(..))"/>
        <!--配置切面-->
        <aop:advisor advice-ref="txAdvice" pointcut-ref="txPointcut"/>
    </aop:config>
</beans>
6.2.3.4 启动 Spring 框架加载多个配置文件
package com.bjsxt.test;

import com.bjsxt.pojo.Orders;
import com.bjsxt.pojo.Users;
import com.bjsxt.service.UsersService;
import org.springframework.context.ApplicationContext;
import org.springframework.context.support.ClassPathXmlApplicationContext;

public class Test {


    public static void main(String[] args)throws Exception{


        ApplicationContext applicationContext = new ClassPathXmlApplicationContext(new String[]{

    "applicationContext-service.xml","applicationContext-tx.xml"});
        UsersService usersService = (UsersService)applicationContext.getBean("usersService");
        Users users = new Users();
        users.setUsername("suibian77");
        users.setUsersex("male");
        Orders orders = new Orders();
        orders.setOrderprice(2800);
        usersService.addUsersAndOrders(users,orders);
    }
}
6.2.4 声明式事务中属性解释
6.2.4.1 name 属性
name=”方法名称|方法名称*”
指定受事务控制的方法,支持*通配符。
6.2.4.2 propagation 属性
propagation=”传播行为名称”
配置事务的传播行为。
6.2.4.3 isolation 属性
Isolation=”隔离级别名称”
配置事物的隔离级别。
6.2.4.4 readonly 属性
readonly=”true|false”
是否为只读事务。
true:开启只读事务。由于只读事务不存在数据的修改,因此数据库将会为只读事务提 供一些优化手段,会对性能有一定提升。建议在查询中开启只读事务。
false:不开启只读事务,默认为 false。
6.2.4.5 timeout 属性
timeout=”秒”
timeout 是设置超时属性。以秒为单位。当在限定的时间内不能完成所有操作,就会抛 异常。
6.2.4.6 rollback-for 属性
rollback-for=”异常名称”
Spring 默认情况下会对 RunTimeException 类型异常进行事务回滚。如果是 Exception 类 型的异常则不回滚。
注意:如果异常被try{}catch{}了,事务就不回滚了,如果想让事务回滚则必须再 抛出异常。
6.2.4.7 no-rollback-for 属性
no-rollback-for=”异常名称”
当出现什么异常时不滚回事务。
6.3使用注解方式实现声明式事务管理
6.3.1 @Transactional 介绍
@Transactional 注解 可以作用于接口、接口方法、类以及类方法上。当作用于类上时, 该类的所有 public 方法将都具有该类型的事务属性,同时,我们也可以在方法级别使用该 注解来覆盖类级别的定义。
虽然@Transactional 注解可以作用于接口、接口方法、类以及类方法上,但是 Spring 建 议不要在接口或者接口方法上使用该注解,因为这只有在使用基于接口的代理时它才会生 效。另外, @Transactional 注解应该只被应用到 public 方法上,这是由 Spring AOP 的本质 决定的。如果你在 protected、private 或者默认可见性的方法上使用 @Transactional 注解, 这将被忽略,也不会抛出任何异常。
6.3.2 使用注解配置声明式事务管理的实现方式
6.3.2.1 注册事务管理驱动
<?xml version="1.0" encoding="UTF-8"?>
<beans xmlns="http://www.springframework.org/schema/beans"
       xmlns:xsi="http://www.w3.org/2001/XMLSchema-instance"
       xmlns:aop="http://www.springframework.org/schema/aop"
       xmlns:tx="http://www.springframework.org/schema/tx"
       xsi:schemaLocation="http://www.springframework.org/schema/beans http://www.springframework.org/schema/beans/spring-beans.xsd
       http://www.springframework.org/schema/aop http://www.springframework.org/schema/aop/spring-aop.xsd
       http://www.springframework.org/schema/tx http://www.springframework.org/schema/tx/spring-tx.xsd">

    <!--配置事务管理器的切面-->
    <bean id="txTransactionManager" class="org.springframework.jdbc.datasource.DataSourceTransactionManager">
        <property name="dataSource" ref="dataSource"/>
    </bean>

    <!--注册事务管理驱动-->
    <tx:annotation-driven transaction-manager="txTransactionManager"/>
</beans>
6.3.2.2 使用@Transactional 实现事务控制
package com.bjsxt.service.impl;

import com.bjsxt.dao.UsersDao;
import com.bjsxt.pojo.Orders;
import com.bjsxt.pojo.Users;
import com.bjsxt.service.UsersService;
import org.springframework.transaction.annotation.Isolation;
import org.springframework.transaction.annotation.Propagation;
import org.springframework.transaction.annotation.Transactional;

@Transactional(propagation = Propagation.REQUIRED,isolation = Isolation.DEFAULT)
public class UsersServiceImpl implements UsersService {


     private UsersDao usersDao;

    public UsersDao getUsersDao() {


        return usersDao;
    }

    public void setUsersDao(UsersDao usersDao) {


        this.usersDao = usersDao;
    }

    /**
     * 添加用户与订单
     * @param users
     * @param orders
     */
    @Override
    public void addUsersAndOrders(Users users, Orders orders)throws Exception{


              this.usersDao.insertOrders(orders);
              this.usersDao.insertUsers(users);

    }
}
八、 Spring 基于 Annotation 装配 Bean 对象
在 Spring 中,尽管使用 XML 配置文件可以实现 Bean 的装配工作,但如果应用中 Bean 的数量较多,会导致 XML 配置文件过于臃肿,从而给维护和升级带来一定的困难。 在 Spring 框架中提供了一些用于装配 Bean 对象的注解用于替换 xml 文件的中配置。
1 jar 包依赖
Spring 核心容器模块
spring-beans-5.2.7.RELEASE.jar
spring-context-5.2.7.RELEASE.jar
spring-core-5.2.7.RELEASE.jar
spring-expression-5.2.7.RELEASE.jar
Spring AOP 模块
spring-aop-5.2.7.RELEASE.jar
Commons-Loggin 日志
commons-logging-1.2.jar
2 在 Spring 的配置文件中开启注解扫描
<context:component-scan base-package="扫描注解的包名"/>
3 注册 Bean 对象
3.1@Component
可以使用此注解描述 Spring 中的 Bean,但它是一个泛化的概念,仅仅表示一个组件 (Bean),并且可以作用在任何层次。使用时只需将该注解标注在相应类上即可。
3.2@Service
通常作用在业务层(Service 层),用于将业务层的类标识为 Spring 中的 Bean,其功 能与 @Component 相同。
3.3@Repository
于将数据访问层(DAO 层)的类标识为 Spring 中的 Bean,其功能与 @Component 相 同。
3.4@Controller
通常作用在控制层(如 Spring MVC 的 Controller),用于将控制层的类标识为 Spring 中 的 Bean,其功能与 @Component 相同。
4 Bean 对象依赖注入注解
4.1@Autowired
用于对 Bean 的属性变量、方法及构造方法进行标注,完成 Bean 的自动注入处理。 @Autowired 按照 Bean 的类型进行装配。
4.2@Resource
其作用与 Autowired 一样。其区别在于 @Autowired 按照 Bean 类型装配,而 @Resource 是可以按照 Bean ID 或者类型进行装配。
4.3@Qualifier
与 @Autowired 注解配合使用,会将默认的按 Bean 类型装配修改为按 Bean 的实例 名称装配,Bean 的实例名称由 @Qualifier 注解的参数指定。
4.4@Value
可获取 Properties 文件中的值。
5 Spring 配置相关注解
5.1@Configuration
声明当前类为配置类,相当于 xml 形式的 Spring 配置。该注解需要添加到类上。
5.2@Bean
注解在方法上,声明当前方法的返回值为一个 Bean 对象,该对象会被添加 SpringIOC 容器中。和标签作用的相同。Bean 的实例名称由 @Qualifier 注解的参数指定。
九、 Junit
1 Junit 简介
Junit 是 Java 编程语言的单元测试框架,用于编写和运行可重复的自动化测试。
单元测试(Unit Testing),是指对软件中的最小可测试单元进行检查和验证。对于单元 测试中单元的含义,一般来说,要根据实际情况去判定其具体含义,如 C 语言中单元指一个 函数,Java 里单元指一个类,图形化的软件中可以指一个窗口或一个菜单等。总的来说,单 元就是人为规定的最小的被测功能模块。单元测试是在软件开发过程中要进行的最低级别的 测试活动,软件的独立单元将在与程序的其他部分相隔离的情况下进行测试。
Junit 特点:
- Junit 是一个开放的资源框架,用于编写和运行测试。
- 提供注解来识别测试方法。
- 提供断言来测试预期结果。
- Junit 测试允许你编写代码更快,并能提高质量。
- Junit 优雅简洁。没那么复杂,花费时间较少。
- Junit 测试可以被组织为测试套件,包含测试用例,甚至其他的测试套件。
- Junit 在一个条中显示进度。如果运行良好则是绿色;如果运行失败,则变成红色。
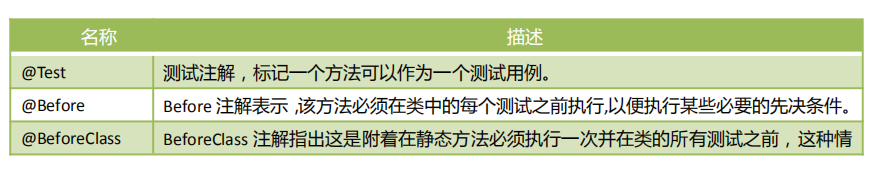
2 Junit 注解

3 Junit 断言
JUnit4.4 引入了 Hamcrest 框架,它们用来帮助我们确定被测试的方法是否按照预期的效 果正常工作,通常把这些辅助方法称为断言。

4 Junit 的使用
4.1Jar 包依赖
junit-4.13.jar
hamcrest-core-1.3.jar
4.2创建项目

4.3Junit 注解的使用
package test.com.bjsxt.usersservice;

import com.bjsxt.service.UsersService;
import com.bjsxt.service.impl.UsersServiceImpl;
import org.junit.*;

public class UsersServiceTest {


 	@Test
 	public void testAddUsers(){


 		System.out.println("Hello Junit");
	 }

   @Before
    public void testBefore(){


        System.out.println("Before....");
    }

    @BeforeClass
    public static void testBeforeClass(){


        System.out.println("BeforeClass....");
    }

    @After
    public void testAfter(){


        System.out.println("After.....");
    }

    @AfterClass
    public static void testAfterClass(){


        System.out.println("AfterClass.....");
    }
}
4.4Junit 断言的使用
    @Test
    public void testAddUsers(){


        UsersService usersService = new UsersServiceImpl();
        UsersService usersService1 = usersService;
        /* int flag = usersService.addUsers();
       Assert.assertEquals(2,flag);*/
       //Assert.assertSame(usersService,usersService1);
       Assert.assertTrue("msg",2>1);
    }
十、 Spring 整合 Junit
//更换测试引擎
@RunWith(SpringJUnit4ClassRunner.class)

//指定 Spring 配置文件
@ContextConfiguration(locations = {

    "classpath:applicationContext.xml"}) public class UsersServiceImplTest {


	@Autowired
	private UsersService usersService;

	@Test
	public void testAddUsers(){


		this.usersService.addUsers();
	}
 }
十一、 Spring 整合 Servlet
1 Jar 包依赖
Spring 核心容器模块
spring-beans-5.2.7.RELEASE.jar
spring-context-5.2.7.RELEASE.jar
spring-core-5.2.7.RELEASE.jar
spring-expression-5.2.7.RELEASE.jar
Commons-Loggin 日志
commons-logging-1.2.jar
Spring AOP 模块
spring-aop-5.2.7.RELEASE.jar
SpringWeb 模块
spring-web-5.2.7.RELEASE.jar
Servlet
servlet-api.jar
2 搭建环境
2.1创建 Web 项目

2.2添加 Spring 配置文件
<?xml version="1.0" encoding="UTF-8"?> <beans xmlns="http://www.springframework.org/schema/beans"
	xmlns:xsi="http://www.w3.org/2001/XMLSchema-instance"
	xmlns:context="http://www.springframework.org/schema/context"
	xsi:schemaLocation="http://www.springframework.org/schema/beans
	http://www.springframework.org/schema/beans/spring-beans.xsd
	http://www.springframework.org/schema/context
	http://www.springframework.org/schema/context/spring-context.xsd" >

</beans>
3 在 Web 项目中启动 Spring 框架
在 Web 项目中需要在 web.xml 文件中配置启动 Spring 框架的监听器。用于启动 Spring 框架。
修改 web.xml 文件
<?xml version="1.0" encoding="UTF-8"?>
<web-app xmlns="http://xmlns.jcp.org/xml/ns/javaee"
         xmlns:xsi="http://www.w3.org/2001/XMLSchema-instance"
         xsi:schemaLocation="http://xmlns.jcp.org/xml/ns/javaee http://xmlns.jcp.org/xml/ns/javaee/web-app_4_0.xsd"
         version="4.0">
    <!--指定配置文件的位置-->
    <context-param>
        <param-name>contextConfigLocation</param-name>
        <param-value>classpath:applicationContext.xml</param-value>
    </context-param>
    <!--配置启动Spring框架的监听器-->
    <listener>
        <listener-class>org.springframework.web.context.ContextLoaderListener</listener-class>
    </listener>
</web-app>
4 在 Servlet 中获取 Bean 对象
4.1创建业务层
package com.bjsxt.service;

public interface UsersService {


    void addUsers();
}
package com.bjsxt.service.impl;

import com.bjsxt.dao.UsersDao;
import com.bjsxt.service.UsersService;
import org.springframework.beans.factory.annotation.Autowired;
import org.springframework.stereotype.Service;

@Service
public class UsersServiceImpl implements UsersService {


    @Autowired
    private UsersDao usersDao;
    @Override
    public void addUsers() {


        this.usersDao.insertUsers();
    }
}
4.2创建 Servlet
package com.bjsxt.web.servlet;

import com.bjsxt.service.UsersService;
import org.springframework.beans.factory.annotation.Autowired;
import org.springframework.context.ApplicationContext;
import org.springframework.web.context.WebApplicationContext;
import org.springframework.web.context.support.WebApplicationContextUtils;

import javax.servlet.ServletException;
import javax.servlet.annotation.WebServlet;
import javax.servlet.http.HttpServlet;
import javax.servlet.http.HttpServletRequest;
import javax.servlet.http.HttpServletResponse;
import java.io.IOException;

@WebServlet(urlPatterns = "/addUsers.do")
public class UsersServlet extends HttpServlet {


    @Override
    protected void doGet(HttpServletRequest req, HttpServletResponse resp) throws ServletException, IOException {


        this.doPost(req, resp);
    }

    @Override
    protected void doPost(HttpServletRequest req, HttpServletResponse resp) throws ServletException, IOException {


        //方式一
       /* WebApplicationContext webApplicationContext = (WebApplicationContext) this.getServletContext().getAttribute(WebApplicationContext.ROOT_WEB_APPLICATION_CONTEXT_ATTRIBUTE);
        UsersService usersService = (UsersService) webApplicationContext.getBean("usersServiceImpl");
        usersService.addUsers();*/
       //方式二
        WebApplicationContext webApplicationContext = WebApplicationContextUtils.getWebApplicationContext(this.getServletContext());
        UsersService usersService = (UsersService) webApplicationContext.getBean("usersServiceImpl");
        usersService.addUsers();
        resp.getWriter().print("Hello Servlet");
    }
}
4.3创建持久层
package com.bjsxt.dao;

public interface UsersDao {


    void insertUsers();
}
package com.bjsxt.dao.impl;

import com.bjsxt.dao.UsersDao;
import org.springframework.stereotype.Repository;

@Repository
public class UsersDaoImpl implements UsersDao {


    @Override
    public void insertUsers() {


        System.out.println("insert into users....");
    }
}
4.4修改 Spring 配置文件
<?xml version="1.0" encoding="UTF-8"?>
<beans xmlns="http://www.springframework.org/schema/beans"
       xmlns:xsi="http://www.w3.org/2001/XMLSchema-instance"
       xmlns:context="http://www.springframework.org/schema/context"
       xsi:schemaLocation="http://www.springframework.org/schema/beans http://www.springframework.org/schema/beans/spring-beans.xsd
http://www.springframework.org/schema/context http://www.springframework.org/schema/context/spring-context.xsd">
    <context:component-scan base-package="com.bjsxt.service,com.bjsxt.dao"/>
</beans>
十二、 Spring 重点知识梳理

下一篇:【SpringMVC】