一 Zookeeper Java客户端
项目构建
zookeeper 官方的客户端没有和服务端代码分离,他们为同一个jar 文件,所以我们直接引入zookeeper的maven即可, 这里版本请保持与服务端版本一致,不然会有很多兼容性的问题
引入依赖
<dependency>
    <groupId>org.apache.zookeeper</groupId>
    <artifactId>zookeeper</artifactId>
    <version>3.5.8</version>
</dependency>
创建客户端实例
为了便于测试,直接在初始化方法中创建zookeeper实例
@Slf4j
public class ZookeeperClientTest {


    //zookeeper服务端地址
    private static final String ZK_ADDRESS="192.168.109.200:2181";
   //超时时间
    private static final int SESSION_TIMEOUT = 5000;

    private static ZooKeeper zooKeeper;

    private static final String ZK_NODE="/zk-node";


    @Before
    public void init() throws IOException, InterruptedException {


        final CountDownLatch countDownLatch=new CountDownLatch(1);
        zooKeeper=new ZooKeeper(ZK_ADDRESS, SESSION_TIMEOUT, event -> {


            if (event.getState()== Watcher.Event.KeeperState.SyncConnected &&
                    event.getType()== Watcher.Event.EventType.None){


                countDownLatch.countDown();
                log.info("连接成功!");
            }
        });
        log.info("连接中....");
        countDownLatch.await();
    }
}
创建Zookeeper实例的方法
ZooKeeper(String connectString, int sessionTimeout, Watcher watcher)
ZooKeeper(String connectString, int sessionTimeout, Watcher watcher, ZKClientConfig)
ZooKeeper(String connectString, int sessionTimeout, Watcher watcher, boolean canBeReadOnly, HostProvider)
ZooKeeper(String connectString, int sessionTimeout, Watcher watcher, boolean canBeReadOnly, HostProvider, ZKClientConfig)
ZooKeeper(String connectString, int sessionTimeout, Watcher watcher, boolean canBeReadOnly)
ZooKeeper(String connectString, int sessionTimeout, Watcher watcher, boolean canBeReadOnly, ZKClientConfig)
ZooKeeper(String connectString, int sessionTimeout, Watcher watcher, long, byte[])
ZooKeeper(String connectString, int sessionTimeout, Watcher watcher, long, byte[], boolean, HostProvider)
ZooKeeper(String connectString, int sessionTimeout, Watcher watcher, long, byte[], boolean, HostProvider, ZKClientConfig)
ZooKeeper(String connectString, int  sessionTimeout, Watcher watcher, long, byte[], boolean)
| 参数名称 | 含义 |
|---|---|
| connectString | ZooKeeper服务器列表,由英文逗号分开的host:port字符串组成, 每一个都代表一台ZooKeeper机器,如,host1:port1,host2:port2,host3:port3。另外,也可以在connectString中设置客户端连接上ZooKeeper 后的根目录,方法是在host:port字符串之后添加上这个根目录,例如,host1:port1,host2:port2,host3:port3/zk-base,这样就指定了该客户端连接上ZooKeeper服务器之后,所有对ZooKeeper 的操作,都会基于这个根目录。例如,客户端对/sub-node 的操作,最终创建 /zk-node/sub-node, 这个目录也叫Chroot,即客户端隔离命名空间。 |
| sessionTimeout | 会话的超时时间,是一个以“毫秒”为单位的整型值。在ZooKeeper中有 会话的概念,在一个会话周期内,ZooKeeper客户端和服务器之间会通过心跳检 测机制来维持会话的有效性,一旦在sessionTimeout时间内没有进行有效 的心跳检测,会话就会失效。 |
| watcher | ZooKeeper允许 客户端在构造方法中传入一个接口 watcher (org.apache. zookeeper. Watcher)的实现类对象来作为默认的 Watcher事件通知处理器。当然,该参 数可以设置为null 以表明不需要设置默认的 Watcher处理器。 |
| canBeReadOnly | 这是一个boolean类型的参数,用于标识当前会话是否支持“read-only(只 读)”模式。默认情况下,在ZooKeeper集群中,一个机器如果和集群中过半及 以上机器失去了网络连接,那么这个机器将不再处理客户端请求(包括读写请 求)。但是在某些使用场景下,当ZooKeeper服务器发生此类故障的时候,我们 还是希望ZooKeeper服务器能够提供读服务(当然写服务肯定无法提供)—— 这就是 ZooKeeper的“read-only”模式。 |
| sessionId和 ses sionPasswd | 分别代表会话ID和会话秘钥。这两个参数能够唯一确定一个会话,同时客户 端使用这两个参数可以实现客户端会话复用,从而达到恢复会话的效果。具体 使用方法是,第一次连接上ZooKeeper服务器时,通过调用ZooKeeper对象实 例的以下两个接口,即可获得当前会话的ID和秘钥: long getSessionId(); byte[]getSessionPasswd( ); 荻取到这两个参数值之后,就可以在下次创建ZooKeeper对象实例的时候传 入构造方法了 |
同步创建节点
@Test
public void createTest() throws KeeperException, InterruptedException {


    String path = zooKeeper.create(ZK_NODE, "data".getBytes(), ZooDefs.Ids.OPEN_ACL_UNSAFE, CreateMode.PERSISTENT);
    log.info("created path: {}",path);
}
异步创建节点
@Test
public void createAsycTest() throws InterruptedException {


     zooKeeper.create(ZK_NODE, "data".getBytes(), ZooDefs.Ids.OPEN_ACL_UNSAFE,
             CreateMode.PERSISTENT,
             (rc, path, ctx, name) -> log.info("rc  {},path {},ctx {},name {}",rc,path,ctx,name),"context");
    TimeUnit.SECONDS.sleep(Integer.MAX_VALUE);
}
修改节点数据
@Test
public void setTest() throws KeeperException, InterruptedException {


    Stat stat = new Stat();
    byte[] data = zooKeeper.getData(ZK_NODE, false, stat);
    log.info("修改前: {}",new String(data));
    zooKeeper.setData(ZK_NODE, "changed!".getBytes(), stat.getVersion());
     byte[] dataAfter = zooKeeper.getData(ZK_NODE, false, stat);
    log.info("修改后: {}",new String(dataAfter));
}
二 Apache Curator 开源客户端
Curator 是一套由netflix 公司开源的,Java 语言编程的 ZooKeeper 客户端框架,Curator项目是现在ZooKeeper 客户端中使用最多,对ZooKeeper 版本支持最好的第三方客户端,并推荐使用,Curator 把我们平时常用的很多 ZooKeeper 服务开发功能做了封装,例如 Leader 选举、分布式计数器、分布式锁。这就减少了技术人员在使用 ZooKeeper 时的大部分底层细节开发工作。在会话重新连接、Watch 反复注册、多种异常处理等使用场景中,用原生的 ZooKeeper 处理比较复杂。而在使用 Curator 时,由于其对这些功能都做了高度的封装,使用起来更加简单,不但减少了开发时间,而且增强了程序的可靠性。
2.1 Curator 基础操作实战
这里我们以 Maven 工程为例,首先要引入Curator 框架相关的开发包,这里为了方便测试引入了junit ,lombok,由于Zookeeper本身已经封装了 log4j 日志框架,所以这里可以创建对应的log4j配置文件后直接使用。 如下面的代码所示,我们通过将 Curator 相关的引用包配置到 Maven 工程的 pom 文件中,将 Curaotr 框架引用到工程项目里,在配置文件中分别引用了两个 Curator 相关的包,第一个是 curator-framework 包,该包是对 ZooKeeper 底层 API 的一些封装。另一个是 curator-recipes 包,该包封装了一些 ZooKeeper 服务的高级特性,如:Cache 事件监听、选举、分布式锁、分布式 Barrier。
<dependency>
    <groupId>org.apache.curator</groupId>
    <artifactId>curator-recipes</artifactId>
    <version>5.0.0</version>
    <exclusions>
        <exclusion>
            <groupId>org.apache.zookeeper</groupId>
            <artifactId>zookeeper</artifactId>
        </exclusion>
    </exclusions>
</dependency>
<dependency>
    <groupId>org.apache.zookeeper</groupId>
    <artifactId>zookeeper</artifactId>
    <version>3.5.8</version>
</dependency>
<dependency>
    <groupId>junit</groupId>
    <artifactId>junit</artifactId>
    <version>4.13</version>
</dependency>
<dependency>
    <groupId>org.projectlombok</groupId>
    <artifactId>lombok</artifactId>
    <version>1.18.12</version>
</dependency>
<dependency>
    <groupId>org.apache.curator</groupId>
    <artifactId>curator-recipes</artifactId>
    <version>5.0.0</version>
    <exclusions>
        <exclusion>
            <groupId>org.apache.zookeeper</groupId>
            <artifactId>zookeeper</artifactId>
        </exclusion>
    </exclusions>
</dependency>
<dependency>
    <groupId>org.apache.zookeeper</groupId>
    <artifactId>zookeeper</artifactId>
    <version>3.5.8</version>
</dependency>
<dependency>
    <groupId>junit</groupId>
    <artifactId>junit</artifactId>
    <version>4.13</version>
</dependency>
<dependency>
    <groupId>org.projectlombok</groupId>
    <artifactId>lombok</artifactId>
会话创建
要进行客户端服务器交互,第一步就要创建会话
Curator 提供了多种方式创建会话,比如用静态工厂方式创建:
// 重试策略
RetryPolicy retryPolicy = new ExponentialBackoffRetry(1000, 3)
CuratorFramework client = CuratorFrameworkFactory.newClient(zookeeperConnectionString, retryPolicy);
client.start();
或者使用 fluent 风格创建
RetryPolicy retryPolicy = new ExponentialBackoffRetry(1000, 3);
CuratorFramework client = CuratorFrameworkFactory.builder()
                .connectString("192.168.128.129:2181")
                .sessionTimeoutMs(5000)  // 会话超时时间
                .connectionTimeoutMs(5000) // 连接超时时间
                .retryPolicy(retryPolicy)
                .namespace("base") // 包含隔离名称
                .build();
client.start();
这段代码的编码风格采用了流式方式,最核心的类是 CuratorFramework 类,该类的作用是定义一个 ZooKeeper 客户端对象,并在之后的上下文中使用。在定义 CuratorFramework 对象实例的时候,我们使用了 CuratorFrameworkFactory 工厂方法,并指定了 connectionString 服务器地址列表、retryPolicy 重试策略 、sessionTimeoutMs 会话超时时间、connectionTimeoutMs 会话创建超时时间。下面我们分别对这几个参数进行讲解:
connectionString:服务器地址列表,在指定服务器地址列表的时候可以是一个地址,也可以是多个地址。如果是多个地址,那么每个服务器地址列表用逗号分隔, 如 host1:port1,host2:port2,host3;port3 。
retryPolicy:重试策略,当客户端异常退出或者与服务端失去连接的时候,可以通过设置客户端重新连接 ZooKeeper 服务端。而 Curator 提供了 一次重试、多次重试等不同种类的实现方式。在 Curator 内部,可以通过判断服务器返回的 keeperException 的状态代码来判断是否进行重试处理,如果返回的是 OK 表示一切操作都没有问题,而 SYSTEMERROR 表示系统或服务端错误。
| 策略名称 | 描述 |
|---|---|
| ExponentialBackoffRetry | 重试一组次数,重试之间的睡眠时间增加 |
| RetryNTimes | 重试最大次数 |
| RetryOneTime | 只重试一次 |
| RetryUntilElapsed | 在给定的时间结束之前重试 |
超时时间:Curator 客户端创建过程中,有两个超时时间的设置。一个是 sessionTimeoutMs 会话超时时间,用来设置该条会话在 ZooKeeper 服务端的失效时间。另一个是 connectionTimeoutMs 客户端创建会话的超时时间,用来限制客户端发起一个会话连接到接收 ZooKeeper 服务端应答的时间。sessionTimeoutMs 作用在服务端,而 connectionTimeoutMs 作用在客户端。
创建节点
创建节点的方式如下面的代码所示,回顾我们之前课程中讲到的内容,描述一个节点要包括节点的类型,即临时节点还是持久节点、节点的数据信息、节点是否是有序节点等属性和性质。
@Test
public void testCreate() throws Exception {


    String path = curatorFramework.create().forPath("/curator-node");
    // curatorFramework.create().withMode(CreateMode.PERSISTENT).forPath("/curator-node","some-data".getBytes())
    log.info("curator create node :{}  successfully.",path);
}
在 Curator 中,可以使用 create 函数创建数据节点,并通过 withMode 函数指定节点类型(持久化节点,临时节点,顺序节点,临时顺序节点,持久化顺序节点等),默认是持久化节点,之后调用 forPath 函数来指定节点的路径和数据信息。
一次性创建带层级结构的节点
@Test
public void testCreateWithParent() throws Exception {


    String pathWithParent="/node-parent/sub-node-1";
    String path = curatorFramework.create().creatingParentsIfNeeded().forPath(pathWithParent);
    log.info("curator create node :{}  successfully.",path);
}
获取数据
@Test
public void testGetData() throws Exception {


    byte[] bytes = curatorFramework.getData().forPath("/curator-node");
    log.info("get data from  node :{}  successfully.",new String(bytes));
}
更新节点
我们通过客户端实例的 setData() 方法更新 ZooKeeper 服务上的数据节点,在setData 方法的后边,通过 forPath 函数来指定更新的数据节点路径以及要更新的数据。
@Test
public void testSetData() throws Exception {


    curatorFramework.setData().forPath("/curator-node","changed!".getBytes());
    byte[] bytes = curatorFramework.getData().forPath("/curator-node");
    log.info("get data from  node /curator-node :{}  successfully.",new String(bytes));
}
删除节点
@Test
public void testDelete() throws Exception {


    String pathWithParent="/node-parent";
    curatorFramework.delete().guaranteed().deletingChildrenIfNeeded().forPath(pathWithParent);
}
guaranteed:该函数的功能如字面意思一样,主要起到一个保障删除成功的作用,其底层工作方式是:只要该客户端的会话有效,就会在后台持续发起删除请求,直到该数据节点在 ZooKeeper 服务端被删除。
deletingChildrenIfNeeded:指定了该函数后,系统在删除该数据节点的时候会以递归的方式直接删除其子节点,以及子节点的子节点。
2.2 Curator 异步接口
Curator 引入了BackgroundCallback 接口,用来处理服务器端返回来的信息,这个处理过程是在异步线程中调用,默认在 EventThread 中调用,也可以自定义线程池。
public interface BackgroundCallback
{


    /**
     * Called when the async background operation completes
     *
     * @param client the client
     * @param event operation result details
     * @throws Exception errors
     */
    public void processResult(CuratorFramework client, CuratorEvent event) throws Exception;
}
如上接口,主要参数为 client 客户端, 和 服务端事件 event
inBackground 异步处理默认在EventThread中执行
@Test
public void test() throws Exception {


    curatorFramework.getData().inBackground((item1, item2) -> {


        log.info(" background: {}", item2);
    }).forPath(ZK_NODE);

    TimeUnit.SECONDS.sleep(Integer.MAX_VALUE);
}
指定线程池
@Test
public void test() throws Exception {


    ExecutorService executorService = Executors.newSingleThreadExecutor();

    curatorFramework.getData().inBackground((item1, item2) -> {


        log.info(" background: {}", item2);
    },executorService).forPath(ZK_NODE);

    TimeUnit.SECONDS.sleep(Integer.MAX_VALUE);
}
2.3 Curator 监听器
/**
 * Receives notifications about errors and background events
 */
public interface CuratorListener
{


    /**
     * Called when a background task has completed or a watch has triggered
     *
     * @param client client
     * @param event the event
     * @throws Exception any errors
     */
    public void         eventReceived(CuratorFramework client, CuratorEvent event) throws Exception;
}
针对 background 通知和错误通知。使用此监听器之后,调用inBackground 方法会异步获得监听
Curator Caches
Curator 引入了 Cache 来实现对 Zookeeper 服务端事件监听,Cache 事件监听可以理解为一个本地缓存视图与远程 Zookeeper 视图的对比过程。Cache 提供了反复注册的功能。Cache 分为两类注册类型:节点监听和子节点监听。
node cache
NodeCache 对某一个节点进行监听
public NodeCache(CuratorFramework client,
                         String path)
Parameters:
client - the client
path - path to cache
可以通过注册监听器来实现,对当前节点数据变化的处理
public void addListener(NodeCacheListener listener)
     Add a change listener
Parameters:
listener - the listener
@Slf4j
public class NodeCacheTest extends AbstractCuratorTest{


    public static final String NODE_CACHE="/node-cache";

    @Test
    public void testNodeCacheTest() throws Exception {


        createIfNeed(NODE_CACHE);
        NodeCache nodeCache = new NodeCache(curatorFramework, NODE_CACHE);
        nodeCache.getListenable().addListener(new NodeCacheListener() {


            @Override
            public void nodeChanged() throws Exception {


                log.info("{} path nodeChanged: ",NODE_CACHE);
                printNodeData();
            }
        });

        nodeCache.start();
    }


    public void printNodeData() throws Exception {


        byte[] bytes = curatorFramework.getData().forPath(NODE_CACHE);
        log.info("data: {}",new String(bytes));
    }
}
path cache
PathChildrenCache 会对子节点进行监听,但是不会对二级子节点进行监听
public PathChildrenCache(CuratorFramework client,
                         String path,
                         boolean cacheData)
Parameters:
client - the client
path - path to watch
cacheData - if true, node contents are cached in addition to the stat
可以通过注册监听器来实现,对当前节点的子节点数据变化的处理
public void addListener(PathChildrenCacheListener listener)
     Add a change listener
Parameters:
listener - the listener
@Slf4j
public class PathCacheTest extends AbstractCuratorTest{


    public static final String PATH="/path-cache";

    @Test
    public void testPathCache() throws Exception {


        createIfNeed(PATH);
        PathChildrenCache pathChildrenCache = new PathChildrenCache(curatorFramework, PATH, true);
        pathChildrenCache.getListenable().addListener(new PathChildrenCacheListener() {


            @Override
            public void childEvent(CuratorFramework client, PathChildrenCacheEvent event) throws Exception {


                log.info("event:  {}",event);
            }
        });

        // 如果设置为true则在首次启动时就会缓存节点内容到Cache中
        pathChildrenCache.start(true);
    }
}
tree cache
TreeCache 使用一个内部类TreeNode来维护这个一个树结构。并将这个树结构与ZK节点进行了映射。所以TreeCache 可以监听当前节点下所有节点的事件。
public TreeCache(CuratorFramework client,
                         String path,
                         boolean cacheData)
Parameters:
client - the client
path - path to watch
cacheData - if true, node contents are cached in addition to the stat
可以通过注册监听器来实现,对当前节点的子节点,及递归子节点数据变化的处理
public void addListener(TreeCacheListener listener)
     Add a change listener
Parameters:
listener - the listener
@Slf4j
public class TreeCacheTest extends AbstractCuratorTest{


    public static final String TREE_CACHE="/tree-path";

    @Test
    public void testTreeCache() throws Exception {


        createIfNeed(TREE_CACHE);
        TreeCache treeCache = new TreeCache(curatorFramework, TREE_CACHE);
        treeCache.getListenable().addListener(new TreeCacheListener() {


            @Override
            public void childEvent(CuratorFramework client, TreeCacheEvent event) throws Exception {


                log.info(" tree cache: {}",event);
            }
        });
        treeCache.start();
    }
}
三 Zookeeper集群&不停机动态扩容/缩容
Zookeeper 集群模式一共有三种类型的角色
- Leader: 处理所有的事务请求(写请求),可以处理读请求,集群中只能有一个Leader
- Follower:只能处理读请求,同时作为 Leader的候选节点,即如果Leader宕机,Follower节点要参与到新的Leader选举中,有可能成为新的Leader节点。
- Observer:只能处理读请求。不能参与选举 。

3.1 Zookeeper集群模式安装
本例搭建的是伪集群模式,即一台机器上启动四个zookeeper实例组成集群,真正的集群模式无非就是实例IP地址不同,搭建方法没有区别
Step1:配置JAVA环境,检验环境:保证是jdk7 及以上即可
java -version
Step2:下载并解压zookeeper
wget https://mirror.bit.edu.cn/apache/zookeeper/zookeeper-3.5.8/apache-zookeeper-3.5.8-bin.tar.gz
tar -zxvf apache-zookeeper-3.5.8-bin.tar.gz
cd  apache-zookeeper-3.5.8-bin
Step3:重命名 zoo_sample.cfg文件
cp conf/zoo_sample.cfg conf/zoo-1.cfg
Step4:修改配置文件zoo-1.cfg,原配置文件里有的,修改成下面的值,没有的则加上
# vim conf/zoo-1.cfg
dataDir=/usr/local/data/zookeeper-1
clientPort=2181
server.1=127.0.0.1:2001:3001:participant// participant 可以不用写,默认就是participant
server.2=127.0.0.1:2002:3002:participant
server.3=127.0.0.1:2003:3003:participant
server.4=127.0.0.1:2004:3004:observer
配置说明
- tickTime:用于配置Zookeeper中最小时间单位的长度,很多运行时的时间间隔都是使用tickTime的倍数来表示的。
- initLimit:该参数用于配置Leader服务器等待Follower启动,并完成数据同步的时间。Follower服务器再启动过程中,会与Leader建立连接并完成数据的同步,从而确定自己对外提供服务的起始状态。Leader服务器允许Follower再initLimit 时间内完成这个工作。
- syncLimit:Leader 与Follower心跳检测的最大延时时间
- dataDir:顾名思义就是 Zookeeper 保存数据的目录,默认情况下,Zookeeper 将写数据的日志文件也保存在这个目录里。
- clientPort:这个端口就是客户端连接 Zookeeper 服务器的端口,Zookeeper 会监听这个端口,接受客户端的访问请求。
- server.A=B:C:D:E 其中 A 是一个数字,表示这个是第几号服务器;B 是这个服务器的 ip 地址;C 表示的是这个服务器与集群中的 Leader 服务器交换信息的端口;D 表示的是万一集群中的 Leader 服务器挂了,需要一个端口来重新进行选举,选出一个新的 Leader,而这个端口就是用来执行选举时服务器相互通信的端口。如果是伪集群的配置方式,由于 B 都是一样,所以不同的 Zookeeper 实例通信端口号不能一样,所以要给它们分配不同的端口号。如果需要通过添加不参与集群选举以及事务请求的过半机制的 Observer节点,可以在E的位置,添加observer标识。
Step4:再从zoo-1.cfg复制三个配置文件zoo-2.cfg,zoo-3.cfg和zoo-4.cfg,只需修改dataDir和clientPort不同即可
cp conf/zoo1.cfg conf/zoo2.cfg
cp conf/zoo1.cfg conf/zoo3.cfg
cp conf/zoo1.cfg conf/zoo4.cfg

vim conf/zoo2.cfg
dataDir=/usr/local/data/zookeeper2
clientPort=2182
vim conf/zoo3.cfg
dataDir=/usr/local/data/zookeeper3
clientPort=2183
vim conf/zoo4.cfg
dataDir=/usr/local/data/zookeeper4
clientPort=2184
Step5:标识Server ID
创建四个文件夹/usr/local/data/zookeeper-1,/usr/local/data/zookeeper-2,/usr/local/data/zookeeper-3,/usr/local/data/zookeeper-4,在每个目录中创建文件myid 文件,写入当前实例的server id,即1,2,3,4
cd /usr/local/data/zookeeper-1
 vim myid
 1
 cd /usr/local/data/zookeeper-2
 vim myid
 2
 cd /usr/local/data/zookeeper-3
 vim myid
 3
cd /usr/local/data/zookeeper-4
vim myid
4
Step6:启动三个zookeeper实例
bin/zkServer.sh start conf/zoo1.cfg
bin/zkServer.sh start conf/zoo2.cfg
bin/zkServer.sh start conf/zoo3.cfg
Step7:检测集群状态,也可以直接用命令 zkServer.sh status conf/zoo1.cfg 进行每台服务的状态查询

bin/zkCli.sh -server ip1:port1,ip2:port2,ip3:port3
可以通过 查看/zookeeper/config 节点数据来查看集群配置
3.2 集群动态配置
Zookeeper 3.5.0 新特性: 集群动态配置
Zookeeper 3.5.0 以前,Zookeeper集群角色要发生改变的话,只能通过停掉所有的Zookeeper服务,修改集群配置,重启服务来完成,这样集群服务将有一段不可用的状态,为了应对高可用需求,Zookeeper 3.5.0 提供了支持动态扩容/缩容的 新特性。但是通过客户端API可以变更服务端集群状态是件很危险的事情,所以在zookeeper 3.5.3 版本要用动态配置,需要开启超级管理员身份验证模式 ACLs。如果是在一个安全的环境也可以通过配置 系统参数 -Dzookeeper.skipACL=yes 来避免配置维护acl 权限配置。
第一步,按照上节课的方式,先配置一个超级管理员(如果不配管理员,也可以设置系统参数 -Dzookeeper.skipACL=yes):如:
在zookeeper启动脚本中添加 超级管理员授权模式:
echo -n gj:123 | openssl dgst -binary -sha1 | openssl base64
// RRCKWv2U2e99M6UmsFaJiQ2xStw=

-Dzookeeper.DigestAuthenticationProvider.superDigest=gj:RRCKWv2U2e99M6UmsFaJiQ2xStw=

配置动态文件
修改配置 zoo1.cfg
注意这里去除了端口号,添加了
reconfigEnabled : 设置为true 开启动态配置
dynamicConfigFile : 指定动态配置文件的路径

创建文件 zoo_replicated1.cfg.dynamic
动态配置文件,加入集群信息
server.A=B.C.D.E;F
A: 服务的唯一标识
B: 服务对应的IP地址,
C: 集群通信端口
D: 集群选举端口
E: 角色, 默认是 participant,即参与过半机制的角色,选举,事务请求过半提交,还有一个是observer, 观察者,不参与选举以及过半机制。
之后是一个分号,一定是分号,
F:服务IP:端口
server.1=192.168.109.200:2001:3001:participant;192.168.109.200:2181
server.2=192.168.109.200:2002:3002:participant;192.168.109.200:2182
server.3=192.168.109.200:2003:3003:participant;192.168.109.200:2183
依次配置其他服务 zoo2.cfg ,zoo3.cfg注意数据文件的路径
依次启动所有服务
如: ./bin/zkServer.sh  start   conf/zoo1.cfg
查看集群状态:
     ./bin/zkServer.sh  status  conf/zoo1.cfg
连上任意一台服务器:
查看集群配置
 config  // 将会把动态配置打印出来
 也可以直接查看目录
 /zookeeper/config
 该节点存储了集群信息

 如果要修改集群状态,需要授权登录
 addauth digest gj:123

 reconfig -remove 3  // 移除serverId为 3 的机器
 // 把对应的机器加进来
 reconfig -add server.3=192.168.109.200:2003:3003:participant;192.168.109.200:2183
如果要变更/或者添加新的服务需要将服务加到配置文件 zoo_replicated1.cfg.dynamic 中,启动服务
然后通过reconfig 命令进行添加或者变更服务角色,但是需要保证服务列表中 participant 角色能够形成集群(过半机制)。
客户端进行连接,会随机选择一台进行连接:

客户端可以通过监听 /zookeeper/confg 节点,来感知集群的变化。从而实现集群的动态变更.
Zookeeper 类提供了对应的API 用来更新服务列表 : updateServerList
 Watcher watcher = new Watcher() {


    @Override
    public void process(WatchedEvent event) {


                 if (event.getType() == Event.EventType.None
                         && event.getState() == Event.KeeperState.SyncConnected){


                           countDownLatch.countDown();
                           log.info(" 连接建立");
                           // start to watch config
                     try {


                         log.info(" 开始监听:{}",ZooDefs.CONFIG_NODE);
                         zookeeper.getConfig(true,null);
                     } catch (KeeperException e) {


                         e.printStackTrace();
                     } catch (InterruptedException e) {


                         e.printStackTrace();
                     }
                 }else if( event.getPath()!=null  &&  event.getPath().equals(ZooDefs.CONFIG_NODE)){


                     try {


                         byte[] config = zookeeper.getConfig(this, null);
                         String clientConfigStr = ConfigUtils.getClientConfigStr(new String(config));
                         log.info(" 配置发生变更: {}",clientConfigStr);
                         zookeeper.updateServerList(clientConfigStr.split(" ")[1]);
                     } catch (KeeperException e) {


                         e.printStackTrace();
                     } catch (InterruptedException e) {


                         e.printStackTrace();
                     } catch (IOException e) {


                         e.printStackTrace();
                     }

                 }
    }
};
Curator 也自带了动态配置的监听,不需要额外的配置和代码实现监听更新;
3.3 Zookeeper分布式锁实战
非公平锁:
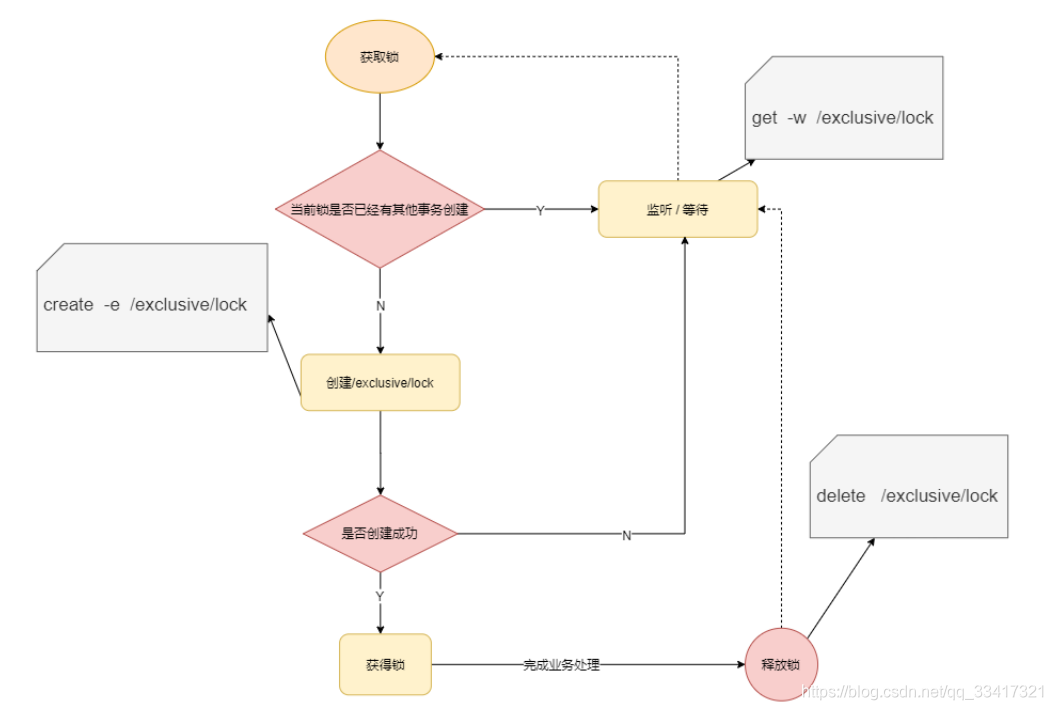
如上实现方式在并发问题比较严重的情况下,性能会下降的比较厉害,主要原因是,所有的连接 都在对同一个节点进行监听,当服务器检测到删除事件时,要通知所有的连接,所有的连接同时 收到事件,再次并发竞争,这就是羊群效应。如何避免呢,我们看下面这种方式。
公平锁:
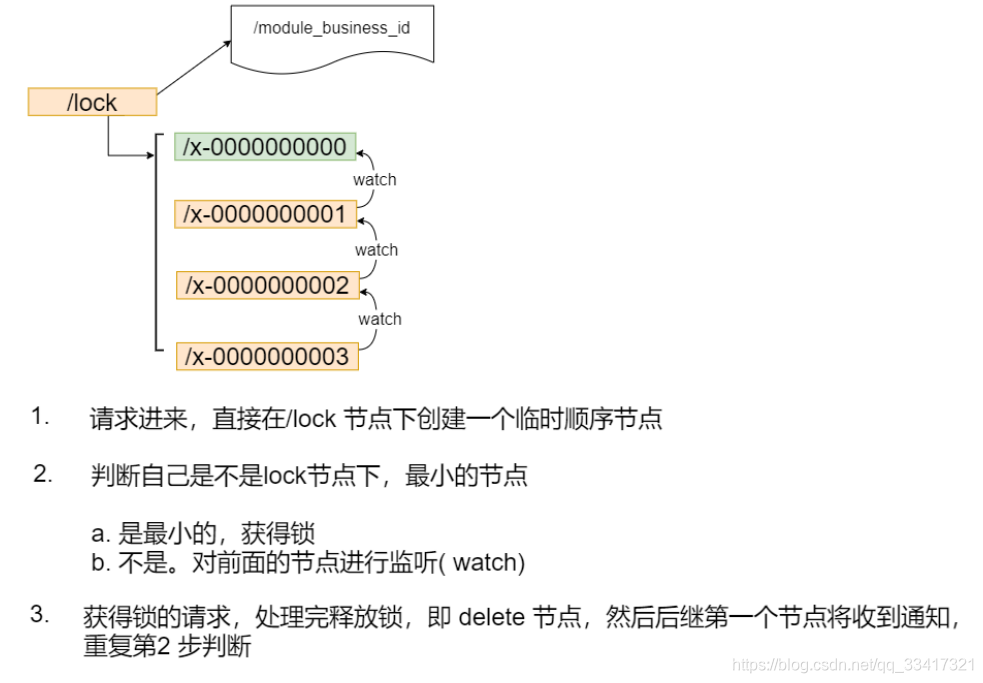
如上借助于临时顺序节点,可以避免同时多个节点的并发竞争锁,缓解了服务端压力。