前言
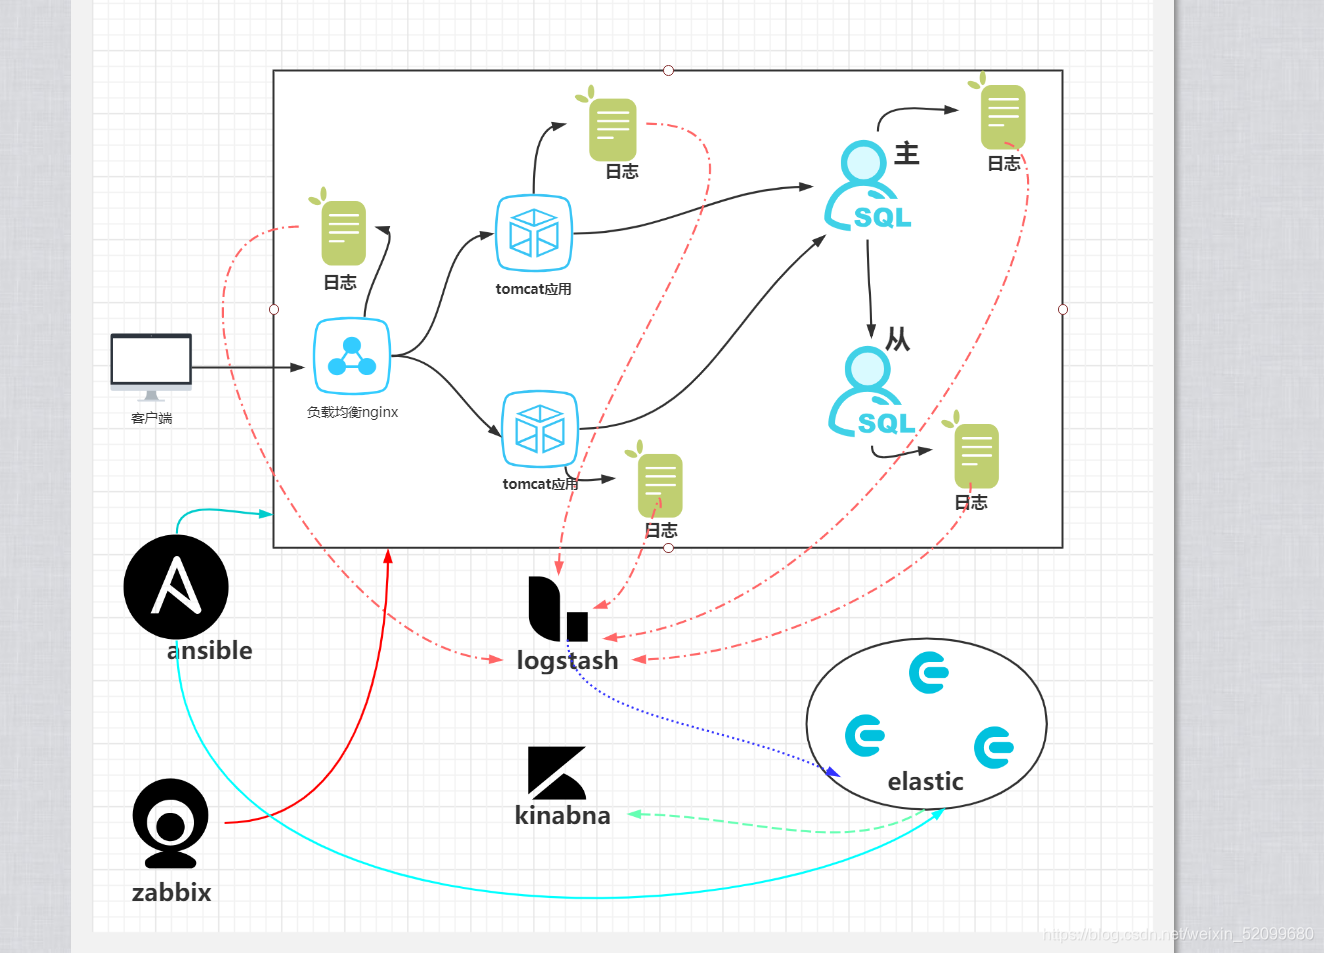
一、图
二、docker-compose
1 定义 Dockerfile
示例:pandas 是基于NumPy 的一种工具,该工具是为了解决数据分析任务而创建的。
- 先定义一个 Dockerfile,我们可以从这个 Dockerfile 中构建一个自定义的镜像,从而获取到一个我们自定义的容器。
FROM centos:7
RUN yum install -y \
    vim bash-com* openssh-clients openssh-server iproute cronie;\
    yum group install -y "Development Tools";yum clean all;\
    localedef -c -f UTF-8 -i zh_CN zh_CN.UTF-8 && \
    ln -sf /usr/share/zoneinfo/Asia/Shanghai /etc/localtime
ENV LANG=zh_CN.UTF-8
在上面的 Dockerfile 中,安装的基本的软件,和 sshd、crond 服务。
会支持 ssh 远程连接、计划任务、ip 命令 ,ss 命令, 还有开发工具。
2 定义 docker-compose
version: '3.8'
services:
  slb:
    build: .
    image: centos7-sshd
    privileged: true
    command: /usr/sbin/init
    hostname: slb
    networks:
      xiuyun_net:

  tomcat1:
    image: centos7-sshd
    privileged: true
    hostname: tomcat1.sharkyun.com
    command: /usr/sbin/init
    networks:
      xiuyun_net:
  tomcat2:
    image: centos7-sshd
    hostname: tomcat2.sharkyun.com
    privileged: true
    command: /usr/sbin/init
    networks:
      xiuyun_net:
  mysql-master:
    image: centos7-sshd
    hostname: mysql-master.sharkyun.com
    privileged: true
    command: /usr/sbin/init
    networks:
      xiuyun_net:
  mysql-slave:
    image: centos7-sshd
    hostname: mysql-slave.sharkyun.com
    privileged: true
    command: /usr/sbin/init
    networks:
      xiuyun_net:
  ansible:
    image: centos7-sshd
    hostname: ansible.sharkyun.com
    privileged: true
    command: /usr/sbin/init
    networks:
      xiuyun_net:
networks:
  xiuyun_net:
3、启动
docker-compose up -d
三、实施步骤
1 Ansible 阶段
1.1 安装 阿里云的 epel 源
- 在 ansible 主机上执行
curl -o /etc/yum.repos.d/epel.repo http://mirrors.aliyun.com/repo/epel-7.repo
1.2 安装 ansible
yum install ansible -y
1.3 设置不检查其他主机的公钥
- 在 ansible 主机上修改 文件 /etc/ansible/ansible.cfg 中如下选项
[defaults]
host_key_checking = False
- 继续在 ansible 主机上执行如下命令,创造自己的密钥对
ssh-keygen -N '' -f ~/.ssh/id_rsa
1.4 建立 hosts 资产清单文件
[nginx]
slb

[tomcat]
tomcat1
tomcat2

[mysql]
mysql-master
mysql-slave
1.5 给需要管理的机器设置 root 密码
- 由于这里是使用容器作为虚拟机的,所以默认情况下,root 用户没有密码,需要我们手动设置。在宿主机上执行如下命令设置密码
docker-compose exec 服务名称 bash -c 'echo 密码 | passwd root --stdin'
docker-compose exec slb  bash -c 'echo upsa | passwd root --stdin'
docker-compose exec tomcat1 bash -c 'echo upsa | passwd root --stdin'
docker-compose exec tomcat2  bash -c 'echo upsa | passwd root --stdin'
docker-compose exec mysql-master  bash -c 'echo upsa | passwd root --stdin'
docker-compose exec mysql-slave bash -c 'echo upsa | passwd root --stdin'
1.6 推送公钥到各个管理节点
- 以下操作在 ansible 主机上操作
— cat send-pubkey.yml
---
- hosts: all
  gather_facts: no
  remote_user: root
  vars:
    ansible_ssh_pass: upsa
  tasks:
  - name: Set authorized key taken from file
    authorized_key:
      user: root
      state: present
      key: "{

    { lookup('file', '/root/.ssh/id_rsa.pub') }}"
...
执行 playbook
ansible-playbook -i hosts.ini send-pubkey.yml
2 MySQL 阶段
2.1 部署MySQL 并启动 MySQL 服务
— mysql/install-mysql.yml
---
- name: 安装 mysql,并启动服务
  hosts: mysql
  gather_facts: no
  tasks:
    - name: 安装仓库文件
      yum:
        name: https://dev.mysql.com/get/mysql80-community-release-el7-3.noarch.rpm
        state: present

    - name: 禁用 MySQL 8.0 仓库
      ini_file:
           path: /etc/yum.repos.d/mysql-community.repo
           section: mysql80-community
           option:  enabled
           value: '0'
    - name: 启用 MySQL 5.7 仓库
      ini_file:
           path: /etc/yum.repos.d/mysql-community.repo
           section: mysql57-community
           option: enabled
           value: '1'

    - name: 安装 mysql 社区版
      yum:
        name: mysql-community-server
        state: present
    - name: start mysql
      service:
        name: mysqld
        state: started
...
执行 playbook
ansible-playbook -i hosts.ini mysql/install-mysql.yml
2.2 设置 MySQL root 用户的密码
- 找到密码
grep password /var/log/mysqld.log
- 重新设置密码
mysqladmin -uroot -p'找到的初始密码' password '新密码'
- 创库: db
create database db default charset utf8mb4 collate utf8mb4_general_ci;
- 创表: stu
create table db.stu(
id int auto_increment primary key,
name varchar(4),
age int,
phone char(11));
2.3 创表
…
2.4 插入数据
insert into stu(name,age,phone)
values('王麻子',32,'13141098899'),
('九筒',32,'13721096541'),
('六子',18,'13139192657'),
('马邦德',37,'15855996688');
2.5 查询数据
查询出 年龄大于 18 的学员姓名
统计出年龄 大于等于 32 的学员数量
统计出每个年龄段的学员数量–>需要用到分组查询
统计出 年龄在 30 到 50 之间的学员信息(id,name,age,phone)
查出年龄是 32 岁,并且电话号是13721096541 的学员姓名
-
- 查询出 年龄大于 18 的学员姓名
mysql> select name from db.stu where age > 18;
+-----------+
| name      |
+-----------+
| 王麻子    |
| 九筒      |
| 马邦德    |
+-----------+
3 rows in set (0.00 sec)
-
- 统计出年龄 大于等于 32 的学员数量
mysql> select count(name) from db.stu where age >= 32;
+-------------+
| count(name) |
+-------------+
|           3 |
+-------------+
1 row in set (0.00 sec)

mysql> select count(name) 数量 from db.stu where age >= 32;
+--------+
| 数量   |
+--------+
|      3 |
+--------+
1 row in set (0.00 sec)
-
- 统计出每个年龄段的学员数量–>需要用到分组查询
mysql> select age 年龄,count(age) 数量 from db.stu group by age;
+--------+--------+
| 年龄   | 数量   |
+--------+--------+
|     18 |      1 |
|     32 |      2 |
|     37 |      1 |
+--------+--------+
3 rows in set (0.00 sec)
假如希望按照数量进行排序
mysql> select age 年龄,count(age) 数量 from db.stu group by age order by 数量;
+--------+--------+
| 年龄   | 数量   |
+--------+--------+
|     18 |      1 |
|     37 |      1 |
|     32 |      2 |
+--------+--------+
3 rows in set (0.00 sec)
-
- 统计出 年龄在 30 到 50 之间的学员信息(id,name,age,phone)
mysql> select id,name,name,age,phone from db.stu where age between 30 and 50;
+----+-----------+-----------+------+-------------+
| id | name      | name      | age  | phone       |
+----+-----------+-----------+------+-------------+
|  1 | 王麻子    | 王麻子    |   32 | 13141098899 |
|  2 | 九筒      | 九筒      |   32 | 13721096541 |
|  4 | 马邦德    | 马邦德    |   37 | 15855996688 |
+----+-----------+-----------+------+-------------+
3 rows in set (0.00 sec)
-
- 查出年龄是 32 岁,并且电话号是13721096541 的学员姓名
mysql> select name from db.stu where age=32 and phone='13721096541';
+--------+
| name   |
+--------+
| 九筒   |
+--------+
1 row in set (0.00 sec)
2.4 配置主从复制
2.4.1 修改主服务器的配置
在主服务上操作,设置二进制日志文件信息并开启
log-bin=/var/log/mysql/mysql-bin
server-id=1
innodb_flush_log_at_trx_commit = 1
sync_binlog = 1
2.5 创建二进制日志文件路径,并授权
mkdir  /var/log/mysql/
chown mysql.mysql /var/log/mysql
2.6 重启 主服务器的 MySQL 服务
systemctl restart mysqld
2.7 在主服务上给从库进行授权
mysql> GRANT REPLICATION SLAVE ON *.* TO 'repl'@'%' IDENTIFIED BY '密码';
2.8 导出主服务器目前的数据
mysqldump -uroot -p'密码' --all-databases --master-data=1 > dbdump.db
2.9 将导出的数据传递给从服务器
- MySQL 的主服务器上执行
scp dbdump.db root@mysql-slave:/root/
2.10 将数据导入到从服务器
- 在从服务器上操作
假如 从服务器的 root 初始密码没有修改,需要按照上面 master 提到的方法修改一下
在从服务器 /root/ 目录下执行下面的命令
mysql -uroot -p'密码' < dbdump.db
2.11 配置从服务器的 server-id
- 编辑 /etc/my.cnf 文件,并添加如下内容
[mysqld]
server-id=2
2.12 重启服务
systemctl restart mysqld
2.13 在从库上配置主库信息
- 先查看二进制文件的同步信息
[root@mysql-master ~]# grep '^CHANGE' dbdump.db
CHANGE MASTER TO MASTER_LOG_FILE='mysql-bin.000003', MASTER_LOG_POS=437;
注意这里的二进制文件名: mysql-bin.000003
位置: 437
登录到 从库 设置连接到 主库 的信息
CHANGE MASTER TO
MASTER_HOST='mysql-master',
MASTER_USER='repl',
MASTER_PASSWORD='密码',
MASTER_LOG_FILE='mysql-bin.000003',
MASTER_LOG_POS=437;
同时再设置一下只读
mysql> SET GLOBAL read_only=1;
Query OK, 0 rows affected (0.00 sec)

mysql> SET GLOBAL super_read_only=1;
Query OK, 0 rows affected (0.00 sec)
验证一下
mysql> SHOW VARIABLES LIKE '%read_only%';
+-----------------------+-------+
| Variable_name         | Value |
+-----------------------+-------+
| innodb_read_only      | OFF   |
| read_only             | ON    |
| super_read_only       | ON    |
| transaction_read_only | OFF   |
| tx_read_only          | OFF   |
+-----------------------+-------+
5 rows in set (0.01 sec)
2.14 从服务器启动 主从复制的进程
mysql> start slave;
2.15 查看是否成功
mysql> show slave status\G
*************************** 1. row ***************************
               Slave_IO_State: Waiting for master to send event
                  Master_Host: mysql-master
                  Master_User: repl
                  Master_Port: 3306
                Connect_Retry: 60
              Master_Log_File: mysql-bin.000003
          Read_Master_Log_Pos: 437
               Relay_Log_File: mysql-slave-relay-bin.000002
                Relay_Log_Pos: 320
        Relay_Master_Log_File: mysql-bin.000003
             Slave_IO_Running: Yes
            Slave_SQL_Running: Yes
              Replicate_Do_DB:
这样是查看 IO 进程和 SQL 进程是否都是 OK
Slave_IO_Running: Yes
Slave_SQL_Running: Yes
3 Tomcat 阶段
3.1 部署 JDK 环境
参考资料
CSDN
tomcat/deploy-jdk.yml
---
- name: 部署 JDK 环境
  hosts: tomcat
  gather_facts: no
  remote_user: root
  vars_files:
    - "tomcat-vars.yml"

  tasks:
    - name: 解压 jdk 包到指定目录 /usr/local/
      ansible.builtin.unarchive:
        src: "{

    { jdk_url }}"
        dest: /usr/local/
        remote_src: yes
        list_files: yes
      register: jdk_dir

    - name: 创建软链接,上部解压后的目录是 jdk1.8.0_181
      ansible.builtin.file:
        src: /usr/local/{

    {

     jdk_dir.files.0 | regex_replace('/.*') }}
        dest: /usr/local/java
        state: link
    - name: 设置环境变量
      copy:
        src: java.sh
        dest: /etc/profile.d/java.sh
    - name: 验证是否部署成功
      shell: java -version
      register: java_version

    - name: 输出验证信息
      debug:
        var: java_version.stderr_lines.0
...
tomcat-vars.yml
jdk_url: https://www.sharkyun.com:8043/2002/soft/jdk-8u181-linux-x64.tar.gz
tomcat_url: https://www.sharkyun.com:8043/2002/soft/apache-tomcat-8.5.63.tar.gz
app_url: https://www.sharkyun.com:8043/2002/soft/tomcat-app.tar
java.sh
export JAVA_HOME=/usr/local/java
export PATH=$JAVA_HOME/bin:$JAVA_HOME/jre/bin:$PATH
export CLASSPATH=.:$JAVA_HOME/lib:$JAVA_HOME/jre/lib:$JAVA_HOME/lib/tools.jar
3.2 部署 Tomcat
tomcat/deploy-tomcat.yml
---
- name: 部署 tomcat
  hosts: tomcat
  gather_facts: no
  remote_user: root
  vars_files:
    - "tomcat-vars.yml"
  tasks:
    - name: 解压 tomcat 压缩包到指定目录 /usr/local
      ansible.builtin.unarchive:
        src: "{

    { tomcat_url }}"
        dest: /usr/local/
        remote_src: yes
        list_files: yes
      register: ret
    - name: 创建软链接
      ansible.builtin.file:
        src: /usr/local/{

    {

     ret.files.0 | regex_replace('/.*') }}
        dest: /usr/local/tomcat
        state: link
    - name: 设置环境变量
      copy:
        src: tomcat.sh
        dest: /etc/profile.d/tomcat.sh
    - name: 验证是否成功
      shell: /usr/local/tomcat/bin/version.sh
      register: tomcat_version
    - name: 输出执行命令的结果
      when: tomcat_version.rc == 0
      debug:
        msg: "{

    { tomcat_version.stdout_lines.0 }}"
...
tomcat.sh
export TOMCAT_HOME=/usr/local/tomcat/
3.3 部署 Java 应用程序
3.3.1 处理应用程序用到的数据库和表
登录到 mysql master 主机上,下载并解压程序需要用到的 sql 文件
wget https://www.sharkyun.com:8043/2002/soft/tomcat-app.tar
[root@vm2 ~]# ls
tomcat-app.tar
[root@vm2 ~]# tar -xf tomcat-app.tar
[root@vm2 ~]# ls
tomcat-app  tomcat-app.tar
[root@vm2 ~]# cd tomcat-app
[root@vm2 tomcat-app]# ls
ROOT  tb_catalog.sql
创建逻辑库 db ,假如没有此逻辑库
[root@vm2 tomcat-app]# mysql -uroot -p -e "create database db DEFAULT CHARSET utf8mb4 COLLATE utf8mb4_general_ci;"
导入数据
[root@vm2 tomcat-app]# mysql -uroot -p db < tb_catalog.sql
给应用程序授权
grant all on db.* to tomcat@'应用程序 IP 地址段' identified by '密码';
3.3.2 部署应用,并启动 tomcat
---
- name: 部署 Java 应用
  hosts: tomcat
  gather_facts: no
  remote_user: root
  vars_files:
    - "tomcat-vars.yml"
  tasks:
    - name: 从一个已知的下载连接,解压程序包到指定目录
      ansible.builtin.unarchive:
        src: "{

    { app_url }}"
        dest: /tmp/
        remote_src: yes

    - name: 删除原来 webapps 目录下的内容
      file:
        path: /usr/local/tomcat/webapps/*
        state: absent

    - name: 将已知的解压后的目录,移动到指定的发布目录
      shell: cp -ar /tmp/tomcat-app/ROOT/ /usr/local/tomcat/webapps/

    - name: 传输配置文件
      copy:
        src: database.properties
        dest: /usr/local/tomcat/webapps/ROOT/WEB-INF/classes/database.properties

    - name: 测试 tomcat 服务是否启动
      shell: jps |grep '[B]ootstrap'
      ignore_errors: yes
      register: tomcat_process
      tags: check

    - name: 调试
      debug: var=tomcat_process
      tags: check

    - name: 停止 tomcat 服务
      shell: /usr/local/tomcat/bin/shutdown.sh
      when: tomcat_process.rc == 0
      tags: stop_tomcat

    - name: 启动 tomcat 服务
      shell: nohup /usr/local/tomcat/bin/startup.sh &
      tags: start_tomcat
...
应用程序使用的配置文件
[root@vm1 playbook]# cat tomcat/database.properties
#连接设置
database.driver=com.mysql.jdbc.Driver
database.url=jdbc:mysql://tomcat1-master:3306/db?useUnicode=true&characterEncoding=utf-8
database.user=tomcat
database.password=QFedu123@
#<!-- 初始化连接 -->
database.initialSize=10
#最大连接数量
database.maxActive=50
#<!-- 最小空闲连接 -->
database.minIdle=5
#<!-- 超时等待时间以毫秒为单位 6000毫秒/1000等于60秒 -->
database.maxWait=5000
# shark
测试 tomcat
[root@vm2 tomcat]# curl -I 127.0.0.1:8080
HTTP/1.1 200
Set-Cookie: JSESSIONID=F6C2D4C578053BAE1A5F816134599382; Path=/; HttpOnly
Content-Type: text/html;charset=UTF-8
Transfer-Encoding: chunked
Date: Fri, 26 Feb 2021 08:24:52 GMT

[root@vm2 tomcat]# curl -I tomcat2-slave:8080
HTTP/1.1 200
Set-Cookie: JSESSIONID=B3004F3C6DAC3A6D58EC397295B1D6EA; Path=/; HttpOnly
Content-Type: text/html;charset=UTF-8
Transfer-Encoding: chunked
Date: Fri, 26 Feb 2021 08:25:50 GMT
4 负载均衡 Nginx 阶段
4.1 部署 Nginx
nginx.repo 仓库文件
[nginx-stable]
name=nginx stable repo
baseurl=http://nginx.org/packages/centos/$releasever/$basearch/
gpgcheck=1
enabled=1
gpgkey=https://nginx.org/keys/nginx_signing.key
module_hotfixes=true
playbook
---
- hosts: nginx
  gather_facts: no
  tasks:
    - name: 拷贝 nginx 仓库文件
      copy:
        src: ./nginx.repo
        dest: /etc/yum.repos.d/nginx.repo

    - name: 安装 nginx
      yum:
        name: [nginx]
        state: present

    - name: 启动 nginx 服务
      systemd:
         name: nginx
         state: started
...
4.2 配置负载均衡
负载均衡配置文件内容
upstream tomcatapp {


    server tomcat1-master:8080;
    server tomcat2-slave:8080;
}

server {


    listen       80;
    server_name  localhost;

    location / {


        proxy_pass http://tomcatapp;
    }

    error_page   500 502 503 504  /50x.html;
    location = /50x.html {


        root   /usr/share/nginx/html;
    }
}
playbook
- hosts: nginx
gather_facts: no
tasks:-
name: 拷贝 nginx 仓库文件
copy:
src: ./nginx.repo
dest: /etc/yum.repos.d/nginx.repo -
name: 安装 nginx
yum:
name: [nginx]
state: present -
name: 传输子配置文件
copy:
src: default.conf
dest: /etc/nginx/conf.d/default.conf
tags: update-conf -
name: 启动 nginx 服务
systemd:
name: nginx
state: started
tags: update-conf
…
-
4.3 验证负载均衡
方式一:
分别查看两台 tomcat 的访问日志,看看有访问的日志记录
日志路径: /usr/local/tomcat/logs/localhost_access_log.*
方式二:
尝试关闭一台 tomcat ,之后查看负载均衡 slb 的错误日志中是否有记录
有记录,说明负载均衡有效果
默认错误日志路径 /var/log/nginx/error.log