前言
在oauth_client_details(Oauth2 客户端信息)表中,有一个resource_ids字段,这个字段是干嘛的呢?

作用
resource_ids字段表示资源服务器id集合,也就是表示当前客户端可以访问哪些资源服务器。
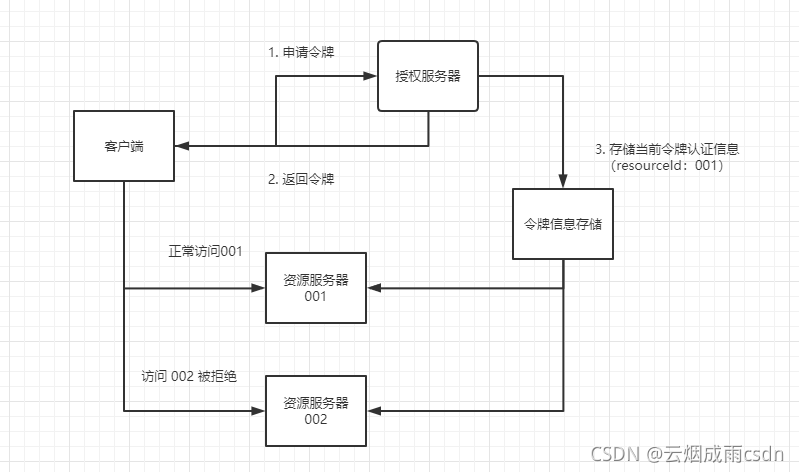
如果设置了客户端的resourceId,就表示只能访问这些resourceId标识的资源服务器,可以达到资源服务服务级别的访问控制,之前我们没有设置资源ID,默认为空时不会校验,也就是没有配置时可以访问所有的资源服务器。
案例演示
1. 设置资源服务器resourceId
配置相当简单,只需要在ResourceServerSecurityConfigurer配置中,添加一个字符串就可以了,一般使用spring boot 应用名【spring.application.name】。
@Configuration
@EnableResourceServer//标识为资源服务
@EnableWebSecurity(debug = true)
@EnableGlobalMethodSecurity(prePostEnabled = true, securedEnabled = true, jsr250Enabled = true)
public class MyResourceServerConfig extends ResourceServerConfigurerAdapter {


    public MyResourceServerConfig() {


        super();
    }

    @Value("${spring.application.name}")
    private String appName;

    @Autowired
    MyAuthenticationEntryPoint myAuthenticationEntryPoint;

    @Override
    public void configure(ResourceServerSecurityConfigurer resources) throws Exception {


        resources.authenticationEntryPoint(myAuthenticationEntryPoint);
        resources.resourceId(appName); // 设置resourceId 默认为spring.application.name
    }

    @Override
    public void configure(HttpSecurity http) throws Exception {


        super.configure(http);
    }
}
2. 授权服务器添加resourceId集合
授权服务器也非常简单 ,如果使用的是数据库查询客户端信息,那么只要在oauth_client_details表中设置resource_ids就可以了。演示使用的是内存存储,则只需要设置resourceIds即可,这里表示client客户端只能访问id为【oauth2-resource-server001-test】的资源服务器。
    @Override
    public void configure(ClientDetailsServiceConfigurer clients) throws Exception {


        // 配置客户端
        clients
                // 使用内存设置
                .inMemory()
                // client_id
                .withClient("client")
                // client_secret
                .secret(passwordEncoder.encode("secret"))
                // 授权类型: 授权码、刷新令牌、密码、客户端、简化模式、短信验证码
                .authorizedGrantTypes("authorization_code", "refresh_token", "password", "client_credentials", "implicit", "sms_code")
                // 授权范围,也可根据这个范围标识,进行鉴权
                .scopes("app")
                .accessTokenValiditySeconds(60*30)
                .refreshTokenValiditySeconds(24*60*60)
                // 授权码模式 授权页面是否自动授权
                //.autoApprove(false)
                // 拥有的权限
                .authorities("add:user")
                // 允许访问的资源服务 ID
                .resourceIds("oauth2-resource-server001-test")
                // 注册回调地址
                .redirectUris("http://localhost:20000/code", "http://localhost:9001/resource001/login");
    }
3. 测试
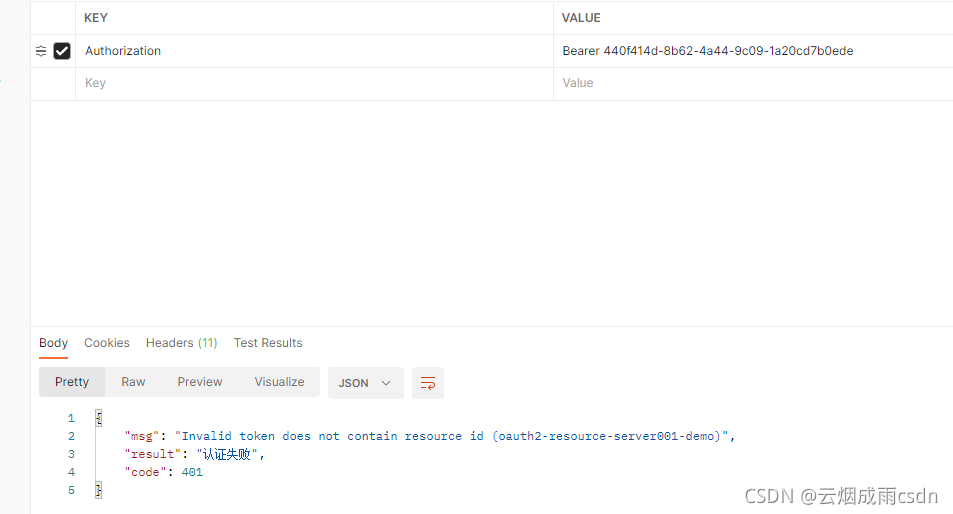
获取令牌,然后访问资源服务器,然后发生了异常,提示当前令牌没有访问当前资源服务的权限。
源码分析
那么对于resourceId的校验是在哪里进行的呢?
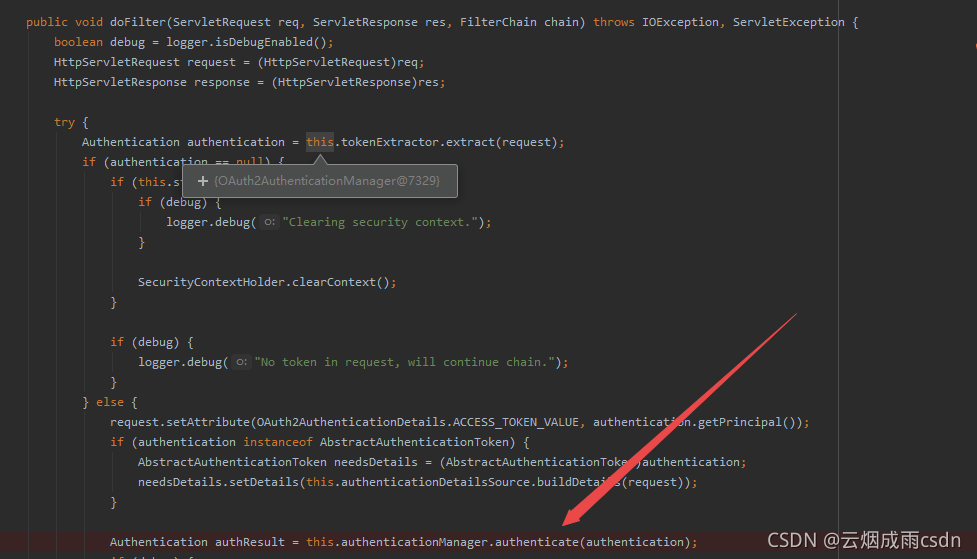
之前了解过资源服务器对令牌进行认证是在OAuth2AuthenticationProcessingFilter过滤器中进行的,在该过滤器中会使用OAuth2AuthenticationManager管理器对令牌进行认证校验。
在OAuth2AuthenticationManager中的authenticate方法完成了对resourceId的校验,具体处理逻辑如下
    public Authentication authenticate(Authentication authentication) throws AuthenticationException {


        if (authentication == null) {


            throw new InvalidTokenException("Invalid token (token not found)");
        } else {


            String token = (String)authentication.getPrincipal();
            // 1. 存储中获取令牌对应的认证信息
            OAuth2Authentication auth = this.tokenServices.loadAuthentication(token);
            if (auth == null) {


                throw new InvalidTokenException("Invalid token: " + token);
            } else {


            	// 2. 认证信息中,获取当前客户端的resourceId集合
                Collection<String> resourceIds = auth.getOAuth2Request().getResourceIds();
                // 3. 如果客户端、资源服务器配置了resourceId,则校验当前资源服务器的resourceId是否包含在客户端的resourceId中,没有则抛出 AccessDenied异常
                if (this.resourceId != null && resourceIds != null && !resourceIds.isEmpty() && !resourceIds.contains(this.resourceId)) {


                    throw new OAuth2AccessDeniedException("Invalid token does not contain resource id (" + this.resourceId + ")");
                } else {


                    this.checkClientDetails(auth);
                    if (authentication.getDetails() instanceof OAuth2AuthenticationDetails) {


                        OAuth2AuthenticationDetails details = (OAuth2AuthenticationDetails)authentication.getDetails();
                        if (!details.equals(auth.getDetails())) {


                            details.setDecodedDetails(auth.getDetails());
                        }
                    }

                    auth.setDetails(authentication.getDetails());
                    auth.setAuthenticated(true);
                    return auth;
                }
            }
        }
    }