本节分别介绍Tmonitor web portal和后台进程的安装部署,web portal和后台最好能分别安装在不同的机器上。注意:所有操作均在root权限下执行。
安装需要3个包(以安装时最新的发布包为准):
- web_portal_2.2.18_05130ad9.tar.gz 主要是Tmonitor管理页面
- tmonitor_install_2.2.18_05130ad9.tar.gz 主要是Tmonitor后台进程
我们要把Tmonitor 与tcaplus center 安装在同一台机器上, 先把上面的3个包上传到/data 目录, 解压
1. Tmonitor Web Portal安装
- cd /data/web_portal/, 由于tcaplus OMS 已经占用80端口, 所以修改conf 文件, Listen 8080 端口. 修改server.php, set_httpd_port(8080)
- 检查数据库datadir 所在磁盘是否够用. 如果不够用就改到/data 盘下
- root 用户登陆mysql
- mysql> create database tmonitor_center_db; – 特别注意, tmonitor前台的数据库和后台数据库是分开的, 前台数据库用这个名字, 后台用其他的名字
- mysql -uroot -pxxxx -Dtmonitor_center_db < *.sql 把/data/web_portal 目录下的所有sql 文件导入
- mysql> create user tmonitor;
- grant ALL on tmonitor_center_db.* to ‘tmonitor’@’%’ identified by ‘xxxx’
- grant ALL on tmonitor_center_db.* to ‘tmonitor’@‘localhost’ identified by ‘xxxx’
- grant ALL on tmonitor_center_db.* to ‘tmonitor’@‘127.0.0.1’ identified by ‘xxxx’
- grant ALL on tmonitor_center_db.* to ‘tmonitor’@‘100.78.65.157’ identified by ‘xxxx’
- grant ALL on tmonitor_center_db.* to ‘tmonitor’@‘100_78_65_157’ identified by 'xxxx- echo $HOSTNAME
- flush privileges
- 切换到root 用户, 执行 ./install_web_protal.sh 100.78.65.157 3306 tmonitor_center_db tmonitor xxxx PASSWORD 2.2.7 (倒数第二个参数是LoginType, 可以填OA 或者PASSWORD), 这个脚本会创建/data/monitor 目录, 前台页面会从这个目录下启动
- 然后netstat –lpn 检查8080 端口是否启动, 如果没有, 重装试试 , php server.php start -p 8080 启动, 停止的命令: php server.php stop
- 登陆到页面, 注册用户tmonitor, 如果无法登陆, telnet ip 端口看看 select * from tm_users_permission; 看看是不是管理员权限(role=1)
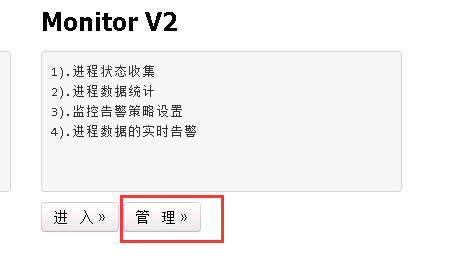
- 点击”管理” 按钮, 把正在部署的tmonitor系统添加进来, 等后台进程起来后就可以提供服务了

- 到这里前台安装完毕, 下面安装后台进程
2. Tmonitor Web Portal添加Tmonitor系统
- https://git.code.oa.com/gcloud_storage_group/tmonitor 代码及安装包在此, 可能需要申请git权限
- 上传web_portal_2.2.18_05130ad9.tar.gz 包到/data 目录下, 解压, cd /data/tmonitor_install
- vim tmonitor_conf.xml 修改以下内容

- 告警发送使用下图所用的接口. 如果是IDC 机器, 使用tof 发送短信和微信, 使用uwork 打打电话
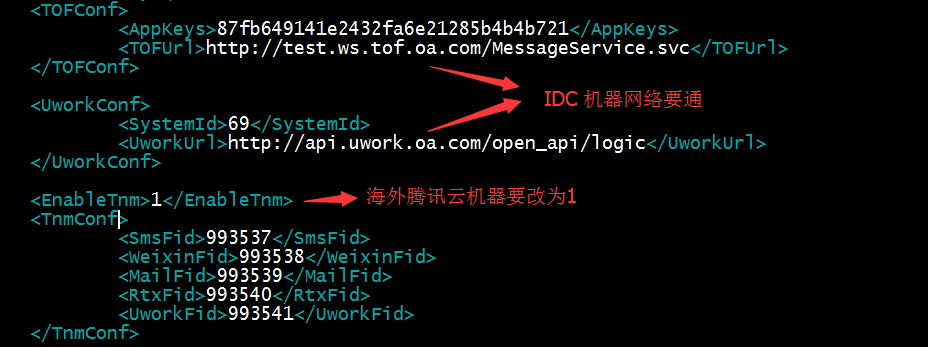
- 如果是IDC 机器, 需要在tof 和uwork”服务ip” 列表中添加sasvr 的ip, 才能正常发送告警(tof 申请: http://tof.oa.com/application/views/, 或联系jasonlzhang, uwork 申请联系 yorkershi).
- 机器要能直接连tnm2, 需要安装agent 工具, 具体步骤在文档后面描述.

- 上图中dcsvr 的business_id 默认改成1, 如果有多个dcsvr 就依次增加. dc_tconnd 的端口用7980, 保持默认不需更改
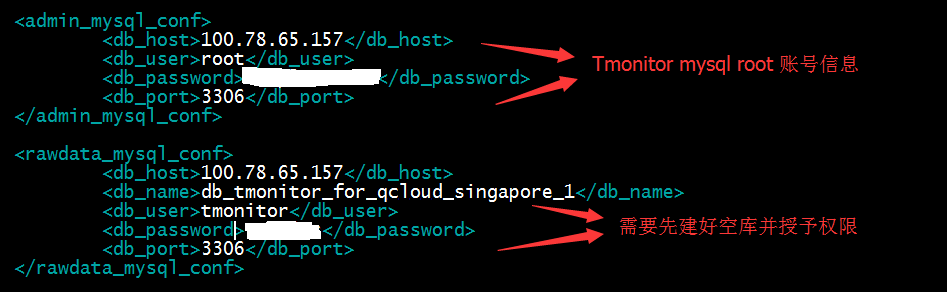
- 上图中需要提供mysql 的root 密码, 并且事先建好后台数据库. 步骤与前台数据库一样
- mysql –uroot –pxxxx
- create database db_tmonitor_for_qcloud_singapore_1;
- grant ALL on db_tmonitor_for_qcloud_singapore_1.* to ‘tmonitor’@’%’ identified by ‘xxxx’ ;
- grant ALL on db_tmonitor_for_qcloud_singapore_1.* to ‘tmonitor’@‘localhost’ identified by ‘xxxx’ ;
- grant ALL on db_tmonitor_for_qcloud_singapore_1.* to ‘tmonitor’@‘127.0.0.1’ identified by ‘xxxx’ ;
- grant ALL on db_tmonitor_for_qcloud_singapore_1.* to ‘tmonitor’@‘100.78.65.157’ identified by ‘xxxx’; – ip
- grant ALL on db_tmonitor_for_qcloud_singapore_1.* to ‘tmonitor’@‘100_78_65_157’ identified by ‘xxxx’; – echo $HOSTNAME
- flush privileges;

- 上图选择需要安装的组件, tcm 和 Business_id 默认与之前填的一样
- 检查22 端口是否能ssh登陆, 否则修改exp端口为36000
- 检查 /etc/ssh/sshd_config 和 sshd_special_user, 确保tmonitor 用户有ssh 登陆权限
- ./tmonitor_install.pl install 开始安装, 安装过程可能会报错, 等待”install end”. 这个脚本会创建tmonitor用户, 并创建/data/tmonitor 目录, 以后所有后台进程都在这个目录下
- 如果执行脚本报错(Can’t locate Time/HiRes.pm) 需要安装:
- yum install -y perl-DBD-MySQL perl-Time-HiRes perl-XML-Simple.noarch
- perl-XML-LibXML.x86_64 perl-libxml-perl.noarch
- mysql -utmonitor -pxxxx -Ddb_tmonitor_for_qcloud_singapore_1 登陆看下表是否创建成功
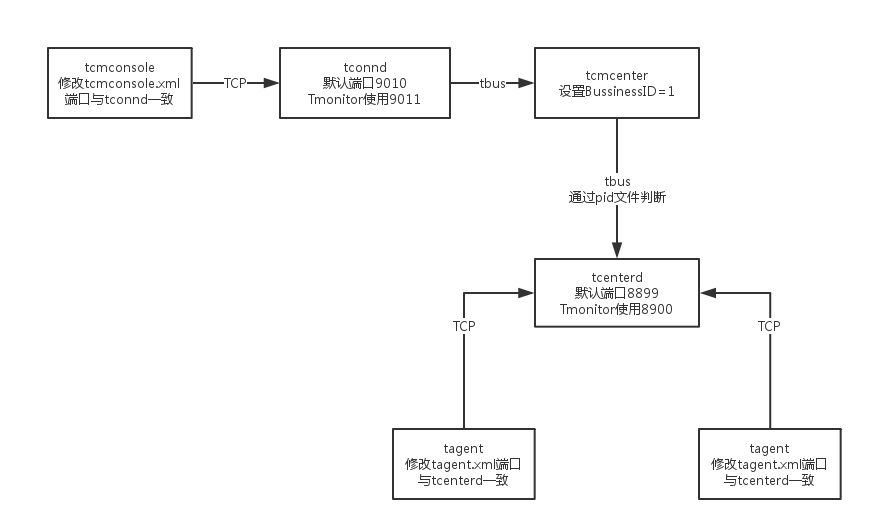
- 由于本机上tcaplus 也安装的tcm 组件, 与tmonitor 的tcm 端口冲突, 所以需要修改/data/tmonitor/tmonitor_install 目录下各个xml(tcmcenter.xml tcmconsole.xml tagent.xml tconnd.xml tcenterd.xml)默认端口并手动拉起进程, 端口使用如下
- chmod 777 /tmp/tcmconsole.pid 这个pid 文件tcaplus 和tmonitor 都会用, 所以要修改权限
- 然后按照下图箭头的方向依次启动各个进程, 并登陆tcmconsole 查看进程是否正确, 然后依次拉起dc_tconnd, dcsvr, sasvr 进程
- start 1.0.1.1 可以直接拉起dc_tconnd
- start 1.0.2.1 拉起dcsvr 进程的时候会报错, 查看dcsvr 的日志, 发现需要连接很多mysql数据库. 这是老版的tmonitor遗留下的问题, 需要手动修改
- ~/tmonitor_install/dcsvr_1/cfg]$ vim dcsvr.xml 按照这个文件里面列出的数据库名称创建空库
- 首先root 登陆mysql, 给tomitor 用户创建数据库的权限: grant ALL on . to ‘tmonitor’@‘100.78.65.157’ identified by ‘xxxx’; flush privileges
- 然后tmonitor 用户登陆 mysql -utmonitor -pxxxx -h100.78.65.157, 创建以下数据库
- create database tmonitor
- create database db_route
- create database db_273_customscript
- create database db_1_autoupdate
- create database db_2_procstatus_data
- create database 0_tbus_data
- create database 0_thostinfo_data
- create database version
- 然后用sed 修改xml
- sed -i ‘/DBMSHost/c 100.78.65.157’ dcsvr.xml
- sed -i ‘/DBMSPassword/c xxx’ dcsvr.xml
- sed -i ‘/DBMSUser/c tmonitor’ dcsvr.xml
- 修改完成之后去tcmconsole 启动dcsvr 和sasvr 进程
- 所有进程启动成功后, 第二部分就完成了. 如果需要卸载或重装, 执行/data/tmonitor_install/tmonitor_install.pl uninstall 即可
3. 业务配置
- 进入tmonitor 页面, 点击”接入变更”
- 上报方式选择custom 方式, 为节点主动上报, tcm 方式是sasvr 拉取
- 运维管理 -> 申请审批 -> 接入审批 下面审批, cc_id 默认填1
- 然后点”Monitor V2” 下面的”进入” 按钮, 选择刚才填的业务, 首次进入会保错说数据库信息未填写, 先过去补充完整
- 重启sasvr
- 注意, 上图中Tmonitor系统自动分配了业务ID=1, 这个跟之前我们配的business_id 是一样的. 如果不一样, 需要修改xml 下面的BussinessID 和TbusConf并重启, 同样 /tmp/tconnd_1.0.1.$instance_1.pid 这个_1 也要对应修改
- 修改tcaplus 的xml, 增加本机ip 到白名单里面, 重启tcmcenter, 然后去”业务配置” -> “采集策略配置”, 直接从IDC 集群上复制过来, 注意修改ip 和端口, 提交更新
- 修改tcaplus center 关于sasvr 相关的配置项, 重启 然后检查mng_path 是否有数据. 检查所有进程都有指标上报. (修改tcapcenter_cfg.xml, 注意!!! 下图中enable要改成true, HttpGetSasvrInfoUrl 最后的0 要改成1, 跟上面的id 保持一致)
- 业务配置 -> 告警接收者配置 ->分组管理 -> 编辑, 填写告警接收者. 由于这个版本有bug, 所以点编辑没用. 只能从数据库修改, 注意app_id 要包含已有app 和default
- 配置一条告警策略, 测试告警是否能发出来
- 复制IDC 的告警策略到新建的环境上
TcaplusDB是腾讯出品的分布式NoSQL数据库,存储和调度的代码完全自研。具备缓存+落地融合架构、PB级存储、毫秒级时延、无损水平扩展和复杂数据结构等特性。同时具备丰富的生态、便捷的迁移、极低的运维成本和五个九高可用等特点。客户覆盖游戏、互联网、政务、金融、制造和物联网等领域。
