我的上一篇博客https://blog.csdn.net/jiugeshao/article/details/110310873中说明了推荐使用第二种方法,即通过程序设置命令行执行py文件,那么如果该c#进程和调起来的python进程需要更多交互,该怎么进行呢,上篇博客看到c#只能通过带命令行参数方式在调用起python程序的同时给其传参数,但c#进程不能很方便获得python反馈的信息,可以通过配置socket方式来进行。
可以在python中设置socket为server, 在c#中设置socket为client(按如下就能慢慢堆积出一个demo平台出来)
成员变量如下:
        private string modelPath;
        private string dataFolderPath;
        private delegate void UpdateString(string text);
        private TcpClient _client;
        private Thread _connectionThread;   // Thread that is responsible for identifying client connection requests.
        private long _totalBytes; // record the total number of bytes received

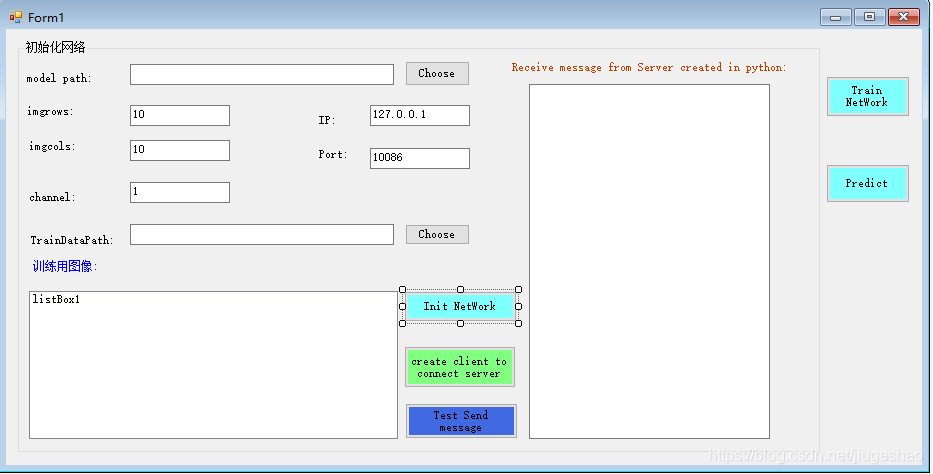
如下是c#端设置的简单界面
mode path后面的Choose按钮的回调函数代码如下:
      OpenFileDialog mDlg = new OpenFileDialog();
            mDlg.InitialDirectory = "D:\\mycode\\0-Object_Classify\\example-CNN-Predict_Train";
            mDlg.Filter = ".h5 (*.h5)|*.h5";
            mDlg.ShowDialog();
            if (mDlg.FileName == "") return;

            txt_modepath.Text = mDlg.FileName;
            Console.WriteLine("from c#: modelpath-> " + mDlg.FileName);
            modelPath = mDlg.FileName;
通过此按钮可以选择要保存或者要打开的模型文件.h5(该demo会使用keras来生成模型,所以这里选择.h5文件)
imgrows、imgcols、channel是图像的相关信息(图像分像素分辨率、通道数)
IP、Port是python里设置的socket服务器的ip及端口号
TrainDataPath是训练图像的路径
TrainDataPath后面的Choose按钮的回调函数代码
 listBox1.Items.Clear();
            FolderBrowserDialog path = new FolderBrowserDialog();
            path.SelectedPath = "D:\\mycode\\0-Object_Classify\\example-CNN-Predict_Train\\mnistCnn-others_code\\1";
            path.ShowDialog();
            Console.WriteLine("from c#: TrainData Path-> " + path.SelectedPath);
            DirectoryInfo info = new DirectoryInfo(path.SelectedPath);
            txtTrainDataPath.Text = path.SelectedPath;
            dataFolderPath = path.SelectedPath;
            foreach (FileInfo fi in info.GetFiles())
            {
                if (fi.Extension == ".jpg" || fi.Extension == ".bmp" || fi.Extension == ".PNG" || fi.Extension == ".png" || fi.Extension == ".gif" || fi.Extension == ".brw" || fi.Extension == ".JPG" || fi.Extension == ".BMP" || fi.Extension == ".GIF" || fi.Extension == ".GIF" || fi.Extension == "BRW")
                {
                    //Console.WriteLine(fi.ToString());
                    listBox1.Items.Add(fi.ToString());
                }
            }

            MessageBox.Show("load train img over");
Init NetWork按钮的回调函数代码如下:
try
            {
                Process p = new Process();
                string path = @"D:\CsharpCallCNN.py";//待处理python文件的路径,本例中放在debug文件夹下
                string sArguments = path;
                ArrayList arrayList = new ArrayList();
                arrayList.Add(txtIP.Text);
                arrayList.Add(txtPort.Text);
                arrayList.Add(txt_modepath.Text);
                arrayList.Add(Convert.ToInt32(txtrows.Text));
                arrayList.Add(Convert.ToInt32(txtcols.Text));
                arrayList.Add(Convert.ToInt32(txtChannel.Text));
                arrayList.Add(txtTrainDataPath.Text);

                foreach (var param in arrayList)//添加参数
                {
                    sArguments += " " + param;
                }

                p.StartInfo.FileName = @"C:\Anaconda3\python.exe";
                p.StartInfo.Arguments = sArguments;//python命令的参数
                p.StartInfo.UseShellExecute = false;
                p.StartInfo.RedirectStandardOutput = true;
                p.StartInfo.RedirectStandardInput = true;
                p.StartInfo.RedirectStandardError = true;
                p.StartInfo.CreateNoWindow = true;
                p.Start();//启动进程
                p.BeginOutputReadLine();
                p.OutputDataReceived += new DataReceivedEventHandler(p_OutputDataReceived);
                // p.Close();
                // p.WaitForExit();
                Console.WriteLine("from c#: start to execute the python code");
            }
            catch (Exception ec)
            {
                Console.WriteLine(ec);
            }
看完我上篇博客的你应该很熟悉这段,就是通过命令行参数方式调用py文件,给其传界面上的参数
p_OutputDataReceived回调函数对应代码及函数内的所涉及函数如下:
        //输出打印的信息
        static void p_OutputDataReceived(object sender, DataReceivedEventArgs e)
        {
            if (!string.IsNullOrEmpty(e.Data))
            {
                //AppendText(e.Data + Environment.NewLine);
                AppendText(e.Data);
            }
        }

        public static void AppendText(string text)
        {
            Console.WriteLine("from python: " + text);     //此处在控制台输出.py文件print的结果

        }
CsharpCallCNN.py中代码如下:
import sys
import socket
import time

def cal(num1, num2, op):
    if op == 1:
        result = num1 + num2
    elif op == 2:
        result = num1 - num2
    elif op == 3:
        result = num1 * num2
    else:
        result = num1 - num2
    return str(result)


if __name__ == '__main__':
    print("python code has been called")
    IP = sys.argv[1]
    Port = sys.argv[2]
    modelPath = sys.argv[3]
    imgRows = sys.argv[4]
    imgCols = sys.argv[5]
    imgChannel = sys.argv[6]
    imgTrainDataPath = sys.argv[7]

    print("IP: ", IP)
    print("Port: ", Port)
    print("modePath: ", modelPath)
    print("imgRows: ", imgRows)
    print("imgCols: ", imgCols)
    print("imgChannel: ", imgChannel)
    print("imgTrainDataPath: ", imgTrainDataPath)
    print("param passed successfully")


    print("python code has been called, after 5s, the server will be created")
    time.sleep(5)
    s = socket.socket()
    s.bind(("127.0.0.1", int(10086)))
    print("the server has been created, waite the client to connect")
    s.listen(5)
    client, address = s.accept()
    print("Connect has been built successfully")
    client.send(bytes("Hi, Weclome!", 'utf-8'))
    while True:
        data = client.recv(1024)
        recv_str = data.decode()
        data_str = recv_str[0:len(recv_str) - 1]
        print(data_str)
        client.send(data_str.encode('utf-8'))
create client to connect server按钮所对应的回调函数如下:
 try
            {
                _totalBytes = 0;
                // There is only one connection thread that is used to connect clients.
                _connectionThread = new System.Threading.Thread(new ThreadStart(ReceiveDataFromServer));
                _connectionThread.IsBackground = true;
                _connectionThread.Priority = ThreadPriority.AboveNormal;
                _connectionThread.Name = "Handle Server";
                _connectionThread.Start();
            }
            catch (Exception ex)
            {
                MessageBox.Show(this, ex.Message, "QuickBuild Client Sample");
            }
ReceiveDataFromServer回调函数代码如下:
    int i = 0;
            for (i = 0; i < 10; i++)
            {
                try
                {
                    // Create TcpClient to initiate the connection to the server.
                    _client = new TcpClient(txtIP.Text, Int32.Parse(txtPort.Text));
                    break;
                }
                catch (SocketException ex)
                {
                    Console.WriteLine("from c#: connect fail, " + ex.Message + ", will connect again after 1s, "+ "has tried " + (i+1).ToString() + " times");
                    Thread.Sleep(1000);
                }
            }
            if(i==10)
            {
                Console.WriteLine("from c#: the client has tried 20 times, still connect fail! please check the client and server config!");
                return;
            }

            Console.WriteLine("from c#: after tried" + (i+1).ToString() + " times" + ", the client connect the server success!");

            NetworkStream netStream = null;

            try
            {
                netStream = _client.GetStream();
            }
            catch (Exception ex)
            {
                // a bad connection, couldn't get the NetworkStream
                MessageBox.Show(ex.Message);
                return;
            }
            // Make sure we can read the data from the network stream

             if (netStream.CanRead)
             {
                 try
                 {
                    // Receive buffer -- should be large enough to reduce overhead.
                    byte[] receiveBuffer = new byte[512];
                    int bytesReceived;                    // Received byte count
                                                              // Read data until server closes the connection.
                    while ((bytesReceived = netStream.Read(receiveBuffer, 0, receiveBuffer.Length)) > 0)
                    {
                       UpdateGUI(Encoding.ASCII.GetString(receiveBuffer, 0, bytesReceived));
                    }

                 }
                 catch (Exception ex)
                 {
                    // Ignore if the error is caused during shutdown
                    // since the stream and client will be closed
                    MessageBox.Show(ex.Message);
                 }
             }
             else
             {
                 Thread.Sleep(1000);
                 Console.WriteLine("from c#: can not read, the client will try to connect the server again after 1s");
             }

            StopClient();
UpdateGUI函数代码如下:
 private void UpdateGUI(string s)
        {
            if (txtreceiveMessage.InvokeRequired)
                txtreceiveMessage.BeginInvoke(new UpdateString(UpdateGUI), new object[] { s });
            else
            {
                if (txtreceiveMessage.TextLength >= txtreceiveMessage.MaxLength)
                    txtreceiveMessage.Text = "";
                txtreceiveMessage.AppendText(s + "\r\n");
            }
        }
stopClient函数代码如下:
  if (_client != null)
            {
                // Close the connection
                _client.Close();

                // Wait for the thread to terminate.
                _connectionThread.Join();
            }
Test Send message函数代码如下:
 NetworkStream netStream = null;
            netStream = _client.GetStream();
            byte[] message = Encoding.ASCII.GetBytes("Just For Test" + "\r\n");
            netStream.Write(message, 0, message.Length);
            netStream.Flush();
运行c#程序,界面上设置如下:

如上设置参数这里只是为了看c#参数能够正确传给python, 没有太多实际意义,如上的模型.h5文件及TrainData文件夹我也上传一下给大家
链接:https://pan.baidu.com/s/1tYTyu_ML1qVWNvuSekzEbQ
提取码:og9b
然后点击Init NetWork按钮,可以看到py文件被调起,同时参数也正确被所接收。socket服务器也被创建

接下来需要测试下c#创建的client能否连接此服务器,发送数据并能收到server反馈的信息
点击create client to connect server按钮

可看到client被创建同时接收到了python那边server的信息
点击Test Send message按钮,python那边的sever接收到了信息,同时将此信息又反馈给了client
至此,c#和python可以通过socket方式进行通信了
接下来讲一下c#共享内存方面的知识