Spring源码分析
1、观察者设计模式
什么是观察者模式
观察者模式:定义对象之间的一种一对多的依赖关系,当一个对象的状态发生改变的时候,所有依赖它的对象都得到**通知(响应)**并自动更新。
又称:发布/订阅、消息通知机制、事件监听机制、事件驱动编程。
package com.xuexiangban.service;
public class OrderService {
public void makeOrder() {
// 1:创建订单 -- 主要的职责是:创建订单
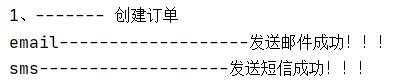
System.out.println("1、------- 创建订单");
// 2:发送短信
System.out.println("2、------- 发送短信");
// 3:发邮件
System.out.println("3、------- 发送邮件");
// 4:发送站内信息
System.out.println("4、------- 发送站内消息");
}
}
// 如果想修改发短信、邮件业务逻辑
// 耦合性太高,我们进行改进

我们先了解Spring的事件监听与事件发布(订阅)机制
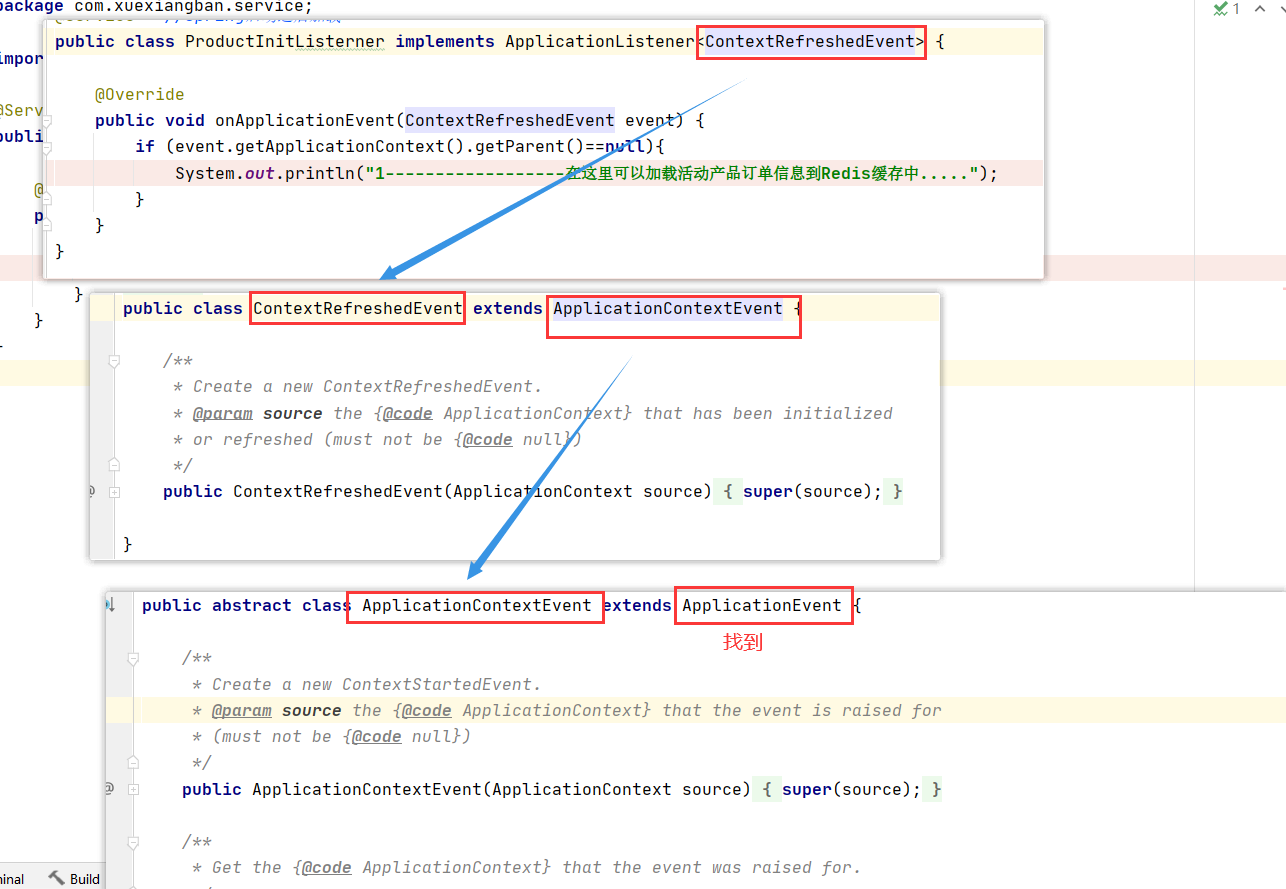
@Service   //Spring启动之后加载
public class OrderProductInitListerner implements ApplicationListener<ContextRefreshedEvent> {


    @Override
    public void onApplicationEvent(ContextRefreshedEvent event) {


        if (event.getApplicationContext().getParent()==null){


            System.out.println("2---------------在这里可以加载商品订单信息到Redis缓存中.....");
        }

    }
}


@Service   //Spring启动之后加载
public class ProductInitListerner implements ApplicationListener<ContextRefreshedEvent> {


    @Override
    public void onApplicationEvent(ContextRefreshedEvent event) {


        if (event.getApplicationContext().getParent()==null){


            System.out.println("1------------------在这里可以加载活动产品订单信息到Redis缓存中.....");
        }
    }
}
当Spring容器将所有的Bean都注册到ioc容器之后,就会调用applicationContext.publicEvent(ContextRefreshedEvent)进行发布,所有实现ApplicationListener<ContextRefreshedEvent>的类都会得到通知!
你会发现ProductInitListener会托管给spring容器,当spring容器加载完毕之后会执行onApplicationEvent方法。
查看运行结果:

于是,我们模仿Spring这种机制,利用spring的事件驱动机制来完成订单发送对应的消息和通知,达到对扩展开放,对修改关闭。的目的。
查看源码:
于是我们自定义一个OrderEvent事件类,也去实现ApplicationEvent类
package com.xuexiangban.service;

import org.springframework.context.ApplicationEvent;

public class OrderEvent extends ApplicationEvent {


    public OrderEvent(Object source) {


        super(source);
    }
}
然后我们将刚才的业务代码进行优化:
@Service
public class OrderService {


    @Autowired
    private ApplicationContext applicationContext;

    public void makeOrder() {


        // 1:创建订单 -- 主要的职责是:创建订单
        System.out.println("1、------- 创建订单");

        //2.发布订单相关的事件
        applicationContext.publishEvent(new OrderEvent(applicationContext));  //核心代码

    }

}
我们再写两个事件监听类进行监听:
@Service
public class SmsListerner implements ApplicationListener<OrderEvent> {

      //泛型为刚才自定义的事件类OrderEvent

    @Override
    public void onApplicationEvent(OrderEvent event) {


        System.out.println("sms-------------------发送短信成功!!!");
    }
}


@Service
public class EmailListerner implements ApplicationListener<OrderEvent> {


    @Override
    public void onApplicationEvent(OrderEvent event) {


        System.out.println("email-------------------发送邮件成功!!!");
    }
}
于是我们写一个测试用例进行测试:
package com.xuexiangban.spring;

import com.xuexiangban.service.OrderService;
import org.junit.jupiter.api.Test;
import org.springframework.beans.factory.annotation.Autowired;
import org.springframework.boot.test.context.SpringBootTest;

@SpringBootTest
class ApplicationTests {


    @Autowired
    private OrderService orderService;

    @Test
    void contextLoads() {


        orderService.makeOrder();
    }

}
查看运行结果:
得已实现,我们再来分析这个源码:
// 1
default void publishEvent(ApplicationEvent event) {
publishEvent((Object) event);
}
// 2
@Override
public void publishEvent(Object event) {
publishEvent(event, null);
}
// 3
protected void publishEvent(Object event, @Nullable ResolvableType eventType) {
Assert.notNull(event, "Event must not be null");
// Decorate event as an ApplicationEvent if necessary
ApplicationEvent applicationEvent;
if (event instanceof ApplicationEvent) {
applicationEvent = (ApplicationEvent) event;
}
else {
applicationEvent = new PayloadApplicationEvent<>(this, event);
if (eventType == null) {
eventType = ((PayloadApplicationEvent<?>) applicationEvent).getResolvableType();
}
}
// Multicast right now if possible - or lazily once the multicaster is initialized
if (this.earlyApplicationEvents != null) {
this.earlyApplicationEvents.add(applicationEvent);
}
else {
getApplicationEventMulticaster().multicastEvent(applicationEvent, eventType); //核心代码
}
// Publish event via parent context as well...
if (this.parent != null) {
if (this.parent instanceof AbstractApplicationContext) {
((AbstractApplicationContext) this.parent).publishEvent(event, eventType);
}
else {
this.parent.publishEvent(event);
}
}
}
// 4
@Override
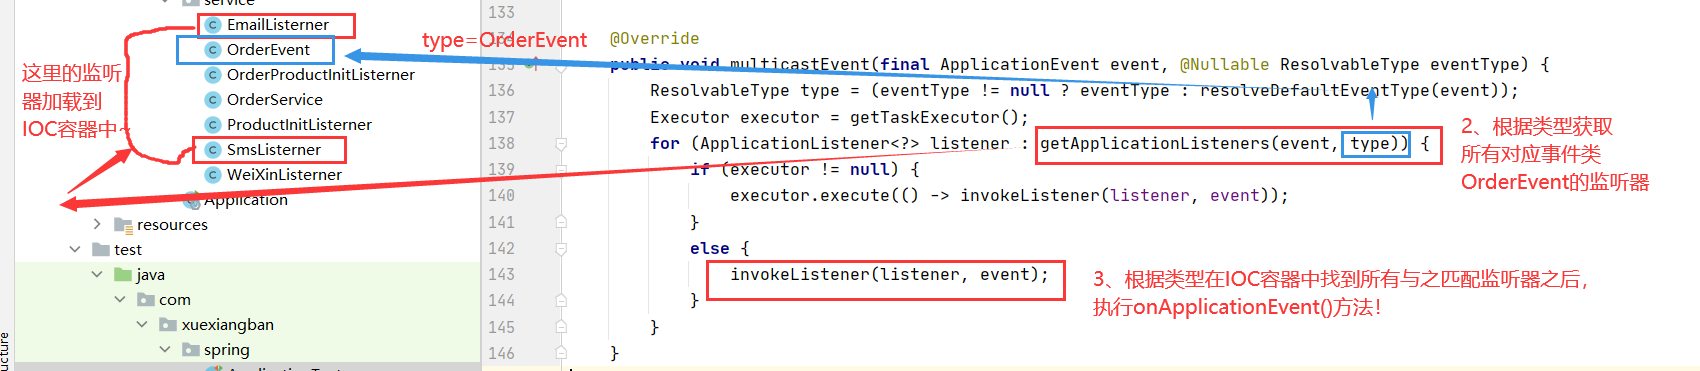
public void multicastEvent(final ApplicationEvent event, @Nullable ResolvableType eventType) {
ResolvableType type = (eventType != null ? eventType : resolveDefaultEventType(event));
Executor executor = getTaskExecutor();
for (ApplicationListener<?> listener : getApplicationListeners(event, type)) {
if (executor != null) {
executor.execute(() -> invokeListener(listener, event)); //执行了 invokeListener
}
else {
invokeListener(listener, event);
}
}
}
// 5
protected void invokeListener(ApplicationListener<?> listener, ApplicationEvent event) {
ErrorHandler errorHandler = getErrorHandler();
if (errorHandler != null) {
try {
doInvokeListener(listener, event); // 执行了 doInvokeListener
}
catch (Throwable err) {
errorHandler.handleError(err);
}
}
else {
doInvokeListener(listener, event);
}
}
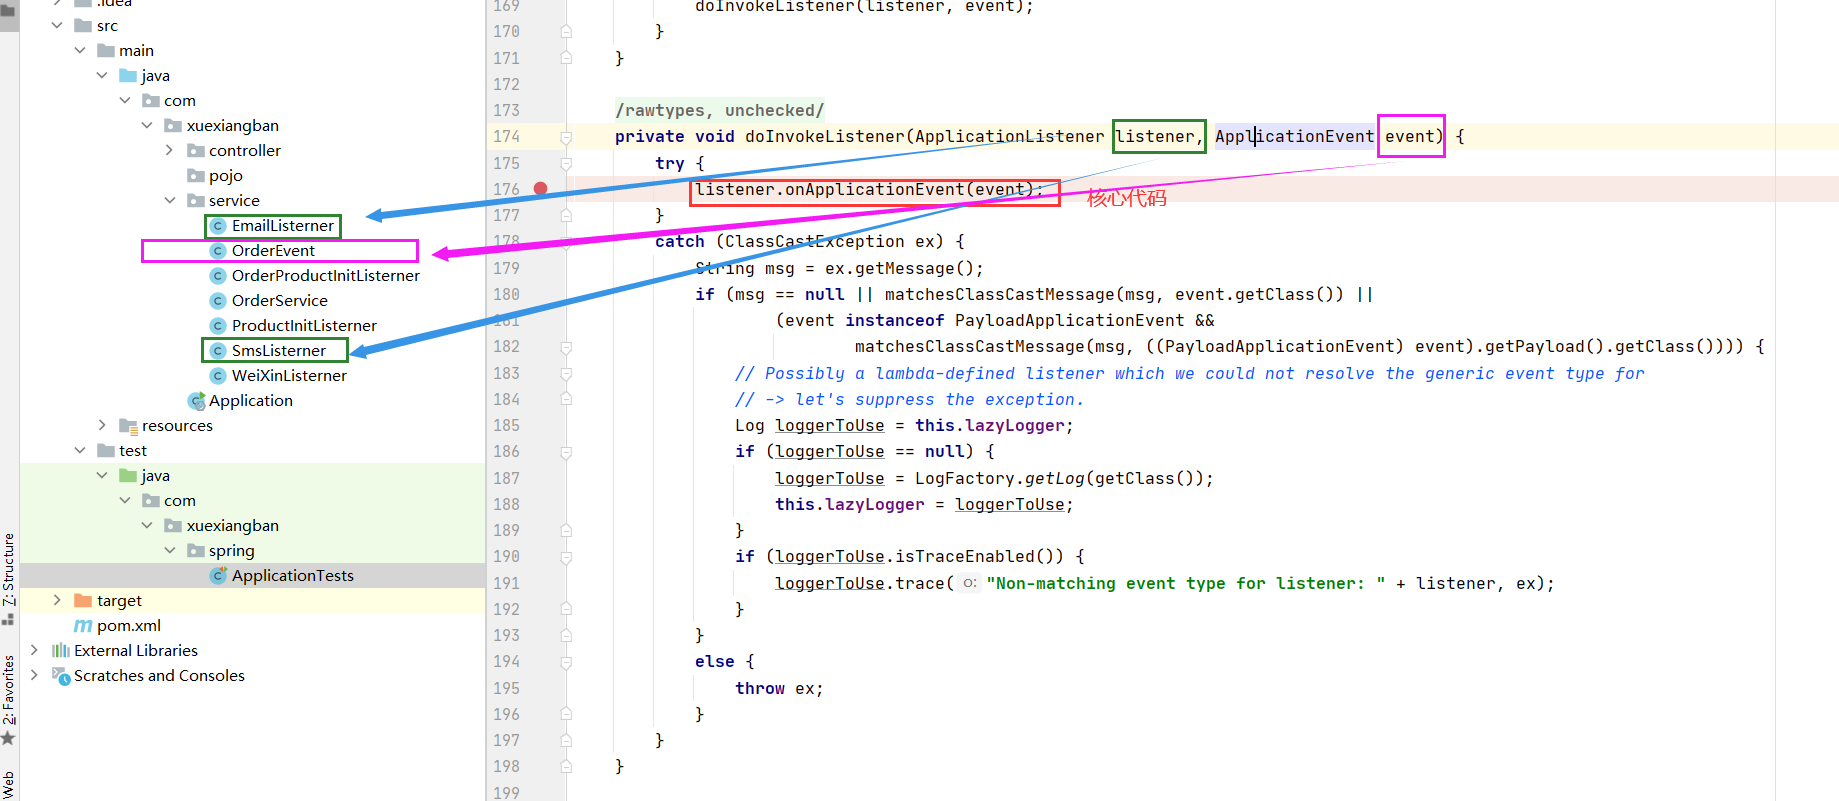
// 6 终于找到最底层
private void doInvokeListener(ApplicationListener listener, ApplicationEvent event) {
try {
listener.onApplicationEvent(event); //最核心代码
}
catch (ClassCastException ex) {
String msg = ex.getMessage();
if (msg == null || matchesClassCastMessage(msg, event.getClass()) ||
(event instanceof PayloadApplicationEvent &&
matchesClassCastMessage(msg, ((PayloadApplicationEvent) event).getPayload().getClass()))) {
// Possibly a lambda-defined listener which we could not resolve the generic event type for
// -> let's suppress the exception.
Log loggerToUse = this.lazyLogger;
if (loggerToUse == null) {
loggerToUse = LogFactory.getLog(getClass());
this.lazyLogger = loggerToUse;
}
if (loggerToUse.isTraceEnabled()) {
loggerToUse.trace("Non-matching event type for listener: " + listener, ex);
}
}
else {
throw ex;
}
}
}
当达到目的之后,于是我们想增加一个下订单完成之后发微信的消息,于是
直接写一个类继承ApplicationListener<OrderEvent>
@Service
public class WeiXinListerner implements ApplicationListener<OrderEvent> {


    @Override
    public void onApplicationEvent(OrderEvent event) {


        System.out.println("微信-------------------发送短信成功!!!");
    }
}
运行,查看结果:

得已实现!!!!
对内修改关闭,对外扩展开放
总结
当我们想在下订单过程中,假设要发送 微信消息 、 短信消息 、 邮件消息 , 这种一对多, 我们可以优先使用 观察者模式
1、先写一个自定义的事件类 继承 ApplicationEvent
2、再写 每个消息发送者 的监听类 , 实现 ApplicationListener<上面自定义的实现类>
3、每个监听类重写 onApplicationEvent方法,在方法中书写 业务代码
4、后期,我们我们再想要横向扩展的时候,直接定义一个 消息监听者的类 ,重复 2 步骤!
2、策略者模式
什么是策略者模式
所谓的策略者模式:定义了一系列的算法,并将每一个算法封装起来,而且使他们可以互相替换,让算法独立于使用它的客户而独立变化。
算法:程序执行的逻辑,或者顺序。
封装:可以是方法,也可以是函数,也可以是类、接口、抽象类
相互替换:
- 代表每一种算法,功能定义是一样的,具体实现不同
- Java中可以直接替换的是接口实现、子类
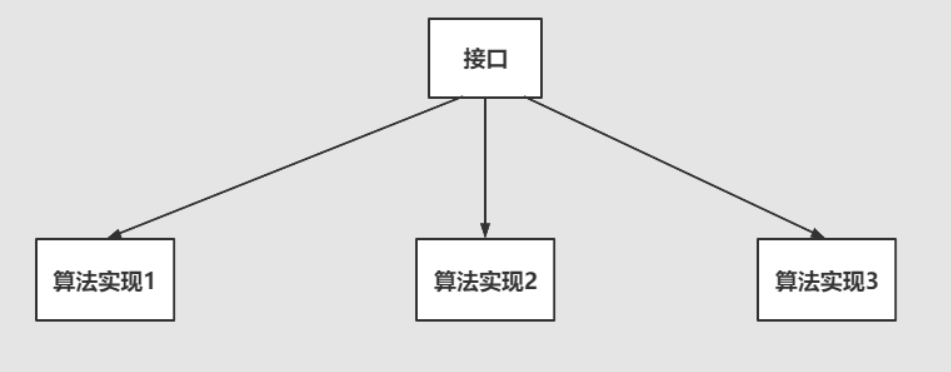
大家在进行项目开发的时候一个接口有多个实现类就是一个典型的策略者设计模式
不同身份用户买课价格案例:
public class CourseRelationService {


    /**
     * @param usertype  mvip yvip svip
     * @param courseId  162454665652
     * @param coursePrice  162454665652
     * @return price
     */
    public double buyCourse(String usertype,String courseId,double coursePrice){


        double price = 0;
        if (usertype.equalsIgnoreCase("mvip")){


            price = coursePrice * 1.0;
        }

        else if (usertype.equalsIgnoreCase("yvip")){


            price = coursePrice * 0.75;
        }

        else if (usertype.equalsIgnoreCase("svip")) {


            price = coursePrice * 0.5;
        }
        return price;
    }

}
代码耦合性太高,我们参考策略者设计模式改进
@Service
public class CourseRelationService {


    @Autowired
    private MonthVipCalculation monthVipCalculation;

    @Autowired
    private SVipCalculation sVipCalculation;

    @Autowired
    private YearVipCalculation yearVipCalculation;

    /**
     * @param usertype  mvip yvip svip
     * @param courseId  162454665652
     * @param coursePrice  162454665652
     * @return price
     */
    public double buyCourse(String usertype,String courseId,double coursePrice){


        double price = 0;
        if (usertype.equalsIgnoreCase("mvip")){


            price = monthVipCalculation.discount(coursePrice);
        }

        else if (usertype.equalsIgnoreCase("yvip")){


            price = yearVipCalculation.discount(coursePrice);
        }

        else if (usertype.equalsIgnoreCase("svip")) {


            price = sVipCalculation.discount(coursePrice);
        }
        return price;
    }

}
package com.xuexiangban.service.strategy.demo;

import org.springframework.beans.factory.annotation.Autowired;
import org.springframework.stereotype.Service;

// 月会员
@Service
public class MonthVipCalculation implements CourseService{


    public String getUserType(){


        return "mvip";
    }

    public double discount(double coursePrice){


        return coursePrice * 1.0;
    }

}
package com.xuexiangban.service.strategy.demo;

import org.springframework.stereotype.Service;

// 月会员
@Service
public class YearVipCalculation implements CourseService{


    public String getUserType(){


        return "yvip";
    }

    public double discount(double coursePrice){


        return coursePrice * 0.75;
    }

}
package com.xuexiangban.service.strategy.demo;

import org.springframework.stereotype.Service;

// 月会员
@Service
public class SVipCalculation implements CourseService{


    public String getUserType(){


        return "svip";
    }

    public double discount(double coursePrice){


        return coursePrice * 0.5;
    }

}
package com.xuexiangban.service.strategy.demo;

import org.springframework.stereotype.Service;

public interface CourseService {


    public String getUserType();

    public double discount(double coursePrice);

}
我们发现还是不能去掉if - else ,我们再进行改进:
// 如果我们能用一个 ? 把他装起来 , 然后根据具体的实现找到对应的方法
// Map<String,?> map = new HashMap<>();
// map.put("mvip",monthVipCalculation);
// map.put("svip",sVipCalculation);
// map.put("yvip",yearVipCalculation)

// 参考spring框架,我们可以使用构造方法进行注入
package com.xuexiangban.service.strategy.demo;

import org.springframework.beans.factory.annotation.Autowired;
import org.springframework.stereotype.Service;

import java.util.HashMap;
import java.util.List;
import java.util.Map;

@Service
public class CourseRelationService {


    private Map<String,CourseService> map = new HashMap<>();

     // Spring构造函数注入,参数一并初始化
     // 在Bean初始化过程中,通过构造方法进入注入,参数也会被初始化,
     // 下面的List集合泛型为CourseService,ioc会找到所有实现这个接口的类对List集合进行初始化
     // 初始化完成后,我们在构造方法中遍历这个List集合,将它作为Map的key和value,用于下面的使用!!
     public CourseRelationService(List<CourseService> courseServices){


         for (CourseService courseService : courseServices) {


             map.put(courseService.getUserType(),courseService);
         }
     }

    /**
     * @param usertype  mvip yvip svip
     * @param courseId  162454665652
     * @param coursePrice  162454665652
     * @return price
     */
    public double buyCourse(String usertype,String courseId,double coursePrice){


        // 当传入参数为svip时,会根据map的key获取到SVipCalculation这个类
        // 获取到之后,用接口进行接受(多态机制)
        // courseService 代表了  SVipCalculation
        CourseService courseService = map.get(usertype);

        return courseService.discount(coursePrice);
    }

}
这样问题就得了解决!!!
用策略者设计模式把它的算法用一个类或者方法重新的进行封装起来!!
当 程序中存在大量 if-else语句 , 我们可以使用 策略者设计 模式进行优化!!!
对内修改关闭,对外扩展开放!!!
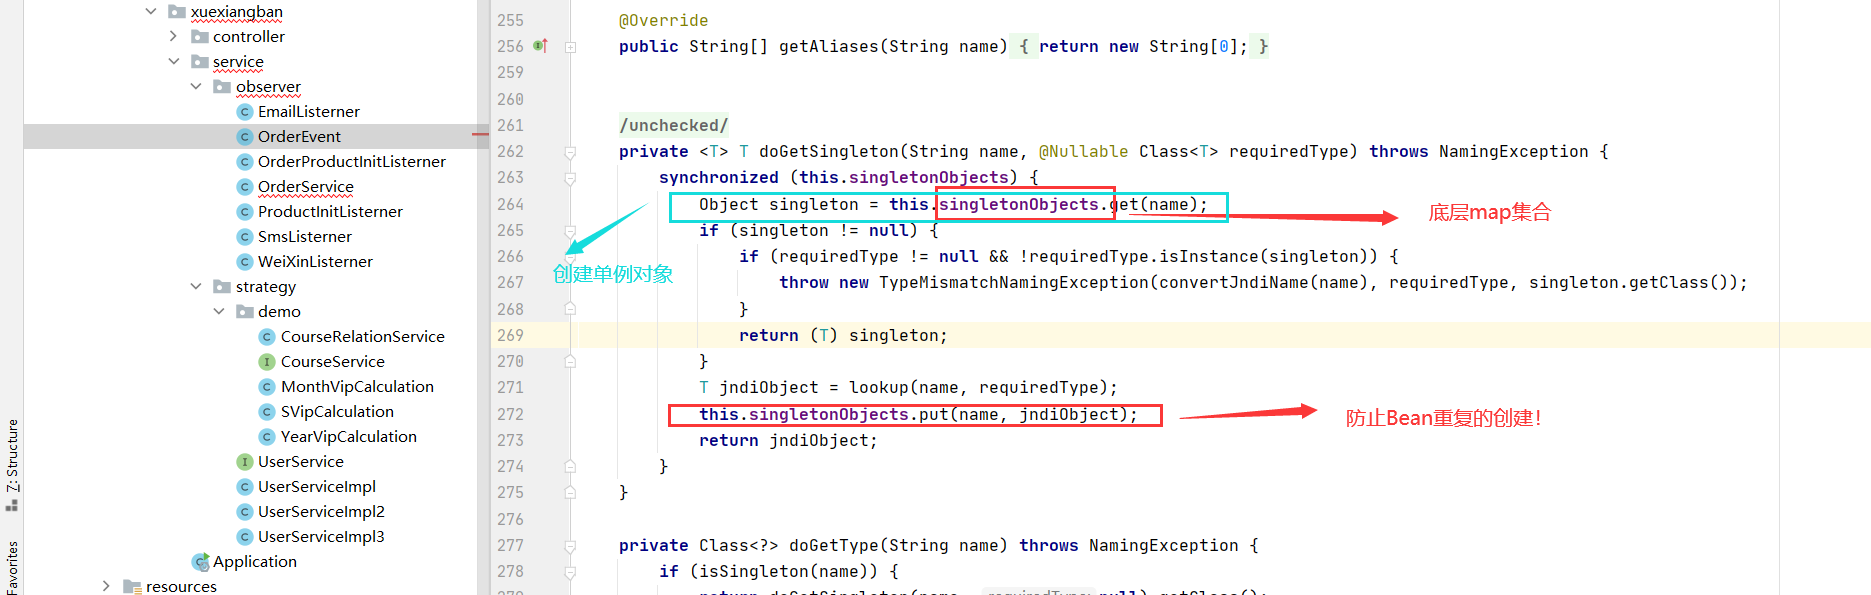
分析Spring源码:借鉴了application.getBean()思想原理!! 调用的时候获取对象!!
问题:为什么在调用的时候才去初始化Bean?
为了防止重复的创建


小总结
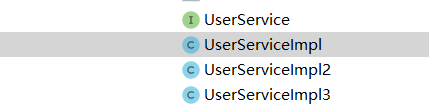
当一个接口只有一个实现类的时候,我们可以使用构造方法进行注入!
private UserService uservice;
public A(UserService uservice){


    this.uservice = uservice;
}
当一个接口有多个实现类的时候,我们使用构造方法进行注入!
private UserService uservice;
public A(List<UserService> uservices){


    this.uservice = uservices.get(0);
}
说明,课程来自于学相伴-飞哥
Spring源码刨析:https://www.bilibili.com/video/BV1A44y167Y5
这是我上课自己记录的笔记,欢迎大家一起交流探讨!!