pyhton爬虫学习
1.准备工作
import bs4                          #网页解析,获取数据
import urllib.request,urllib.error  #制定URL,获取网页数据
import xlwt                         #进行excel操作
import re                           #正则表达式,进行数据的筛选
import sys
import sqlite3                      #进行sqllite数据库操作
2.尝试,测试工作
对百度,httpbin.org等网站的尝试连接
#-*- codeing = utf-8 -*-
#@Time : 2020/9/28 14:49
#@Author : chengcheng
#@File : test.py
#@Software : douban

import urllib.request
import urllib.parse

#get请求

#get请求,直接输入网站域名
try:
    test_pa = urllib.request.urlopen("https://www.baidu.com")
    print(test_pa.read().decode("utf-8"))

except:
    print("time out!")


#post请求

#使用post请求时,需要发送封装好的表单
data = bytes(urllib.parse.urlencode({

    "hellow":"world"}), encoding="utf-8")

response = urllib.request.urlopen("http://httpbin.org/post", data=data, timeout=1)
print(response.read().decode("utf-8"))
请求豆瓣的测试
#ulr地址
# url = "https://www.douban.com"
# #post请求需要封装的表单
# data = bytes(urllib.parse.urlencode({"name":"eric"}), encoding="utf-8")
# #请求头,更好的伪装成正常浏览器
# headers = {


#     "user-agent": "Mozilla/5.0 (Windows NT 10.0; Win64; x64) AppleWebKit/537.36 (KHTML, like Gecko) Chrome/85.0.4183.121 Safari/537.36"
# }
# #进行对网站请求
# req = urllib.request.Request(url=url, data=data, headers=headers, method="POST")
#
# response = urllib.request.urlopen(req)
#
# print(response.read().decode("utf-8"))
#get请求豆瓣
# url = "https://www.douban.com"
# headers = {


#      "user-agent": "Mozilla/5.0 (Windows NT 10.0; Win64; x64) AppleWebKit/537.36 (KHTML, like Gecko) Chrome/85.0.4183.121 Safari/537.36"
#  }
#
# req = urllib.request.Request(url=url, headers=headers)
# response = urllib.request.urlopen(req)
# print(response.read().decode("utf-8"))
补充:
urllib.request.Request
构建一个较为完整的请求(get,post等)
urllib.request.urlopen
发起一个请求,默认是get 请求
bytes(urllib.parse.urlencode({“name”:“eric”}), encoding=“utf-8”)
data参数如果要传必须传bytes(字节流)类型的,如果是一个字典,先用urllib.parse.urlencode()编码。
BeautifulSoup
将获取到的网页数据转换成树状节图,每个节点都是
Tag
标签及其内容,最先读取到(第一次)的对应标签的内容
NavigableString
标签里的内容
BeautifulSoup
表示整个文档
Comment
一种特殊的NavigableString,但其输出内容不包含注释
中的一个
bs = BeautifulSoup(html, "html.parser")

print(bs.title.string)		#获取标签内的内容

print(bs.title)				#获取整个标签

print(bs.title.attrs)		#获取标签的属性值,以键值对的方式
文档的遍历
conents
print(bs.head.contents) #将网页内容所有的标签遍历返回一个列表
children
for child in bs.body.children:	#将body标签里的所有内容遍历,返回
	print(child)
其他的方法:
获取tag的所有子节点,返回一个生成器
.descendants
获取tag的所有子孙节点
.strings
如果tag包含多个字符串,即再子孙节点中有内容,可以用此获取,然后遍历
.stripped_strings
与string用s法一致,只不过可以去除那些多余的空白符号
.parent
获取tag的父节点
文档的搜索
多种搜索方式
#1.文档搜索
#字符串搜索的方式
# t_list = bs.find_all("a")
# print(t_list)

#正则表达式搜索
# t_lists = bs.find_all(re.compile("a"))
#
# print(t_lists)

#2.方法搜索
#传入一个函数,根据函数的要求来搜索

# def name_select(tag):
#     return tag.has_attr("name")
#
# tlst = bs.find_all(name_select)
# print(tlst)

# 3.kwargs   参数

# t_lst = bs.find_all(class_=True)
# t_lsts = bs.find_all(herf="https://www.bilibili.com")   #可以制定多种规则
# for item in t_lsts:
#     print(item)

#4.text参数

# t_list = bs.find_all(text="主站")		#在网页内容内搜索全部带有制定text的内容,并返回
# t_list = bs.find_all(text=["主站", "番剧", "直播", "会员购",   "bilibili"])
#t_list = bs.find_all(text= re.compile("\d"))

# for i in t_list:
#     print(i)

#5.limit 参数

# t_list = bs.find_all("a", limit=3)
#限制查询德奥的符合条件的返回数据数目
# print(t_list)

#css 选择器

#t_list = bs.select('div')  标签查找

#t_list = bs.select(".video-card-common")   类型查找

# t_list = bs.select("#12")   id 查找

# t_list = bs.select("div > div")   可以选择子代的标签

# t_list = bs.select(".video-card-common ~ .international-home")
# t_list = bs.select(".video-card-common , .international-home")
#选择是否包含指定类名的标签元素
# for i in t_list:
#     print(i)
正则表达式
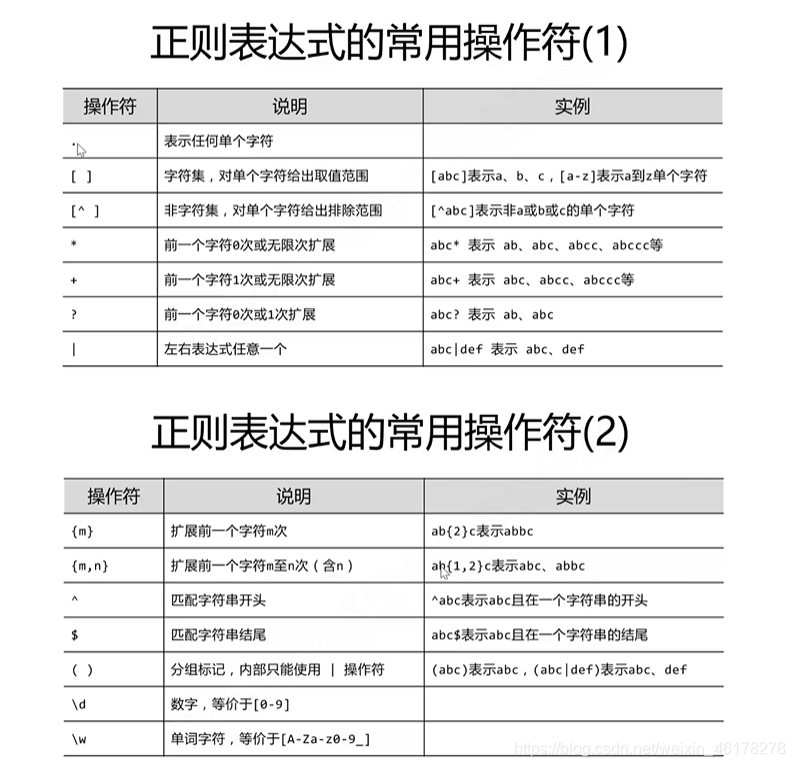

# 使用正则表达式对数据进行基本的数据处理
#re.compile('<div class="grid_view">.*?<div class="pic">.*?href="(.*?)".*?<>', re.S)
findlink_img = re.compile(r'<img.*?src="(.*?)".*?>', re.S)
findlink_movie = re.compile(r'<a href="(.*?)">', re.S)
findlink_text = re.compile(r'<span class="title">(.*?)</span>', re.S)
findlink_pingfen = re.compile(r'<span class="rating_num".*?>(.*?)</span>', re.S)
findlink_person = re.compile(r'<span>(\d*).*</span>',re.S)
findlink_inq = re.compile(r'<p class="quote".*?<span class="inq">(.*?)</span>', re.S)
findlink_bd = re.compile(r'<p class="">(.*?)</p>',re.S)
补充简单的通过Windows访问虚拟机的Linux上的flask简单小程序
这里使用的Windows10和Centos8之间的实现。
一般需要先在Linux安装python所需的虚拟环境(不同的python版本的库互相并不兼容,虚拟环境可以为每一个项目安装独立的 Python 库,这样就可以隔离不同项目之间的 Python 库,也可以隔离项目与操作系统之间的 Python 库)
centos8一般都内置了python3。Python 3 内置了用于创建虚拟环境的 venv 模块
创建一个虚拟环境
创建一个项目文件夹,然后创建一个虚拟环境。创建完成后项目文件夹中会有一个 venv 文件夹:
$ mkdir myproject
$ cd myproject
$ python3 -m venv venv
激活虚拟环境
在开始工作前,先要激活相应的虚拟环境:
进入venv的bin文件夹下,source activate即可
使用 deactivate退出虚拟环境
$ . venv/bin/activate
激活后,你的终端提示符会显示虚拟环境的名称。
安装 Flask
在已激活的虚拟环境中可以使用如下命令安装 Flask:
$ pip install Flask
在Linux上部署好程序,关闭防火墙。
[root@zcwyou ~]# systemctl status firewalld.service 	#查看防火墙服务状态
[root@zcwyou ~]# systemctl stop firewalld.service 	#关闭防火墙服务
[root@zcwyou ~]# systemctl disable firewalld.service #开机不自启动服务
确保Windows和虚拟机之间的可以相互ping通(如果不行,尝试下面的方法)
配置network并重启服务:(其中一个即可)
1.手工配置ifcfg,使用nmcli来生效新的网络配置
假设网卡标识符为xxx
[root@zcwyou ~]# vi /etc/sysconfig/network-scripts/ifcfg-xxx
使用nmcli重新回载网络配置
[root@zcwyou ~]# nmcli c reload
如果之前没有xxx的connection,则上一步reload后就已经自动生效了
[root@zcwyou ~]# nmcli c up xxx
2.安装network.service服务
可以通过yum install network-scripts来安装传统的network.service,不过redhat说了,在下一个RHEL的大版本里将彻底废除,因此不建议使用network.service。
检验网络互通性
ping 命令
浏览器等访问远程主机
通过IP和端口号
补充echarts
https://echarts.apache.org/zh/index.html
访问官网,下载获取echatrs.js文件
<!DOCTYPE html>
<html lang="en">
<head>
    <meta charset="UTF-8">
    <title>Echarts</title>
<!--    引入echarts文件-->
    <script src="echarts.js"></script>
</head>
<body>
    <div id="main" style="width: 600px;height: 400px"></div>
    <script type="text/javascript">
        // 基于准备好的dom,初始化echarts实例
        var myChart = echarts.init(document.getElementById('main'));

        // 指定图表的配置项和数据
        var option = {


            title: {


                text: 'ECharts 入门示例'
            },
            tooltip: {

     },
            legend: {


                data:['销量']
            },
            xAxis: {


                data: ["衬衫","羊毛衫","雪纺衫","裤子","高跟鞋","袜子"]
            },
            yAxis: {

     },
            series: [{


                name: '销量',
                type: 'bar',
                data: [5, 20, 36, 10, 10, 20]
            }]
        };

        // 使用刚指定的配置项和数据显示图表。
        myChart.setOption(option);
    </script>
</body>
</html>
补充WordCloud
生成词云图片
# -*- codeing = utf-8 -*-
# @Time : 2020/10/8 9:20
# @Author : chengcheng
# @File : testwordcloud.py
# @Software : pycharm

import jieba                        #分词
from matplotlib import pylab as plt #绘图,数据可视化
from wordcloud import WordCloud     #词云
from PIL import Image               #图像处理
import numpy as np                  #矩阵运算
import sqlite3                      #数据库
import pymysql

#1.获取数据
conn = pymysql.connect(host="127.0.0.1", user="root", password="tcc062556", database="school", charset="utf8")
cursor = conn.cursor()
sql = 'select info from movie_douban'
data = cursor.execute(sql)
result = cursor.fetchall()              #需要使用fetchall获取查询到的结果
text = ""
if len(result) != 0:                    #通过len(result)是否等于零判断是否查询到数据
    for item in result:
        text = text + item[0]
else:
    print("none")

# con = sqlite3.connect('movie.db')
# cur = con.cursor()
# sqls = 'select * from movie'
# data = cur.execute(sqls)
#2.分词,使用jieba
cut = jieba.cut(text)
#以什么分割分词后的内容
strs = ' '.join(cut)
#print(strs)
#print(len(strs))

#3.准备画布
img = Image.open(r'timg.jpg')   #准备遮罩图片
img_array = np.array(img)   #图像转换成数组

wc = WordCloud(
    background_color='white',
    mask=img_array,
    font_path="msyh.ttc"
)
wc.generate_from_text(strs)


#4.绘图
fig = plt.figure(1)
plt.imshow(wc)
plt.axis('off')

#plt.show()
#5.输出词云图片到文件
plt.savefig('time_cloud.jpg', dpi=400)