理论部分
1.测试分为哪几个阶段
![]()
2.测试的流程是什么

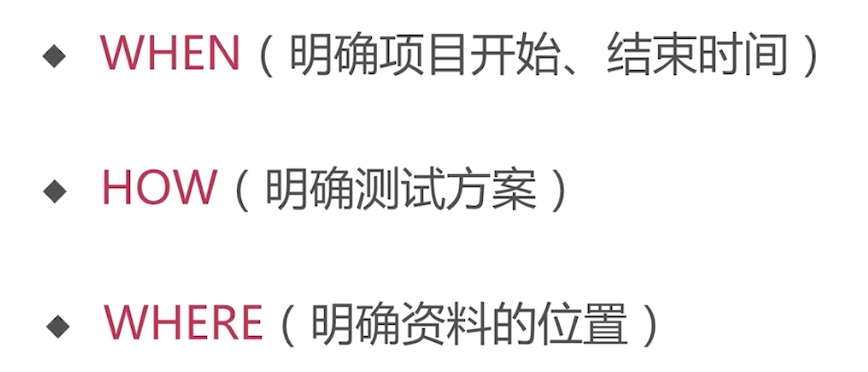
3.如何做好测试计划

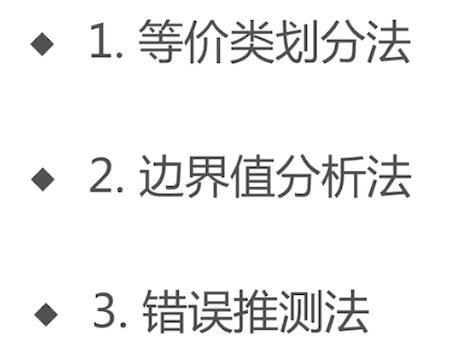
4.常见的测试用例设计方法有哪些

5.一条bug记录包含哪些内容


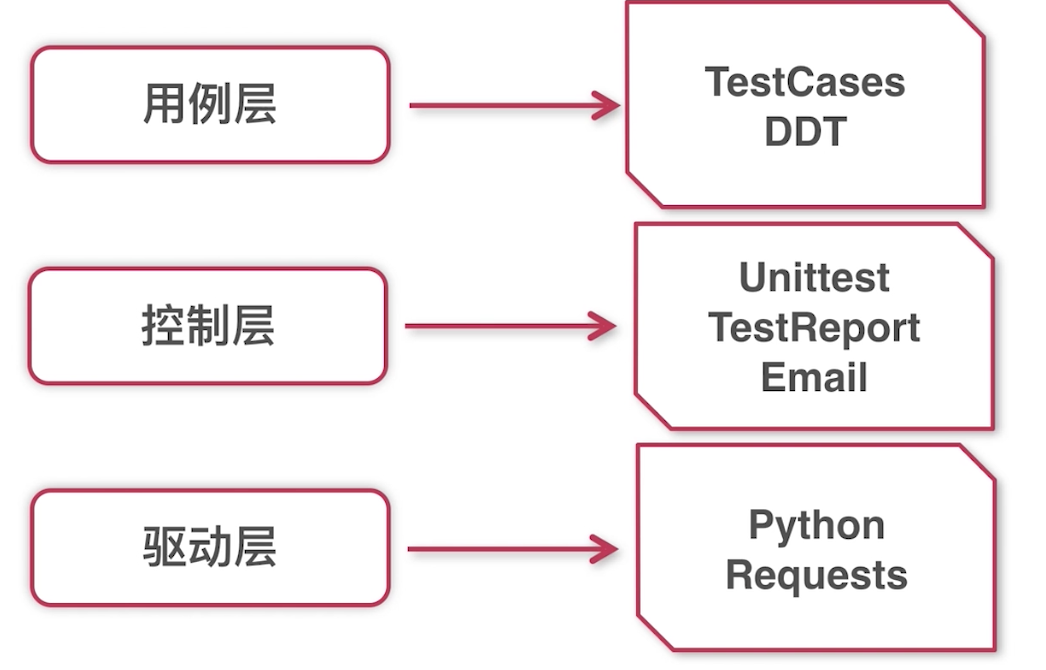
5.如何分层自动化测试

6.如何保证脚本的有效性
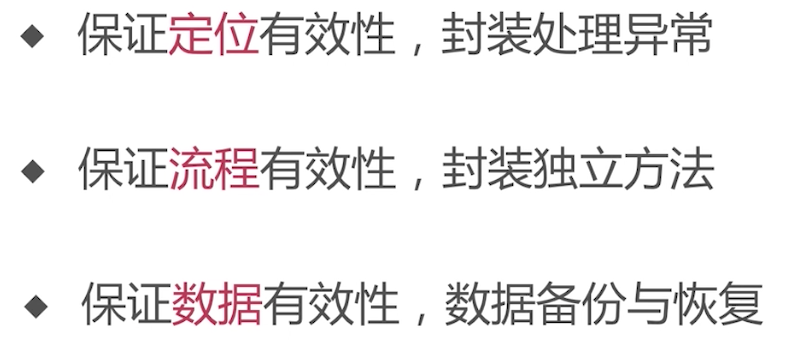
7.如何降低自动化维护成本

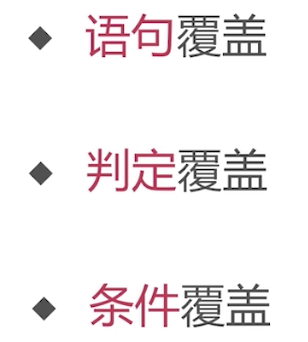
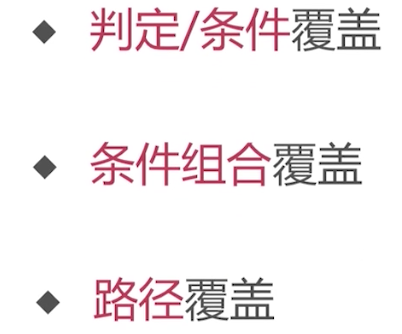
8.常见的测试覆盖类型
9.B/S和C/S架构什么区别
![]() ,客户端,比如微信,QQ
,客户端,比如微信,QQ
![]() ,浏览器页面,比如百度页面
,浏览器页面,比如百度页面
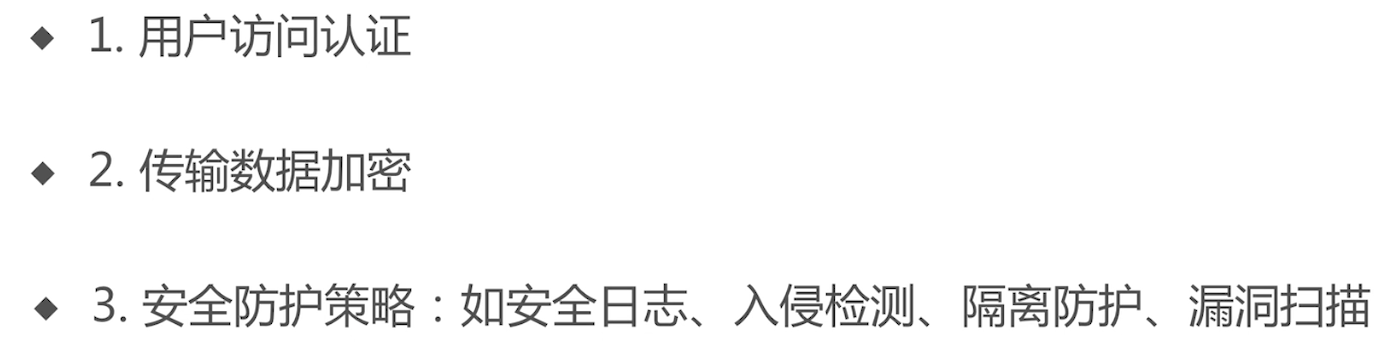
10.安全性都包含哪些内容

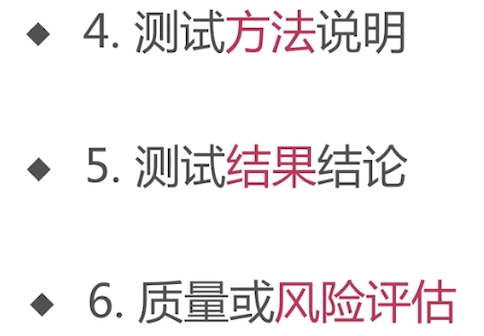
11.测试报告都包含哪些内容

12.Alpha和Beta测试的区别是什么

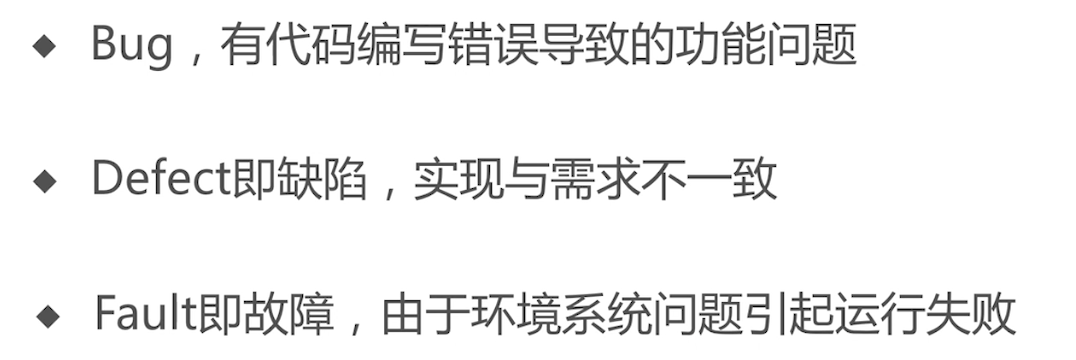
13.bug的类型都有哪些
![]()
Python部分
1.面向对象的概念

代码示例:
 1 # Animal是类,相同事物的统称
 2 class Animal(object):
 3     def run(self):
 4         print('Animal is running...')
 5
 6
 7 # Dog类,继承于Animal类
 8 class Dog(Animal):
 9     pass
10
11 puppy = Dog()
12 puppy.run()
13
14 # 多态,子类方法覆盖父类方法
15 class Cat(Animal):
16     def __init__(self, name):
17         # __name是属性
18         self.__name = name
19
20     def getName(self):
21         print(self.__name)
22
23     def run(self):
24         print('Cat is running...')
25
26
27 # limi是一个猫类的实例
28 limi = Cat("limi")
29 # run是实例的一个方法
30 limi.run()
31 # getName方法
32 limi.getName()
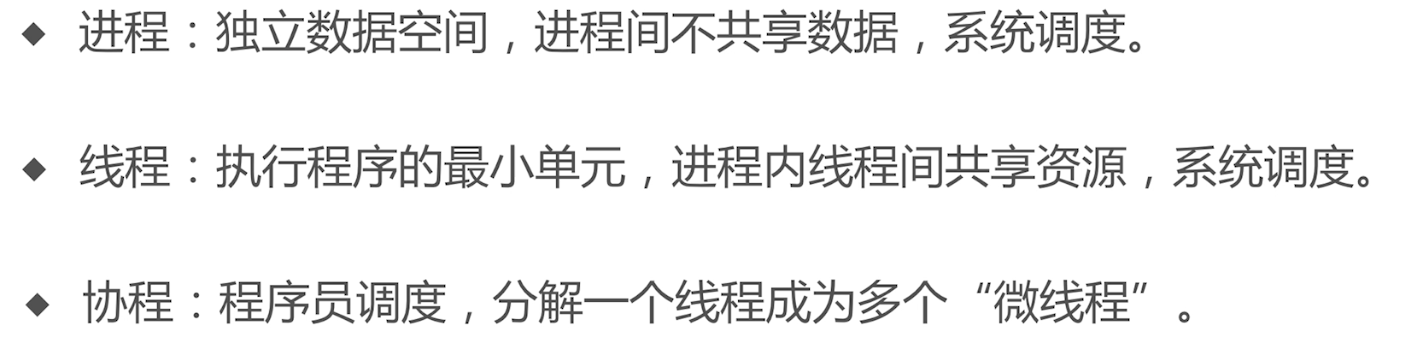
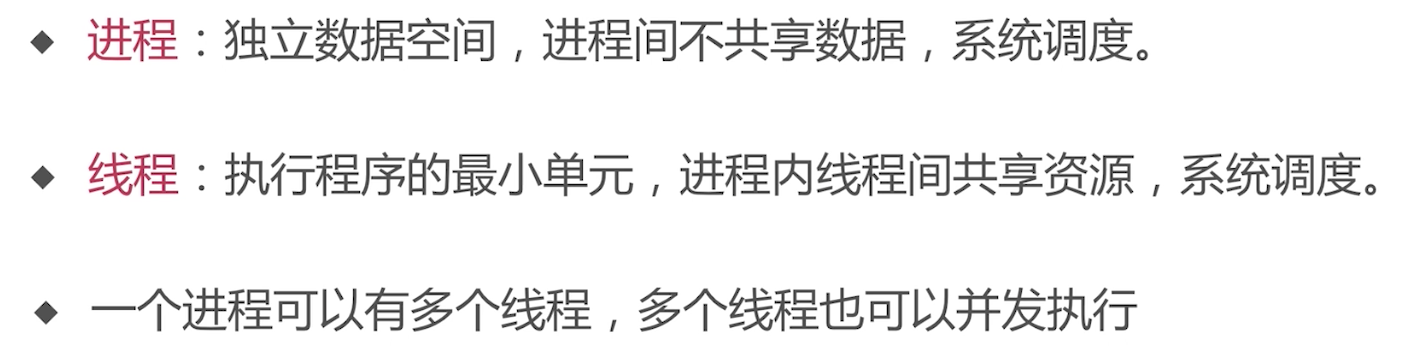
2.什么是进程,线程,协程
代码示例:
 1 # encoding: utf-8
 2 #进程
 3 # from multiprocessing import Process
 4 #
 5 # def foo(i):
 6 #     print("This is Process ", i)
 7 #
 8 # for i in range(5):
 9 #     p = Process(target=foo, args=(i,))
10 #     p.start()
11
12 #线程
13 # import threading
14 #
15 # def show(i):
16 #     print('This is Thread', i)
17 #
18 # for i in range(5):
19 #     t = threading.Thread(target=show, args=(i,))
20 #     t.start()
21
22 #协程
23 import gevent
24
25 def foo():
26     print("start_foo")
27     gevent.sleep(2)
28     print("end_foo")
29
30 def bar():
31     print("start_bar")
32     gevent.sleep(0)
33     print("end_bar")
34
35 # foo()
36 # bar()
37 gevent.joinall([
38     gevent.spawn(foo),
39     gevent.spawn(bar),
40 ])
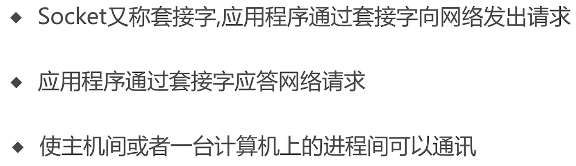
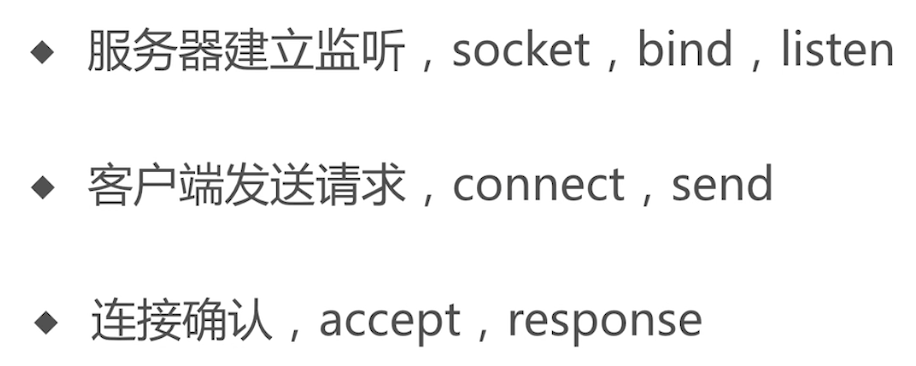
3.如何使用python实现socket编程
 1 #encoding: utf-8
 2 #服务端
 3
 4 # 导入 socket 模块
 5 import socket
 6
 7 # 创建 socket 对象
 8 s = socket.socket()
 9 # 绑定端口
10 s.bind(("127.0.0.1", 6666))
11
12 # 等待客户端连接
13 s.listen(5)
14
15 while True:
16     # 建立客户端连接
17     c, addr = s.accept()
18     print '连接地址:', addr
19     c.send('Welcome')
20     # 关闭连接
21     c.close()
 1 #encoding: utf-8
 2 客户端
 3 # 导入 socket 模块
 4 import socket
 5
 6 # 创建 socket 对象
 7 s = socket.socket()
 8
 9 #连接服务端
10 s.connect(("127.0.0.1", 6666))
11 print s.recv(1024)
12 s.close()
4.什么是lambda函数
![]()
 1 #encoding: utf-8
 2
 3 #计算平方
 4 def square(x):
 5     return x**2
 6
 7 print square(10)
 8
 9
10 #lambda表达式
11 r = lambda x:x**2
12 print r(10)
5.tuple和list有什么区别

6.range()函数的用法

1 #range生成从0到100的列表
2 alist = range(0, 101)
3 print(alist)
4
5 #设置步长为2
6 blist = range(2, 101, 2)
7 print(blist)
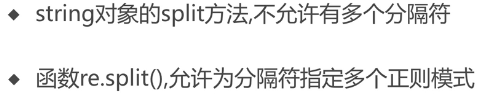
7.字符串的拆分方法有哪些
8.单引号,双引号,三引号的区别

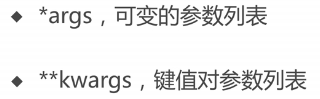
9.*args,**kwargs有什么作用
 1 #encoding: utf-8
 2
 3 #arg
 4 def test_args(first, *args):
 5    print first
 6    for v in args:
 7       print "args %s" % v
 8
 9 #args = (2, 3, 4, 5)
10 test_args(1, 2, 3, 4, 5, 6)
11
12 #kwargs
13 def test_kwargs(first, *args, **kwargs):
14    print first
15    for v in args:
16       print "args %s" % v
17    for k, v in kwargs.items():
18       print "kwargs", (k, v)
19 #args = (2, 3, 4, 5)
20 #kwargs: k1=5, k2=6, k0=4
21 test_kwargs(1, 2, 3, 4, 5, k0=4, k1=5, k2=6)
10.python中pass语句的作用
![]()
1 #encoding: utf-8
2
3 def test():
4     pass
5
6 test()
11.re模块中match和search方法的不同

 1 #encoding: utf-8
 2 import re
 3
 4 s1 = "helloworld, helloworld"
 5 w1 = 'hello'
 6 w2 = 'world'
 7
 8 #search扫描整个字符串
 9 print(re.search(w2, s1))
10 print(re.search(w2, s1).group())
11
12 #match只在字符串开始的位置匹配
13 print(re.match(w2, s1))
14 print(re.match(w2, s1).group())
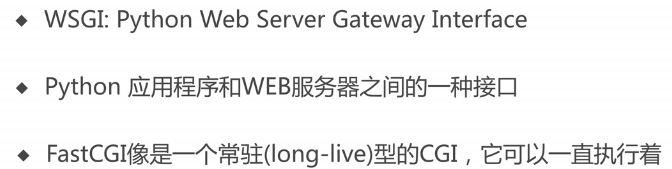
12.WSGI和FastCGI的的关系

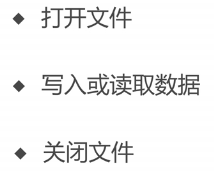
13.python是如何操作文件的
 1 #encoding: utf-8
 2
 3 #写文件
 4 f = open('test.txt', 'wt')
 5 f.write("hello world")
 6 f.close()
 7
 8 #使用with,追加内容,不用关心文件关闭问题
 9 with open("test.txt", 'at') as f:
10     f.write("\nhello mook")
11
12 #读取文件
13 with open("test.txt", 'rt') as f:
14     print(f.read())
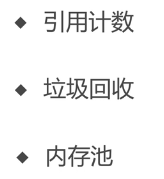
14.python的内存管理机制
 1 #encoding: utf-8
 2 from sys import getrefcount
 3
 4 #引用计数
 5 a1 = 10000000
 6 a2 = 10000000
 7 #del a1
 8 del a2
 9
10 print(id(a1))
11 #print(id(a2))
12
13 #检验a1和a2是同一个东西
14 #print(a1 is a2)
15
16 # #获取a2的引用计数
17 print(getrefcount(a1))
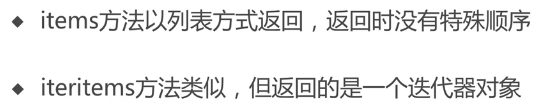
15.dict的items与iteritems的区别
 1 #encoding: utf-8
 2
 3 testl = {'key1': 2, 'key2': 3, 'key3': 4}
 4
 5 kv1 = testl.items()
 6 # print(next(kv1))
 7
 8 kv2 = testl.iteritems()
 9 print(next(kv2))
10 print(next(kv2))
11 print(next(kv2))
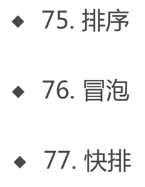
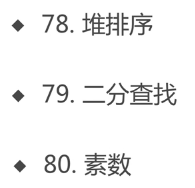
16.python常用算法
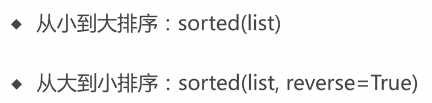
sorted()方法排序后生成新的列表,不会改变原来的列表
list.sort()方法排序后会改变原来的列表
1 #encoding: utf-8
2
3 alist = [0, 10, 88, 19, 9, 1]
4 #print(sorted(alist))
5
6 #print(sorted(alist, reverse=True))
7
8 alist.sort(reverse=True)
9 print(alist)
冒泡排序:
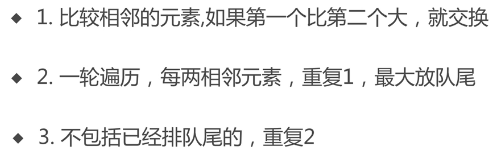
 1 #encoding: utf-8
 2
 3 # 冒泡排序
 4 def bubble_sort(lists):
 5     #获取数组长度
 6     count = len(lists)-1
 7     itemrange = range(count, 0, -1)
 8     #N个元素遍历N次
 9     for index in itemrange:
10         #第i个和第i+1个依次对比
11         for sub_index in range(index):
12             #大的元素冒上去
13             if lists[sub_index] > lists[sub_index+1]:
14                 lists[sub_index],lists[sub_index+1]=lists[sub_index+1],lists[sub_index]
15     return lists
16
17 alist = [0, 10, 88, 19, 9, 1]
18 print(bubble_sort(alist))
快速排序:
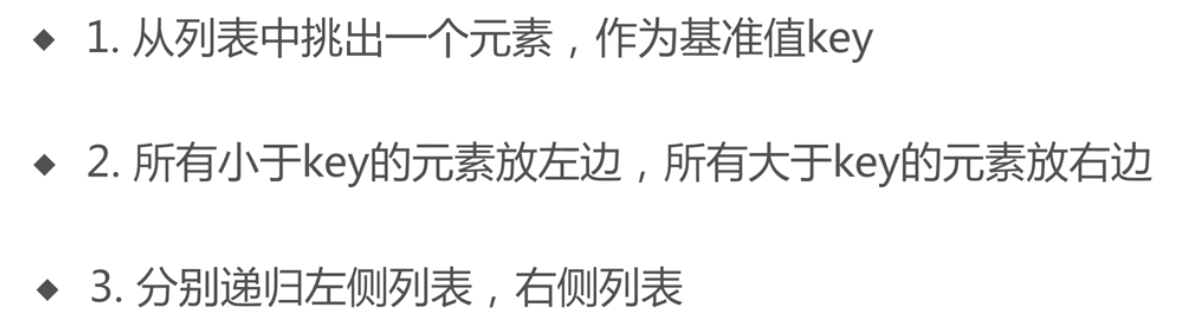
 1 #encoding: utf-8
 2 # 快速排序
 3 def quick_sort(lists, left, right):
 4     #递归过程中,发现left和right一致时,停止递归,直接返回列表
 5     if left >= right:
 6         return lists
 7     #定义游标
 8     low = left
 9     high = right
10
11     #取参考标志,最左边的元素
12     key = lists[low]
13     while low < high:
14         #从最右侧向左,依次和标志元素对比,如果右侧的元素大于标志元素
15         while low < high and lists[high] >= key:
16             #右侧减1
17             high -= 1
18         #否则low赋high值
19         lists[low] = lists[high]
20
21         #从最左侧向右,依次和标志元素对比,如果左侧的元素小于标志元素
22         while low < high and lists[low] <= key:
23             #左侧加1
24             low += 1
25         #否则high赋low值
26         lists[high] = lists[low]
27
28     #最后给high位置赋值
29     lists[high] = key
30
31     #处理左侧元素
32     quick_sort(lists, left, low - 1)
33     #处理右侧元素
34     quick_sort(lists, low + 1, right)
35     return lists
36
37 alist = [0, 10, 88, 19, 9, 1, 7]
38 print(quick_sort(alist, 0, 6))
堆排序:
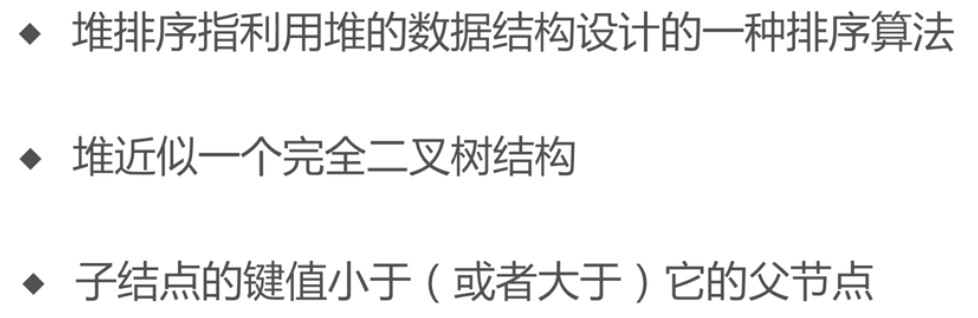
 1 #encoding: utf-8
 2
 3 def heap_sort(lst):
 4     def sift_down(start, end):
 5         """最大堆调整"""
 6         root = start
 7         print "root %d start %d end %d"%(root, start, end)
 8         while True:
 9             child = 2 * root + 1
10             #print "child index: %d" % child
11
12             #终止条件,孩子的索引值超过数组最大长度
13             if child > end:
14                 break
15             #print "lst child value:%d" % lst[child]
16
17             #确定最大的孩子节点的索引值
18             if child + 1 <= end and lst[child] < lst[child + 1]:
19                 child += 1
20                 #print "child+1 index: %d" % child
21
22             #孩子节点最大值和根节点交换
23             if lst[root] < lst[child]:
24                 lst[root], lst[child] = lst[child], lst[root]
25                 #print "lstroot %d" % lst[root], "lstchild %d" % lst[child]
26                 root = child
27                 #print "root %d" % root
28             else:
29                 break
30
31     print("-----------------创建最大堆------------------")
32     # 创建最大堆
33     print(xrange((len(lst) - 2) // 2, -1, -1))
34     for start in xrange((len(lst) - 2) // 2, -1, -1):
35         print "---->Loop start %d" % start
36         sift_down(start, len(lst) - 1)
37         print(lst)
38
39     print("-----------------排序过程------------------")
40     # 堆排序
41     for end in xrange(len(lst) - 1, 0, -1):
42         #首尾交换
43         lst[0], lst[end] = lst[end], lst[0]
44         #剩余重新堆排序
45         sift_down(0, end - 1)
46         print(lst)
47     return lst
48
49
50 alist = [70, 60, 12, 40, 30, 8, 10]
51 print(heap_sort(alist))
二分查找:
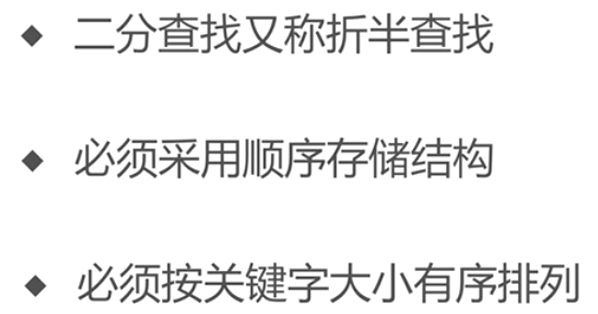
 1 # encoding: utf-8
 2
 3 alist = [0, 1, 10, 88, 19, 9, 1]
 4
 5
 6 def binary_search(arr, start, end, hkey):
 7     if start > end:
 8         return -1
 9     mid = start + (end - start) / 2
10     if arr[mid] > hkey:
11         return binary_search(arr, start, mid - 1, hkey)
12     if arr[mid] < hkey:
13         return binary_search(arr, mid + 1, end, hkey)
14     return mid
15
16
17 alist = sorted(alist)
18 print(alist)
19 print binary_search(alist, 0, 6, 9)
素数(质数):
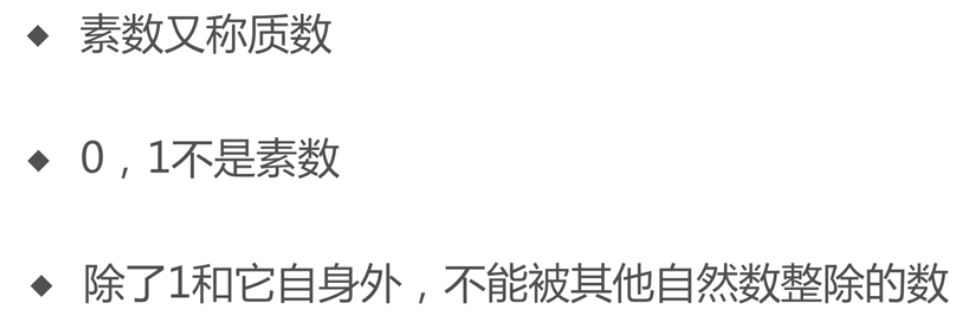
 1 #encoding: utf-8
 2
 3 #0,1不是素数
 4 #除了1和它自身外,不能被其他自然数整除的数
 5 def is_prime(n):
 6     if n <= 1:
 7         return False
 8
 9     for i in range(2, n-1):
10         if n % i == 0:
11             return False
12     return True
13
14 for i in range(0, 100):
15     if is_prime(i):
16         print i
Linux部分
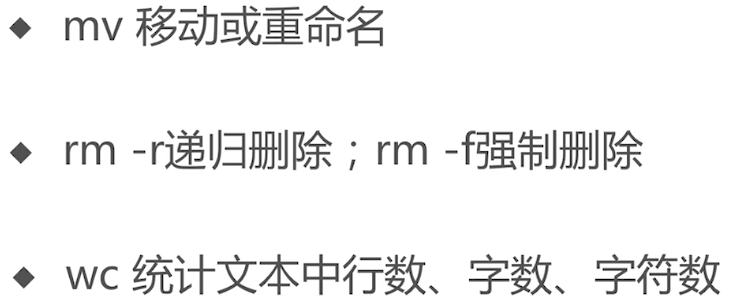
基础命令


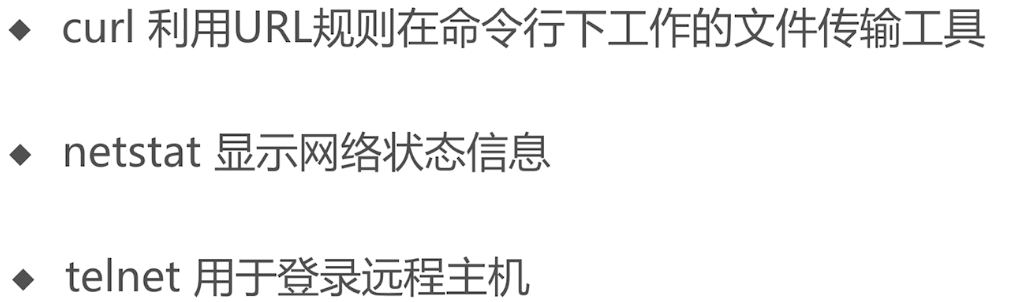
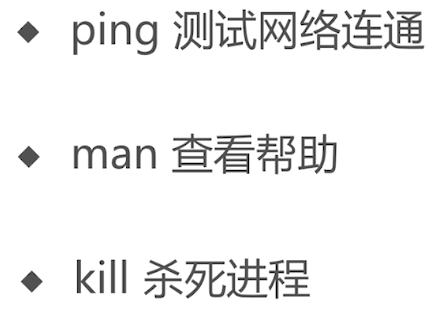
网络命令:
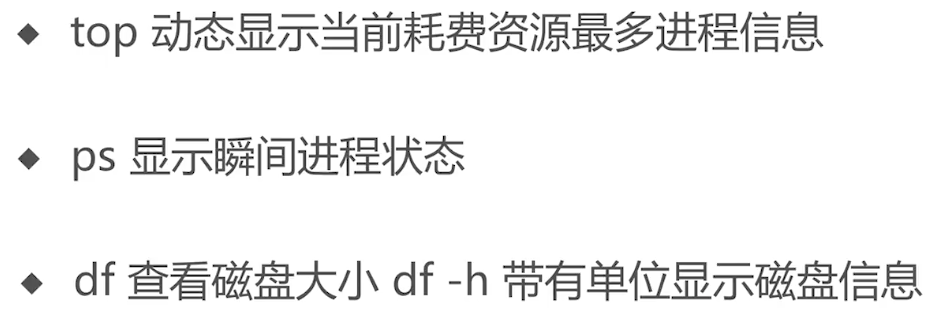
系统命令:
计算机网络相关
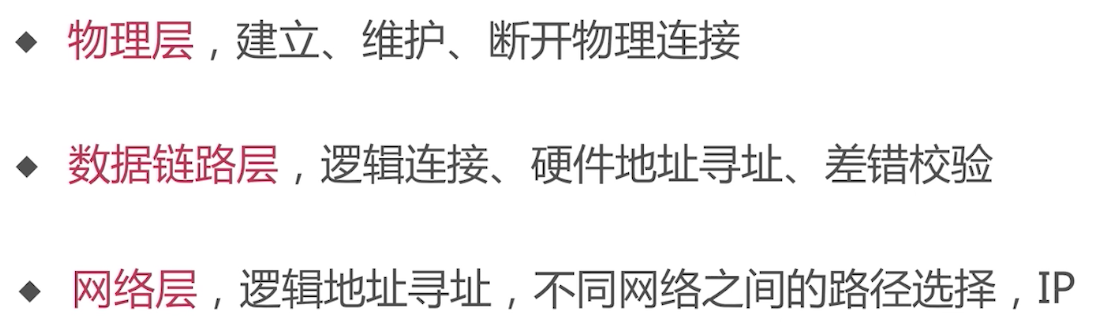
1.OSI网络七层模型指的哪些内容
![]()
2.http协议中get,post的区别

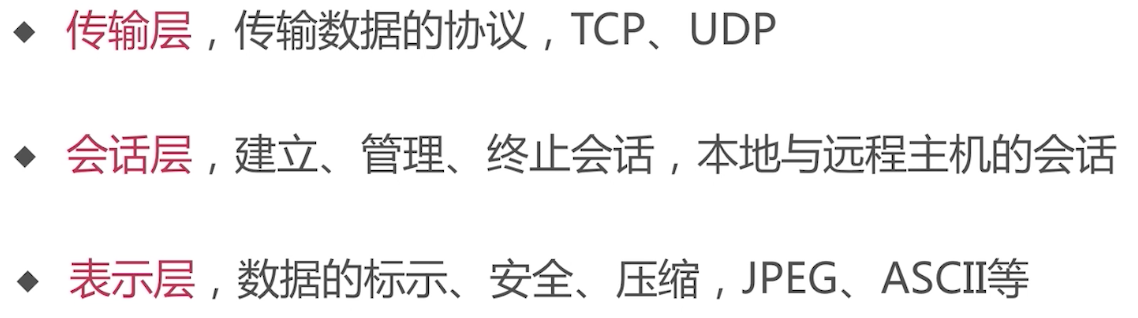
2.tcp和udp的区别
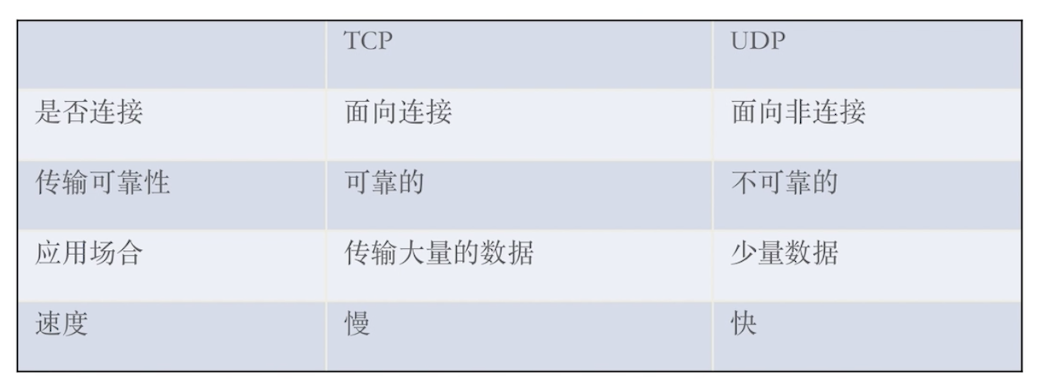
3.tcp连接3次握手的具体过程
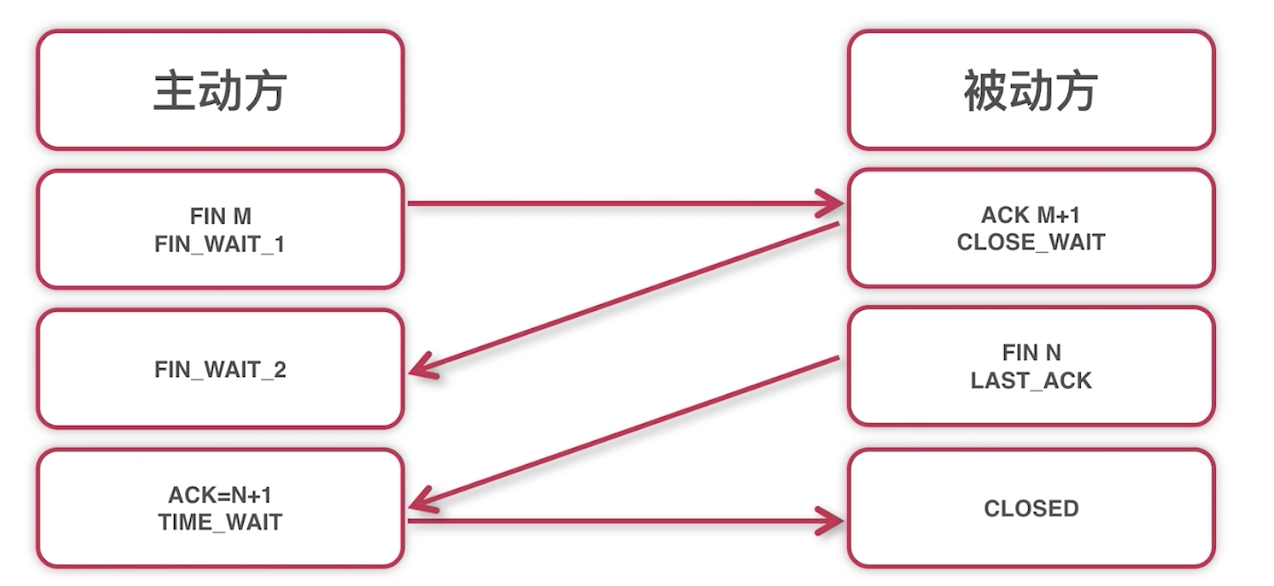
tcp连接4次挥手的过程(主动方可以是客户端,也可以是服务端)
4.socket建立连接的过程
操作系统相关
1.进程与线程的区别
2.进程都有哪些状态


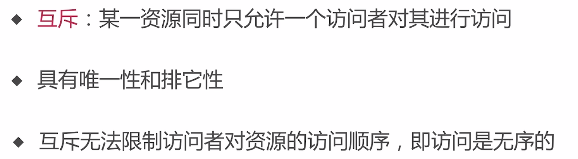
3.进程同步与互斥的区别
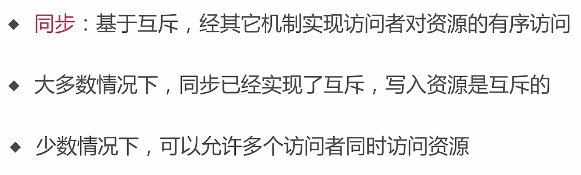
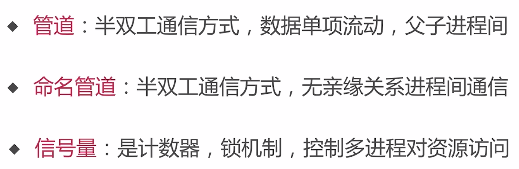
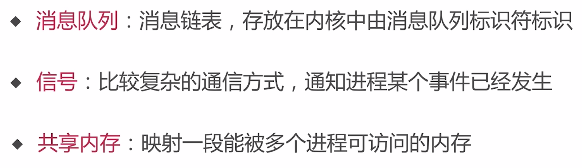
4.进程间通信都包括哪些
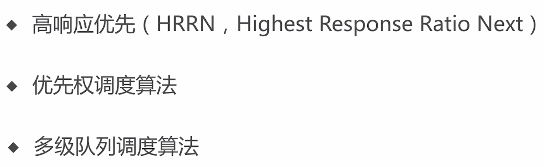
5.进程的调度算法有哪些

6.死锁产生的原因
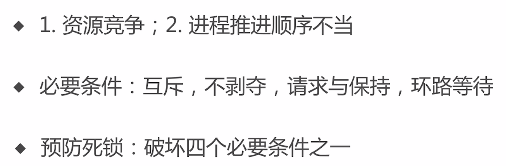
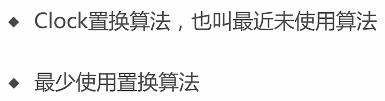
7.页面置换算法都有哪些

8.makefile的作用是什么

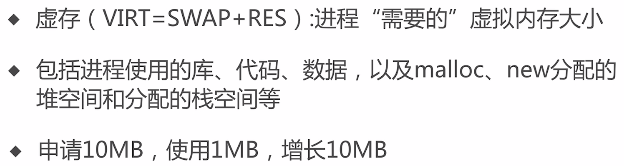
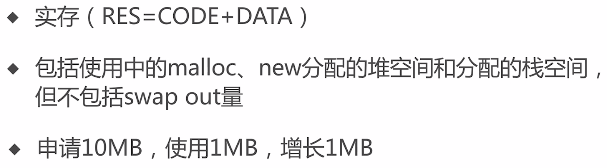
9.什么是虚存,实存,共享内存

MySQL相关
1.创建数据库:CREATE DATABASE 数据库名;
2.删除数据库:DROP DATABASE 数据库名;
3.创建数据表:CREATE TABLE 表名;
4.插入数据:INSERT INTO 表名 VALUES(内容);
5.查询数据:SELECT 字段名 FROM 表名 WHERE 条件;
6.更新数据:UPDATE 表名 SET 字段名=新值 WHERE 条件;
7.删除数据表:DROP TABLE 表名;
Fiddler工具相关

1.如何抓取手机包
具体使用过程,可以参考自己之前的博客:http://www.cnblogs.com/ailiailan/p/hanxiaobei.html
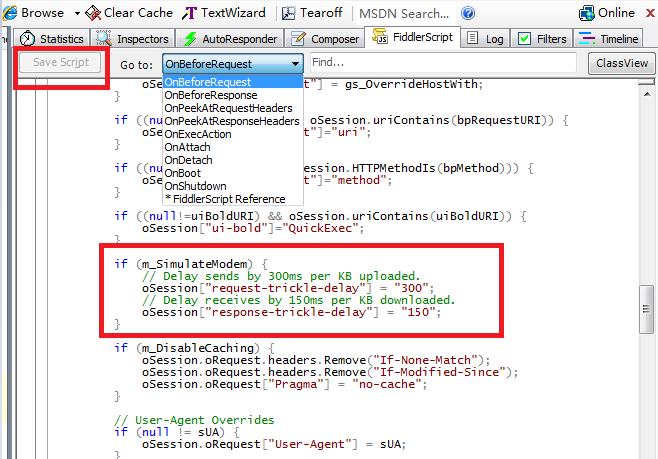
2.实现慢网速,过滤
过滤:
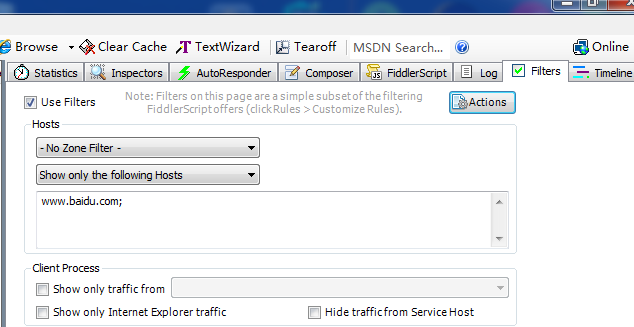
慢网速:

自定义修改延时时间:
Android相关
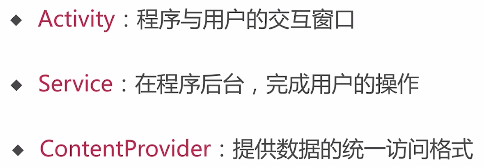
1.Android的四大组件
![]()
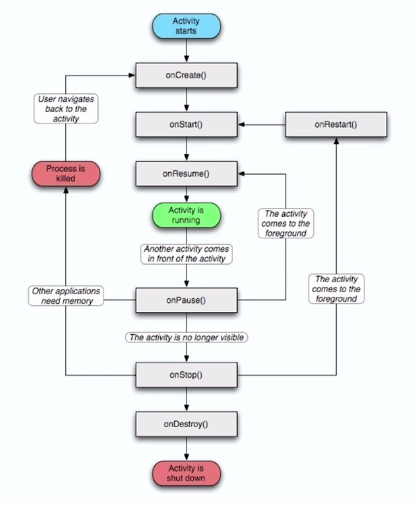
2.Activity的生命周期
Activity的4个状态:运行、暂停、停止、关闭;关闭有系统来完成。
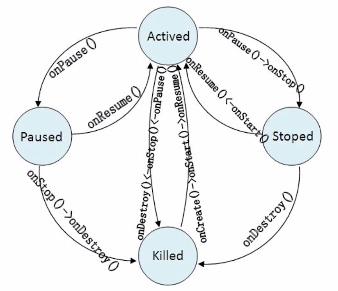
4个状态间的转换过程图:
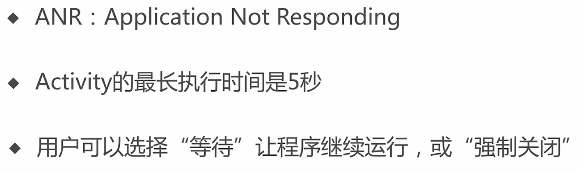
3.什么是ANR
ANR:应用无响应,是由系统来监控应用程序的,如果应用程序超时,系统会弹出ANR提示
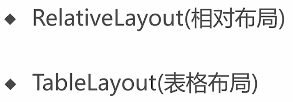
4.Android常见的5种布局
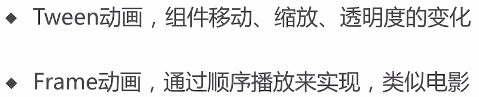
5.Android中动画类型有哪几种
ADB相关
1.重启adb服务

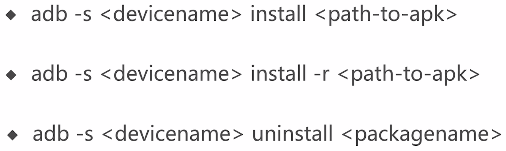
2.app的安装与卸载
3.电脑和手机之间传输数据

4.如何静默安装app

5.adb命令启停一个app
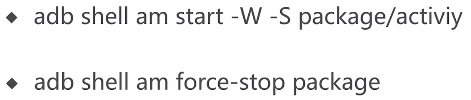
-S:如果app已经启动了,先执行停止app,再启动
6.通过关键字查找已安装的包

-f:所有包 -3:第三方包 -i:已经安装的包
7.截屏、录屏

8.抓log
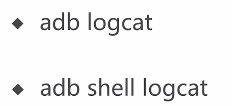
9.获取当前CPU,内存状态
Monkey相关
1.Monkey进行压力测试的命令
![]()
2.如何重现crash,anr
![]()
3.如何提取crash,anr信息
adb shell monkey -v -v -v -p packagename count >文件名.txt (3个-v会显示最详细的log信息)
4.如何设置monkey运行8个小时
--throttle 毫秒数 (定义两个动作之间的时间间隔) 时间间隔 * count = 总执行时间
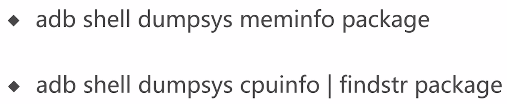
5.在crash/anr出现后,如何继续执行
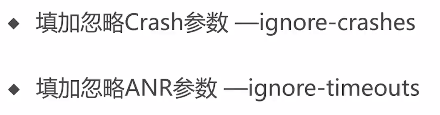
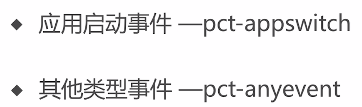
6.monkey执行指定的事件类型

自动化工具
![]()
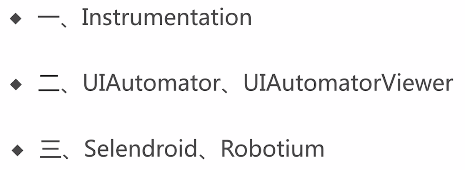
1.Instrumentation的原理是什么

2.Instrumentation用来测试什么
3.什么时候用Instrumentation
4.UIAutomator是什么
5.UIAutomator可以测试什么
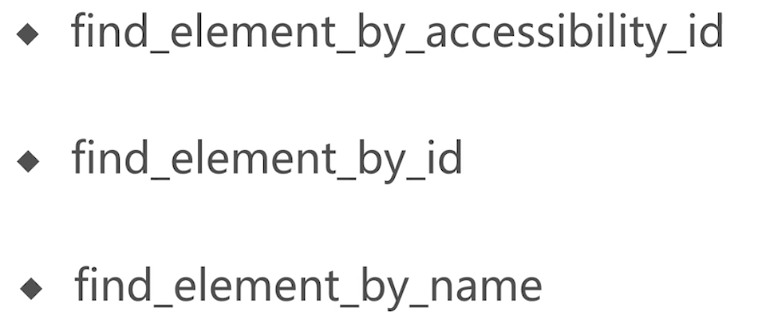
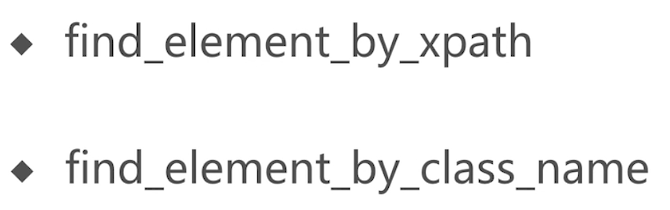
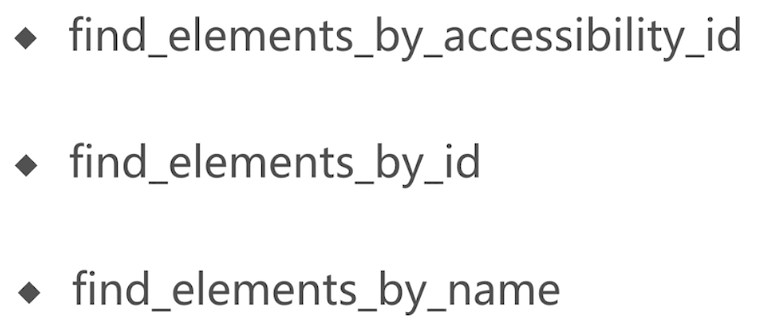
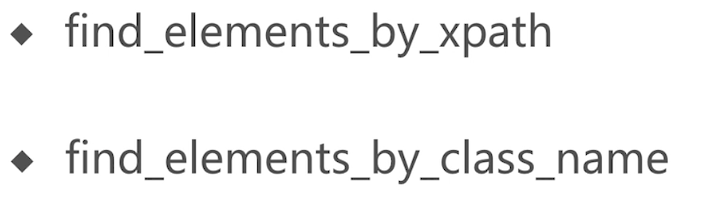
6.如何识别App视图内的元素
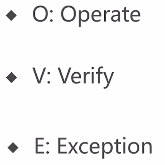
7.Selendroid原理

![]()
8.Robotium原理

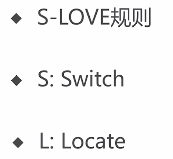
9.Appium的理念是什么
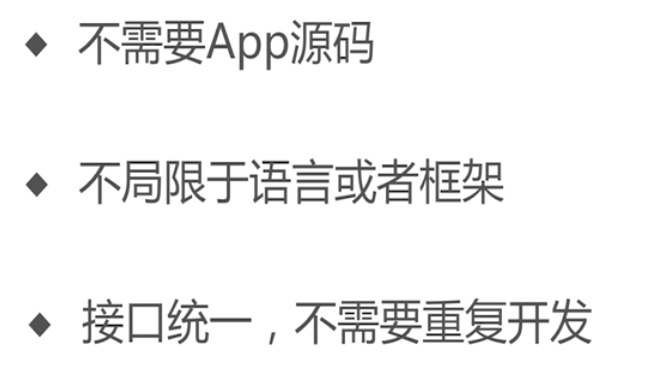
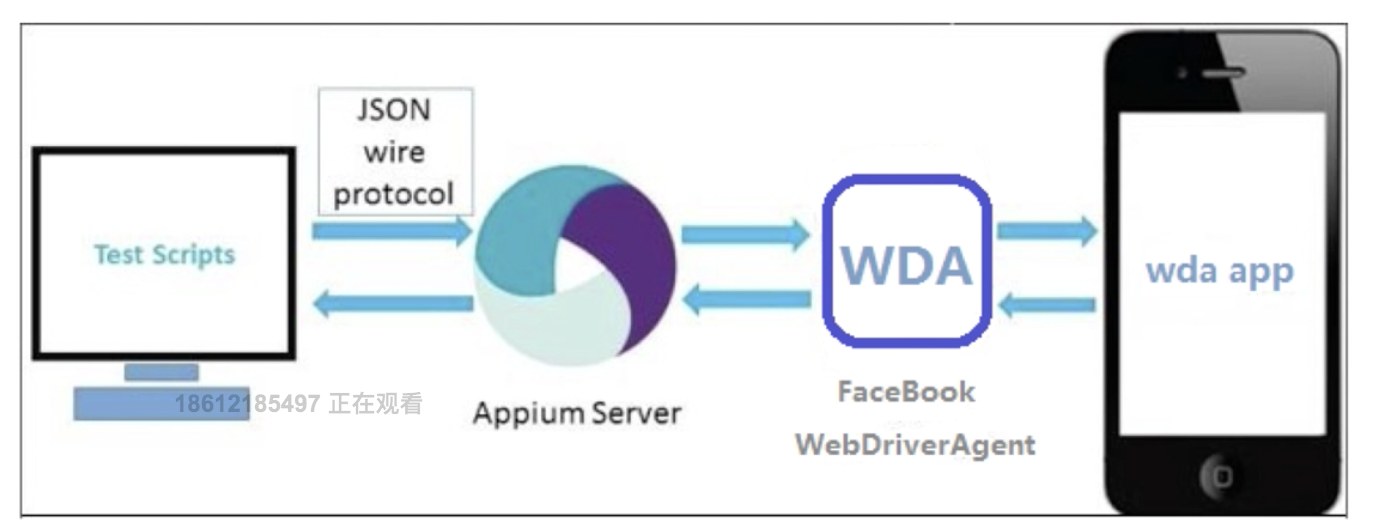
![]()
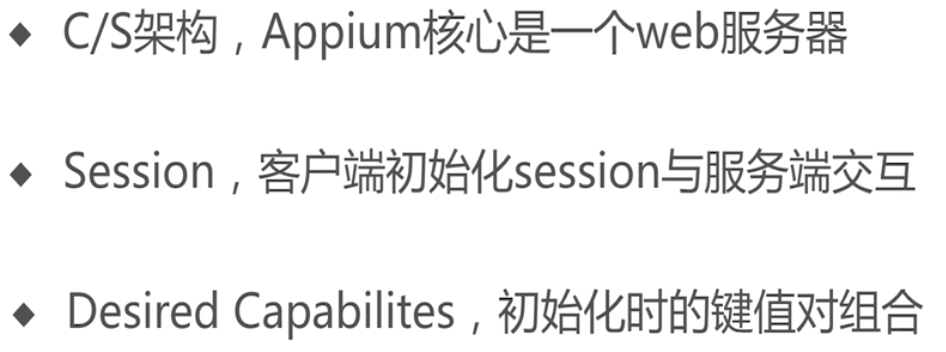
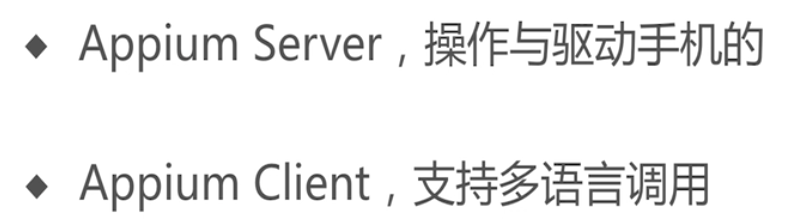
10.Appium相关概念
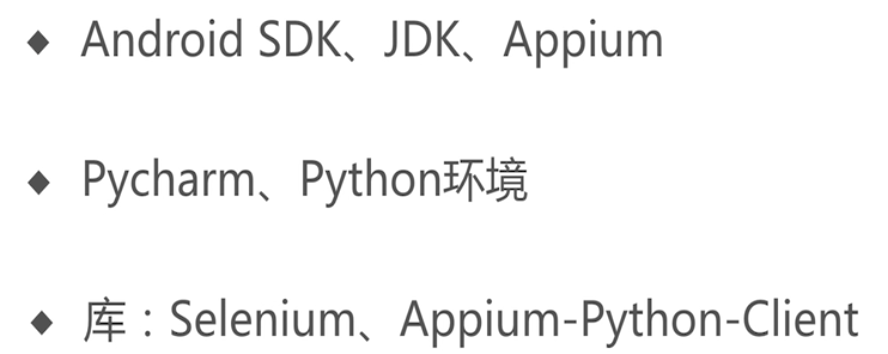
11.Appium的环境
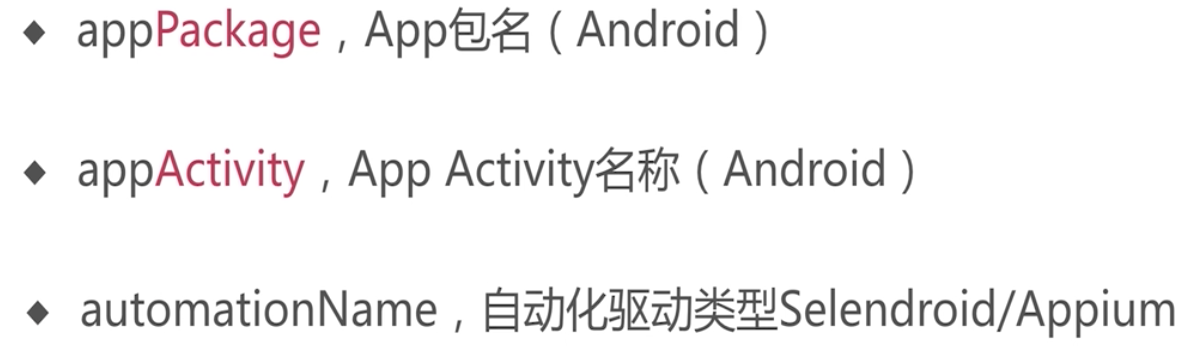
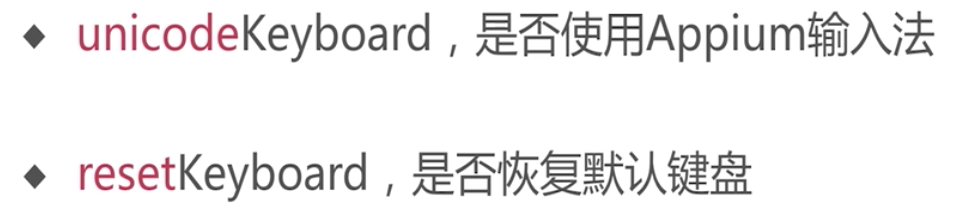
12.Appium初始化需要配置哪些内容

13.Appium测试Native App的原理

14.Appium测试Hybrid App的原理

15.Appium测试Ios App的原理
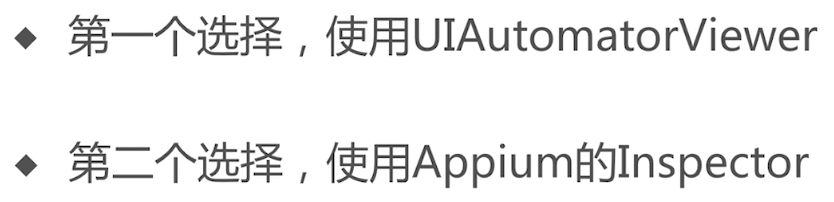
16.Native App元素的定位工具
17.定位元素的Api有哪些
18.Native App脚本的编写原则


19.Native App初始化注意事项

20.Hybrid App的定位方式

21.Hybrid App脚本的编写原则
22.Hybrid App初始化注意事项
自动化框架
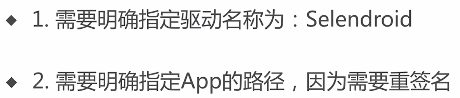
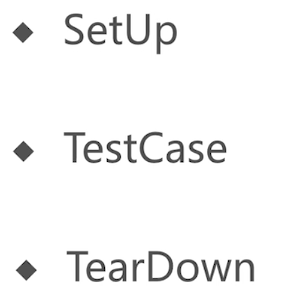
1.unittest框架都包含哪些内容
![]()
TestFixture包含
2.什么是数据驱动
3.数据驱动DDT的原理
4.数据驱动DDT的意义
5.什么是行为驱动

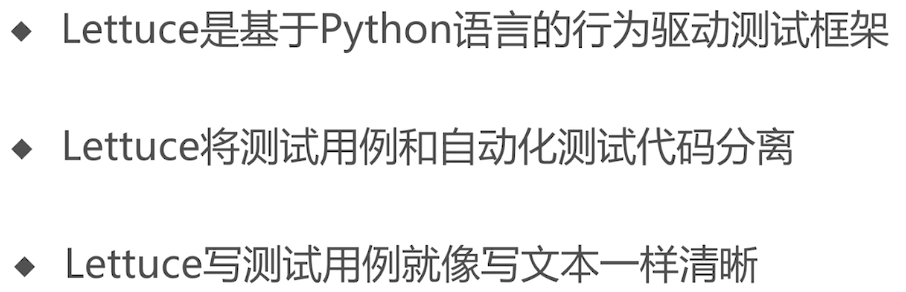
6.行为驱动Lettuce的原理是什么
代码示例:
自动化测试代码:
 1 #encoding:utf-8
 2 from lettuce import *
 3 from appium import webdriver
 4
 5 @before.each_scenario
 6 def lauchApp(scenario):
 7     desired_caps = {}
 8     desired_caps['platformName'] = 'Android'
 9     desired_caps['platformVersion'] = '5.1'
10     desired_caps['deviceName'] = '192.168.56.102:5555'
11     desired_caps['appPackage'] = 'com.android.calculator2'
12     desired_caps['appActivity'] = '.Calculator'
13     desired_caps["unicodeKeyboard"] = "True"
14     desired_caps["resetKeyboard"] = "True"
15     world.driver = webdriver.Remote('http://localhost:4723/wd/hub', desired_caps)
16
17 @after.each_scenario
18 def closeApp(scenario):
19     world.driver.quit()
20
21 @step("I have two number: (\d+) and (\d+)")
22 def have2number(step, number1, number2):
23     world.number1 = number1
24     world.number2 = number2
25
26 @step("Do add method")
27 def doAdd(step):
28     numa = world.driver.find_element_by_id("digit_"+world.number1)
29     numa.click()
30
31     add = world.driver.find_element_by_id("op_add")
32     add.click()
33
34     numb = world.driver.find_element_by_id("digit_"+world.number2)
35     numb.click()
36
37     equal =  world.driver.find_element_by_id("eq")
38     equal.click()
39
40     world.result = world.driver.find_element_by_class_name("android.widget.EditText").text
41
42 @step("I get result: (\d+)")
43 def judgeResult(step, result):
44     assert result == world.result, "The result are not equal %s and %s" %result and world.result
测试用例:
 1 Feature: Calculation
 2     Input two number, then compare result
 3
 4     Scenario: Do a simple add method
 5         Given I have two number: 1 and 5
 6         When Do add method
 7         Then I get result: 6
 8
 9     Scenario: Do a simple add method
10         Given I have two number: 2 and 5
11         When Do add method
12         Then I get result: 8
7.什么是关键字驱动
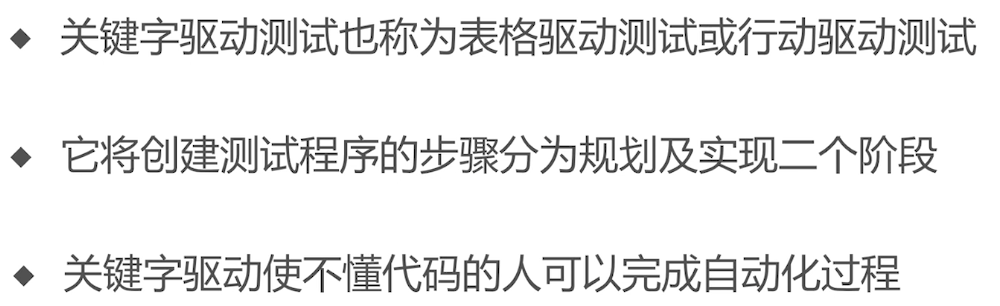
8.关键字驱动测试框架Robot framework的原理
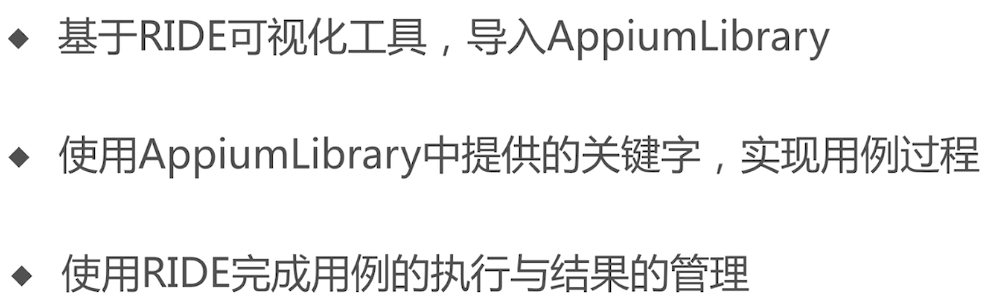
RIDE工具:

9.测试报告管理
代码示例:
 1 #encoding: utf-8
 2 import unittest
 3 import time
 4 from HTMLTestRunner import HTMLTestRunner
 5
 6 class MyTestCase(unittest.TestCase):
 7     #每条用例初始化
 8     def setUp(self):
 9         self.initdata = "hello imooc"
10     #测试用例,以test开头
11     def test_something(self):
12         self.assertEqual("hello imooc", self.initdata)
13     #每条用例执行完后释放资源
14     def tearDown(self):
15         pass
16
17 if __name__ == '__main__':
18     #声明一个suite
19     suite = unittest.TestSuite()
20     #从类加载用例集
21     cases = unittest.TestLoader().loadTestsFromTestCase(MyTestCase)
22     #添加用例到suite
23     suite.addTests(cases)
24
25     #生成HTMLTestReport
26     #以时间戳来定义报告名称
27     now = time.strftime("%Y-%m-%d-%H_%M_%S", time.localtime(time.time()))
28     HtmlFile = "report/" + now + "_Report.html"
29     fp = file(HtmlFile, "wb")
30
31     #声明一个runner
32     myTestRunner = HTMLTestRunner(stream=fp, title=u"测试报告", description=u"用例测试情况")
33
34     #执行Runner
35     myTestRunner.run(suite)
36     fp.close()
10.邮件通知
代码示例:
#!/usr/bin/python
# -*- coding: utf8 -*-
import smtplib
from email.mime.text import MIMEText

mail_host = "smtp.163.com"  # 设置服务器
mail_user = "[email protected]"  # 用户名
mail_pass = "tester123"  # 口令
mail_postfix = "163.com"  # 发件箱的后缀

# to_list:收件人;sub:主题;content:邮件内容
def send_mail(to_list, sub, reportpath):
    file = open(reportpath, "rb")
    content = ""
    for line in file.readlines():
        content = content + line.replace("class='hiddenRow'", "")

    # 这里的hello可以任意设置,收到信后,将按照设置显示
    me = "TestCenter" + "<" + mail_user + ">"
    # 创建一个实例,这里设置为html格式邮件
    msg = MIMEText(content, _subtype='html', _charset='utf-8')
    # 设置主题
    msg['Subject'] = sub
    msg['From'] = me
    msg['To'] = ";".join(to_list)
    try:
        s = smtplib.SMTP()
        # 连接smtp服务器
        s.connect(mail_host)
        # 登陆服务器
        s.login(mail_user, mail_pass)
        # 发送邮件
        s.sendmail(me, to_list, msg.as_string())
        s.close()
        return True
    except Exception, e:
        return False
接口测试相关
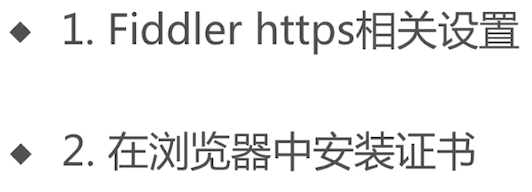
1.Fiddler抓取https包

2.如何实现一个Api测试框架
3.如何使用Python requests实现get请求

代码示例:
 1 #encoding: utf-8
 2
 3 import requests
 4 import unittest
 5 import ddt
 6
 7 @ddt.ddt
 8 class testClass(unittest.TestCase):
 9
10     @ddt.data("App专项测试", "自动化", "Python")
11     def testGet(self, queryword):
12         #header部分的配置
13         headers_data = {
14             'User-Agent':'Mozilla/5.0 (Linux; Android 5.1.1; Nexus 6 Build/LYZ28E) AppleWebKit/537.36 (KHTML, like Gecko) Chrome/63.0.3239.132 Mobile Safari/537.36',
15             'Host':'m.imooc.com',
16             'Referer': 'https://m.imooc.com/',
17             'Connection':'keep-alive',
18             'Accept-Encoding':'gzip, deflate, br'
19         }
20
21         #cookies部分的配置
22         cookies_data = dict(imooc_uuid='ffbd103a-b800-4170-a267-4ea3b301ff06',
23                             imooc_isnew_ct='1511175583',
24                             imooc_isnew='2',
25                             page = 'https://m.imooc.com/')
26
27         #get请求的构造
28         res = requests.get(
29             "https://m.imooc.com/search/?words="+queryword,
30             headers=headers_data,
31             cookies=cookies_data)
32
33         #print res.status_code
34         #print res.text
35
36         self.assertTrue(u"共找到" in res.text)
37
38 if __name__ == "__main__":
39     unittest.main()
4.如何使用Python requests实现post请求
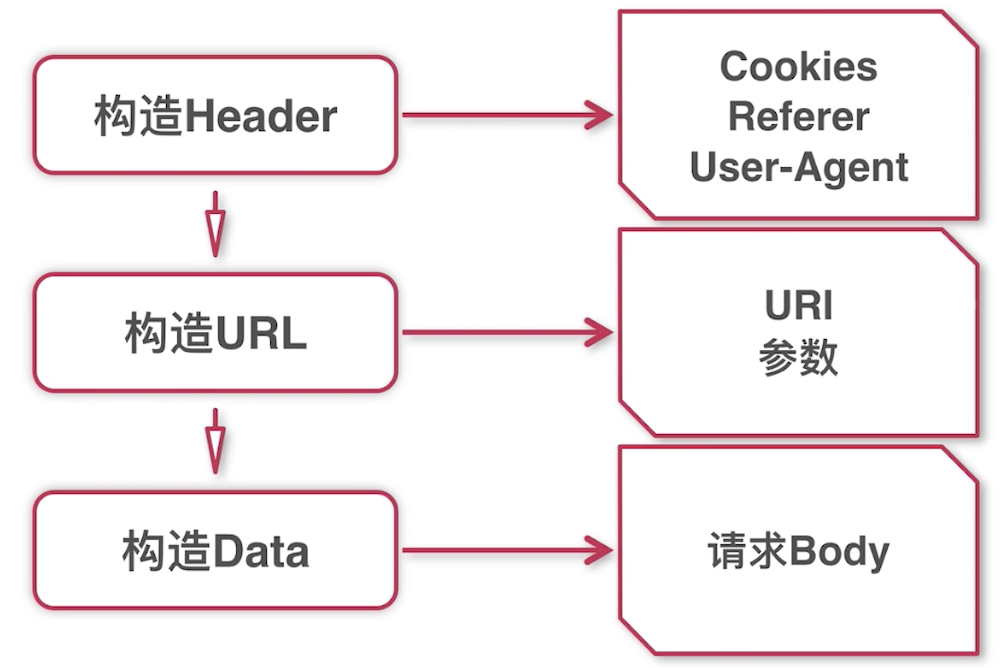
代码示例:
 1 #encoding: utf-8
 2 import requests
 3 import unittest
 4 import ddt
 5
 6 @ddt.ddt
 7 class testClass(unittest.TestCase):
 8
 9     @ddt.data(
10         ("15977778888", "999999"),
11         ("15977778889", "999998")
12     )
13     @ddt.unpack
14     def testPost(self, username_data, password_data):
15         formdata = {
16             "username": username_data,
17             "password": password_data,
18             "verify": '',
19             "referer":'https://m.imooc.com'}
20
21         headers_data = {
22             'User-Agent': 'Mozilla/5.0 (Linux; Android 5.1.1; Nexus 6 Build/LYZ28E) AppleWebKit/537.36 (KHTML, like Gecko) Chrome/63.0.3239.132 Mobile Safari/537.36',
23             'Host': 'm.imooc.com'
24         }
25
26         #cookies部分的配置
27         cookies_data = dict(imooc_uuid='ffbd103a-b800-4170-a267-4ea3b301ff06',
28                             imooc_isnew_ct='1511175583',
29                             imooc_isnew='2',
30                             page = 'https://m.imooc.com/')
31
32         res = requests.post("https://m.imooc.com/passport/user/login",
33             data = formdata,
34             headers = headers_data,
35             cookies = cookies_data
36         )
37
38         print res.json()
39
40         self.assertTrue(90003 == res.json()['status'] or 10005 == res.json()['status'])
41
42 if __name__ == "__main__":
43     unittest.main()
5.什么是持续集成
6.持续集成都包括哪些内容
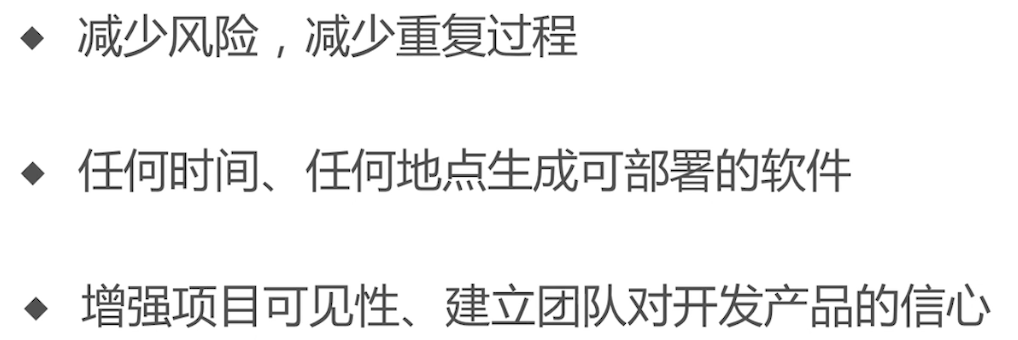
7.持续集成有什么意义
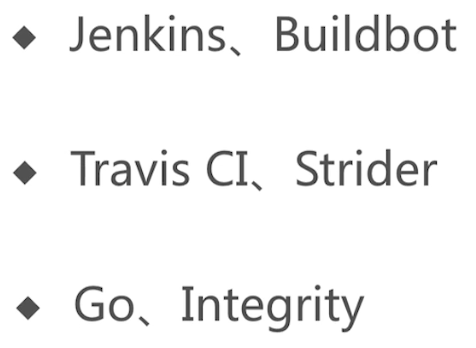
8.实现持续集成的工具有哪些
9.如何搭建Jenkins持续集成平台

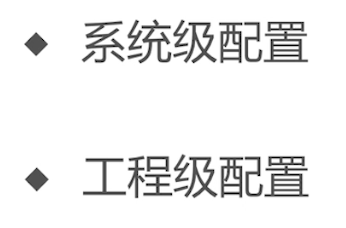
10.使用Jenkins需要做哪些配置
11.持续集成的应用

服务端测试
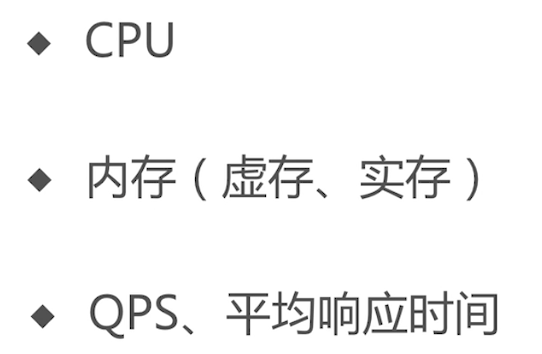
1.服务端压力测试需要关注哪些指标
兼容性测试
1.App兼容性测试都考虑哪些因素
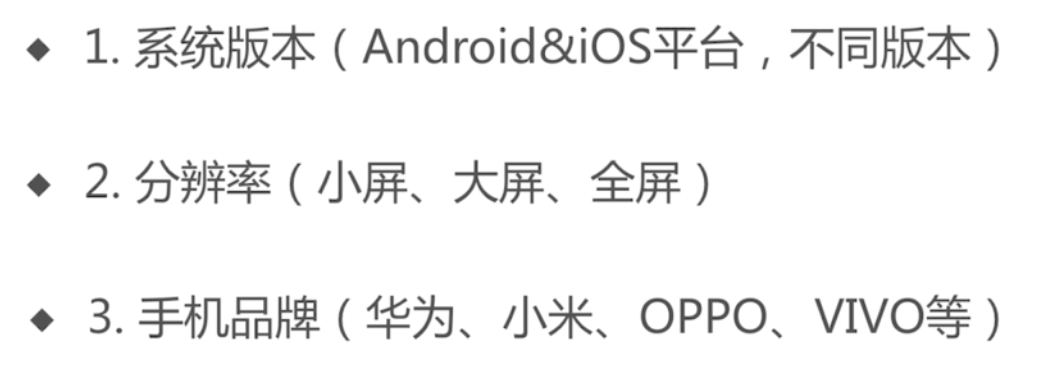
可以借助云测平台,提高兼容性测试的覆盖度
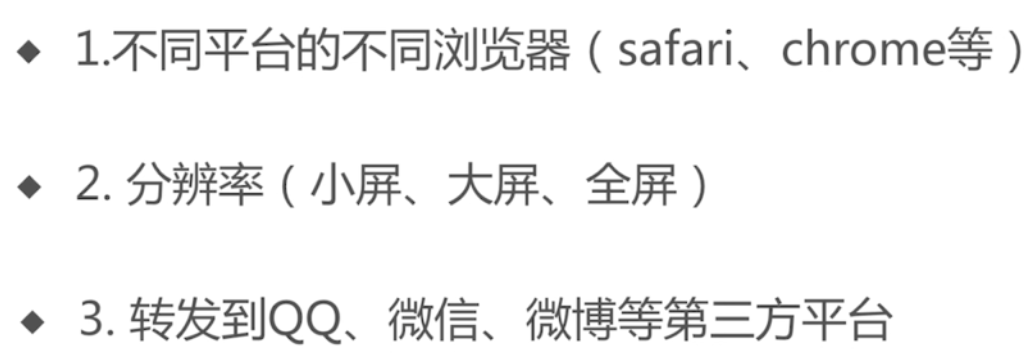
2.WAP网页兼容性测试都考虑哪些因素
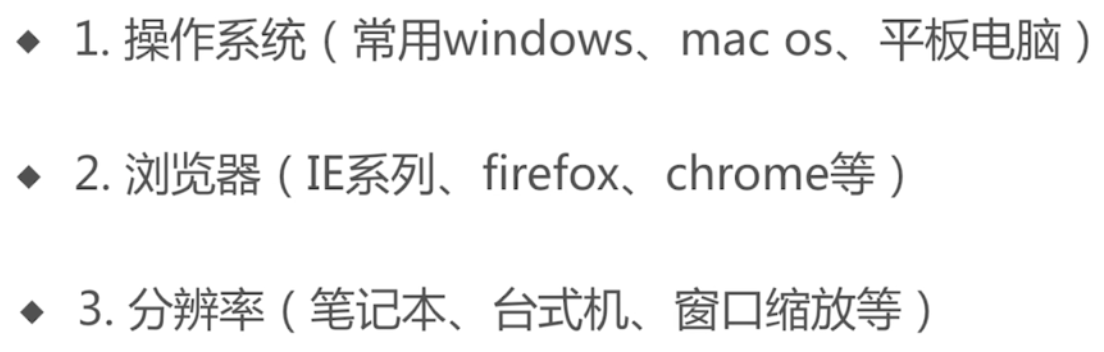
3.PC网页兼容性测试都考虑哪些因素
Bug 调试与定位
1.APP相关的bug调试工具有哪些
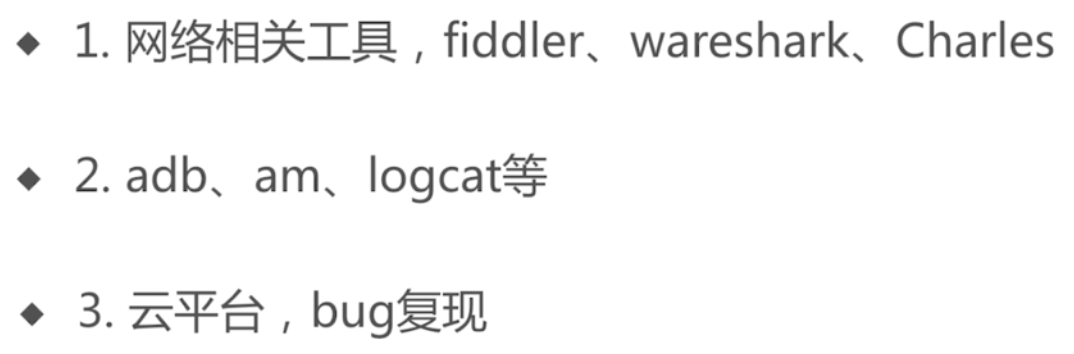
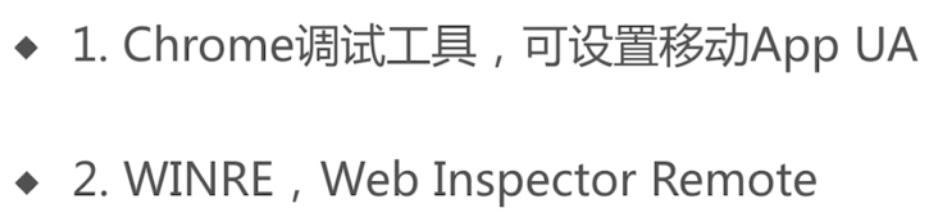
2.WAP网页相关的bug调试工具有哪些
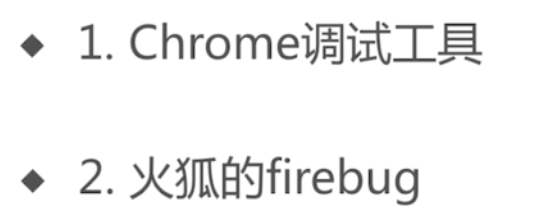
3.PC网页相关的bug调试工具有哪些