陈拓 2021/05/13-2021/05/19
1. 概述
我们在《ESP8266与MQTT服务器收发送数据》
https://zhuanlan.zhihu.com/p/367921342
https://blog.csdn.net/chentuo2000/article/details/116157767
一文中的例子已经可以将消息发布到MQTT服务器上了。
在《ESP8266_RTOS_SDK v3.x 读DS18B20温度数据》
https://zhuanlan.zhihu.com/p/370007889
https://blog.csdn.net/chentuo2000/article/details/116448392
一文中我们用ESP8266读出了DS18B20的温度数据。
在《将MQTT收到的数据保存到MySQL数据库(异步)》
https://zhuanlan.zhihu.com/p/366248012
https://blog.csdn.net/chentuo2000/article/details/115898929
本文我们将这几篇文章的内容结合起来,将温度数据发送到MQTT服务器,并存储到数据库中。
.2 硬件连接
- 开发板
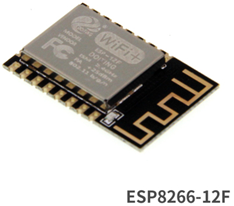
我用的是网上买的下面这种开发板,加上ESP8366-12F模块。

- 接线
有关DS18B20的使用参考《树莓派+温度传感器DS18B20》
https://blog.csdn.net/chentuo2000/article/details/81051701
3. 创建项目
我们在《ESP8266_RTOS_SDK v3.x 读DS18B20温度数据》一文的项目基础上增加MQTT数据发布功能。
- 下载ds18b20_test.tar.gz
网址:
https://download.csdn.net/download/chentuo2000/18626858
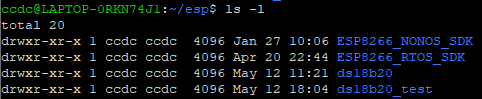
- 将压缩文件ds18b20_test.tar.gz放在这里
![]()
![]()
- 修改权限
chmod 644 ds18b20_test.tar.gz
![]()
- 解压
tar -zxvf ds18b20_test.tar.gz
![]()
- 修改目录名称
mv ds18b20_test temperature

- 目录结构

4. 编写代码
4.1 主程序
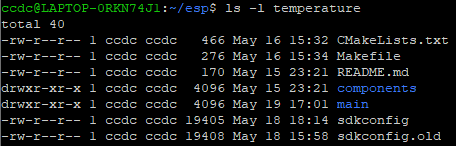
- 进入项目目录
cd temperature
![]()
- 主程序
![]()
/* user_main.c */
#include <stdio.h>
#include <stddef.h>
#include <string.h>

#include "freertos/FreeRTOS.h"
#include "freertos/task.h"
#include "freertos/semphr.h"
#include "freertos/queue.h"
#include "freertos/event_groups.h"

#include "esp_spi_flash.h"
#include "esp_wifi.h"
#include "esp_system.h"
#include "nvs_flash.h"
#include "esp_event.h"
#include "esp_event_loop.h"
#include "esp_netif.h"
#include "driver/gpio.h"
#include "esp_log.h"

#include "lwip/sockets.h"
#include "lwip/dns.h"
#include "lwip/netdb.h"

#include "ds18b20.h"
#include "mqtt_client.h"
//#include "protocol_examples_common.h"

static const char *TAG = "MQTT_temperature";
#define DQ GPIO_NUM_13 // GPIO13,传感器DS18B20数据线
static EventGroupHandle_t wifi_event_group; //wifi连上事件
static EventGroupHandle_t mqtt_event_group; //mqtt连上事件
const static int CONNECTED_BIT = BIT0;
esp_mqtt_client_handle_t client; // esp_mqtt_client句柄

// MQTT事件回调函数
static esp_err_t mqtt_event_handler(esp_mqtt_event_handle_t event)
{
    esp_mqtt_client_handle_t client = event->client;
    int msg_id;
    // your_context_t *context = event->context;
    switch (event->event_id) {
        case MQTT_EVENT_CONNECTED: // 连接
            ESP_LOGI(TAG, "MQTT_EVENT_CONNECTED");
            xEventGroupSetBits(mqtt_event_group, CONNECTED_BIT);
            msg_id = esp_mqtt_client_publish(client, "/ihome/msg1", "Connect successful!", 0, 1, 0); // 向服务发布一个主题为/topic/qos1的消息
            ESP_LOGI(TAG, "Sent publish connect successful!, msg_id=%d", msg_id);
            break;
        case MQTT_EVENT_DISCONNECTED: // 断开连接
            ESP_LOGI(TAG, "MQTT_EVENT_DISCONNECTED");
            xEventGroupClearBits(mqtt_event_group, CONNECTED_BIT);
            break;
        case MQTT_EVENT_SUBSCRIBED: // 订阅
            ESP_LOGI(TAG, "MQTT_EVENT_SUBSCRIBED, msg_id=%d", event->msg_id);
            msg_id = esp_mqtt_client_publish(client, "/topic/qos0", "Subscribe successful!", 0, 0, 0);
            ESP_LOGI(TAG, "sent publish successful, msg_id=%d", msg_id);
            break;
        case MQTT_EVENT_UNSUBSCRIBED: // 取消订阅
            ESP_LOGI(TAG, "MQTT_EVENT_UNSUBSCRIBED, msg_id=%d", event->msg_id);
            break;
        case MQTT_EVENT_PUBLISHED: // 发布
            ESP_LOGI(TAG, "MQTT_EVENT_PUBLISHED, msg_id=%d", event->msg_id);
            break;
        case MQTT_EVENT_DATA: // 来自服务器的数据
            ESP_LOGI(TAG, "MQTT_EVENT_DATA");
            printf("TOPIC=%.*s\r\n", event->topic_len, event->topic);
            printf("DATA=%.*s\r\n", event->data_len, event->data);
            break;
        case MQTT_EVENT_ERROR: // 错误
            ESP_LOGI(TAG, "MQTT_EVENT_ERROR");
            xEventGroupClearBits(mqtt_event_group, CONNECTED_BIT);
            break;
        default: // 默认
            ESP_LOGI(TAG, "Other event id:%d", event->event_id);
            break;
    }
    return ESP_OK;
}

//wifi状态机
static esp_err_t wifi_event_handler(void *ctx, system_event_t *event)
{
    switch (event->event_id) {
        case SYSTEM_EVENT_STA_START:
            esp_wifi_connect();
            break;
        case SYSTEM_EVENT_STA_GOT_IP:
            xEventGroupSetBits(wifi_event_group, CONNECTED_BIT);

            break;
        case SYSTEM_EVENT_STA_DISCONNECTED:
            esp_wifi_connect();
            xEventGroupClearBits(wifi_event_group, CONNECTED_BIT);
            break;
        default:
            break;
    }
    return ESP_OK;
}

// wifi初始化
static void wifi_init(void)
{
    tcpip_adapter_init();
    wifi_event_group = xEventGroupCreate();
    mqtt_event_group = xEventGroupCreate();
    ESP_ERROR_CHECK(esp_event_loop_init(wifi_event_handler, NULL));
    wifi_init_config_t cfg = WIFI_INIT_CONFIG_DEFAULT();
    ESP_ERROR_CHECK(esp_wifi_init(&cfg));
    ESP_ERROR_CHECK(esp_wifi_set_storage(WIFI_STORAGE_RAM));
    wifi_config_t wifi_config = {
        .sta = {
            .ssid = "TP-LINK_A929",
            .password = "ABCDE12345",
        },
    };
    ESP_ERROR_CHECK(esp_wifi_set_mode(WIFI_MODE_STA));
    ESP_ERROR_CHECK(esp_wifi_set_config(ESP_IF_WIFI_STA, &wifi_config));
    ESP_LOGI(TAG, "start the WIFI SSID:[%s]", wifi_config.sta.ssid);
    ESP_ERROR_CHECK(esp_wifi_start());
    ESP_LOGI(TAG, "Waiting for wifi");
    //等待wifi连上
    xEventGroupWaitBits(wifi_event_group, CONNECTED_BIT, false, true, portMAX_DELAY);
}

// mqtt初始化
static void mqtt_app_start(void)
{
    esp_mqtt_client_config_t mqtt_cfg = {
        //.uri = CONFIG_BROKER_URL, // 在make menuconfig中配置的MQTT代理服务器URL
        .uri = "mqtt://192.168.0.8", // 也可以在这里直接写,会覆盖在make menuconfig中的配置
        //.host = "192.168.0.8", // uri或者host选用一个即可
        .event_handle = mqtt_event_handler, //MQTT事件
        .port = 1883,
        .username = "ct",
        .password = "1qaz2wsx",
    }; // MQTT配置

    client = esp_mqtt_client_init(&mqtt_cfg); // 根据MQTT配置创建的客户端句柄
    //esp_mqtt_client_register_event(client, ESP_EVENT_ANY_ID, mqtt_event_handler, client); // 注册MQTT事件处理回调函数。.event_handle = mqtt_event_handler代替这一
    esp_mqtt_client_start(client); // 使用已创建的客户端句柄启动mqtt客户端。
    xEventGroupWaitBits(mqtt_event_group, CONNECTED_BIT, false, true, portMAX_DELAY); // 等待mqtt连上
}

/* 温度检测任务函数 */
uint8_t temp_s[8] = {' ','9','9','9','9','9','9','\0'};
void temp_task(void *arg)
{
    uint8_t msb, lsb;
    uint8_t temp0,temp1;    // temp0温度的小数位,temp1温度的整数位
    uint8_t sign;           // sign判断温度符号
    int temp, temp_d;

    while (1) {
        vTaskSuspendAll(); // 开启调度锁,禁止任务调度
        temp = ds18b20_read_temp(DQ);
        xTaskResumeAll(); // 关闭调度锁
        printf("ds18b20 temp_raw: %d \n", temp);
        lsb = (uint8_t)temp;
        msb = (uint8_t)(temp >> 8);

        // 转换18B20格式到十进制数
        temp0 = lsb & 0x0f;                             // 取4位小数部分存放到temp0
        temp1 = ((msb & 0x07)<<4)|((lsb>>4) & 0x0f);    // 取7位整数部分存放到存放temp1
        sign=(msb>>4==0X0F);
        if(sign) {  // MS Byte 的前面5位是符号位,同时为 0 或 1,这里只看高4位。如果值为负
            temp0 = 16 - temp0;     // 求补码(4位 1111=15)
            temp1 = 128 - temp1;    // 求补码(7位 1111111=127)
        }
        temp_d = temp1 * 16 + temp0;    // 十六进制转换为10进制
        temp_d = temp_d * 100 / 16; //12位精度,最小分辨率为0.0625=1/16,乘100保留2位小数
        // 转换温度的每个位到ASCII
        temp_s[1] = temp_d/10000+'0';         // 百位
        temp_s[2] = (temp_d%10000)/1000+'0';  // 十位
        temp_s[3] = (temp_d%1000)/100+'0';    // 个位
        temp_s[4] = 0x2e;                     // 小数点
        temp_s[5] = (temp_d%100)/10+'0';      // 小数点后第一位
        temp_s[6] = temp_d%10+'0';            // 小数点后第二位
        // 删除前导0
        uint8_t i = 0, j = 0;
        for (i=0; i<2 ;i++ ) {
            if (temp_s[1] == '0') {
                for (j = 0; j < 6; j++) {temp_s[j+1] = temp_s[j+2];}
            }
        }
        // 添加符号
        if(sign) {
            temp_s[0] = '-';
        } else {
            temp_s[0] = '+';
        }
        printf("ds18b20 temp value -> %s\n", temp_s);

        vTaskDelay(295000 / portTICK_PERIOD_MS); // 调用任务睡眠函数延时
    }
}

/* mqtt任务函数 */
void mqtt_task(void *arg)
{
    while (1) {
        const char* payload = (const char *)temp_s; // uint8_t[]数组转换 const char*
        esp_mqtt_client_publish(client, "/ihome/temperature", payload, 0, 0, 0);
        printf("temperature = %s\r\n", payload);
        vTaskDelay(300000 / portTICK_PERIOD_MS); // 5分钟发布一次数据
    }
}

void app_main()
{
    /* 定义gpio配置结构体 */
    gpio_config_t io_conf;

    /* 初始化gpio配置结构体 */
    io_conf.pin_bit_mask = (1ULL << DQ); // 选择gpio
    io_conf.intr_type = GPIO_INTR_DISABLE; // 禁用中断
    io_conf.mode = GPIO_MODE_OUTPUT; // 设置为输出模式
    io_conf.pull_down_en = 0; // 不用下拉模式
    io_conf.pull_up_en = 0; // 不用上拉模式

    /* 用给定的设置配置GPIO */
    gpio_config(&io_conf);

    // 启动读温度任务
    xTaskCreate(temp_task, "temp task", 2048, NULL, 9, NULL);

    ESP_LOGI(TAG, "[APP] Startup..");
    ESP_LOGI(TAG, "[APP] Free memory: %d bytes", esp_get_free_heap_size());
    ESP_LOGI(TAG, "[APP] IDF version: %s", esp_get_idf_version());

    ESP_ERROR_CHECK(nvs_flash_init()); // 初始化Flash
    ESP_ERROR_CHECK(esp_netif_init()); // 初始化底层TCP/IP堆栈
    ESP_ERROR_CHECK(esp_event_loop_create_default()); // 创建默认事件循环
//    ESP_ERROR_CHECK(example_connect()); // 在esp-idf中已经封装好的连接WIFI的API,在protocol_examples_common.h中声明
    /* 上面的wifi连接参数在make menuconfig中设置,为方便修改wifi连接参数,下面的方法覆盖了make menuconfig中的设置 */
    wifi_init(); // wifi初始化
    mqtt_app_start(); // mqtt初始化
    xTaskCreate(mqtt_task, "mqtt task", 2048, NULL, 10, NULL); // 启动MQTT任务
}
4.2 DS18B20操作程序
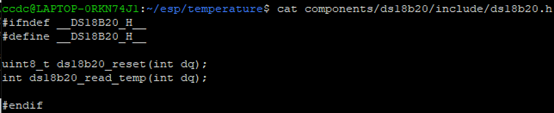
- 头文件ds18b20.h
- 库文件libds18b20.a
![]()
说明:不提供源代码。
4.3 CMakeList.txt、Makefile、component.mk、sdkconfig和Kconfig文件
4.3.1 顶层
- 项目顶层CMakeList.txt
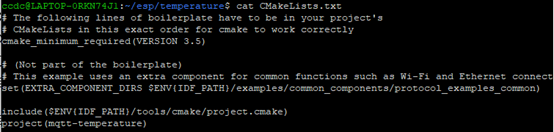
- 项目顶层Makefile
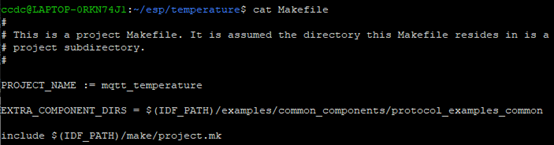
其中PROJECT_NAME: 项目名称,最终输出的二进制文件也使用该名称。
- 项目配置文件 sdkconfig
执行 make menuconfig 后会创建或更新此文件
4.3.2 main目录
- main 目录
main 目录是一个特殊的伪组件,它包含项目本身的源代码。main 是默认名称,Makefile 变量 COMPONENT_DIRS 默认会导入此组件,但您也可以修改此变量(或者设置 EXTRA_COMPONENT_DIRS )以查找其他位置的组件。
- main目录下component.mk(组件Makefile文件)

此Makefile文件可以保留为空。默认情况下,它将从src/目录获取源,编译它们并将它们链接到build目录的lib(subdirectory_name).a中。这种行为是完全可配置的,如果需要,请阅读ESP-IDF文档。
如果文件为空,则组件的默认构建行为会被设置为:
(1) makefile 所在目录中的所有源文件(*.c,*.cpp,*.cc,*.S)将会被编译进组件库中。
(2) 子目录 include 将被添加到其他组件的全局头文件搜索路径中。
(3) 组件库将会被链接到项目的应用程序中。
空的 component.mk 文件同没有 component.mk 文件之间存在本质差异,前者会调用默认的组件构建行为,后者不会发生默认的组件构建行为。
4.3.3 components目录下的组件目录ds18b20
- components/ds18b20目录下component.mk

- components/ds18b20目录下Kconfig

每个组件都可以包含一个 Kconfig 文件,和 component.mk 放在同一个目录下。Kconfig 中包含此组件在 make menuconfig 时要展示的配置规则的设置。
运行 menuconfig 时,可以在 Component Settings 菜单栏下找到这些设置。
创建一个组件的 Kconfig 文件,最简单的方法就是使用 ESP-IDF 中现有的 Kconfig 文件作为模板,在这基础上进行修改。
5. 配置
- 查看USB-串口

Windows中的串口COM3对应Linux中的设备/dev/ttyS3。
- 在树莓派上安装MQTT服务
见《MQTT服务器Mosquitto 2.x编译安装配置》
https://zhuanlan.zhihu.com/p/365103802
https://blog.csdn.net/chentuo2000/article/details/115731687
- 设置树莓派设置固定IP地址
见《树莓派WiFi设置固定IP地址》
https://zhuanlan.zhihu.com/p/367982385
https://blog.csdn.net/chentuo2000/article/details/116158902
查看MQTT服务器的IP地址:

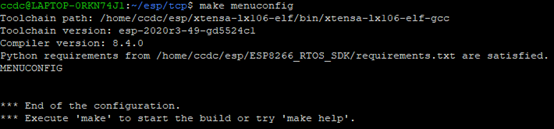
- 项目配置
make menuconfig
![]()
设置串口和Flash存储器

保存Save,退出Exit。
6. 编译烧写
- 编译
make
![]()

第一次编译需要较长的时间。
- 烧写
make flash
![]()

7. 运行测试
7.1 订阅消息
- 打开终端窗口连接树莓派

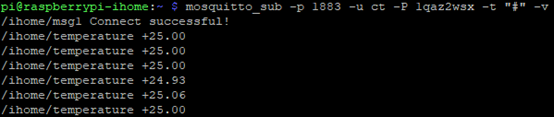
- 在树莓派上启动MQTT订阅程序
mosquitto_sub -p 1883 -u ct -P 1qaz2wsx -t "#" -v
![]()
使用通配符#可以接收任何主题消息。
有关MQTT服务器安装见《MQTT服务器Mosquitto 2.x编译安装配置》
https://zhuanlan.zhihu.com/p/365103802
https://blog.csdn.net/chentuo2000/article/details/115731687
7.2 发布消息
- 按ESP8266开发板的RST键,程序运行
- 从串口查看程序运行状态

Win10的串口调试助手的使用参考《Win10使用CH340 USB-SERIAL串口》
https://zhuanlan.zhihu.com/p/343013801
https://blog.csdn.net/chentuo2000/article/details/112323488
- 服务器MQTT订阅程序收到数据ESP8266发布的消息
参考文档
- ESP32学习笔记之MQTT
https://blog.csdn.net/zym326975/article/details/98999947