文章目录
python的函数
python的函数定义
def hi(name="yasoob"):
    return "hi " + name

print(hi())
# output: 'hi yasoob'

# 我们甚至可以将一个函数赋值给一个变量,比如
greet = hi
# 我们这里没有在使用小括号,因为我们并不是在调用hi函数
# 而是在将它放在greet变量里头。我们尝试运行下这个

print(greet())
# output: 'hi yasoob'

# 如果我们删掉旧的hi函数,看看会发生什么!
del hi
print(hi())
#outputs: NameError

print(greet())
#outputs: 'hi yasoob'
python的在函数中定义函数
刚才那些就是函数的基本知识了。我们来让你的知识更进一步。在 Python 中我们可以在一个函数中定义另一个函数:
def hi(name="yasoob"):
    print("now you are inside the hi() function")

    def greet():
        return "now you are in the greet() function"

    def welcome():
        return "now you are in the welcome() function"

    print(greet())
    print(welcome())
    print("now you are back in the hi() function")

hi()
#output:now you are inside the hi() function
#       now you are in the greet() function
#       now you are in the welcome() function
#       now you are back in the hi() function

# 上面展示了无论何时你调用hi(), greet()和welcome()将会同时被调用。
# 然后greet()和welcome()函数在hi()函数之外是不能访问的,比如:

greet()
#outputs: NameError: name 'greet' is not defined
那现在我们知道了可以在函数中定义另外的函数。也就是说:我们可以创建嵌套的函数。现在你需要再多学一点,就是函数也能返回函数。
python的从函数中返回函数
其实并不需要在一个函数里去执行另一个函数,我们也可以将其作为输出返回出来:
def hi(name="yasoob"):
    def greet():
        return "now you are in the greet() function"

    def welcome():
        return "now you are in the welcome() function"

    if name == "yasoob":
        return greet
    else:
        return welcome

a = hi()
print(a)
#outputs: <function greet at 0x7f2143c01500>

#上面清晰地展示了`a`现在指向到hi()函数中的greet()函数
#现在试试这个

print(a())
#outputs: now you are in the greet() function
再次看看这个代码。在 if/else 语句中我们返回 greet 和 welcome,而不是 greet() 和 welcome()。为什么那样?这是因为当你把一对小括号放在后面,这个函数就会执行;然而如果你不放括号在它后面,那它可以被到处传递,并且可以赋值给别的变量而不去执行它。 你明白了吗?让我再稍微多解释点细节。
当我们写下 a = hi(),hi() 会被执行,而由于 name 参数默认是 yasoob,所以函数 greet 被返回了。如果我们把语句改为 a = hi(name = “ali”),那么 welcome 函数将被返回。我们还可以打印出 hi()(),这会输出 now you are in the greet() function。
python的将函数作为参数传给另一个函数
def hi():
    return "hi yasoob!"

def doSomethingBeforeHi(func):
    print("I am doing some boring work before executing hi()")
    print(func())

doSomethingBeforeHi(hi)
#outputs:I am doing some boring work before executing hi()
#        hi yasoob!
python的函数装饰器(函数的函数)
def a_new_decorator(a_func):
    def wrapTheFunction():
        print("I am doing some boring work before executing a_func()")

        a_func()

        print("I am doing some boring work after executing a_func()")

    return wrapTheFunction


def a_function_requiring_decoration():
    print("I am the function which needs some decoration to remove my foul smell")


a_function_requiring_decoration()
# outputs: "I am the function which needs some decoration to remove my foul smell"

a_function_requiring_decoration = a_new_decorator(a_function_requiring_decoration)
# now a_function_requiring_decoration is wrapped by wrapTheFunction()

a_function_requiring_decoration()
# outputs:I am doing some boring work before executing a_func()
#        I am the function which needs some decoration to remove my foul smell
#        I am doing some boring work after executing a_func()
python的 @语法糖
如果你接触 Python 有一段时间了的话,想必你对 @ 符号一定不陌生了,没错 @ 符号就是装饰器的语法糖,它放在函数开始定义的地方,这样就可以省略最后一步再次赋值的操作。
这里是我们如何使用 @ 来运行之前的代码:
def a_new_decorator(a_func):
    def wrapTheFunction():
        print("I am doing some boring work before executing a_func()")

        a_func()

        print("I am doing some boring work after executing a_func()")

    return wrapTheFunction

@a_new_decorator
def a_function_requiring_decoration():
    """Hey you! Decorate me!"""
    print("I am the function which needs some decoration to "
          "remove my foul smell")


a_function_requiring_decoration()
# outputs: I am doing some boring work before executing a_func()
#         I am the function which needs some decoration to remove my foul smell
#         I am doing some boring work after executing a_func()
希望你现在对 Python 装饰器的工作原理有一个基本的理解。如果我们运行如下代码会存在一个问题:
a_function_requiring_decoration = a_new_decorator(a_function_requiring_decoration)
print(a_function_requiring_decoration.__name__)
# Output: wrapTheFunction
[外链图片转存失败,源站可能有防盗链机制,建议将图片保存下来直接上传(img-uRwfsH9K-1584186742797)(C:\Users\void\Desktop\img\Snipaste_2020-03-14_14-15-14.png)]
其运行结果过程如上:
[外链图片转存失败,源站可能有防盗链机制,建议将图片保存下来直接上传(img-xM0MZzhn-1584186742799)(C:\Users\void\Desktop\img\Snipaste_2020-03-14_14-16-03.png)]
这并不是我们想要的!Ouput输出应该是"a_function_requiring_decoration"。这里的函数被warpTheFunction替代了。它重写了我们函数的名字和注释文档(docstring)。幸运的是Python提供给我们一个简单的函数来解决这个问题,那就是functools.wraps。我们修改上一个例子来使用functools.wraps:
from functools import wraps

def a_new_decorator(a_func):
    @wraps(a_func)
    def wrapTheFunction():
        print("I am doing some boring work before executing a_func()")
        a_func()
        print("I am doing some boring work after executing a_func()")

    return wrapTheFunction

@a_new_decorator
def a_function_requiring_decoration():
    """Hey you! Decorate me!"""
    print("I am the function which needs some decoration to "
          "remove my foul smell")


a_function_requiring_decoration()
# outputs: I am doing some boring work before executing a_func()
#         I am the function which needs some decoration to remove my foul smell
#         I am doing some boring work after executing a_func()

# the @a_new_decorator is just a short way of saying:
a_function_requiring_decoration = a_new_decorator(a_function_requiring_decoration)
print(a_function_requiring_decoration.__name__)
# Output: wrapTheFunction
*args、**kwargs的使用
可能有人问,如果我的业务逻辑函数 foo 需要参数怎么办?比如:
def foo(name):
    print("i am %s" % name)
我们可以在定义 wrapper 函数的时候指定参数:
def wrapper(name):
        logging.warn("%s is running" % func.__name__)
        return func(name)
    return wrapper
这样 foo 函数定义的参数就可以定义在 wrapper 函数中。这时,又有人要问了,如果 foo 函数接收两个参数呢?三个参数呢?更有甚者,我可能传很多个。当装饰器不知道 foo 到底有多少个参数时,我们可以用 *args 来代替:
def wrapper(*args):
        logging.warn("%s is running" % func.__name__)
        return func(*args)
    return wrapper
如此一来,甭管 foo 定义了多少个参数,我都可以完整地传递到 func 中去。这样就不影响 foo 的业务逻辑了。这时还有读者会问,如果 foo 函数还定义了一些关键字参数呢?比如:
def foo(name, age=None, height=None):
    print("I am %s, age %s, height %s" % (name, age, height))
这时,你就可以把 wrapper 函数指定关键字函数:
def wrapper(*args, **kwargs):
        # args是一个数组,kwargs一个字典
        logging.warn("%s is running" % func.__name__)
        return func(*args, **kwargs)
    return wrapper
带参数的装饰器
装饰器还有更大的灵活性,例如带参数的装饰器,在上面的装饰器调用中,该装饰器接收唯一的参数就是执行业务的函数 foo 。装饰器的语法允许我们在调用时,提供其它参数,比如@decorator(a)。这样,就为装饰器的编写和使用提供了更大的灵活性。比如,我们可以在装饰器中指定日志的等级,因为不同业务函数可能需要的日志级别是不一样的。
def use_logging(level):
    def decorator(func):
        def wrapper(*args, **kwargs):
            if level == "warn":
                logging.warn("%s is running" % func.__name__)
            elif level == "info":
                logging.info("%s is running" % func.__name__)
            return func(*args)
        return wrapper

    return decorator

@use_logging(level="warn")
def foo(name='foo'):
    print("i am %s" % name)

foo()
上面的 use_logging 是允许带参数的装饰器。它实际上是对原有装饰器的一个函数封装,并返回一个装饰器。我们可以将它理解为一个含有参数的闭包。当我 们使用@use_logging(level="warn")调用的时候,Python 能够发现这一层的封装,并把参数传递到装饰器的环境中。
@use_logging(level="warn")`等价于`@decorator
运行过程为:
[外链图片转存失败,源站可能有防盗链机制,建议将图片保存下来直接上传(img-FRAYItLU-1584186742800)(C:\Users\void\Desktop\img\Snipaste_2020-03-14_14-36-07.png)]
扩展:类装饰器
没错,装饰器不仅可以是函数,还可以是类,相比函数装饰器,类装饰器具有灵活度大、高内聚、封装性等优点。使用类装饰器主要依靠类的__call__方法,当使用 @ 形式将装饰器附加到函数上时,就会调用此方法。
class Foo(object):
    def __init__(self, func):
        self._func = func

    def __call__(self):
        print ('class decorator runing')
        self._func()
        print ('class decorator ending')

@Foo
def bar():
    print ('bar')

bar()
运行过程中:
[外链图片转存失败,源站可能有防盗链机制,建议将图片保存下来直接上传(img-PZ5gxJYB-1584186742802)(C:\Users\void\Desktop\img\Snipaste_2020-03-14_14-52-41.png)]
运行结果为:
class decorator runing
bar
class decorator ending
functools.wraps
使用装饰器极大地复用了代码,但是他有一个缺点就是原函数的元信息不见了,比如函数的docstring、__name__、参数列表,先看例子:
# 装饰器
def logged(func):
    def with_logging(*args, **kwargs):
        print func.__name__      # 输出 'with_logging'
        print func.__doc__       # 输出 None
        return func(*args, **kwargs)
    return with_logging

# 函数
@logged
def f(x):
   """does some math"""
   return x + x * x

logged(f)
运行过程为:
[外链图片转存失败,源站可能有防盗链机制,建议将图片保存下来直接上传(img-LXc35ryF-1584186742803)(C:\Users\void\Desktop\img\Snipaste_2020-03-14_14-57-33.png)]
不难发现,函数 f 被with_logging取代了,当然它的docstring,__name__就是变成了with_logging函数的信息了。好在我们有functools.wraps,wraps本身也是一个装饰器,它能把原函数的元信息拷贝到装饰器里面的 func 函数中,这使得装饰器里面的 func 函数也有和原函数 foo 一样的元信息了。
from functools import wraps
def logged(func):
    @wraps(func)
    def with_logging(*args, **kwargs):
        print func.__name__      # 输出 'f'
        print func.__doc__       # 输出 'does some math'
        return func(*args, **kwargs)
    return with_logging

@logged
def f(x):
   """does some math"""
   return x + x * x
运行过程为:
[外链图片转存失败,源站可能有防盗链机制,建议将图片保存下来直接上传(img-2FYl0EO3-1584186742804)(C:\Users\void\Desktop\img\Snipaste_2020-03-14_15-00-44.png)]
装饰器顺序
一个函数还可以同时定义多个装饰器,比如:
@a
@b
@c
def f ():
    pass
它的执行顺序是从里到外,最先调用最里层的装饰器,最后调用最外层的装饰器,它等效于
f = a(b(c(f)))
python的高阶函数
map函数
- map函数的原型是map(function, iterable, …),它的返回结果是一个列表。
- 参数function传的是一个函数名,可以是python内置的,也可以是自定义的。
- 参数iterable传的是一个可以迭代的对象,例如列表,元组,字符串这样的。
这个函数的意思就是将function应用于iterable的每一个元素,结果以列表的形式返回。注意到没有,iterable后面还有省略号,意思就是可以传很多个iterable,如果有额外的iterable参数,并行的从这些参数中取元素,并调用function。如果一个iterable参数比另外的iterable参数要短,将以None扩展该参数元素。还是看例子来理解吧!
a=(1,2,3,4,5)
b=[1,2,3,4,5]
c="zhangkang"

la=map(str,a)
lb=map(str,b)
lc=map(str,c)

print(list(la))
print(list(lb))
print(list(lc))

# 输出:
#
# ['1', '2', '3', '4', '5']
# ['1', '2', '3', '4', '5']
# ['z', 'h', 'a', 'n', 'g', 'k', 'a', 'n', 'g']
运行过程为:
[外链图片转存失败,源站可能有防盗链机制,建议将图片保存下来直接上传(img-2Aer5IRL-1584186742805)(C:\Users\void\Desktop\img\Snipaste_2020-03-14_15-09-15.png)]
或者是:
def mul(x):
    return x*x

n=[1,2,3,4,5]
res=map(mul,n)

#输出:[1, 4, 9, 16, 25]
[外链图片转存失败,源站可能有防盗链机制,建议将图片保存下来直接上传(img-mMVoezph-1584186742805)(C:\Users\void\Desktop\img\Snipaste_2020-03-14_15-14-23.png)]
把列表n中的每个元素运行一次mul函数后得到的结果作为最终结果列表的元素。再看下有多个iterable参数的情况。
def add(x,y,z):
    return x+y+z

list1=[1,2,3]
list2=[1,2,3]
list3=[1,2,3]
res=map(add,list1,list2,list3)
print(res)

#输出:[3, 6, 9]
[外链图片转存失败,源站可能有防盗链机制,建议将图片保存下来直接上传(img-QhbR04Br-1584186742806)(C:\Users\void\Desktop\img\Snipaste_2020-03-14_15-25-58.png)]
并行的从三个列表中各自取出元素然后运行add函数,有人可能会问,如果三个列表长度不一样怎么办,前面已经说了,对于短的那个iterable参数会用None填补。对于上面的例子,如果list3=[1,2]的话,那么这个程序会报错,因为虽然在运行add函数的时候列表list3的最后一个元素会用None填补,但是None和int类型的数是不能相加的。也就是说,除非参数function支持None的运算,否则根本没意义。现在我们看下另一个例子你就明白了
def add(x,y,z):
    return x,y,z

list1 = [1,2,3]
list2 = [1,2,3,4]
list3 = [1,2,3,4,5]
res = map(add, list1, list2, list3)
print(res)

#输出:
#[(1, 1, 1), (2, 2, 2), (3, 3, 3)]
运行过程
[外链图片转存失败,源站可能有防盗链机制,建议将图片保存下来直接上传(img-NsxEAETv-1584186742807)(C:\Users\void\Desktop\img\Snipaste_2020-03-14_15-30-15.png)]
reduce()函数
格式:reduce (func, seq[, init()])
reduce()函数即为化简函数,它的执行过程为:每一次迭代,都将上一次的迭代结果(注:第一次为init元素,如果没有指定init则为seq的第一个元素)与下一个元素一同传入二元func函数中去执行。在reduce()函数中,init是可选的,如果指定,则作为第一次迭代的第一个元素使用,如果没有指定,就取seq中的第一个元素。
educe()函数的执行过程如下图所示:
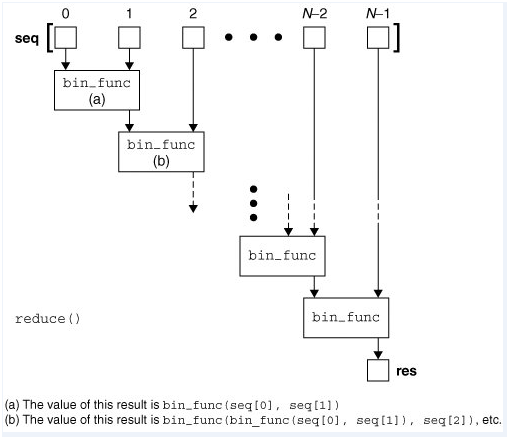
从reduce函数的执行过程,让我们很容易联想到求一个数的阶乘,而Python中并没有给出一个求阶乘的内置函数,正好我们就拿这个例子来说明reduce函数吧。
from functools import reduce
reduce(lambda x,y:x+y,[1,2,3,4,5,6,7,8,9])
#45
reduce(lambda x,y:x*y,[1,2],2)
#4
reduce(lambda x,y:x+y,[1,2],2)
#5
filter()函数
格式:filter(func, seq)
该函数的目的是提取出seq中能使func为true的元素序列。func函数是一个布尔函数,filter()函数调用这个函数一次作用于seq中的每一个元素,筛选出符合条件的元素,并以列表的形式返回。
下面举一个列子说明,假如有个列表,列表中有几个数字,现在我想从这些数字中,选出即能被2整除又能被3整除的数。
nums = [2,3,6,12,15,18]
def nums_res (x):
  return x % 2 == 0 and x % 3 == 0
print filter(nums_res, nums)
#执行结果:[6, 12, 18]
如果使用普通方法的话,就需要使用for循环去挨个挨个遍历list中的元素。当然我们也可以使用列表解析法:
print [x for x in nums if x % 2 == 0 and x % 3 == 0]
[6, 12, 18]
sorted()函数
- 对于sorted()函数中key的重写,和sort()函数中是一样的,所以刚刚对于sort()中讲解的方法,都是适用于sorted()函数中,
单的升序排序非常简单:只需调用sorted()功能。它返回一个新的排序列表:
>>> sorted([5, 2, 3, 1, 4])
[1, 2, 3, 4, 5]
还可以使用list.Sort()方法。它就地修改列表(并返回None以避免混淆)。通常情况下,它不太方便,但如果您不需要原始列表,它的效率稍高一些。
>>> a = [5, 2, 3, 1, 4]

>>> a.sort()

>>>a

[1, 2, 3, 4, 5]
另一个区别是list.sort()方法仅为列表定义。相反,sorted()函数接受任何可迭代的。
>>> sorted({

    1: 'D', 2: 'B', 3: 'B', 4: 'E', 5: 'A'})

[1, 2, 3, 4, 5]
sort 与 sorted 区别:
-
sort 是应用在 list 上的方法,sorted 可以对所有可迭代的对象进行排序操作。
-
list 的 sort 方法返回的是对已经存在的列表进行操作,而内建函数 sorted 方法返回的是一个新的 list,而不是在原来的基础上进行的操作。
-
语法
-
sorted 语法:
sorted(iterable, key=None, reverse=False)
-
参数说明:
iterable – 可迭代对象。
key – 主要是用来进行比较的元素,只有一个参数,具体的函数的参数就是取自于可迭代对象中,指定可迭代对象中的一个元素来进行排序。
reverse – 排序规则,reverse = True 降序 , reverse = False 升序(默认)。
-
返回值
返回重新排序的列表。
-
实例
以下实例展示了 sorted 的最简单的使用方法:
>>>sorted([5, 2, 3, 1, 4])

[1, 2, 3, 4, 5]                      # 默认为升序
你也可以使用 list 的 list.sort() 方法。这个方法会修改原始的 list(返回值为None)。通常这个方法不如sorted()方便-如果你不需要原始的 list,list.sort()方法效率会稍微高一些。
>>>a=[5,2,3,1,4]

>>> a.sort()

>>> a

[1,2,3,4,5]
另一个区别在于list.sort() 方法只为 list 定义。而 sorted() 函数可以接收任何的 iterable。
>>>sorted({

        1: 'D', 2: 'B', 3: 'B', 4: 'E', 5: 'A'})

[1, 2, 3, 4, 5]
利用key进行倒序排序:
>>>example_list = [5, 0, 6, 1, 2, 7, 3, 4]

>>> result_list = sorted(example_list, key=lambda x: x*-1)     #精彩

>>> print(result_list)

[7, 6, 5, 4, 3, 2, 1, 0]
要进行反向排序,也通过传入第三个参数 reverse=True:
>>>example_list = [5, 0, 6, 1, 2, 7, 3, 4]

>>> sorted(example_list, reverse=True)

[7, 6, 5, 4, 3, 2, 1, 0]
-
python的定义模块
一个python文件就是一个模块
一个包含模块的文件夹也是一个模块
导入模块
import ${

    module_name} # module_name 就是模块文件的名称,不加后缀 .py
from ${

    module_namespace} import ${

    module_name} #从模块空间导入某个模块
常用模块说明
os 操作系统模块,文件路径操作等
sys 程序系统本身模块,获取参数,导入的模块,输入输出等
time timestamp时间戳,struct_time时间元组,format time 格式化时间模块
datetime模块 datatime模块重新封装了time模块,提供更多接口
hashlib加密 hashlib主要提供字符加密功能,将md5和sha模块整合到了一起,支持md5,sha1, sha224, sha256, sha384, sha512等算法
logging模块简介 logging模块是Python内置的标准模块,可以设置级别
subprocess模块 subprocess是Python 2.4中新增的一个模块,它允许你生成新的进程
总结
那么我们到底该用哪个模块、哪个函数来执行命令与系统及系统进行交互呢?下面我们来做个总结:
首先应该知道的是,Python2.4版本引入了subprocess模块用来替换os.system()、os.popen()、os.spawn*()等函数以及commands模块;也就是说如果你使用的是Python 2.4及以上的版本就应该使用subprocess模块了。
如果你的应用使用的Python 2.4以上,但是是Python 3.5以下的版本,Python官方给出的建议是使用subprocess.call()函数。Python 2.5中新增了一个subprocess.check_call()函数,Python 2.7中新增了一个subprocess.check_output()函数,这两个函数也可以按照需求进行使用。
如果你的应用使用的是Python 3.5及以上的版本(目前应该还很少),Python官方给出的建议是尽量使用subprocess.run()函数。
当subprocess.call()、subprocess.check_call()、subprocess.check_output()和subprocess.run()这些高级函数无法满足需求时,我们可以使用subprocess.Popen类来实现我们需要的复杂功能。
json ,pickle模块
JSON(JavaScript Object Notation, JS 对象标记) 是一种轻量级的数据交换格式。JSON的数据格式其实就是python里面的字典格式,里面可以包含方括号括起来的数组,也就是python里面的列表。
在python中,有专门处理json格式的模块—— json 和 picle模块
Json 模块提供了四个方法: dumps、dump、loads、load
pickle 模块也提供了四个功能:dumps、dump、loads、load