一、Android控件架构
1.1 关于View&ViewGroup

1、Android中每个控件都会在界面中占得一块矩形的区域
2、控件一般分为两类:ViewGroup控件和View控件,他们两个的关系如上图一样,ViewGroup可以包含View控件
3、通过最顶部的ViewGroup控件,整个界面上的控件就形成了一个 控件树 的结构
4、通常在使用 findViewById()方法 就是在控件树中以树的深度优先遍历来查找对应元素
5、ViewParent对象在控件树的顶部,作为整棵树的控制核心
1.2 关于setContentView()方法
1、该方法一般在onCreate()方法的前面,用于设置一个布局
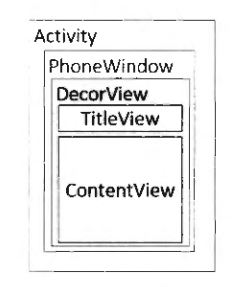
2、上图时=为UI界面架构图,从中可以看出,每个Activity都包含了一个PhoneWindow
3、PhoneWindow将DecorView设置为整个应用窗口的根View
4、DecorView作为窗口界面的顶层视图,封装了一些窗口操作的通用方法,在这个View中的所有View的监听事件,都是通过WindowManagerService来进行接收,并通过Activity对象来回调相应的onClickListener
5、在DecorView中分成了两个部分:TitleView和ContentView,其中后者就是我们常见的页面布局的所在处

6、上述视图树中,第二层装载了一个布局,这个布局就是我们初始化活动时的布局文件所在之处
7、当程序在onCreate()方法中调用setContentView()方法后,ActivityManagerService会回调onResume()方法,此时系统会把整个DecorView添加到PhoneWindow中让其显示出来
二、View的测量
2.1 基本概念
1、关于View的测量,这个过程是在 onMeasure()方法 中进行的
2、MeasureSpec类——通过这个类帮助测量View,该类是一个32位的int值,其中高2位为测量的模式,低30位位测量的大小
3、关于测量的模式的种类:
- EXACTLY:即精确值模式,该模式下一般layout_width或layout_height属性值为具体值或match_parent
- AT_MOST:即最大值模式,该模式下一般layout_width或layout_height属性值为wrap_content
- UNSPECIFIED:该模式不指定其大小测量模式,通常在绘制自定义View时会使用
4、View默认的onMeasure()方法只支持EXACTLY模式
5、通过MeasureSpec类可以获取View的测量模式和View想要绘制的大小
2.2 具体实施
1、首先要创建一个MyView类继承View类,并且重写其中的onMeasure()方法
public class MyView extends View {


   	....(构造方法)
    @Override
    protected void onMeasure(int widthMeasureSpec, int heightMeasureSpec) {


        super.onMeasure(widthMeasureSpec, heightMeasureSpec);
    }
2、在onMeasure()方法中,调用setMeasureDimension()方法,该方法传入两个参数,分别是测量后的宽高值。
 protected void onMeasure(int widthMeasureSpec, int heightMeasureSpec) {


        super.onMeasure(widthMeasureSpec, heightMeasureSpec);
        setMeasuredDimension(measureWidth(widthMeasureSpec),measureHeight(heightMeasureSpec));
    }
3、这里自定义了两个方法,每个方法传入一个MeasureSpec对象,其中宽度的方法如下:
  private int measureWidth(int measureSpec){


        int result = 0;
        int specMode = MeasureSpec.getMode(measureSpec);
        int specSize = MeasureSpec.getSize(measureSpec);
        if(specMode == MeasureSpec.EXACTLY){


            result = specSize;
        }else {


            result = 200;
            if(specMode == MeasureSpec.AT_MOST){


                result = Math.min(result,specSize);
            }
        }
        return result;
    }
	1)首先从MeasureSpec对象中提取出具体的测量模式和大小
	2)然后对模式进行判断,若为精准值模式则将获取到的宽度赋值给result;反之,先设置一个宽度值,然后判断是否是最大值模式,若是,则取一个最小值
4、最后在布局文件中调用
<androidx.constraintlayout.widget.ConstraintLayout
	...>
    <com.example.testview.MyView
        android:layout_width="wrap_content"
        android:layout_height="wrap_content"
        android:background="@color/teal_200"
        tools:ignore="MissingConstraints" />
</androidx.constraintlayout.widget.ConstraintLayout>
5、运行结果

三、View的绘制
在自定义的View类中,重写onDraw()方法即可
 @Override
    protected void onDraw(Canvas canvas) {


        super.onDraw(canvas);
        Paint paint = new Paint();
        paint.setAntiAlias(true);//抗锯齿
        paint.setColor(Color.RED);//画笔颜色
        paint.setStyle(Paint.Style.FILL);//画笔风格
        paint.setTextSize(30);//绘制文字大小,单位px
        paint.setStrokeWidth(5);//画笔粗细
        canvas.drawColor(Color.GREEN);
        canvas.drawCircle(getWidth()/2, getWidth()/2, getWidth()/2, paint);
    }
其中:必须在Canvas上进行图像的绘制,Canvas就相当于一个画板,而Paint相当于一个画笔,通过使用Paint就可以在上面作画
四、ViewGroup的测量
1、ViewGroup会去管理其子View,其中管理项目就是负责子View的显示大小
2、当ViewGroup指定为wrap_content时,会通过遍历子View,并调用其中的onMeasure()方法来获取所有的子View大小来决定自己的大小
3、当子View测量完毕后,就需将子View放到合适的位置,这个过程即为View的Layout过程
4、在执行Layout过程时,通过遍历子View的Layout方法指定其具体现实的位置以决定其布局位置
5、在自定义ViewGroup时,通过重写onLayout()方法来控制其子View显示位置的逻辑
6、其余的操作同View的测量一样
五、ViewGroup的绘制
ViewGroup通常不需要绘制,一般会使用dispatchDraw()方法来绘制其子View
六、自定义View
关于自定义View有如下几个常用的方法:
- onFinishInflate():从XML加载组件后回调
- onSizeChanged():组件大小改变时回调
- onMeasure():回调该方法来进行测量
- onLayoutEvent():回调该方法来确定显示的位置
- onTouchEvent():监听到触摸事件时回调
6.1 对现有控件进行扩展
以TextView为例:
1、定义一个MyTextView并继承TextView,重写构造方法
public class MyTextView extends androidx.appcompat.widget.AppCompatTextView {


    public MyTextView(Context context) {


        super(context);
    }
    public MyTextView(Context context, @Nullable AttributeSet attrs) {


        super(context, attrs);
    }
    public MyTextView(Context context, @Nullable AttributeSet attrs, int defStyleAttr) {


        super(context, attrs, defStyleAttr);
    }
}
2、重写其中的onDraw()方法
  @Override
    protected void onDraw(Canvas canvas) {


        Paint paint = new Paint();
        paint.setColor(getResources().getColor(R.color.teal_200));
        paint.setStyle(Paint.Style.FILL);
        Paint paint1 = new Paint();
        paint1.setColor(Color.YELLOW);
        paint1.setStyle(Paint.Style.FILL);
        canvas.drawRect(0,0,getMeasuredWidth(),getMeasuredHeight(),paint);
        canvas.drawRect(10,10,getMeasuredWidth()-10,getMeasuredHeight()-10,paint1);
        canvas.save();//保存图层
        canvas.translate(10,0);//绘制文字前平移10像素
        super.onDraw(canvas);
        canvas.restore();
    }
其中,关于onDraw()方法的重写说明如下:
 @Override
    protected void onDraw(Canvas canvas) {


     	//在回调父类方法前,实现自己的逻辑,,对TextView来说即是在绘制文本内容前
        canvas.restore();
        //在回调父类方法后,实现自己的逻辑,,对TextView来说即是在绘制文本内容后
    }
3、重写onSizeChanged()方法以实现一个TextView的渐变色
    @Override
    protected void onSizeChanged(int w, int h, int oldw, int oldh) {


        super.onSizeChanged(w, h, oldw, oldh);
        int viewWidth = 0;
        Paint paint;
        LinearGradient linearGradient;
        if(viewWidth == 0){


            viewWidth = getMeasuredWidth();//获取TextView的宽度
            if(viewWidth > 0){


                paint = getPaint();//通过getPaint()获取当前绘制TextView的Paint对象
                linearGradient = new LinearGradient(0,0,viewWidth,0,new int[]{

    Color.BLUE,0xffffffff},null, Shader.TileMode.CLAMP);
                paint.setShader(linearGradient);//设置渲染效果
            }
        }
    }
其中:LinearGradient是一个用于实现线性渐变的类,具体使用方法:LinearGradient的使用
4、在调用者活动的布局文件中调用
<com.example.testview.MyTextView
android:textSize="30sp"
android:gravity="center"
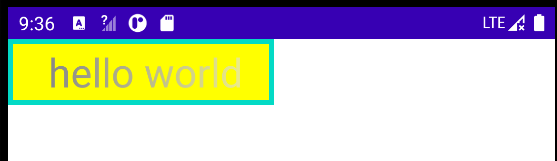
android:text="hello world"
android:layout_width="200dp"
android:layout_height="50dp"
tools:ignore="MissingClass,MissingConstraints" />
效果:
6.2 创建复合控件
举例:创建如下的导航栏
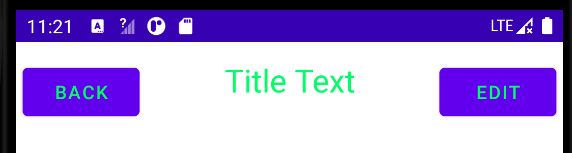
1、在layout包下创建一个布局文件title.xml,然后添加控件
		<?xml version="1.0" encoding="utf-8"?>
		<LinearLayout xmlns:android="http://schemas.android.com/apk/res/android"
		    android:orientation="horizontal"
		    android:layout_width="match_parent"
		    android:layout_height="match_parent">
		    <Button
		        android:id="@+id/title_back"
		        android:layout_width="wrap_content"
		        android:layout_height="wrap_content"
		        android:layout_margin="5dp"//可以指定控件在上下左右方向上偏移的距离
		        android:text="Back"
		        android:textColor="#00ff66" />
		    <TextView
		        android:id="@+id/title_text"
		        android:layout_width="0dp"
		        android:layout_height="58dp"
		        android:layout_weight="1"
		        android:gravity="center"
		        android:text="Title Text"
		        android:textColor="#00ff66"
		        android:textSize="24sp" />
		    <Button
		        android:id="@+id/title_edit"
		        android:layout_width="wrap_content"
		        android:layout_height="wrap_content"
		        android:layout_margin="5dp"
		        android:text="Edit"
		        android:textColor="#00ff66" />
		</LinearLayout>
2、新建一个类,继承LinearLayout类,让他成为我们自定义的标题栏控件
		public class Linear extends LinearLayout {


		    public Linear(Context context, AttributeSet attrs) {


		        super(context, attrs);
		        LayoutInflater.from(context).inflate(R.layout.title,this);
		    }
		}
LayoutInflater的from()方法创建了一个LayoutInflater对象,调用inflate()方法以动态加载一个布局文件,传入的第一个参数就要加载的布局文件的id,第二个参数就是给加载好的布局再添加一个父布局
3、在我们想要引用该控件的布局文件中中添加自定义控件代码:
   <com.example.testview.Linear
        android:id="@+id/linear"
        android:layout_width="match_parent"
        android:layout_height="wrap_content"
        tools:ignore="MissingConstraints" />
4、定义一个回调接口,使得可以对该组合View进行自定义点击事件设置
public interface BackClickListener {


	    void leftClick();
	    void rightClick();
}
5、然后再在回到自定义的View中为按钮注册点击事件
public class TitleLayout extends LinearLayout {


	BackClickListener backClickListener;

    public TitleLayout(Context context, AttributeSet attrs) {


        super(context, attrs);
        LayoutInflater.from(context).inflate(R.layout.title,this);
        Button titleback = (Button)findViewById(R.id.title_back);
        Button titleEdit = (Button)findViewById(R.id.title_edit);
        titleback.setOnClickListener(new OnClickListener() {


            @Override
            public void onClick(View v) {


               backClickListener.leftClick();
            }
        });
        titleEdit.setOnClickListener(new OnClickListener() {


            @Override
            public void onClick(View v) {


               backClickListener.rightClick();
            }
        });
    }
    public void getListener(BackClickListener listener){


        backClickListener = listener;
    }
}
6、在调用者的活动中进行自定义的点击事件
	 @Override
    protected void onCreate(Bundle savedInstanceState) {


        super.onCreate(savedInstanceState);
        setContentView(R.layout.activity_main);
        ActionBar actionBar = getSupportActionBar();//getSupportActionBar()方法用于获取实例
        if (actionBar != null){


            actionBar.hide();
        }
 		Linear topBarView = findViewById(R.id.linear);
        topBarView.getListener(new BackClickListener() {


            @Override
            public void leftClick() {


                Toast.makeText(MainActivity.this,"leftButton",Toast.LENGTH_SHORT).show();
            }

            @Override
            public void rightClick() {


                Toast.makeText(MainActivity.this,"rightButton",Toast.LENGTH_SHORT).show();
            }
        });
关于上述布局引用的方法:
	<LinearLayout xmlns:android="http://schemas.android.com/apk/res/android"
	    xmlns:app="http://schemas.android.com/apk/res-auto"
	    xmlns:tools="http://schemas.android.com/tools"
	    android:layout_width="match_parent"
	    android:layout_height="match_parent"
	    tools:context=".MainActivity">

	    <include layout="@layout/title"/>//引用,这样该页面就有了自定好的导航栏
	</LinearLayout>
	①在include中,引号里的格式:“@包名/布局文件名”
	②引用自定义布局和引用自定义View是不一样的,前者是静态的,后者可以自定义点击事件等
6.3 重写View来实现全新的控件
以实现如下的View为例:

1、首先创建个CircleView类,继承View并重写onDraw()等方法
public class CircleView extends View {


    public CircleView(Context context) {


        super(context);
    }
    public CircleView(Context context, @Nullable AttributeSet attrs) {


        super(context, attrs);
    }
    public CircleView(Context context, @Nullable AttributeSet attrs, int defStyleAttr) {


        super(context, attrs, defStyleAttr);
    }
    @SuppressLint("ResourceAsColor")
    @Override
    protected void onDraw(Canvas canvas) {


        super.onDraw(canvas);
    }
    @Override
    protected void onMeasure(int widthMeasureSpec, int heightMeasureSpec) {


        super.onMeasure(widthMeasureSpec, heightMeasureSpec);
    }
    @Override
    public boolean onTouchEvent(MotionEvent event) {


        return super.onTouchEvent(event);
    }

}
2、在onDraw()方法中,利用Paint类(相当于画笔)进行画图
  @Override
    protected void onDraw(Canvas canvas) {


        super.onDraw(canvas);
        Paint circle = new Paint();
        circle.setStyle(Paint.Style.FILL);
        circle.setColor(R.color.blue);
        canvas.drawCircle(500,500,300,circle);
        @SuppressLint("DrawAllocation")
        Paint paintArc = new Paint();
        paintArc.setColor(Color.GREEN);
        paintArc.setStyle(Paint.Style.STROKE);
        paintArc.setStrokeWidth(20);
        canvas.drawArc(100,100,900,900,180,270,false,paintArc);
        Paint text = new Paint();
        text.setTextSize(80);
        text.setColor(Color.BLACK);
        canvas.drawText("自定义View",300,500,text);
    }
3、在调用者活动的布局文件中调用
	   <com.example.testview.CircleView
	        android:layout_width="match_parent"
	        android:layout_height="match_parent"/>
七、事件拦截机制分析
7.1 基本概述
1、简介:Android提供了一整套完善的事件传递、处理机制来帮助开发者完成准确的事件分配与处理,使得当系统捕获到用户的各种输入事件后,能够准确地传递给真正需要这个事件的控件
2、触摸事件概述:捕获触摸屏幕后产生的事件
3、触摸事件分类:①按钮按下;②滑动;③离开按钮
4、Android为触摸事件封装了一个MotionEvent类,通过重写onTouchEvent()方法时,该方法的参数就是一个MotionEvent类
5、当用户点击子View的事件时,父ViewGroup可以将点击事件给拦截,自己处理该电击的事件。
7.2 事件拦截机制分析

1、上图定义了三层嵌套的View,由外到内为:MyViewGroupA、MyViewGroupB、MyView
2、重写ViewGroup和View的几个方法
ViewGroup重写的父方法如下:
  @Override
    public boolean onTouchEvent(MotionEvent event) {


        return super.onTouchEvent(event);
    }

    @Override
    public boolean dispatchTouchEvent(MotionEvent event) {


        return super.dispatchTouchEvent(event);
    }

    @Override
    public boolean onInterceptTouchEvent(MotionEvent ev) {


        return super.onInterceptTouchEvent(ev);
    }
View重写的方法如下:
 	@Override
    public boolean onTouchEvent(MotionEvent event) {


        return super.onTouchEvent(event);
    }

    @Override
    public boolean dispatchTouchEvent(MotionEvent event) {


        return super.dispatchTouchEvent(event);
    }
3、正常情况下,点击View后,整个事件流程如下
传递过程:
MyViewGroupA dispatchTouchEvent() -> MyViewGroupA onInterceptTouchEvent() -> MyViewGroupB dispatchTouchEvent() -> MyViewGroupB onInterceptTouchEvent() -> MyView dispatchTouchEvent()
处理过程:
MyView onTouchEvent() -> MyViewGroupB onTouchEvent() -> MyViewGroupA onTouchEvent()

可以看出,整个事件传递顺序为:MyViewGroupA -> MyViewGroupB -> MyView
事件的处理机制:MyView --> MyViewGroupB -> MyViewGroupA
4、关于与事件传递有关的方法的返回值:true,拦截,不继续;false,相反
事件事件处理有关的方法的返回值:true,处理了;false,相反
5、现在若MyViewGroupA(MyViewGroupB)对事件的 传递 进行拦截,则整个事件过程如下所示:
MyViewGroupA dispatchTouchEvent() -> MyViewGroupA onInterceptTouchEvent() -> MyViewGroupA onTouchEvent()
或
MyViewGroupA dispatchTouchEvent() -> MyViewGroupA onInterceptTouchEvent() -> MyViewGroupB dispatchTouchEvent() -> MyViewGroupB onInterceptTouchEvent() -> MyViewGroupB onTouchEvent() -> MyViewGroupA onTouchEvent()

6、若现在现在若MyViewGroupB(MyViewG)对事件的处理 进行拦截,则整个事件过程如下所示:
MyViewGroupA dispatchTouchEvent() -> MyViewGroupA onInterceptTouchEvent() -> MyViewGroupB dispatchTouchEvent() -> MyViewGroupB onInterceptTouchEvent() -> MyView dispatchTouchEvent() -> MyView onTouchEvent() -> MyViewGroupB onTouchEvent()
或
MyViewGroupA dispatchTouchEvent() -> MyViewGroupA onInterceptTouchEvent() -> MyViewGroupB dispatchTouchEvent() -> MyViewGroupB onInterceptTouchEvent() -> MyView dispatchTouchEvent() -> MyView onTouchEvent()
