1. 高可用集群搭建方案
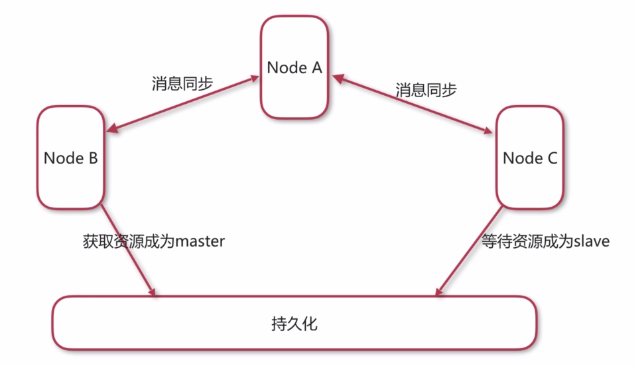
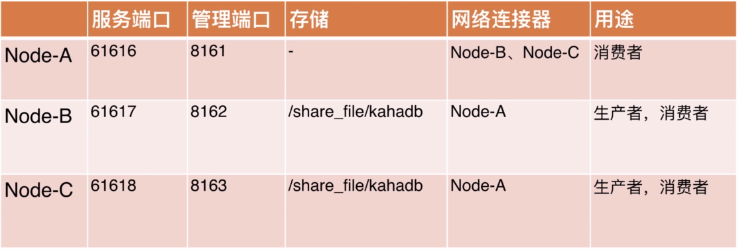
节点A: 与 节点B 节点C 进行消息同步, 所以节点A 节点B 节点C 都可用作消费者访问节点
节点B: 作为 master 主节点, 作为 生产者访问节点和消费者访问节点
节点C: 作为 slave 从节点, 作为 生产者访问节点和消费者访问节点, 当 master 节点挂掉后, slave 自动转换为 master 节点.
2. 高可用集群搭建步骤
正常应该在3台独立的服务器上进行集群搭建, 本演示只在同一台服务器上进行演示搭建.
将 ActiveMQ 安装包 解压到 三个不同的文件夹, 分别为 activemq-a, activemq-b, activemq-c
修改 activemq-a/conf/activemq.xml
<transportConnectors>
<!-- DOS protection, limit concurrent connections to 1000 and frame size to 100MB -->
<transportConnector name="openwire" uri="tcp://0.0.0.0:61616?maximumConnections=1000&wireFormat.maxFrameSize=104857600"/>
<!--<transportConnector name="amqp" uri="amqp://0.0.0.0:5672?maximumConnections=1000&wireFormat.maxFrameSize=104857600"/>
<transportConnector name="stomp" uri="stomp://0.0.0.0:61613?maximumConnections=1000&wireFormat.maxFrameSize=104857600"/>
<transportConnector name="mqtt" uri="mqtt://0.0.0.0:1883?maximumConnections=1000&wireFormat.maxFrameSize=104857600"/>
<transportConnector name="ws" uri="ws://0.0.0.0:61614?maximumConnections=1000&wireFormat.maxFrameSize=104857600"/>-->
</transportConnectors>
<networkConnectors>
<networkConnector name="local_network" uri="static:(tcp://127.0.0.1:61617,tcp://127.0.0.1:61618)"/>
</networkConnectors>修改 activemq-b/conf/activemq.xml
<transportConnectors>
<!-- DOS protection, limit concurrent connections to 1000 and frame size to 100MB -->
<transportConnector name="openwire" uri="tcp://0.0.0.0:61617?maximumConnections=1000&wireFormat.maxFrameSize=104857600"/>
<!--<transportConnector name="amqp" uri="amqp://0.0.0.0:5672?maximumConnections=1000&wireFormat.maxFrameSize=104857600"/>
<transportConnector name="stomp" uri="stomp://0.0.0.0:61613?maximumConnections=1000&wireFormat.maxFrameSize=104857600"/>
<transportConnector name="mqtt" uri="mqtt://0.0.0.0:1883?maximumConnections=1000&wireFormat.maxFrameSize=104857600"/>
<transportConnector name="ws" uri="ws://0.0.0.0:61614?maximumConnections=1000&wireFormat.maxFrameSize=104857600"/>-->
</transportConnectors>
<networkConnectors>
<networkConnector name="network_a" uri="static:(tcp://127.0.0.1:61616)"/>
</networkConnectors>修改 activemq-b/conf/jetty.xml
<bean id="jettyPort" class="org.apache.activemq.web.WebConsolePort" init-method="start">
	<!-- the default port number for the web console -->
	<property name="host" value="0.0.0.0"/>
	<property name="port" value="8162"/>
</bean>
修改 activemq-c/conf/activemq.xml
<transportConnectors>
<!-- DOS protection, limit concurrent connections to 1000 and frame size to 100MB -->
<transportConnector name="openwire" uri="tcp://0.0.0.0:61618?maximumConnections=1000&wireFormat.maxFrameSize=104857600"/>
<!--<transportConnector name="amqp" uri="amqp://0.0.0.0:5672?maximumConnections=1000&wireFormat.maxFrameSize=104857600"/>
<transportConnector name="stomp" uri="stomp://0.0.0.0:61613?maximumConnections=1000&wireFormat.maxFrameSize=104857600"/>
<transportConnector name="mqtt" uri="mqtt://0.0.0.0:1883?maximumConnections=1000&wireFormat.maxFrameSize=104857600"/>
<transportConnector name="ws" uri="ws://0.0.0.0:61614?maximumConnections=1000&wireFormat.maxFrameSize=104857600"/>-->
</transportConnectors>
<networkConnectors>
<networkConnector name="network_a" uri="static:(tcp://127.0.0.1:61616)"/>
</networkConnectors>修改 activemq-c/conf/jetty.xml
<bean id="jettyPort" class="org.apache.activemq.web.WebConsolePort" init-method="start">
	<!-- the default port number for the web console -->
	<property name="host" value="0.0.0.0"/>
	<property name="port" value="8163"/>
</bean>
3. 用代码简单测试
package com.codingos.springboot.activemq.queue;

import javax.jms.Connection;
import javax.jms.ConnectionFactory;
import javax.jms.Destination;
import javax.jms.JMSException;
import javax.jms.MessageProducer;
import javax.jms.Session;
import javax.jms.TextMessage;

import org.apache.activemq.ActiveMQConnectionFactory;
/**
 * 队列模式 生产者 集群测试
 */
public class AppProducer2 {

	private static final String url = "failover:(tcp://192.168.159.128:61617,tcp://192.168.159.128:61618)?randomize=true";
	private static final String queueName = "queue-test1";

	public static void main(String[] args) throws JMSException {
		// 1.常见ConnectionFactory
		ConnectionFactory connectionFactory = new ActiveMQConnectionFactory(url);
		// 2.创建Connection
		Connection connection = connectionFactory.createConnection();
		// 3.启动连接
		connection.start();
		// 4.创建会话 (1参: 是否在事务中处理, 2参: 使用自动应答模式)
		Session session = connection.createSession(false, Session.AUTO_ACKNOWLEDGE);
		// 5.创建一个目标队列
		Destination destination = session.createQueue(queueName);
		// 6.创建生产者
		MessageProducer producer = session.createProducer(destination);

		for (int i = 0; i < 100; i++) {
			// 7.创建消息
			TextMessage textMessage = session.createTextMessage("Message " + i);
			// 8.发送消息
			producer.send(textMessage);
			System.out.println("发送消息: " + textMessage.getText());
		}
		// 9.关闭连接
		connection.close();
	}
}
package com.codingos.springboot.activemq.queue;

import javax.jms.Connection;
import javax.jms.ConnectionFactory;
import javax.jms.Destination;
import javax.jms.JMSException;
import javax.jms.Message;
import javax.jms.MessageConsumer;
import javax.jms.MessageListener;
import javax.jms.Session;
import javax.jms.TextMessage;

import org.apache.activemq.ActiveMQConnectionFactory;
/**
 * 队列模式 消费者 集群测试
 */
public class AppConsumer2 {

	private static final String url = "failover:(tcp://192.168.159.128:61616,tcp://192.168.159.128:61617,tcp://192.168.159.128:61618)?randomize=true";
	private static final String queueName = "queue-test1";

	public static void main(String[] args) throws JMSException {
		// 1.常见ConnectionFactory
		ConnectionFactory connectionFactory = new ActiveMQConnectionFactory(url);
		// 2.创建Connection
		Connection connection = connectionFactory.createConnection();
		// 3.启动连接
		connection.start();
		// 4.创建会话 (1参: 是否在事务中处理, 2参: 使用自动应答模式)
		Session session = connection.createSession(false, Session.AUTO_ACKNOWLEDGE);
		// 5.创建一个目标队列
		Destination destination = session.createQueue(queueName);
		// 6.创建消费者
		MessageConsumer consumer = session.createConsumer(destination);
		// 7.创建监听器
		consumer.setMessageListener(new MessageListener() {
			@Override
			public void onMessage(Message message) {
				TextMessage textMessage = (TextMessage) message;
				try {
					System.out.println("接收消息: "+textMessage.getText());
				} catch (JMSException e) {
					e.printStackTrace();
				}
			}
		});
	}
}
最后 访问 三个节点的 ActiveMQ 管理界面 进行相关查看
activemq-a http://192.168.159.128:8161
activemq-b http://192.168.159.128:8162
activemq-c http://192.168.159.128:8163