概述
源码中的这一段注释,我们先尝试从中提取一些信息:
Doubly-linked list implementation of the List and Deque interfaces. Implements all optional list operations, and permits all elements (including null).

All of the operations perform as could be expected for a doubly-linked list. Operations that index into the list will traverse the list from the beginning or the end, whichever is closer to the specified index.

Note that this implementation is not synchronized. If multiple threads access a linked list concurrently, and at least one of the threads modifies the list structurally, it must be synchronized externally. (A structural modification is any operation that adds or deletes one or more elements; merely setting the value of an element is not a structural modification.) This is typically accomplished by synchronizing on some object that naturally encapsulates the list.
从这段注释中,我们可以得知 LinkedList 是通过一个双向链表来实现的,它允许插入所有元素,包括 null,同时,它是线程不同步的。
如果对双向链表这个数据结构很熟悉的话,学习 LinkedList 就没什么难度了。下面
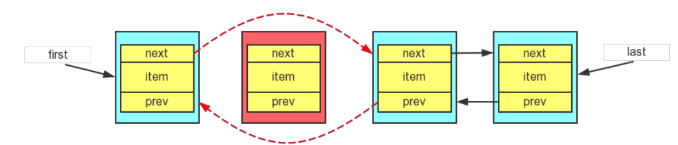
是双向链表的结构:

双向链表每个结点除了数据域之外,还有一个前指针和后指针,分别指向前驱结点和后继结点(如果有前驱/后继的话)。另外,双向链表还有一个 first 指针,指向头节点,和 last 指针,指向尾节点。
属性
//链表的节点个数
transient int size = 0;

//指向头节点的指针
transient Node<E> first;

//指向尾节点的指针
transient Node<E> last;
LinkedList 的属性非常少,就只有这些。通过这三个属性,其实我们大概也可以猜测出它是怎么实现的了。
方法
结点结构
Node 是在 LinkedList 里定义的一个静态内部类,它表示链表每个节点的结构,包括一个数据域 item,一个后置指针 next,一个前置指针 prev。
private static class Node<E> {


    E item;
    Node<E> next;
    Node<E> prev;

    Node(Node<E> prev, E element, Node<E> next) {


        this.item = element;
        this.next = next;
        this.prev = prev;
    }
}
添加元素
对于链表这种数据结构来说,添加元素的操作无非就是在表头/表尾插入元素,又或者在指定位置插入元素。因为 LinkedList 有头指针和尾指针,所以在表头或表尾进行插入元素只需要 O(1) 的时间,而在指定位置插入元素则需要先遍历一下链表,所以复杂度为 O(n)。
在表头添加元素的过程如下:

当向表头插入一个节点时,很显然当前节点的前驱一定为 null,而后继结点是 first指针指向的节点,当然还要修改 first 指针指向新的头节点。除此之外,原来的头节点变成了第二个节点,所以还要修改原来头节点的前驱指针,使它指向表头节点,源码的实现如下:
private void linkFirst(E e) {


    final Node<E> f = first;

    //当前节点的前驱指向 null,后继指针原来的头节点
    final Node<E> newNode = new Node<>(null, e, f);

    //头指针指向新的头节点
    first = newNode;

    //如果原来有头节点,则更新原来节点的前驱指针,否则更新尾指针
    if (f == null)
        last = newNode;
    else
        f.prev = newNode;

    size++;
    modCount++;
}
在表尾添加元素跟在表头添加元素大同小异,如图所示:

当向表尾插入一个节点时,很显然当前节点的后继一定为 null,而前驱结点是 last指针指向的节点,然后还要修改 last 指针指向新的尾节点。此外,还要修改原来尾节点的后继指针,使它指向新的尾节点,源码的实现如下:
void linkLast(E e) {


    final Node<E> l = last;

    //当前节点的前驱指向尾节点,后继指向 null
    final Node<E> newNode = new Node<>(l, e, null);

    //尾指针指向新的尾节点
    last = newNode;

    //如果原来有尾节点,则更新原来节点的后继指针,否则更新头指针
    if (l == null)
        first = newNode;
    else
        l.next = newNode;

    size++;
    modCount++;
}
最后,在指定节点之前插入,如图所示:

当向指定节点之前插入一个节点时,当前节点的后继为指定节点,而前驱结点为指定节点的前驱节点。此外,还要修改前驱节点的后继为当前节点,以及后继节点的前驱为当前节点,源码的实现如下:
void linkBefore(E e, Node<E> succ) {


    // assert succ != null;
    //指定节点的前驱
    final Node<E> pred = succ.prev;

    //当前节点的前驱为指点节点的前驱,后继为指定的节点
    final Node<E> newNode = new Node<>(pred, e, succ);

    //更新指定节点的前驱为当前节点
    succ.prev = newNode;

    //更新前驱节点的后继
    if (pred == null)
        first = newNode;
    else
        pred.next = newNode;

    size++;
    modCount++;
}
删除元素
删除操作与添加操作大同小异,例如删除指定节点的过程如下图所示,需要把当前节点的前驱节点的后继修改为当前节点的后继,以及当前节点的后继结点的前驱修改为当前节点的前驱(是不是很绕?):
删除头节点和尾节点跟删除指定节点非常类似,就不一一介绍了,源码如下:
//删除表头节点,返回表头元素的值
private E unlinkFirst(Node<E> f) {


    // assert f == first && f != null;
    final E element = f.item;
    final Node<E> next = f.next;
    f.item = null;
    f.next = null; // help GC
    first = next; //头指针指向后一个节点

    if (next == null)
        last = null;
    else
        next.prev = null; //新头节点的前驱为 null

    size--;
    modCount++;
    return element;
}

//删除表尾节点,返回表尾元素的值
private E unlinkLast(Node<E> l) {


    // assert l == last && l != null;
    final E element = l.item;
    final Node<E> prev = l.prev;
    l.item = null;
    l.prev = null; // help GC
    last = prev; //尾指针指向前一个节点

    if (prev == null)
        first = null;
    else
        prev.next = null; //新尾节点的后继为 null

    size--;
    modCount++;
    return element;
}

//删除指定节点,返回指定元素的值
E unlink(Node<E> x) {


    // assert x != null;
    final E element = x.item;
    final Node<E> next = x.next; //当前节点的后继
    final Node<E> prev = x.prev; //当前节点的前驱

    if (prev == null) {


        first = next;
    } else {


        prev.next = next; //更新前驱节点的后继为当前节点的后继
        x.prev = null;
    }

    if (next == null) {


        last = prev;
    } else {


        next.prev = prev; //更新后继节点的前驱为当前节点的前驱
        x.next = null;
    }

    x.item = null;
    size--;
    modCount++;
    return element;
}
获取元素
//获取表头元素
public E getFirst() {


    final Node<E> f = first;
    if (f == null)
        throw new NoSuchElementException();

    return f.item;
}

//获取表尾元素
public E getLast() {


    final Node<E> l = last;
    if (l == null)
        throw new NoSuchElementException();

    return l.item;
}

//获取指定下标的元素
Node<E> node(int index) {


    // assert isElementIndex(index);
    //根据下标是否超过链表长度的一半,来选择从头部开始遍历还是从尾部开始遍历
    if (index < (size >> 1)) {


        Node<E> x = first;
        for (int i = 0; i < index; i++)
            x = x.next;
        return x;
    } else {


        Node<E> x = last;
        for (int i = size - 1; i > index; i--)
            x = x.prev;
        return x;
    }
}
常用方法
前面介绍了链表的添加和删除操作,你会发现那些方法都不是 public 的, LinkedList是在这些基础的方法进行操作的,下面就来看看我们可以调用的方法有哪些。
//删除表头元素
public E removeFirst() {


    final Node<E> f = first;
    if (f == null)
        throw new NoSuchElementException();
    return unlinkFirst(f);
}

//删除表尾元素
public E removeLast() {


    final Node<E> l = last;
    if (l == null)
        throw new NoSuchElementException();
    return unlinkLast(l);
}

//插入新的表头节点
public void addFirst(E e) {


    linkFirst(e);
}

//插入新的表尾节点
public void addLast(E e) {


    linkLast(e);
}

//链表的大小
public int size() {


    return size;
}

//添加元素到表尾
public boolean add(E e) {


    linkLast(e);
    return true;
}

//删除指定元素
public boolean remove(Object o) {


    if (o == null) {


        for (Node<E> x = first; x != null; x = x.next) {


            if (x.item == null) {


                unlink(x);
                return true;
            }
        }
    } else {


        for (Node<E> x = first; x != null; x = x.next) {


            if (o.equals(x.item)) {


                unlink(x);
                return true;
            }
        }
    }
    return false;
}

//获取指定下标的元素
public E get(int index) {


    checkElementIndex(index); //先检查是否越界
    return node(index).item;
}

//替换指定下标的值
public E set(int index, E element) {


    checkElementIndex(index);
    Node<E> x = node(index);
    E oldVal = x.item;
    x.item = element;
    return oldVal;
}

//在指定位置插入节点
public void add(int index, E element) {


    checkPositionIndex(index);
    if (index == size)
        linkLast(element);
    else
        linkBefore(element, node(index));
}

//删除指定下标的节点
public E remove(int index) {


    checkElementIndex(index);
    return unlink(node(index));
}

//获取表头节点的值,表头为空返回 null
public E peek() {


    final Node<E> f = first;
    return (f == null) ? null : f.item;
}

//获取表头节点的值,表头为空抛出异常
public E element() {


    return getFirst();
}

//获取表头节点的值,并删除表头节点,表头为空返回 null
public E poll() {


    final Node<E> f = first;
    return (f == null) ? null : unlinkFirst(f);
}

//添加元素到表头
public void push(E e) {


    addFirst(e);
}

//删除表头元素
public E pop() {


    return removeFirst();
}
总结
1、LinkedList 的底层结构是一个带头/尾指针的双向链表,可以快速的对头/尾节点进行操作。
2、相比数组,链表的特点就是在指定位置插入和删除元素的效率较高,但是查找的效率就不如数组那么高了。