此篇文章是博主在win10上装tensorflow(cpu)时遇到的一些问题和解决办法:
如何查看自己的显卡是不是NVIDIA,自行百度
1.自然要先安装python(必须是64位才支持tensoeflow)
python官网下载安装包太慢,想快速下载 点击这里
2.安装Anaconda,也是官网下载,文件太大就不上传文件了。想加快下载速度的话,请看这篇博客
3.这里便开始安装了,
1.pip指令安装
pip install tensorflow
这里便开始出问题了:
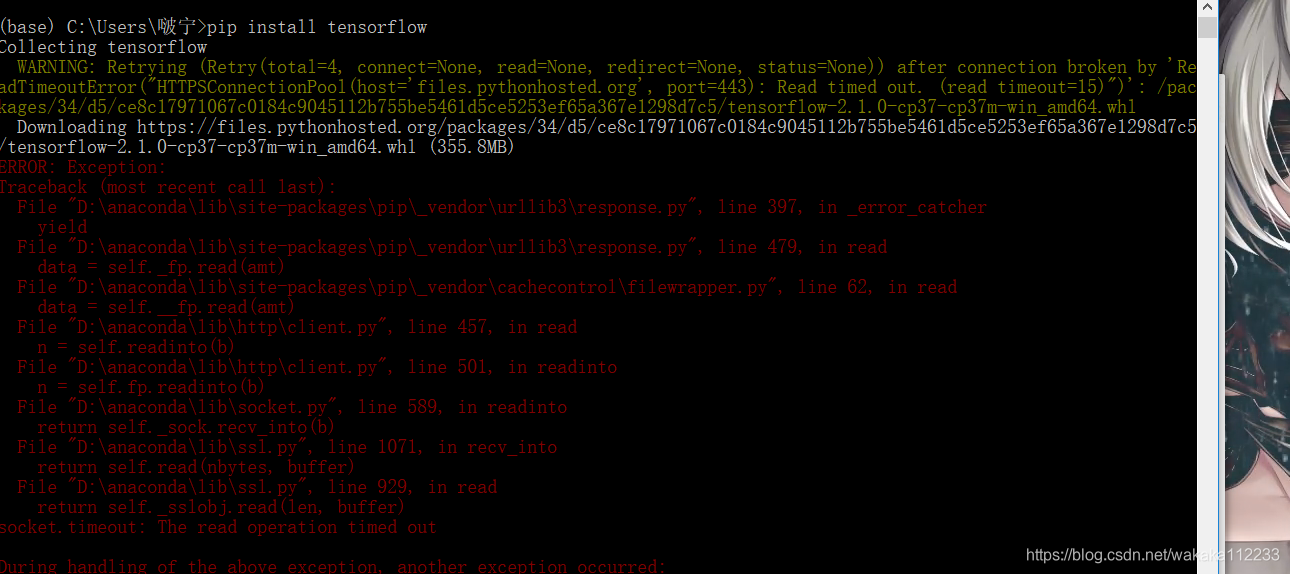
问题一:
WARNING: Retrying (Retry(total=4, connect=None, read=None, redirect=None, status=None)) after connection broken by ‘ReadTimeoutError(“HTTPSConnectionPool(host=‘files.pythonhosted.org’, port=443): Read timed out. (read timeout=15)”)’: /packages/34/d5/ce8c17971067c0184c9045112b755be5461d5ce5253ef65a367e1298d7c5/tensorflow-2.1.0-cp37-cp37m-win_amd64.whl
Downloading https://files.pythonhosted.org/packages/34/d5/ce8c17971067c0184c9045112b755be5461d5ce5253ef65a367e1298d7c5/tensorflow-2.1.0-cp37-cp37m-win_amd64.whl (355.8MB)
这里是由于镜像问题,下载请求无法通过,在这就要改一下镜像了,这里选用了阿里的镜像库。
解决方法:
pip install tensorflow -i http://mirrors.aliyun.com/pypi/simple/
但是更改后还是有问题。
问题二:

解决办法: 此时将安装指令改为
pip install tensorflow -i http://mirrors.aliyun.com/pypi/simple/ --trusted-host mirrors.aliyun.com
这便可以成功安装了
2.安装好后进行测试出现问题
测试代码自然是import指令:
python
import tensorflow as tf
hello = tf.constant(‘Hello, TensorFlow!’)
sess = tf.Session()
print(sess.run(hello))
问题三: import指令识别不了,找不到指定模块。
ImportError: DLL load failed: 找不到指定的模块。
Failed to load the native TensorFlow runtime.
这个问题在别的博客找到答案,原文为这篇
原因大概是版本的问题,不指定版本的tensorflow安装的是最新版本,可能是自己的电脑和最新版不适配之类的。
解决方法;

- 先将本来tensorflow的卸载
pip uninstall tensorflow
- 再重新装指定版本的tensorflow,这里装了2.0版本
pip install tensorflow==2.0.0 -i http://mirrors.aliyun.com/pypi/simple/ --trusted-host mirrors.aliyun.com
之后便可以使用import指令了
3.测试tensorflow安装是否成功
在执行指令
python
import tensorflow as tf
hello = tf.constant(‘Hello, TensorFlow!’)
sess = tf.Session()
print(sess.run(hello))
前三句都没问题,第四句又有错误
问题四:
Traceback (most recent call last):
File “”, line 1, in
AttributeError: module ‘tensorflow’ has no attribute ‘Session’
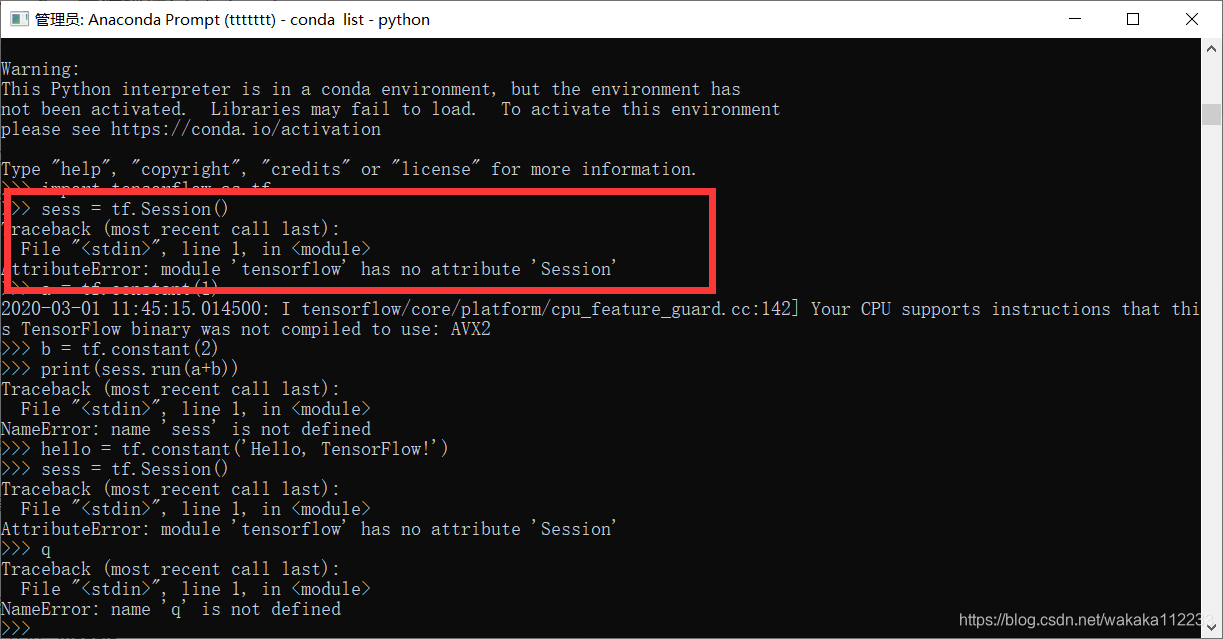
后来知道session不能用于tensorflow2中,
解决办法: 要么去学tensorflow2的新语法,要么去重装tensorflow1.xx