摘要:上周我们实现了用运动模型实现的打飞碟小游戏,具体就是给出设定好的路径,那么飞碟会沿着路径往设定的方向去走,我们只要咋过程中击打飞碟就能实现有效得分。这样的运动模型需要我们设定位置与路径等变量。如果采用物理模型,我们给他一个三维的力,根据F = M * a;那么一个物体将会以在力的作用下产生一定的运动轨迹并且随着力的作用运动,我们今天就是要实现这样的移动物理引擎模型。这边文章主要将两部分实现的差异进行一点自我理解的讲解
再这之前我们先看一下我们上周完成了的运动模型的打飞碟小游戏。参考我的上篇博客连接:运动模型的打飞碟
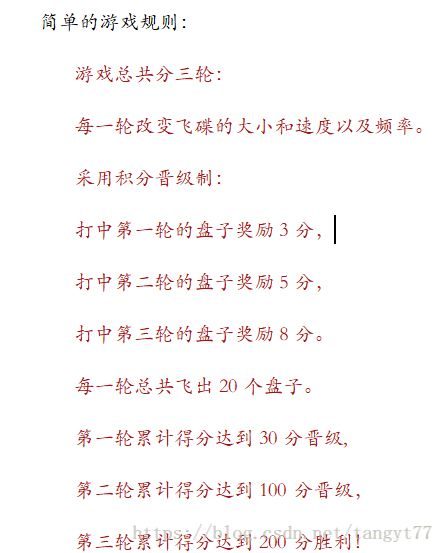
我们制定了游戏规则还有实现了动作分离模型以及工厂模型,也实现了给定路径的运动模型。

我们上周实现了这部分的代码,这周很多代码可以复用,实际上不用修改,我们只需要增加我们需要实现的物理引擎的功能的代码部分即可。
首先接口是一定要的,先定义一个接口
public interface IActionManager
{
    void playDisk();
}
至于动作路径的实现,我们运动模型中的初始化了飞碟飞出的位置,并且设定了目标位置,飞碟沿着特定路径以相应速度进行前行
    float startX;
    float targetX;
    float targetY;

    public override void Start()
    {
        speed = 5 + sceneControler.round * 5;//使速度随着轮数变化
        startX = 5 - Random.value * 10;//使发射位置随机在(-5,5)
        if (Random.value > 0.5)
        {
            targetX = 30;
        }
        else
        {
            targetX = -30;
        }
        targetY = -5;
        this.transform.position = new Vector3(startX, 0, -6);
        target = new GameObject();//创建终点
        target.transform.position = new Vector3(targetX, targetY, 30);
        //计算两者之间的距离
        distanceToTarget = Vector3.Distance(this.transform.position, target.transform.position);
    }
同时运动模型下我们还需要去增加一下飞行路线的美感,丰富一下运动的路径动作,
public override void Update()
    {
        Vector3 targetPos = target.transform.position;

        //让始终它朝着目标
        gameobject.transform.LookAt(targetPos);
        float angle = Mathf.Min(1, Vector3.Distance(gameobject.transform.position, targetPos) / distanceToTarget) * 45;
        gameobject.transform.rotation = gameobject.transform.rotation * Quaternion.Euler(Mathf.Clamp(-angle, -42, 42), 0, 0);
        float currentDist = Vector3.Distance(gameobject.transform.position, target.transform.position);
        gameobject.transform.Translate(Vector3.forward * Mathf.Min(speed * Time.deltaTime, currentDist));
        if (this.transform.position == target.transform.position)
        {
            DiskFactory.getInstance().freeDisk(gameobject);
            Destroy(target);
            this.enable = false;
            this.destroy = true;
        }
    }
物理引擎模型下要简单很多,我们初始化出发位置和力的方向,完全不需要考虑目标位置;
public override void Start()
    {
        startX = 5 - Random.value * 10;//同样使飞碟在(-5到5)之间任意位置飞出
        this.transform.position = new Vector3(startX, 0, 0);//起始位置
        force = new Vector3(6 * Random.Range(-1, 1), 6 * Random.Range(0.5f, 2), 13 + 2 * sceneControler.round);//设置力的大小
    }
至于如何实现力的作用,我们引入了一个参数来判断力是否作用了,如果作用了将不再作用,并且对物体只作用一次
    public void Destory()
    {
        DiskFactory.getInstance().freeDisk(gameobject);
        Destroy(target);
        this.enable = false;
        this.destroy = true;
    }
    // Update is called once per frame
    public override void FixedUpdate()
    {
        if (!this.destroy)
        {
            if (enableEmit)
            {
                gameobject.GetComponent<Rigidbody>().velocity = Vector3.zero;
                gameobject.GetComponent<Rigidbody>().AddForce(force, ForceMode.Impulse);
                enableEmit = false;
            }//对于还未销毁的飞碟确保作用一次
        }
    }
同样的我们需要增加一个Manager来实现对游戏的控制
运动模型下我们的实现是这样的:
public class MoveManager : SSActionManager
{
    public SceneController sceneController;
    public DiskFactory diskFactory;
    public Emit2 DiskMove;
    int count = 0;
    // Use this for initialization
    protected void Start()
    {
        sceneController = (SceneController)SSDirector.getInstance().currentScenceController;
        diskFactory = DiskFactory.getInstance();
        sceneController.actionManager = this;
    }

    // Update is called once per frame
    protected new void Update()
    {
        if (sceneController.round == 1 && sceneController.game == 1)
        {
            count++;
            if (count == 70)//70帧发射一个,发射的速度不同,发射慢一点
            {
                DiskMove = Emit2.GetSSAction();
                this.addAction(diskFactory.getDisk(sceneController.round), DiskMove);
                sceneController.num++;//记录发射的个数
                count = 0;
            }
            base.Update();
        }
        if (sceneController.round ==2 && sceneController.game == 1)
        {
            count++;
            if (count == 60)//60帧发射一个,发射的速度不同
            {
                DiskMove = Emit2.GetSSAction();
                this.addAction(diskFactory.getDisk(sceneController.round), DiskMove);
                sceneController.num++;//记录发射的个数
                count = 0;
            }
            base.Update();
        }
        if (sceneController.round ==3 && sceneController.game == 1)
        {
            count++;
            if (count == 50)//50帧发射一个,发射的速度不同
            {
                DiskMove = Emit2.GetSSAction();
                this.addAction(diskFactory.getDisk(sceneController.round), DiskMove);
                sceneController.num++;//记录发射的个数
                count = 0;
            }
            base.Update();
        }
    }
    public void SSActionEvent(SSAction source,
        int intParam = 0, string strParam = null, Object objectParam = null)
    {
        //
    }
}
而physicsManager的实现几乎不需要太多改动,同样我们还是坚持使用原来的几份规则。而且飞碟抛出的频率与原来一样
    public SceneController sceneController;
    public DiskFactory diskFactory;
    public Emit2 DiskMove;
    int count = 0;
    // Use this for initialization
    protected void Start()
    {
        sceneController = (SceneController)SSDirector.getInstance().currentScenceController;
        diskFactory = DiskFactory.getInstance();
        sceneController.actionManager = this;
    }

    // Update is called once per frame
    protected new void Update()
    {
        if (sceneController.round == 1 && sceneController.game == 1)
        {
            count++;
            if (count == 70)//70帧发射一个,发射的速度不同,发射慢一点
            {
                DiskMove = Emit2.GetSSAction();
                this.addAction(diskFactory.getDisk(sceneController.round), DiskMove);
                sceneController.num++;//记录发射的个数
                count = 0;
            }
            base.Update();
        }
        if (sceneController.round ==2 && sceneController.game == 1)
        {
            count++;
            if (count == 60)//60帧发射一个,发射的速度不同
            {
                DiskMove = Emit2.GetSSAction();
                this.addAction(diskFactory.getDisk(sceneController.round), DiskMove);
                sceneController.num++;//记录发射的个数
                count = 0;
            }
            base.Update();
        }
        if (sceneController.round ==3 && sceneController.game == 1)
        {
            count++;
            if (count == 50)//50帧发射一个,发射的速度不同
            {
                DiskMove = Emit2.GetSSAction();
                this.addAction(diskFactory.getDisk(sceneController.round), DiskMove);
                sceneController.num++;//记录发射的个数
                count = 0;
            }
            base.Update();
        }
    }
    public void SSActionEvent(SSAction source,
        int intParam = 0, string strParam = null, Object objectParam = null)
    {
        //
    }
实现之后我们只需要把我们完成的代码挂在摄像机上,并且将我们原来的movemanager的cs文件不要勾选上,就切换到了物理引擎模式,我们可以开始正常的飞碟游戏
总结心得体会:这两周其实重要的任务都在实训,基本上留给制作游戏的时间不是很多。还好这两周的作业量还行,对于物理引擎的引进还是感觉蛮多惊喜的,毕竟自我感觉,比起运动模型将什么都人为提前设置好的东西,物理引擎模型可能带来更多的可能还有更方便的代码操作。继续加油,好好努力!