1.代码层优化
1.没有必要的变量直接使用

2.多个地方用到的配置文件提取到公共的地方


3.用集合处理多个变量

修改为
4.冗余代码换个写法

改为:
5.规范注释的书写

6.对于异常类的处理,如果捕捉到一定要处理,不然任务报错没有查询的地方

7.配置信息从类里抽出来,直接写到配置文件里,方便查找统一修改如下:

2.流程优化:
-
对于任务算子的并行度单独设置,


2.Hbase落地表分区写入,超过100W数据的加缓存,批量刷新写入;

3.写法优化注意:

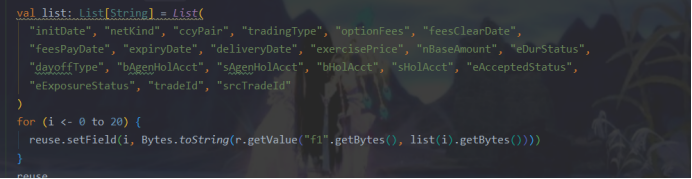
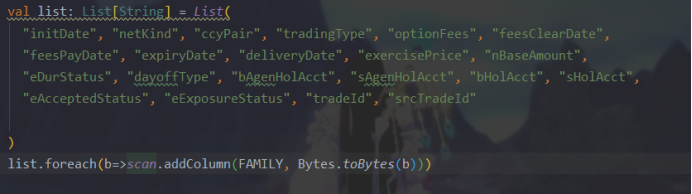
换个写法:hive映射到hbase新加字段按字典序,如果是获取hbase数据,增加可读性减少下标用法,否则加个字段就得挨个对一遍下标位置。

4.运行环境的优化
脚本启动:
/opt/flink/bin/flink run -m yarn-cluster -ytm 4g -yjm 2g -ynm sq1_job   -c com.yss.optionUnexpired.FlinkMain /opt/sq_project/job/ceshi100w-02.jar -6226220968126435072 30 >/opt/sq_project/log/optionUnexpired.log 2>&1 &
发现:如果统一都设置为90个并行度,第一个作业申请到资源会一直占用,第二个job执行的时候,一直处于创建阶段无法执行
加入配置 (默认8G/1核,ysm 最大可以申请到8G的资源)
<property>
        <name>yarn.nodemanager.resource.memory-mb</name>
        <value>24576</value>
    </property>
    <property>
        <name>yarn.nodemanager.resource.cpu-vcores</name>
        <value>15</value>
    </property>
<property>
        <name>yarn.scheduler.maximum-allocation-mb</name>
        <value>24576</value>
    </property>

    <property>
        <name>yarn.scheduler.maximum-allocation-vcores</name>
        <value>15</value>
    </property>
查看磁盘节点是16核64G,接着调整到48G内存,还是用shell脚本批量发送
for i in `cat hosts`;do scp /opt/hadoop/etc/hadoop/yarn-site.xml $i:/opt/hadoop/etc/hadoop/yarn-site.xml;done
最后具体情况需要根据业务的复杂度、数据量和集群情况合理分配slot ytm tjm p,其实并行度的设置可以根据算子里面的不同情况各自设置并行度,但是最大的并行度是由 [(slot * jobmanager的数据 ) * nodemanager数量 ]决定的,jobmanager的数量=(可申请的最大内存 - yjm ) / ytm 。其实有的时候slot越大并不会性能越高,集群的资源需要留一部分给hbase hive等数据仓库来做缓存使用,在代码层无法优化后,还是需要根据实际情况测试调整集群资源和运行资源。
5.Flink内部算子优化
Flink框架非常复杂,并提供了许多方法来调整其执行方式。本文我将介绍提高Flink应用程序性能的四种不同方法。
如果不熟悉Flink,你可以阅读一些介绍性的文章,比如这篇,这篇,还有这篇。但是如果已经非常熟悉Apache Flink了,本文描述的内容可以帮助你如何提高应用程序的运行速度。
1.使用Flink Tuples
当使用类似于groupBy、join或keyBy这些操作时,Flink提供了多种方式以便用户在数据集中选择主键。用户可以使用主键选择函数:
// Join movies and ratings datasets
movies.join(ratings)
// Use movie id as a key in both cases
.where(new KeySelector<Movie, String>() {
@Override
public String getKey(Movie m) throws Exception {
return m.getId();
}
})
.equalTo(new KeySelector<Rating, String>() {
@Override
public String getKey(Rating r) throws Exception {
return r.getMovieId();
}
})
也可以在POJO类型中指定字段名称:
movies.join(ratings)
// Use same fields as in the previous example
.where("id")
.equalTo("movieId")
但是如果现在使用的是Flink tuple类型,那么只要简单地指定字段元组的位置,就可以被用作主键了:
DataSet<Tuple2<String, String>> movies = ...
DataSet<Tuple3<String, String, Double>> ratings = ...
movies.join(ratings)
// Specify fields positions in tuples
.where(0)
.equalTo(1)
可见最后一种方式的性能是最好的,但是可读性怎么样呢?代码现在看起来是不是就像下面这样?
DataSet<Tuple3<Integer, String, Double>> result = movies.join(ratings)
.where(0)
.equalTo(0)
.with(new JoinFunction<Tuple2<Integer,String>, Tuple2<Integer,Double>, Tuple3<Integer, String, Double>>() {
// What is happening here?
@Override
public Tuple3<Integer, String, Double> join(Tuple2<Integer, String> first, Tuple2<Integer, Double> second) throws Exception {
// Some tuples are joined with some other tuples and some fields are returned???
return new Tuple3<>(first.f0, first.f1, second.f1);
}
});
在本例中,想要提高可读性,最常见的做法就是创建一个类,该类需要继承TupleX类,并为类里面的这些字段实现getter和setter。下面是Flink Gelly库的Edge类,继承了Tuple3类:
public class Edge<K, V> extends Tuple3<K, K, V> {
public Edge(K source, K target, V value) {
this.f0 = source;
this.f1 = target;
this.f2 = value;
}
// Getters and setters for readability
public void setSource(K source) {
this.f0 = source;
}
public K getSource() {
return this.f0;
}
// Also has getters and setters for other fields
...
}
2.复用Flink对象
另一个可以用来提高Flink应用程序性能的选项是,当从用户定义的函数返回数据时,最好使用可变对象。看看下面这个例子:
stream
.apply(new WindowFunction<WikipediaEditEvent, Tuple2<String, Long>, String, TimeWindow>() {
@Override
public void apply(String userName, TimeWindow timeWindow, Iterable<WikipediaEditEvent> iterable, Collector<Tuple2<String, Long>> collector) throws Exception {
long changesCount = ...
// A new Tuple instance is created on every execution
collector.collect(new Tuple2<>(userName, changesCount));
}
}
可以看出,apply函数每执行一次,都会新建一个Tuple2类的实例,因此增加了对垃圾收集器的压力。解决这个问题的一种方法是反复使用相同的实例:
stream
.apply(new WindowFunction<WikipediaEditEvent, Tuple2<String, Long>, String, TimeWindow>() {
// Create an instance that we will reuse on every call
private Tuple2<String, Long> result = new Tuple<>();
@Override
public void apply(String userName, TimeWindow timeWindow, Iterable<WikipediaEditEvent> iterable, Collector<Tuple2<String, Long>> collector) throws Exception {
long changesCount = ...
// Set fields on an existing object instead of creating a new one
result.f0 = userName;
// Auto-boxing!! A new Long value may be created
result.f1 = changesCount;
// Reuse the same Tuple2 object
collector.collect(result);
}
}
这种做法更好一点。虽然每次调用时都新建一个Tuple2的实例,但是其实还间接创建了Long类的实例。为了解决这个问题,Flink有许多所谓的value class:IntValue、LongValue、StringValue、FloatValue等。下面介绍一下如何使用它们:
stream
.apply(new WindowFunction<WikipediaEditEvent, Tuple2<String, Long>, String, TimeWindow>() {
// Create a mutable count instance
private LongValue count = new IntValue();
// Assign mutable count to the tuple
private Tuple2<String, LongValue> result = new Tuple<>("", count);
@Override
// Notice that now we have a different return type
public void apply(String userName, TimeWindow timeWindow, Iterable<WikipediaEditEvent> iterable, Collector<Tuple2<String, LongValue>> collector) throws Exception {
long changesCount = ...
// Set fields on an existing object instead of creating a new one
result.f0 = userName;
// Update mutable count value
count.setValue(changesCount);
// Reuse the same tuple and the same LongValue instance
collector.collect(result);
}
}
这种做法经常用在Flink库里面,如Flink Gelly。
3.使用注解功能
优化Flink应用程序的另一种方法是提供一些关于用户自定义的函数会对输入数据做哪些操作的信息。由于Flink无法解析和理解代码,所以可以提供一些有利于构建更有效执行计划的重要信息。可以使用以下三个注解:
@ForwardedFields:指定输入值中哪些字段保持不变,哪些字段是用于输出的。
@NotForwardedFields:指定在输出中未保留相同位置的字段。
@ReadFields:指定用来计算结果值的字段。指定的字段应该只在计算中使用,而不仅仅是复制到输出参数中。
看一下如何使用ForwardedFields注释:
// Specify that the first element is copied without any changes
@ForwardedFields("0")
class MyFunction implements MapFunction<Tuple2<Long, Double>, Tuple2<Long, Double>> {
@Override
public Tuple2<Long, Double> map(Tuple2<Long, Double> value) {
// Copy first field without change
return new Tuple2<>(value.f0, value.f1 + 123);
}
}
这意味着输入元组中的第一个元素没有被更改,它将返回到相同的位置。
如果不更改字段,但只需将其移动到另一个位置,那么也可以使用ForwardedFields。在下一个示例中,我们在输入tuple中互换一下字段,并通知Flink:
// 1st element goes into the 2nd position, and 2nd element goes into the 1st position
@ForwardedFields("0->1; 1->0")
class SwapArguments implements MapFunction<Tuple2<Long, Double>, Tuple2<Double, Long>> {
@Override
public Tuple2<Double, Long> map(Tuple2<Long, Double> value) {
// Swap elements in a tuple
return new Tuple2<>(value.f1, value.f0);
}
}
上面提到的注解只能应用于只有一个输入参数的函数,例如map或flatMap。如果函数有两个输入参数,则可以使用ForwardedFieldsFirst和ForwardedFieldsSecond,分别提供关于第一个参数和第二个参数的信息。
下面是如何在JoinFunction接口的实现中使用这些注释:
// Two fields from the input tuple are copied to the first and second positions of the output tuple
@ForwardedFieldsFirst("0; 1")
// The third field from the input tuple is copied to the third position of the output tuple
@ForwardedFieldsSecond("2")
class MyJoin implements JoinFunction<Tuple2<Integer,String>, Tuple2<Integer,Double>, Tuple3<Integer, String, Double>>() {
@Override
public Tuple3<Integer, String, Double> join(Tuple2<Integer, String> first, Tuple2<Integer, Double> second) throws Exception {
return new Tuple3<>(first.f0, first.f1, second.f1);
}
})
Flink还提供NotForwardedFieldsFirst、NotForwardedFieldsSecond、ReadFieldsFirst ReadFirldsSecond注释,这些注释都可以达到类似目的。
4.Select Join Type
如果给Flink另一个提示,那么就可以让joins速度更快,但是在讨论它的工作原理之前,先讨论一下Flink是如何执行joins的。
当Flink处理批量数据时,集群中的每台机器都存储了部分数据。要执行join,Apache Flink需要找到满足连接条件的两个数据集。为了做到这一点,Flink首先必须将两个数据集的项目放在同一台机器上。这里有两种策略:
Repartition-分配策略:在这种情况下,两个数据集都被各自的主键分离了,并通过网络发送。这意味着如果数据集很大,可能需要大量的时间才能通过网络完成复制。
广播转发策略:在这种情况下,一个数据集不受影响,但是第二个数据集被复制到集群中的每台机器上,它们都有第一个数据集的一部分。
如果是将某个小数据集join到更大的数据集,那么可以使用广播转发策略,这样也可以避免第一个数据集的分区付出的昂贵代价。这很容易做到:
ds1.join(ds2, JoinHint.BROADCAST_HASH_FIRST)
这就表示第一个数据集比第二个数据集小得多。
你也可以使用其他连接提示:
BROADCAST_HASH_SECOND:第二个数据集要小得多
REPARTITION_HASH_FIRST:第一个数据集稍微小一些
REPARTITION_HASH_SECOND:第二个数据集要小一点
REPARTITION_SORT_MERGE:使用排序和合并策略对数据集进行重新分配
**OPTIMIZER_CHOOSES:**Flink优化器将决定如何join数据集
4.注意代码中不要使用输出类提交job的算子

这两个job其实是一个任务产生的,应该产生一个job才对,这导致运行两个job浪费资源和时间,因为代码里使用了 dataSet.collect(); 当然 输出类的print、 syso等 flink 都会提交多次,源码如下
public void print() throws Exception {
		List<T> elements = collect();  //这边也是调用了collect 方法
		for (T e: elements) {
			System.out.println(e);
		}
	}
public List<T> collect() throws Exception {
final String id = new AbstractID().toString();
final TypeSerializer<T> serializer = getType().createSerializer(getExecutionEnvironment().getConfig());
this.output(new Utils.CollectHelper<>(id, serializer)).name("collect()");
JobExecutionResult res = getExecutionEnvironment().execute(); //重点来了,熟悉么,是它 是它就是他
ArrayList<byte[]> accResult = res.getAccumulatorResult(id);
if (accResult != null) {
try {
return SerializedListAccumulator.deserializeList(accResult, serializer);
} catch (ClassNotFoundException e) {
throw new RuntimeException("Cannot find type class of collected data type.", e);
} catch (IOException e) {
throw new RuntimeException("Serialization error while deserializing collected data", e);
}
} else {
throw new RuntimeException("The call to collect() could not retrieve the DataSet.");
}
}