分布式框架-Dubbox
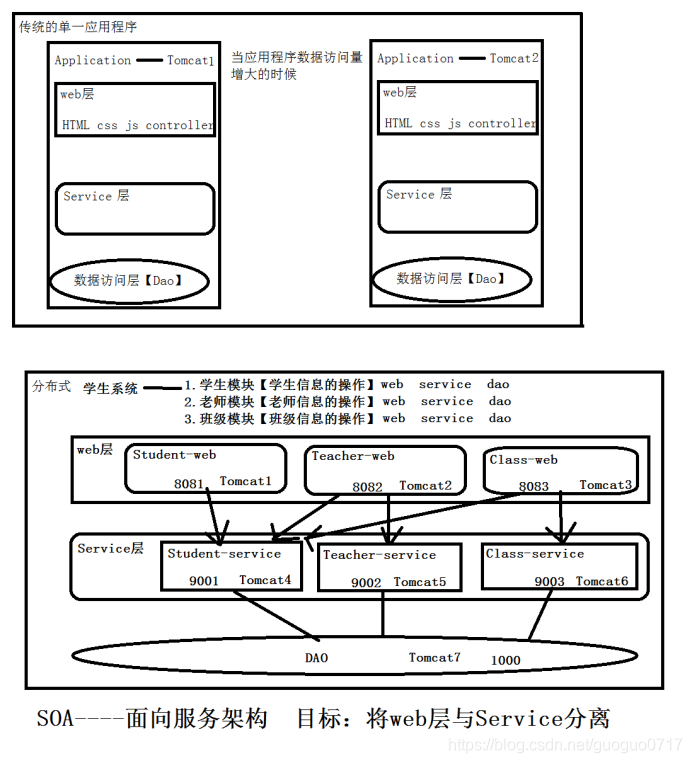
1 什么是SOA架构
SOA是Service-Oriented Architecture的首字母简称,它是一种支持面向服务的架构样式。从服务、基于服务开发和服务的结果来看,面向服务是一种思考方式。其实SOA架构更多应用于互联网项目开发。
为什么互联网项目会采用SOA架构呢?随着互联网的发展,网站应用的规模不断扩大,常规的垂直应用架构已无法应对,分布式服务架构以及流动计算架构势在必行,迫切需一个治理系统确保架构有条不紊的演进。
战争论–《战争论》是普鲁士军事理论家卡尔·冯·克劳塞维茨创作的一部军事理论著作,首次出版于1832年。
政治是目的,战争是手段。
2.Dubbox简介
Dubbo 是一个分布式服务框架,其前身是阿里巴巴开源项目Dubbo ,被国内电商及互联网项目中使用,后期阿里巴巴停止了该项目的维护,当当网便在Dubbo基础上进行优化,并继续维护,为了与原有的Dubbo区分,故将其命名为Dubbox。
Dubbox 致力于提供高性能和透明化的RPC[RPC是远程过程调用(Remote Procedure Call)的缩写形式]远程服务调用方案,以及SOA服务治理方案。简单的说,dubbox就是个服务框架,如果没有分布式的需求,其实是不需要用的,只有在分布式的时候,才有dubbox这样的分布式服务框架的需求,并且本质上是个服务调用的东东,说白了就是个远程服务调用的分布式框架。
Dubbo是一个基于RPC的分布式服务框架【只有在分布式】
Dubbo运行结构图
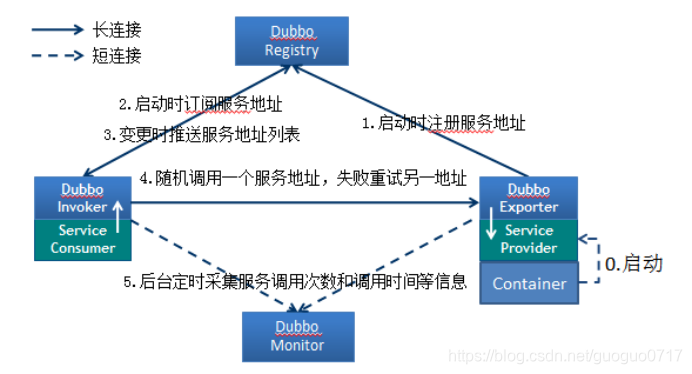
节点角色说明:
Provider: 暴露服务的服务提供方。
Consumer: 调用远程服务的服务消费方。
Registry: 服务注册与发现的注册中心。
Monitor: 统计服务的调用次调和调用时间的监控中心。
Container: 服务运行容器。
调用关系说明:
0. 服务容器负责启动,加载,运行服务提供者。
1. 服务提供者在启动时,向注册中心注册自己提供的服务。
2. 服务消费者在启动时,向注册中心订阅自己所需的服务。
3. 注册中心返回服务提供者地址列表给消费者,如果有变更,注册中心将基于长连接推送变更数据给消费者。
4. 服务消费者,从提供者地址列表中,基于软负载均衡算法,选一台提供者进行调用,如果调用失败,再选另一台调用。
5. 服务消费者和提供者,在内存中累计调用次数和调用时间,定时每分钟发送一次统计
数据到监控中心。
3.Zookeeper 介绍
官方推荐使用 zookeeper 注册中心。注册中心负责服务地址的注册与查找,相当于目录服务,服务提供者和消费者只在启动时与注册中心交互,注册中心不转发请求,压力较小。
Zookeeper 是 Apacahe Hadoop 的子项目,是一个树型的目录服务,支持变更推送,适合作为Dubbox 服务的注册中心,工业强度较高,可用于生产环境。
4.Zookeeper 在Linux系统的安装
安装步骤:
第1步:安装 Linux(此步省略)[因为我们使用的windows系统,所以我们只能把linux安装在虚拟机中] 安装虚拟机和在虚拟机中安装linux系统请参考linux课件
【设置虚拟机网络连接方式为仅主机。】
第2步:下载zookeeper安装包
https://www.apache.org/dyn/closer.lua/zookeeper/zookeeper-3.6.2/apache-zookeeper-3.6.2-bin.tar.gz
第3步:打开linux虚拟机,查看ip地址

第4步:打开SecureCRT工具连接到对应的ip地址所指示的 linux 系统。

第5步:通过SecureCRT工具将在windows系统中下载好的zookeeper安装包上传到 linux 系统。
5.1 Alt+P 进入SFTP 输入put zookeeper安装包路径上传

5.2查看上传成功以后的zookeeper安装包
[wxrj@wxrj ~]$ ll
鎬荤敤閲?452488
drwxrwxr-x. 9 wxrj wxrj 4096 12鏈?15 14:30 apache-tomcat-7.0.103
-rwxrwxrwx. 1 wxrj wxrj 9604761 4鏈? 18 2020 apache-tomcat-7.0.103.tar.gz
-rw-rw-r–. 1 wxrj wxrj 12515974 12鏈?24 11:16 apache-zookeeper-3.6.2-bin.tar.gz
drwxrwxr-x. 9 wxrj wxrj 4096 12鏈?15 14:17 eclipse
-rwxrwxrwx. 1 wxrj wxrj 264956749 8鏈? 2 2019 eclipse-jee-luna-SR2-linux-gtk-x86_64.tar.gz
…
5.3 修改zookeeper安装包的访问权限
[wxrj@wxrj ~]$
[wxrj@wxrj ~]$ chmod 777 apache-zookeeper-3.6.2-bin.tar.gz
[wxrj@wxrj ~]$ ll
鎬荤敤閲?452488
drwxrwxr-x. 9 wxrj wxrj 4096 12鏈?15 14:30 apache-tomcat-7.0.103
-rwxrwxrwx. 1 wxrj wxrj 9604761 4鏈? 18 2020 apache-tomcat-7.0.103.tar.gz
-rwxrwxrwx. 1 wxrj wxrj 12515974 12鏈?24 11:16 apache-zookeeper-3.6.2-bin.tar.gz
drwxrwxr-x. 9 wxrj wxrj 4096 12鏈?15 14:17 eclipse
…
5.4解压缩zookeepe压缩包
[wxrj@wxrj-linux ~]$ tar -zxvf apache-zookeeper-3.6.2-bin.tar.gz
…
[wxrj@wxrj ~]$ ll
鎬荤敤閲?452492
drwxrwxr-x. 9 wxrj wxrj 4096 12鏈?15 14:30 apache-tomcat-7.0.103
-rwxrwxrwx. 1 wxrj wxrj 9604761 4鏈? 18 2020 apache-tomcat-7.0.103.tar.gz
drwxrwxr-x. 6 wxrj wxrj 4096 12鏈?24 11:30 apache-zookeeper-3.6.2-bin
-rwxrwxrwx. 1 wxrj wxrj 12515974 12鏈?24 11:16 apache-zookeeper-3.6.2-bin.tar.gz
drwxrwxr-x. 9 wxrj wxrj 4096 12鏈?15 14:17 eclipse
…
5.5进入 zookeeper的解压目录,创建 data文件夹。
[wxrj@wxrj ~]$ cd apache-zookeeper-3.6.2-bin
[wxrj@wxrj apache-zookeeper-3.6.2-bin]$ ll
鎬荤敤閲?40
drwxr-xr-x. 2 wxrj wxrj 4096 9鏈? 4 20:43 bin
drwxr-xr-x. 2 wxrj wxrj 4096 9鏈? 4 20:43 conf
drwxr-xr-x. 5 wxrj wxrj 4096 9鏈? 4 20:44 docs
drwxrwxr-x. 2 wxrj wxrj 4096 12鏈?24 11:30 lib
-rw-r–r--. 1 wxrj wxrj 11358 9鏈? 4 20:43 LICENSE.txt
-rw-r–r--. 1 wxrj wxrj 432 9鏈? 4 20:43 NOTICE.txt
-rw-r–r--. 1 wxrj wxrj 1963 9鏈? 4 20:43 README.md
-rw-r–r--. 1 wxrj wxrj 3166 9鏈? 4 20:43 README_packaging.md
[wxrj@wxrj apache-zookeeper-3.6.2-bin]$ mkdir data
[wxrj@wxrj apache-zookeeper-3.6.2-bin]$ ll
鎬荤敤閲?44
drwxr-xr-x. 2 wxrj wxrj 4096 9鏈? 4 20:43 bin
drwxr-xr-x. 2 wxrj wxrj 4096 9鏈? 4 20:43 conf
drwxrwxr-x. 2 wxrj wxrj 4096 12鏈?24 11:33 data
drwxr-xr-x. 5 wxrj wxrj 4096 9鏈? 4 20:44 docs
drwxrwxr-x. 2 wxrj wxrj 4096 12鏈?24 11:30 lib
-rw-r–r--. 1 wxrj wxrj 11358 9鏈? 4 20:43 LICENSE.txt
-rw-r–r--. 1 wxrj wxrj 432 9鏈? 4 20:43 NOTICE.txt
-rw-r–r--. 1 wxrj wxrj 1963 9鏈? 4 20:43 README.md
-rw-r–r--. 1 wxrj wxrj 3166 9鏈? 4 20:43 README_packaging.md
5.6 修改conf目录中的zoo_sample.cfg文件的名称,修改成zoo.cfg
[wxrj@wxrj apache-zookeeper-3.6.2-bin]$ cd conf
[wxrj@wxrj conf]$ ll
鎬荤敤閲?12
-rw-r–r--. 1 wxrj wxrj 535 9鏈? 4 20:43 configuration.xsl
-rw-r–r--. 1 wxrj wxrj 3435 9鏈? 4 20:43 log4j.properties
-rw-r–r--. 1 wxrj wxrj 1148 9鏈? 4 20:43 zoo_sample.cfg
[wxrj@wxrj conf]$ mv zoo_sample.cfg zoo.cfg
[wxrj@wxrj conf]$ ll
鎬荤敤閲?12
-rw-r–r--. 1 wxrj wxrj 535 9鏈? 4 20:43 configuration.xsl
-rw-r–r--. 1 wxrj wxrj 3435 9鏈? 4 20:43 log4j.properties
-rw-r–r--. 1 wxrj wxrj 1148 9鏈? 4 20:43 zoo.cfg
5.7打开zoo.cfg , 修改 data 属性
[wxrj@wxrj conf]$ vim zoo.cfg
点击“i”进入插入模式
修改 data 属性:dataDir=/home/wxrj/apache-zookeeper-3.6.2-bin/data
按“Esc”,输入“:wq”
5.8 进入bin目录,启动zookeeper服务输入命令
进入bin目录,启动服务输入命令
[wxrj@wxrj conf]$ cd …
[wxrj@wxrj apache-zookeeper-3.6.2-bin]$ cd bin
[wxrj@wxrj bin]$ ./zKServer.sh start
输出以下内容表示启动成功

5.8 进入bin目录,关闭zookeeper服务输入命令
[wxrj@wxrj-linux bin]$ ./zKServer.sh stop
输出以下提示信息

5.2服务提供者开发
1.创建一个空的项目作为dubbo的工作空间
2.删除src目录
3.选中空项目右键新建module[新建一个子模块{war}],没有继承关系

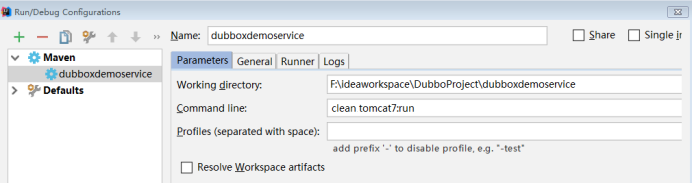
4.打开dubboxdemoservice子模块的pom导入依赖包,配置tomcat插件
<!-- https://mvnrepository.com/artifact/org.springframework/spring-webmvc -->
<dependency>
  <groupId>org.springframework</groupId>
  <artifactId>spring-webmvc</artifactId>
  <version>4.2.4.RELEASE</version>
</dependency>
<!-- dubbo相关 -->
<dependency>
  <groupId>com.alibaba</groupId>
  <artifactId>dubbo</artifactId>
  <version>2.5.3</version>
</dependency>
<dependency>
  <groupId>org.apache.zookeeper</groupId>
  <artifactId>zookeeper</artifactId>
  <version>3.4.6</version>
</dependency>
<dependency>
  <groupId>com.github.sgroschupf</groupId>
  <artifactId>zkclient</artifactId>
  <version>0.1</version>
</dependency>
配置tomcat插件
<plugin>
	<groupId>org.apache.tomcat.maven</groupId>
	<artifactId>tomcat7-maven-plugin</artifactId>
	<configuration>
		<!-- 指定端口 -->
		<port>8080</port>
		<!-- 请求路径 -->
		<path>/</path>
	</configuration>
</plugin>
5.完善子模块的项目结构
6.在web.xml文件中配置加载spring配置文件【applicationContext-service.xml】
<!-- 配置加载spring配置文件 -->
<context-param>
  <param-name>contextConfigLocation</param-name>
  <param-value>classpath:applicationContext*.xml</param-value>
</context-param>
<listener>
  <listener-class>org.springframework.web.context.ContextLoaderListener</listener-class>
</listener>
7.在resources目录下创建spring配置文件【applicationContext-service.xml】,添加dubbo命名空间地址
<?xml version="1.0" encoding="UTF-8"?>
<beans xmlns="http://www.springframework.org/schema/beans"
       xmlns:xsi="http://www.w3.org/2001/XMLSchema-instance"
       xmlns:dubbo="http://code.alibabatech.com/schema/dubbo"
       xsi:schemaLocation="http://www.springframework.org/schema/beans
       http://www.springframework.org/schema/beans/spring-beans.xsd
        http://code.alibabatech.com/schema/dubbo
        http://code.alibabatech.com/schema/dubbo/dubbo.xsd">

</beans>
8.创建一个业务访问接口
package com.click369.dubbodemo.service;
/**
 * 用户信息的服务层访问接口
 */
public interface UserService {


    //得到用户名
    public String getUserName();
}
9.创建接口实现类
package com.click369.dubbodemo.service.impl;
import com.alibaba.dubbo.config.annotation.Service;
import com.click369.dubbodemo.service.UserService;
@Service
public class UserServiceImpl implements UserService{


    @Override
    public String getUserName() {


        return "zhangsan";
    }
}
注意:Service注解与原来不同,需要引入com.alibaba包下的
10.在spring的配置文件中注册服务
<dubbo:application name="dubboxdemoservice"/>
<dubbo:registry address="zookeeper://192.168.137.128:2181"/>
<dubbo:annotation package="com.click369.dubbodemo.service.impl"/>
11.启动注册中心
12.测试dubboxdemoservice服务
5.3服务消费者开发
1.选中空项目右键新建module[新建一个子模块{war}],没有继承关系
2.打开dubboxdemoweb子模块的pom导入依赖包,配置tomcat插件,把tomcat插件的运行端口改为9090 。
<!-- https://mvnrepository.com/artifact/org.springframework/spring-webmvc -->
<dependency>
  <groupId>org.springframework</groupId>
  <artifactId>spring-webmvc</artifactId>
  <version>4.2.4.RELEASE</version>
</dependency>
<!-- dubbo相关 -->
<dependency>
  <groupId>com.alibaba</groupId>
  <artifactId>dubbo</artifactId>
  <version>2.5.3</version>
</dependency>
<dependency>
  <groupId>org.apache.zookeeper</groupId>
  <artifactId>zookeeper</artifactId>
  <version>3.4.6</version>
</dependency>
<dependency>
  <groupId>com.github.sgroschupf</groupId>
  <artifactId>zkclient</artifactId>
  <version>0.1</version>
</dependency>
配置tomcat插件
<plugin>
	<groupId>org.apache.tomcat.maven</groupId>
	<artifactId>tomcat7-maven-plugin</artifactId>
	<configuration>
		<!-- 指定端口 -->
		<port>9090</port>
		<!-- 请求路径 -->
		<path>/</path>
	</configuration>
</plugin>
3.完善子模块的项目结构
4.配置web.xml文件
<filter>
  <filter-name>CharacterEncodingFilter</filter-name>
  <filter-class>org.springframework.web.filter.CharacterEncodingFilter</filter-class>
  <init-param>
    <param-name>encoding</param-name>
    <param-value>utf-8</param-value>
  </init-param>
  <init-param>
    <param-name>forceEncoding</param-name>
    <param-value>true</param-value>
  </init-param>
</filter>
<filter-mapping>
  <filter-name>CharacterEncodingFilter</filter-name>
  <url-pattern>/*</url-pattern>
</filter-mapping>
<!-- 配置中央处理器-->
<servlet>
  <servlet-name>dispatcherServlet</servlet-name>
  <servlet-class>org.springframework.web.servlet.DispatcherServlet</servlet-class>
  <init-param>
    <param-name>contextConfigLocation</param-name>
    <param-value>classpath:applicationContext-web.xml</param-value>
  </init-param>
  <load-on-startup>1</load-on-startup>
</servlet>
<servlet-mapping>
  <servlet-name>dispatcherServlet</servlet-name>
  <!--http://127.0.0.1:8080/springmvc1/add.do-->
  <url-pattern>*.do</url-pattern>
</servlet-mapping>
4.resources下创建applicationContext-web.xml,添加dubbo命名空间
<?xml version="1.0" encoding="UTF-8"?>
<beans xmlns="http://www.springframework.org/schema/beans"
       xmlns:xsi="http://www.w3.org/2001/XMLSchema-instance"
       xmlns:dubbo="http://code.alibabatech.com/schema/dubbo"
       xsi:schemaLocation="http://www.springframework.org/schema/beans
       http://www.springframework.org/schema/beans/spring-beans.xsd
       http://code.alibabatech.com/schema/dubbo
       http://code.alibabatech.com/schema/dubbo/dubbo.xsd">

</beans>
5.创建业务访问接口
package com.click369.dubbodemo.service;
/**
 * 用户信息的服务层访问接口
 */
public interface UserService {


    //得到用户名
    public String getUserName();
}
6.创建控制器
package com.click369.dubbodemo.controller;

import com.alibaba.dubbo.config.annotation.Reference;
import com.click369.dubbodemo.service.UserService;
import org.springframework.web.bind.annotation.RequestMapping;
import org.springframework.web.bind.annotation.ResponseBody;
import org.springframework.web.bind.annotation.RestController;

@RestController
public class UserController {


    @Reference
    private UserService userService;
    /**
     *得到用户名的请求处理方法
     */
    @RequestMapping("/show.do")
    @ResponseBody
    public  String  showUserName(){


        return userService.getUserName();
    }
}
7.在spring的配置文件中订阅服务
<mvc:annotation-driven >
		<mvc:message-converters register-defaults="false">
			<bean class="org.springframework.http.converter.StringHttpMessageConverter">
				<constructor-arg value="UTF-8" />
			</bean>
		</mvc:message-converters>
	</mvc:annotation-driven>
<!-- 消费者订阅服务 -->
<dubbo:application name="dubboxdemoweb" />
<dubbo:registry address="zookeeper://192.168.137.128:2181"/>
<dubbo:annotation package="com.click369.dubbodemo.controller" />
8.启动注册中心
9.启动dubboxdemoservice服务
10.启动dubboxdemoweb服务
连接zookeeper失败
运行dubboxdemo-service以后,控制输出的提示信息的最后一行中没有出现下面语句
“信息: Starting ProtocolHandler [“http-bio-8080”]”
,说明dubboxdemo-service程序没有正常连接到注册中心所在的计算机。
原因:可能是注册中心所在的计算机【Linux ContOS6.5】的防火墙未关闭。
解决方法:
计算机【Linux ContOS6.5】
切换至root账号下
[wxrj@wxrj-linux ~]$ su root
密码:
[root@wxrj-linux ~]#
2.永久性关闭防火墙
[root@wxrj-linux ~]# chkconfig iptables off
重启系统
3.查看防火墙状态
[root@wxrj-linux ~]# service iptables status
iptables:未运行防火墙。