代码地址
demo
觉得博主还可以给个Star
AOP
aop:面向切面编程,针对业务处理过程中的切面进行提取,它所面对的是处理过程中的某个步骤或阶段,以获得逻辑过程中各部分之间低耦合性的隔离效果。一般使用在方法上,对方法进行调用前后的处理。
应用场景:日志、事务、安全控制、计算方法耗时
核心通知:前置通知,后置通知,环绕通知,运行通知,异常通知
原理:动态代理模式
目前的动态代理有:
- JDK动态代理,实现InvocationHandler,底层使用反射技术,是基于接口实现代理
- cglib动态代理,基于asm 基于类实现代理 继承模式
下面我们来了解一下怎么使用(案例中的应用场景为事务)
我们先来了解一下简单问题
1.在我们使用切面中需要要到@Aspect,但是这个注解我们会发现它并不在aop的jar包中,那么我们引入的时候需要加入另一个pom配置
<dependency>
  <groupId>org.aspectj</groupId>
  <artifactId>aspectjweaver</artifactId>
  <version>1.9.6</version>
  <scope>compile</scope>
</dependency>
2.也就是最重要的开启aop,用到的注解为@EnableAspectJAutoProxy,我们点击进去发现,它只是@Import({AspectJAutoProxyRegistrar.class})这一个类,而这个类就是我们aop的核心,之后我会在源码的时候分析出来
3.前面提到了五个核心通知,我们一步一步示范
pom.xml
<?xml version="1.0" encoding="UTF-8"?>
<project xmlns="http://maven.apache.org/POM/4.0.0"
         xmlns:xsi="http://www.w3.org/2001/XMLSchema-instance"
         xsi:schemaLocation="http://maven.apache.org/POM/4.0.0 http://maven.apache.org/xsd/maven-4.0.0.xsd">
    <modelVersion>4.0.0</modelVersion>

    <groupId>org.example</groupId>
    <artifactId>demo</artifactId>
    <version>1.0-SNAPSHOT</version>

    <properties>
        <project.build.sourceEncoding>UTF-8</project.build.sourceEncoding>
        <project.reporting.outputEncoding>UTF-8</project.reporting.outputEncoding>
        <java.version>1.8</java.version>
    </properties>

    <dependencies>
        <dependency>
            <groupId>org.springframework</groupId>
            <artifactId>spring-context</artifactId>
            <version>5.0.20.RELEASE</version>
        </dependency>
        <dependency>
            <groupId>org.aspectj</groupId>
            <artifactId>aspectjweaver</artifactId>
            <version>1.9.6</version>
        </dependency>
    </dependencies>
</project>
LogAop.java
package com.aop;

import org.aspectj.lang.JoinPoint;
import org.aspectj.lang.annotation.*;
import org.springframework.context.annotation.EnableAspectJAutoProxy;
import org.springframework.stereotype.Component;

@Aspect
@Component
@EnableAspectJAutoProxy
public class LogAop {


    //定义切入点 开始方法拦截的入口
    @Pointcut("execution(* com.service..*.*(..))")
    public void logAop(){


    }

    @Before("logAop()")
    // 前置通知
    public void doBefore(){


        System.out.println("Before");
    }

    @After("logAop()")
    // 后置通知
    public void doAfter(){


        System.out.println("After");
    }
}
MyConfig.java
package com.config;

import com.aop.LogAop;
import org.springframework.context.annotation.ComponentScan;
import org.springframework.context.annotation.Configuration;
import org.springframework.context.annotation.Import;

@Configuration
@ComponentScan("com.service")
@Import(LogAop.class)
public class MyConfig {


}
MsgService.java
package com.service;

import org.springframework.stereotype.Component;

@Component
public class MsgService {


    public String ms(){


        System.out.println("ssss");
        return "1";
    }
}
Application.java
package com;

import com.config.MyConfig;
import com.service.MsgService;
import org.springframework.context.annotation.AnnotationConfigApplicationContext;

public class Application {


    public static void main(String[] args) {


        AnnotationConfigApplicationContext applicationContext = new AnnotationConfigApplicationContext(MyConfig.class);
        MsgService msgService = applicationContext.getBean("msgService", MsgService.class);
        msgService.ms();
    }
}
执行结果:

这样我们的初步实现就出来了。
接下来我们使用运行通知(最终通知)和异常通知
在LogAop中添加代码
 @AfterReturning("logAop()")
 public void doAfterReturning(JoinPoint joinPoint){


     System.out.println("AfterReturning");
 }

 @AfterThrowing("logAop()")
 public void doAfterThrowing(JoinPoint joinPoint){


     System.out.println("AfterThrowing");
 }
运行结果:
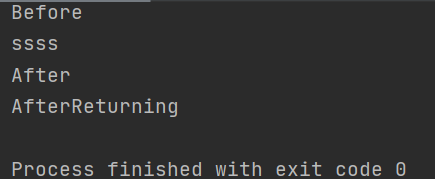
这里可以看到After在AfterReturn之前,但是。博主原本使用的是springboot写的这篇文章,结果却是和spring中的结果不同,运行结果是这样的:
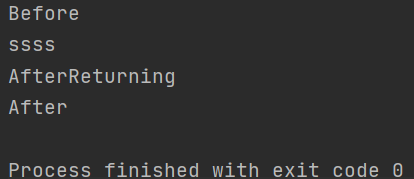
就很意外,最后通知和后置通知的位置反过来了,等理解为什么了,再来填坑吧。。
好了,我们继续填上面某个坑,大家会发现输出少了一个“AfterThrowing”,那我们怎么把它打印出来呢。
很简单,设置一个异常,他就出来了,更改MsgService.java
package com.service;

import org.springframework.stereotype.Component;

@Component
public class MsgService {


    public String ms(){


        System.out.println("ssss");
        int i = 1/0;
        return "1";
    }
}
运行出来了。。
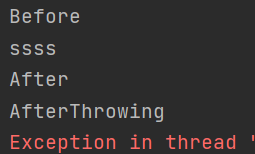
我们会会发现,异常通知出来了,可是运行通知没有出来,这是因为他们两者并不共存。
上面的结果在springboot中,两者有时反过来的。。。 不纠结了,我们继续下一个重点内容
环绕通知
环绕通知很特别,它几乎可以做前后通知都可以做的事情
我们来看看怎么使用的吧,同样在LogAop.java增加代码
@Around("logAop()")
    public void doAround(ProceedingJoinPoint joinPoint) throws Throwable {


        System.out.println("环绕前");
        // 执行目标方法
        joinPoint.proceed();
        System.out.println("环绕后");
    }
运行结果:

我们会发现,环绕前在前置通知之前,环绕后在后置通知之前,所以有时候可以代替他们两