后台管理系统(增删改查)——CRUD by Express
下载运行
仓库连接(请各位老铁多多star): https://github.com/hcq29/Learning-Node.js.git
git clone https://github.com/hcq29/Learning-Node.js.git
cd Learning-Node.js
git checkout crud
node app.js
前期准备
安装配置
mkdir crud-express
cd crud-express/

npm init
Press ^C at any time to quit.
package name: (crud-express)
version: (1.0.0)
description: 增删改查crud-express
entry point: (index.js)
test command:
git repository:
keywords:
author:
license: (ISC)
About to write to ..\笔记与代码\Learning-Node.js\Nodejs Code\18-CRUD-express\crud-express\package.json:

{


  "name": "crud-express",
  "version": "1.0.0",
  "description": "增删改查crud-express",
  "main": "index.js",
  "scripts": {


    "test": "echo \"Error: no test specified\" && exit 1"
  },
  "author": "",
  "license": "ISC"
}

Is this OK? (yes) y

npm install express --save
npm install art-template --save
npm install express-art-template --save
npm install express body-parser --save
npm install bootstrap --save
npm install nodemon --save
bootstrap网站实例: https://v3.bootcss.com/examples/dashboard/
改写index.html
<!DOCTYPE html>
<html lang="zh-CN">
<head>
<meta charset="utf-8">
<meta http-equiv="X-UA-Compatible" content="IE=edge">
<meta name="viewport" content="width=device-width, initial-scale=1">
<meta name="description" content="">
<meta name="author" content="">
<link rel="icon" href="../../favicon.ico">
<title>学生管理系统</title>
<!-- Bootstrap core CSS -->
<link href="/node_modules/bootstrap/dist/css/bootstrap.min.css" rel="stylesheet">
<!-- Custom styles for this template -->
<link href="/public/css/main.css" rel="stylesheet">
</head>
<body>
<nav class="navbar navbar-inverse navbar-fixed-top">
<div class="container-fluid">
<div class="navbar-header">
<button type="button" class="navbar-toggle collapsed" data-toggle="collapse" data-target="#navbar" aria-expanded="false" aria-controls="navbar">
<span class="sr-only">Toggle navigation</span>
<span class="icon-bar"></span>
<span class="icon-bar"></span>
<span class="icon-bar"></span>
</button>
<a class="navbar-brand" href="#">学生管理系统</a>
</div>
<div id="navbar" class="navbar-collapse collapse">
<ul class="nav navbar-nav navbar-right">
<li><a href="#">仪表板</a></li>
<li><a href="#">设置</a></li>
<li><a href="#">简况</a></li>
<li><a href="#">帮助</a></li>
</ul>
<form class="navbar-form navbar-right">
<input type="text" class="form-control" placeholder="搜索...">
</form>
</div>
</div>
</nav>
<div class="container-fluid">
<div class="row">
<div class="col-sm-3 col-md-2 sidebar">
<ul class="nav nav-sidebar">
<li class="active"><a href="#">概述 <span class="sr-only">(当前)</span></a></li>
<li><a href="#">报告</a></li>
<li><a href="#">分析</a></li>
<li><a href="#">导出</a></li>
</ul>
<ul class="nav nav-sidebar">
<li><a href="">导航栏</a></li>
<li><a href="">Nav item again</a></li>
<li><a href="">One more nav</a></li>
<li><a href="">Another nav item</a></li>
<li><a href="">More navigation</a></li>
</ul>
<ul class="nav nav-sidebar">
<li><a href="">Nav item again</a></li>
<li><a href="">One more nav</a></li>
<li><a href="">Another nav item</a></li>
</ul>
</div>
<div class="col-sm-9 col-sm-offset-3 col-md-10 col-md-offset-2 main">
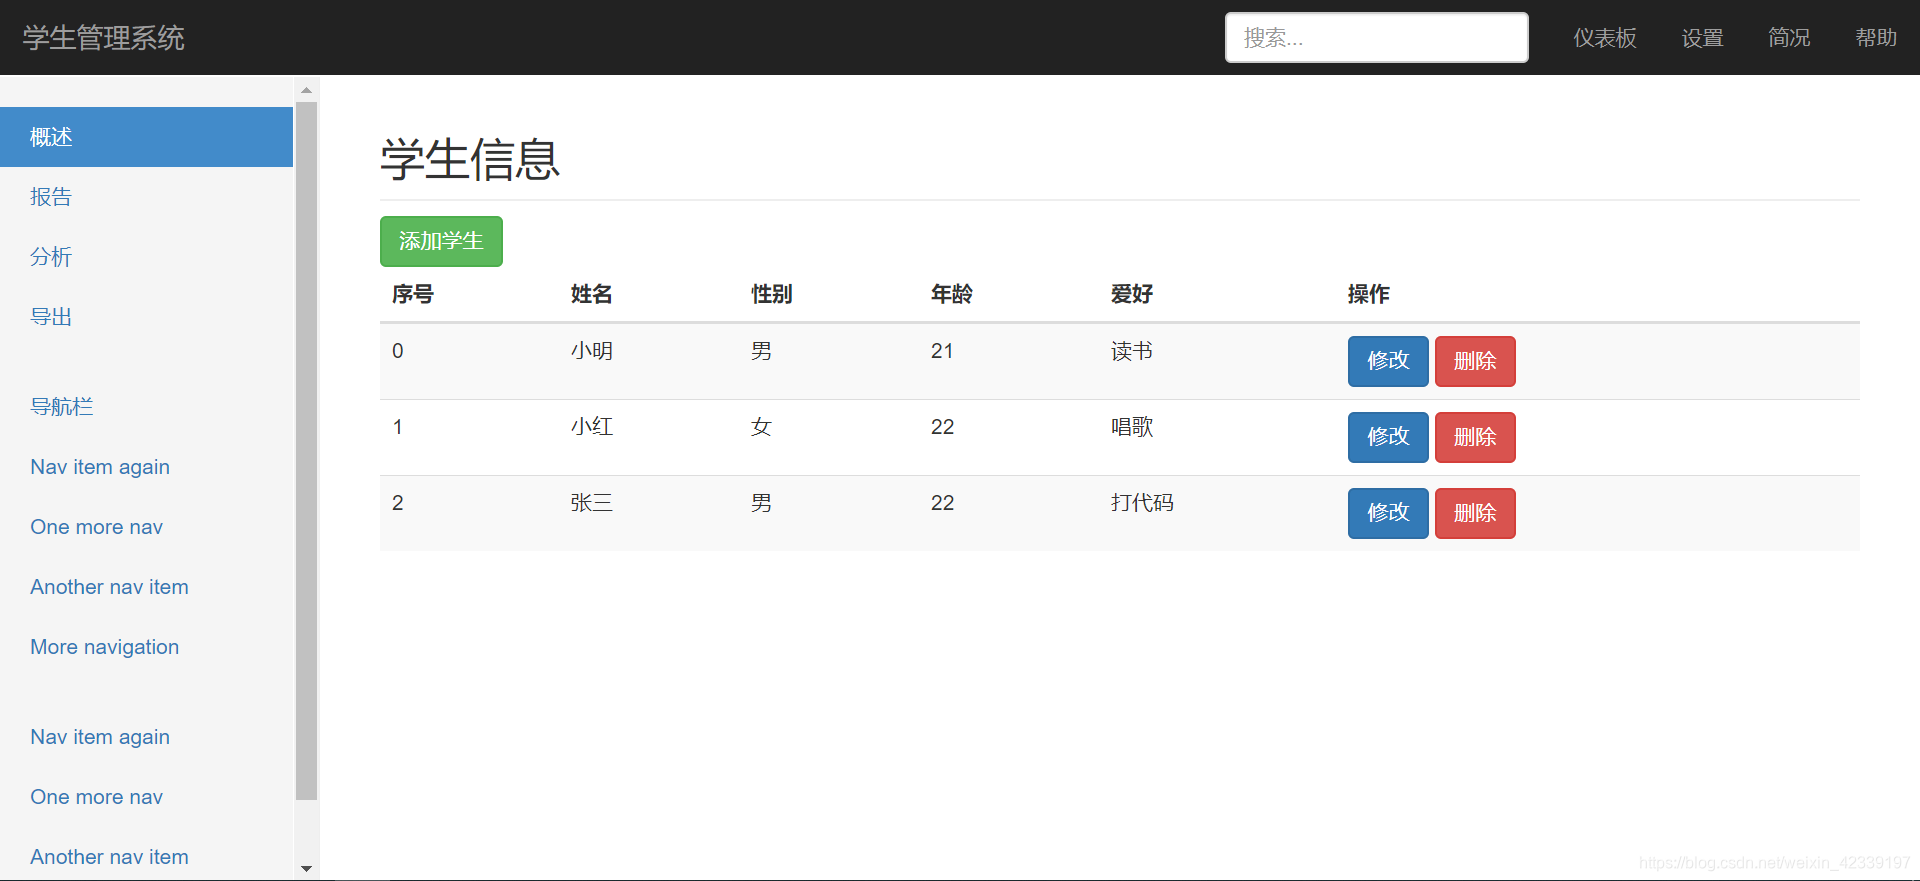
<h2 class="sub-header">学生信息</h2>
<button class="btn btn-success">添加</button>
<div class="table-responsive">
<table class="table table-striped">
<thead>
<tr>
<th>序号</th>
<th>姓名</th>
<th>性别</th>
<th>年龄</th>
<th>爱好</th>
</tr>
</thead>
<tbody>
{
{ each students}}
<tr>
<td>{
{ $value.id }}</td>
<td>{
{ $value.name }}</td>
<td>{
{ $value.gender }}</td>
<td>{
{ $value.age }}</td>
<td>{
{ $value.hobbies }}</td>
</tr>
{
{ /each}}
</tbody>
</table>
</div>
</div>
</div>
</div>
<script src="/node_modules/jquery/dist/jquery.js"></script>
<script>window.jQuery || document.write('<script src="../../assets/js/vendor/jquery.min.js"><\/script>')</script>
<script src="/node_modules/bootstrap/dist/js/bootstrap.min.js"></script>
<!-- Just to make our placeholder images work. Don't actually copy the next line! -->
<script src="/public/js/holder.min.js"></script>
<!-- IE10 viewport hack for Surface/desktop Windows 8 bug -->
<script src="/public/js/ie10-viewport-bug-workaround.js"></script>
</body>
</html>
路由设计
| 请求方法 | 请求路径 | GET | PPST | 备注 |
|---|---|---|---|---|
| GET | /students | 渲染首页 | ||
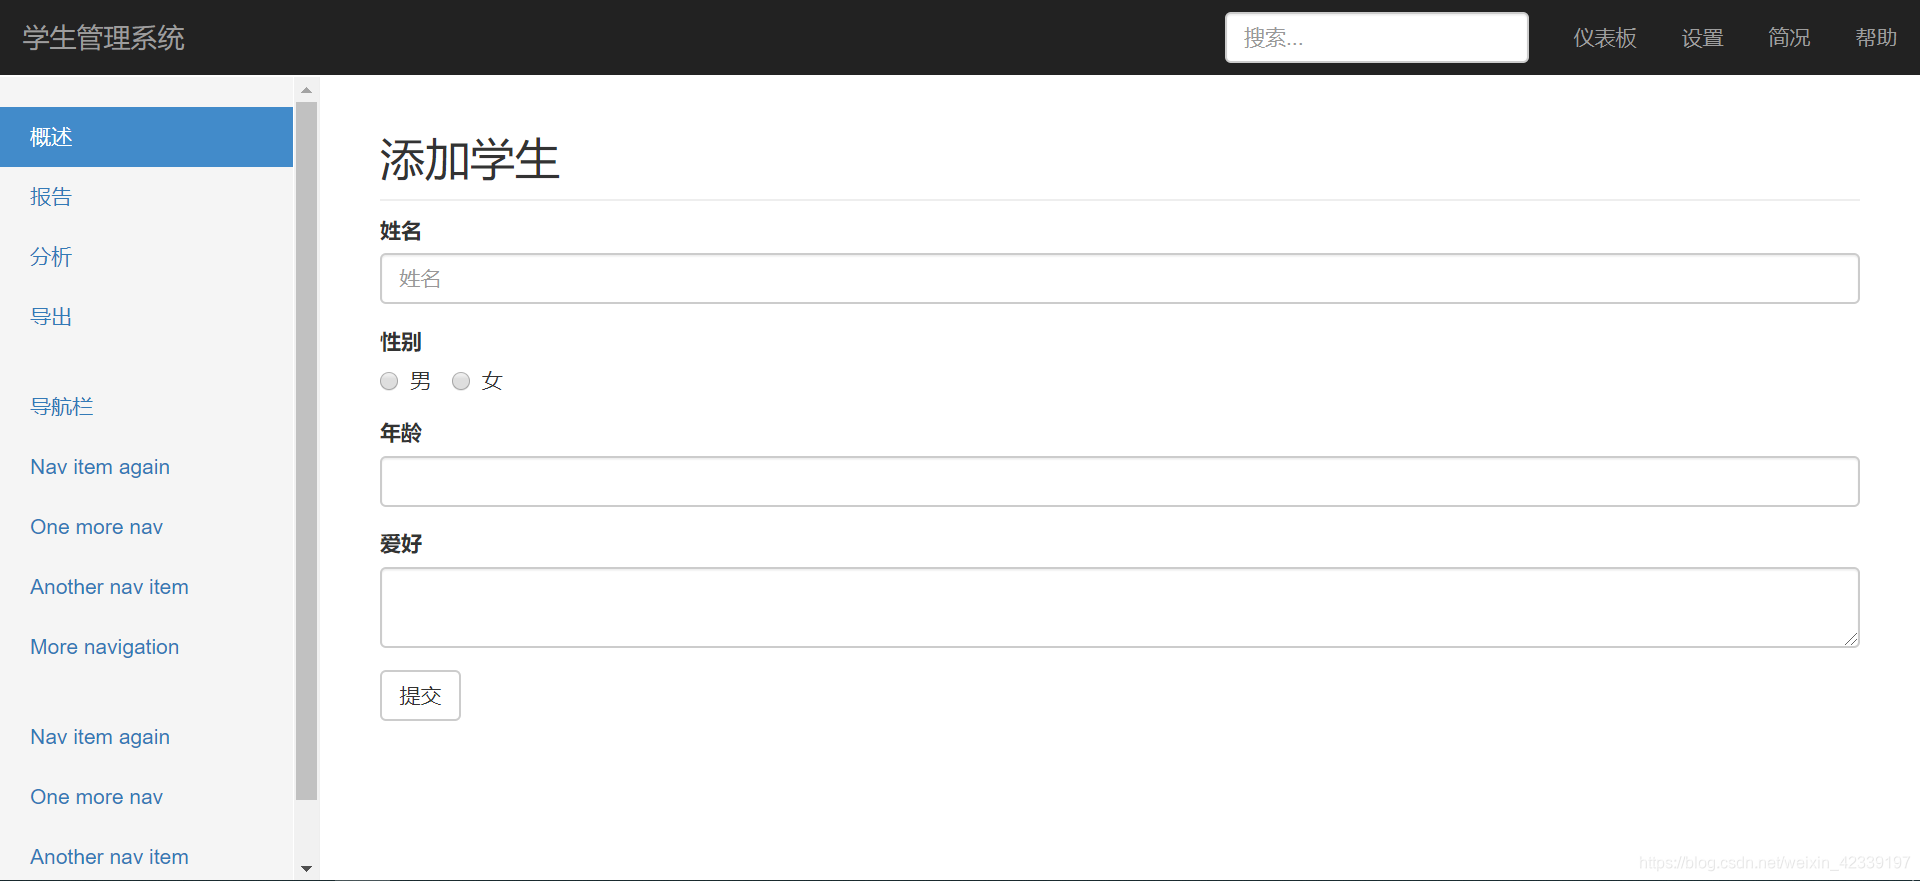
| GET | /students/new | 渲染添加学生页面 | ||
| POST | /students/new | name、gender、age、 hobbies | 处理添加学生请求 | |
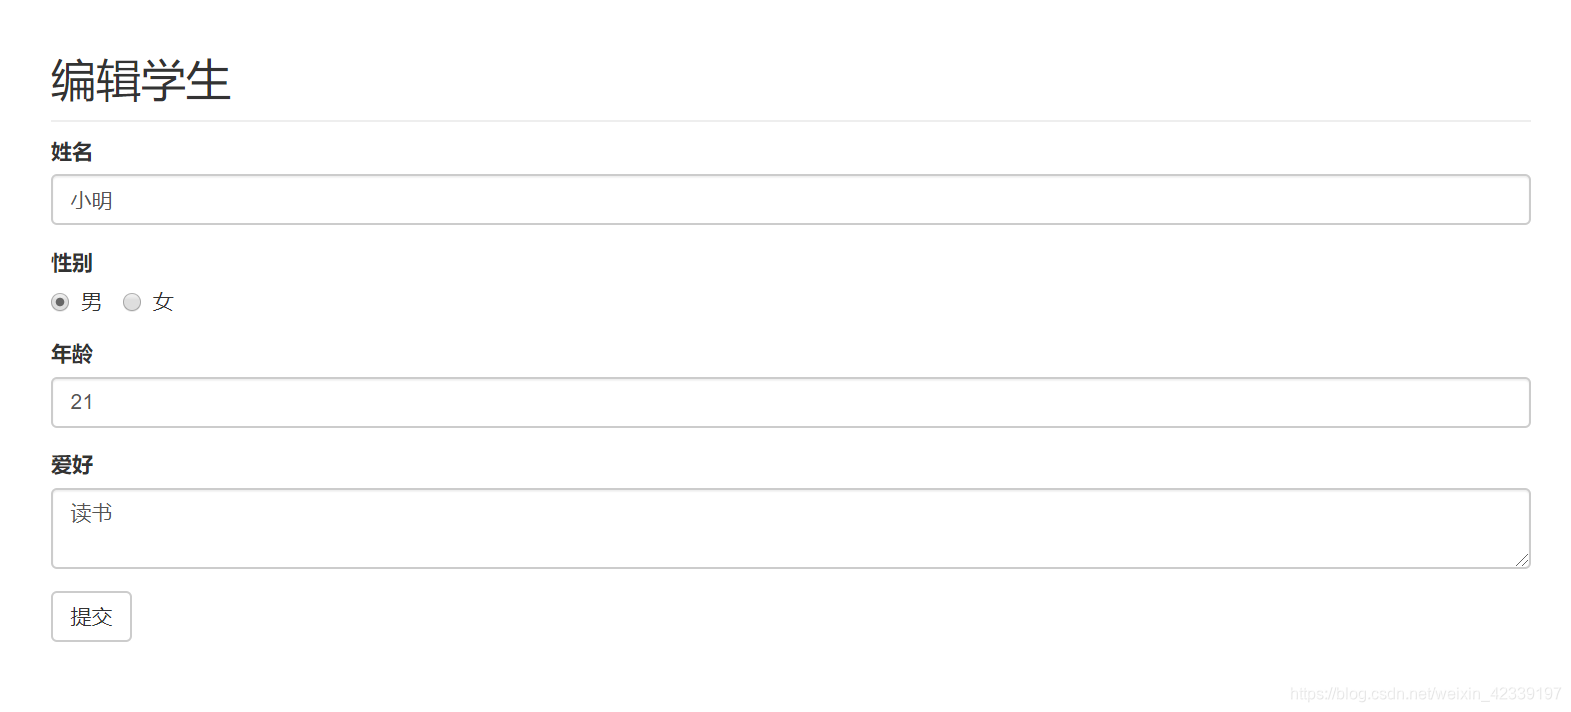
| GET | /students?id=xxx | id | 渲染编辑页面 | |
| POST | /students/edit | id、name、gender、age、hobbies | 处理编辑请求 | |
| GET | /students/delete | id | 处理删除请求 |
路由模块的提取
router.js路由模块
- 处理路由
- 根据不同的请求方法 + 请求路径设置具体的请求函数
/**
 * router.js
 */
// Express 提供了一个方式专门包装路由
const express = require('express');
// 创建一个路由容器
const router = express.Router();
const fs = require('fs');
const Student = require('./students');

// 把路由都挂在到 router 路由容器中
router.get('/students', (req, res) => {


    Student.find((err, students) => {


        //...
    })
})
router.get('/students/new', (req, res) => {


    res.render('new.html');
})
router.post('/students/new', (req, res) => {


    console.log(req.body)
    // ...
    // 1.获取表单数据
    // 2、处理
    //        将数据保存到students.json 文件中
    // 3、发送相应
    //     先读取文件,转成对象
    //     然后网对象中插入数据
    //     讲对象转为字符串
    //     将字符串再次写入文件
    Student.save(req.body, (err) => {


        if (err) return res.status(500).end('Server Error....');
        res.redirect('/students');
    })

})
router.get('/students/edit', (req, res) => {


    // 1、在客户端的列表页中处理链接问题(需要有 id 参数)
    // 2、获取要编辑的学生 id
    // 3、渲染编辑页面
    Student.findById(parseInt(req.query.id), (err, student)=>{


        if(err) return res.status(500).end('Server error....');
        res.render('edit.html',{


            student: student
        })
    })
})
router.post('/students/edit', (req, res) => {


    // 1、获取表单数据
    // 2、更新
    // 3、发送相应
    Student.update(req.body, (error)=>{


        if(error) return res.status(500).end('Server error....');
        res.redirect('/students');
    })
})
router.get('/students/delete', (req, res) => {


    Student.delete(parseInt(req.query.id), (err)=>{


        if(err) return res.status(500).end('Server error....');
        res.redirect('/students');
    })
})
// 把router导出
module.exports = router;
app.js入口模块
- 启动服务
- 做一些服务相关的配置
- 模板引擎
- body-parser 解析表单 post 请求体
- 提供静态资源服务
- 监听端口,启动服务
- 挂载使用路由
/**
 * app.js
 */
const express = require('express');
const app = express();
const port = 3000;
const bodyParser = require('body-parser');
const router = require('./router');

app.engine('html', require('express-art-template'));

app.use(bodyParser.urlencoded({

    extended: false}));
app.use(bodyParser.json());

app.use('/public/', express.static('./public/'));
app.use('/node_modules/', express.static('./node_modules/'));
// 把路由容器挂载到 app 服务中
app.use(router);

app.listen(port, (error)=>{


    if(error) return console.log('服务器开启失败!');
    console.log('running in....' + port);
})
封装异步API
一般情况下,将函数作为参数就是为了获取函数内部的异步操作的结果,上层设计下层调用,这也是回调函数的作用所在。
function fn(callback){


	// var callback = function(data) { console.log(data)}
	setTimeout(function(){


		var data = 'hello';
		callback(data);
	},1000)
}
// 如果需要获取一个函数中异步操作的结果,则必须通过回调函数来获取
fn(function(data){


	console.log(data);
})
/**
 * students.js
 * 数据操作文件模块
 * 任务:操作文件中的数据,只处理数据,不管性业务
 *
 */
const fs = require('fs');
const dbPath = './mock/db.json';

/**
 * 获取所有学生的列表
 */
exports.find = function (callback) {


}

/**
 * 查询对应学生 id 的所有信息
 */
exports.findById = function (id, callback) {


}

/**
 * 添加保存学生
 */
exports.save = function (student, callback) {


    // 1. 获取表单数据
	// 2. 处理
   	//- 将数据保存到db.json 文件中

	// 3. 发送相应
   //- 先读取文件,转成对象
   //- 然后网对象中插入数据
   //- 讲对象转为字符串
   //- 将字符串再次写入文件
}

/**
 * 更新学生
 */
exports.update = function (student, callback) {


    // 1、读取文件
    // 2、将文件中的字符串转为对象
    // 3、将 students 的 id 对应的 student 替换
    // 4、重新写入文件
}

/**
 * 删除学生
 */
exports.delete = function (id, callback) {


    // 1、获取要删除学生的 id
    // 2、根据 id 执行删除操作
    // 3、根据操作结果进行发送相应结果
}
源代码请查看::https://github.com/hcq29/Learning-Node.js/tree/crud
具体效果: