Python动态调节参数-滑动条-pygame和cv2
前言:
强烈案例这个脚本!!!
多个参数的调整,连续量的排列组合,一个个的试简直是噩梦。
所以是不是该有一个动态调参的脚本?
它来了!!!
目前还没搜到好调用的脚本(手动斜眼笑)
最近在整动态调参,然后每次修改参数,重启启动程序过于复杂,因此,结合网上资源,造了一个轮子,刚开始找到的是cv2的滑动条,然后发现,滑动条过于呆板,初始值设定,滑动条位置,以及最小值设定都不能调整。
就感觉很蠢,不适合我需要的从-90,90这样的调节范围。
因此想着thinkter能不能做,然后没发现,最后找pygame这种做游戏的,发现做的还可以。
由于时间不够,简单放一下代码就好了, 大家随便看看吧,不明白的debug一下就好了。
OpenCV的垃圾实现:
import cv2
import numpy as np
#定义回调函数,参数x为函数cv2.createTrackbar()传递的滑块位置对应的值
# 每次滑动, 都会调用这个函数, 但是我们用不上
def img_intensity_change_x(x):
    pass
def img_intensity_change_y(y):
    pass

img=np.zeros((512,512),dtype='uint8')
#新建一个窗口
cv2.namedWindow('img')
# 第一个参数是滑动杆名称,第二个是对应的图片,第三个是默认值,第四个是最大值,第五个是回调函数
cv2.createTrackbar('joint 1', 'img', 0, 40, img_intensity_change_x)
cv2.createTrackbar('joint 3', 'img', 0, 40, img_intensity_change_y)

while(1):
    img=np.zeros((512,512),dtype='uint8')
    # 拿到对应滑动杆的值
    x = cv2.getTrackbarPos('joint 1', 'img')
    y = cv2.getTrackbarPos('joint 3', 'img')
    # 对值进行需要的处理
    joint_1 = x - 20
    joint_3 = y - 20
    # print("x:", x)
    # print("y:", y)
    # 将数值写到图片当中。
    cv2.putText(img, 'joint 1:'+str(joint_1), (20, 20), fontFace=2, fontScale=1, color=(200, 0, 100), thickness=3 )
    cv2.putText(img, 'joint 3:'+str(joint_3), (20, 60), fontFace=2, fontScale=1, color=(200, 0, 100), thickness=3 )
    cv2.imshow('img',img)
    # 每1毫秒刷新一次,当输入q键的时候,结束整个主程序
    if cv2.waitKey(1)==ord('q'):
        break

cv2.destroyAllWindows()

pygame 动态调参:
import pygame
from pygame.locals import *
from sys import exit
import numpy as np
import cv2
import imutils
def create_scales(height, joints_num=3):
#用于创建指定大小的图像对象实例,分别表示红,绿,蓝三块区域,主动实例化三个Surface对象
# 参考的原代码是红绿蓝三色,但是我需要的是七个滑动杆,所以加了一个参数
surface_list = []
for _ in range(joints_num):
surface=pygame.surface.Surface((SCREEN_WIDTH,height))#与窗口Surface等宽,高度自行调整,下同
surface_list.append(surface)
for x in range(SCREEN_WIDTH):
# 这里面的函数是给滑动栏,加上颜色渐变,红绿蓝轮着来
c=int((x/SCREEN_WIDTH)*255)
# 每个x轴部分占RGB颜色的多少,等同x*(255/640)
red=(c,0,0)
green=(0,c,0)
blue=(0,0,c)
color_list = [red, green, blue]
line_rect=Rect(x,0,1,height)
for i in range(joints_num):
pygame.draw.rect(surface_list[i], color_list[i%len(color_list)], line_rect)
return surface_list
def drawText(screen,text,posx,posy,textHeight=15,fontColor=(0,0,0),backgroudColor=(255,255,255)):
fontObj = pygame.font.Font('freesansbold.ttf', textHeight) # 通过字体文件获得字体对象
textSurfaceObj = fontObj.render(text, True,fontColor,backgroudColor) # 配置要显示的文字
textRectObj = textSurfaceObj.get_rect() # 获得要显示的对象的rect
textRectObj.center = (posx, posy) # 设置显示对象的坐标
screen.blit(textSurfaceObj, textRectObj) # 绘制字
def main():
pygame.init()
# 获取笔记本摄像头的视频流
cap = cv2.VideoCapture(0)
forucc = cv2.VideoWriter_fourcc(*'XVID')
# 初始化pygame以及相关模块
screen=pygame.display.set_mode((SCREEN_WIDTH, SCREEN_HEIGHT), 0, 32)#返回一个窗口Surface对象
surface_list = create_scales(rect_height, joints_num=joints_num)
color=[127]*joints_num
# joint_list可以换成你需要的参数列表,这里设定的是默认值
joint_list = [0]*joints_num
# 初始化为灰色
while True:
for event in pygame.event.get():
if event.type==QUIT:
pygame.quit()
exit()
screen.fill((0,0,0))
for i, surface in enumerate(surface_list):
screen.blit(surface,(0, rect_height*i))
# 获取鼠标在窗口中的位置,这一步是交互的关键
# 主程序必须要刷新的非常快,尽量在10毫秒之内完成才行。要不然明显卡顿
x, y=pygame.mouse.get_pos()
# 获取鼠标按钮状态,get_pressed()[0]为左键是否为按下状态,修改按下的数值
if pygame.mouse.get_pressed()[0]:
for component in range(joints_num):
#判断是在哪个Surface对象(red_scale,green_scale,blue_scale)上移动鼠标
if y > component*rect_height and y < (component+1)*rect_height:
#操作color列表,component为索引值
color[component] = int((x/(SCREEN_WIDTH-1))*255)
# 先根据位置画圆, 再在圆内标上数值
for component in range(joints_num):
pos = ( int((color[component]/255)*(SCREEN_WIDTH-1)), component*rect_height+rect_height//2 )
pygame.draw.circle(screen, (255, 255, 255), pos[:3], rect_height//2)#绘制白色圆点.pos圆心坐标,20为圆半径大小
joint_list[component] = np.round(180 * (pos[0] - SCREEN_WIDTH//2)/SCREEN_WIDTH, 1)
drawText(screen, str(joint_list[component]), pos[0], pos[1])
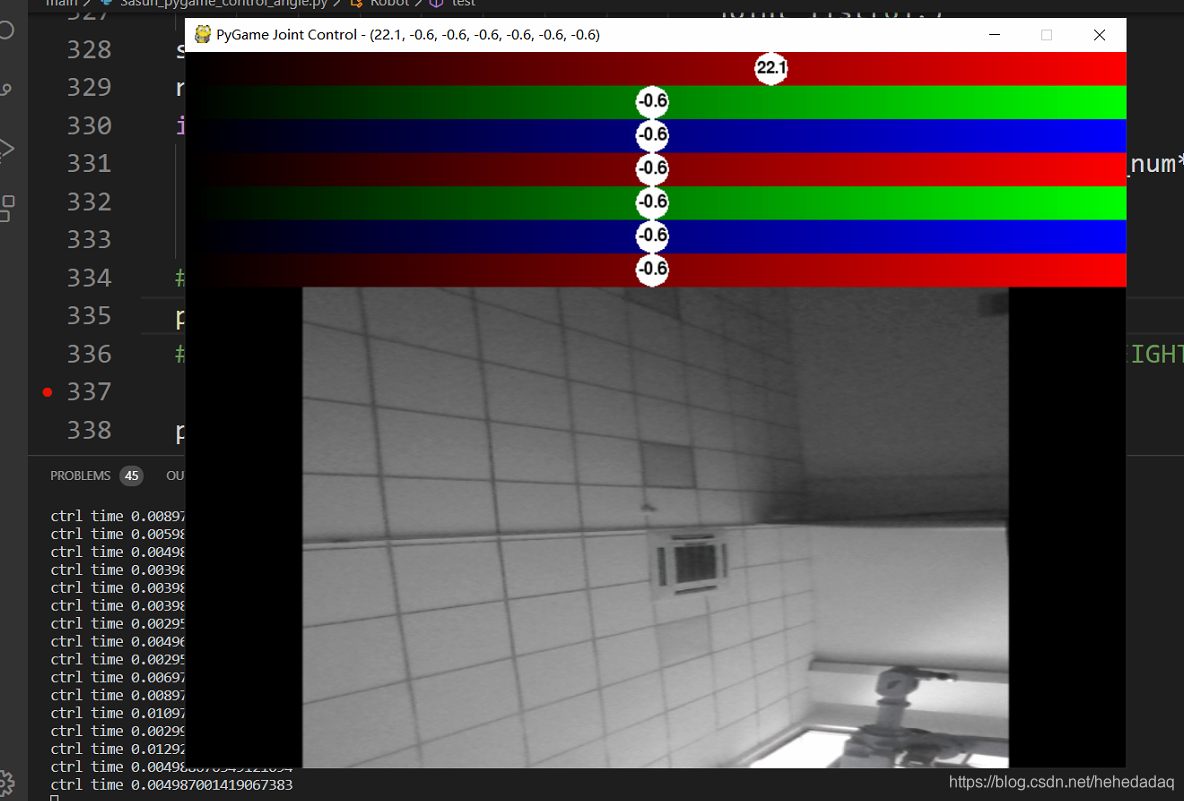
#在窗口标题上显示参数元组
pygame.display.set_caption("PyGame Joint Control - "+str(tuple(joint_list)))
# get robot img stream from pc camera
ret,robot_image = cap.read()
if ret:
# cv2.imshow("origin", robot_image)
# cv2.waitKey(1)
# 图片可能需要旋转,不需要的话就注释掉
robot_image = imutils.rotate(robot_image, 90, )
robot_image=cv2.resize(robot_image, (SCREEN_HEIGHT-joints_num*rect_height, SCREEN_WIDTH))
my_surface = pygame.pixelcopy.make_surface(robot_image)
screen.blit(my_surface,(0, rect_height*joints_num))
my_surface = pygame.pixelcopy.make_surface(robot_image)
screen.blit(my_surface,(0, rect_height*joints_num))
pygame.display.update()
cv2.destroyAllWindows()
if __name__=="__main__":
#设置非全屏模式下窗口分辨率
SCREEN_WIDTH = 720
SCREEN_HEIGHT = 540
rect_height = 30
joints_num = 7
main()
封装成class!!!
注释清晰,易于调用。
不给个赞简直过分…
import pygame
from pygame.locals import *
from sys import exit
import numpy as np
import cv2
import imutils


class DynamicsParamsClass:
    def __init__(self,
                 image_width=400,
                 image_height=400,
                 rect_height=20,
                 value_num=5,
                 exp_info='dynamics',
                 value_max=180.0
                 ):
        pygame.init()
        self.image_width = image_width
        self.image_height = image_height
        self.rect_height = rect_height
        self.value_num = value_num
        self.break_flag = False
        self.exp_info = exp_info
        self.value_max = value_max

        # 初始化pygame以及相关模块
        # 返回一个窗口Surface对象
        self.screen=pygame.display.set_mode((image_width,
                                             image_height+self.rect_height*self.value_num),
                                             0, 32)
        self.surface_list = self.create_scales(rect_height, value_num=value_num)
        self.point_pos_in_color = [127] * value_num
        # joint_list可以换成你需要的参数列表,这里设定的是默认值
        self.value_list = [0] * value_num

    def create_scales(self, height, value_num=3):
        #用于创建指定大小的图像对象实例,分别表示红,绿,蓝三块区域,主动实例化三个Surface对象
        # 参考的原代码是红绿蓝三色,但是我需要的是七个滑动杆,所以加了一个参数
        surface_list = []
        for _ in range(value_num):
            # 与窗口Surface等宽,高度自行调整,下同
            surface=pygame.surface.Surface((self.image_width, height))
            surface_list.append(surface)

        for x in range(self.image_width):
            # 这里面的函数是给滑动栏,加上颜色渐变,红绿蓝轮着来
            c=int((x/self.image_width)*255)
            # 每个x轴部分占RGB颜色的多少,等同x*(255/640)
            red=(c,0,0)
            green=(0,c,0)
            blue=(0,0,c)
            color_list = [red, green, blue]
            line_rect=Rect(x,0,1,height)
            for i in range(value_num):
                pygame.draw.rect(surface_list[i], color_list[i%len(color_list)], line_rect)

        return surface_list

    def drawText(self,
                 screen,
                 text,
                 posx,
                 posy,
                 textHeight=15,
                 fontColor=(0,0,0),
                 backgroudColor=(255,255,255)):
        fontObj = pygame.font.Font('freesansbold.ttf', textHeight)  # 通过字体文件获得字体对象
        textSurfaceObj = fontObj.render(text, True,fontColor,backgroudColor)  # 配置要显示的文字
        textRectObj = textSurfaceObj.get_rect()  # 获得要显示的对象的rect
        textRectObj.center = (posx, posy)  # 设置显示对象的坐标
        screen.blit(textSurfaceObj, textRectObj)  # 绘制字

    def update(self, image):
        # 判断是否退出
        for event in pygame.event.get():
            if event.type == QUIT:
                self.break_flag = True
        # 清空滑动栏
        self.screen.fill((0, 0, 0))
        for i, surface in enumerate(self.surface_list):
            self.screen.blit(surface, (0, self.rect_height * i))
        # 获取鼠标在窗口中的位置,这一步是交互的关键
        # 主程序必须要刷新的非常快,尽量在10毫秒之内完成才行。要不然明显卡顿
        x, y = pygame.mouse.get_pos()

        # 获取鼠标按钮状态,get_pressed()[0]为左键是否为按下状态,修改按下的数值
        if pygame.mouse.get_pressed()[0]:
            for component in range(self.value_num):
                # 判断是在哪个Surface对象(red_scale, green_scale, blue_scale)上移动鼠标
                if y > component * self.rect_height and y < (component + 1) * self.rect_height:
                    # 获取滑动点x坐标,存入point_pos_in_color列表,component为索引值,分辨率为255
                    self.point_pos_in_color[component] = int((x / (self.image_width - 1)) * 255)
        # 先根据位置画圆, 再在圆内标上数值
        for component in range(self.value_num):
            # 再将0-255的值映射到xy坐标中
            pos = (int((self.point_pos_in_color[component] / 255) * (self.image_width - 1)),
                   component * self.rect_height + self.rect_height // 2)
            # 绘制白色圆点.pos圆心坐标,20为圆半径大小
            pygame.draw.circle(self.screen, (255, 255, 255), pos[:3],
                               self.rect_height // 2)
            # 获取归一化的值,映射到(-self.value_max, self.value_max)
            self.value_list[component] = np.round(self.value_max * 2 * (pos[0] - self.image_width // 2) / self.image_width, 1)
            self.drawText(self.screen, str(self.value_list[component]), pos[0], pos[1])

        # 在窗口标题上显示参数元组
        pygame.display.set_caption(self.exp_info + str(tuple(self.value_list)))

        robot_image = cv2.cvtColor(image, cv2.COLOR_RGB2BGR)

        # cv2.imshow("origin", robot_image)
        # cv2.waitKey(1)
        # 图片可能需要旋转,不需要的话就注释掉
        robot_image = imutils.rotate(robot_image, 90, )
        robot_image = cv2.resize(robot_image,
                                 (self.image_height,
                                 self.image_width))

        my_surface = pygame.pixelcopy.make_surface(robot_image)
        self.screen.blit(my_surface, (0, self.rect_height * self.value_num))
        my_surface = pygame.pixelcopy.make_surface(robot_image)
        self.screen.blit(my_surface, (0, self.rect_height * self.value_num))
        pygame.display.update()


def main():
    import time
    dpc = DynamicsParamsClass()
    # 获取笔记本摄像头的视频流
    cap = cv2.VideoCapture(0)
    while True:
        # get robot img stream from pc camera
        ret, robot_image = cap.read()
        # 封装后,用户只需要将待处理的图片传入update函数,即可拿到滑动栏的值
        dpc.update(robot_image)
        # 模拟主程序的延迟
        time.sleep(0.5)
        print('value_list:', dpc.value_list)
        if dpc.break_flag:
            pygame.quit()
            exit()
    cv2.destroyAllWindows()


if __name__=="__main__":
    main()
再加一个pygame窗口界面永久置顶的功能,防止其他窗口弹出,影响交互…
窗口置顶
from ctypes import windll
SetWindowPos = windll.user32.SetWindowPos

NOSIZE = 1
NOMOVE = 2
TOPMOST = -1
NOT_TOPMOST = -2

def alwaysOnTop(yesOrNo):
    zorder = (NOT_TOPMOST, TOPMOST)[yesOrNo] # choose a flag according to bool
    hwnd = pygame.display.get_wm_info()['window'] # handle to the window
    SetWindowPos(hwnd, zorder, 0, 0, 0, 0, NOMOVE|NOSIZE)
把这个函数加到调用update之前就行了
再次更新,如果主程序的耗时太大,那就需要摁住鼠标左键才能实现连续滑动的感觉。
硬点的话,就是在用自己的手速,拼概率,是不行的…