目录
背景
记录下HBase在CentOS7下的安装过程,请事先安装好Hadoop、Kafka和ZooKeeper,可以分别参见文章Hadoop2.5.0在CentOS7下的安装部署、CentOS7下安装使用kafka及其监控组件、CentOS7安装zookeeper
数据结构
1、逻辑结构
列、列族、行键、区等名词关系如下图所示

行键按字典序排序
2、物理存储结构如下图所示

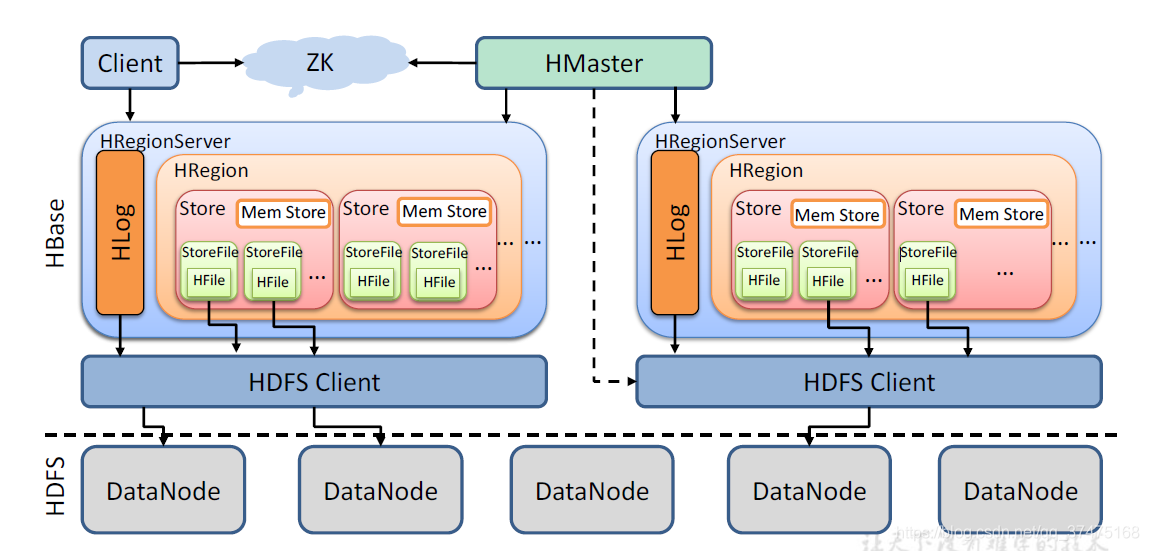
3、架构图如下所示
4、写流程
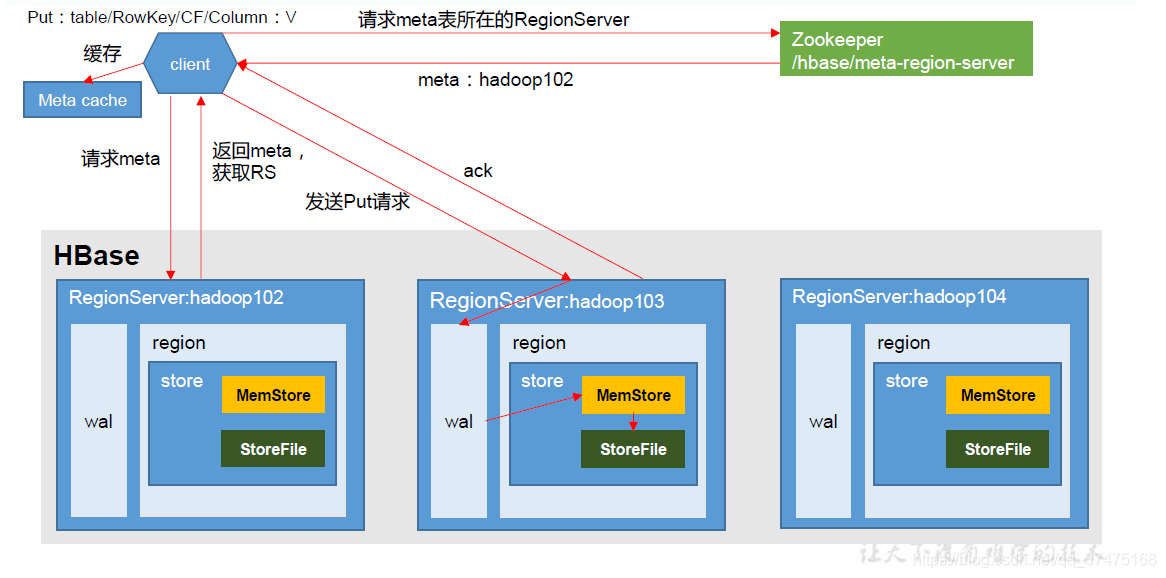
memstore刷写:

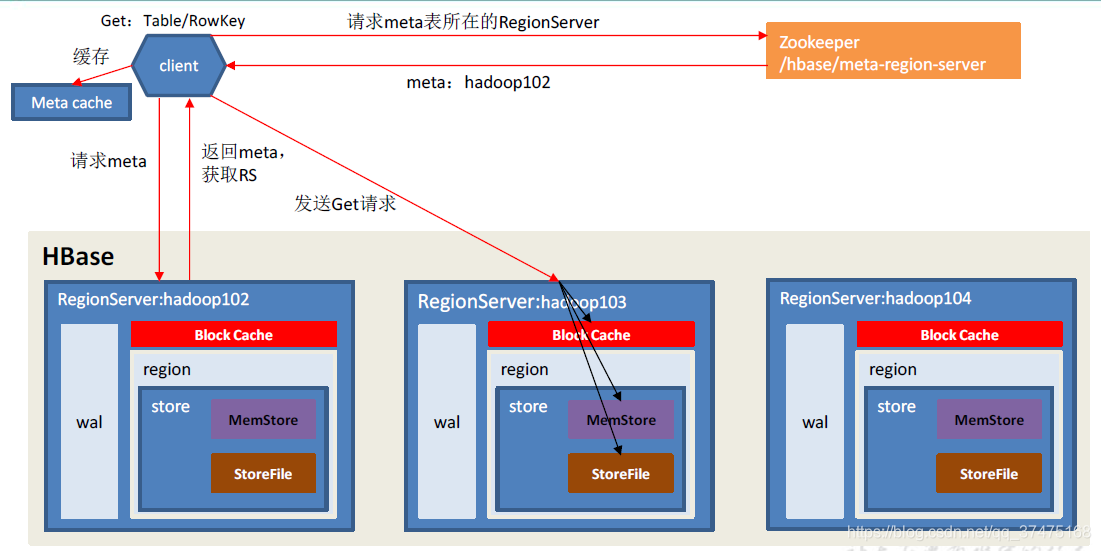
5、读流程
6、存储文件合并

7、分区切分

安装
启动hadoop、kafka、ZooKeeper
解压hbase压缩包
[root@localhost szc]# tar -zxvf hbase-1.3.1-bin.tar.gz配置HBase
进入hbase目录下的conf目录中,修改hbase-site.xml、hbase-env.sh、regionservers三个文件,其中所有的ip都是CentOS本机ip
[root@localhost szc]# cd hbase-1.3.1/conf/hbase-env.sh修改JAVA_HOME,关闭hbase自带的ZooKeeper
export JAVA_HOME=/home/szc/jdk8_64

export HBASE_MANAGES_ZK=false
hbase-site.xml配置hdfs路径、分布式、webUI端口、ZooKeeper等信息
<configuration>

    <property>

        <name>hbase.rootdir</name>

        <value>hdfs://192.168.57.141:8020/Hbase</value>

    </property>

    <property>

        <name>hbase.cluster.distributed</name>

        <value>true</value>

    </property>

    <property>

        <name>hbase.zookeeper.quorum</name>

        <value>192.168.57.141</value>

    </property>

    <property>

        <name>hbase.zookeeper.property.dataDir</name>

        <value>/home/szc/zookeeper/data</value>

    </property>

    <property>

        <name>hbase.master.info.port</name>

        <value>16010</value>

    </property>

</configuration>
regionservers配置服务器
192.168.57.141启动hbase
[root@localhost conf]# cd ..

[root@localhost hbase-1.3.1]# ./bin/hbase-daemon.sh start master

[root@localhost hbase-1.3.1]# ./bin/hbase-daemon.sh start regionserver
开放16010端口后,在windows浏览器上可以看到HBase的webui
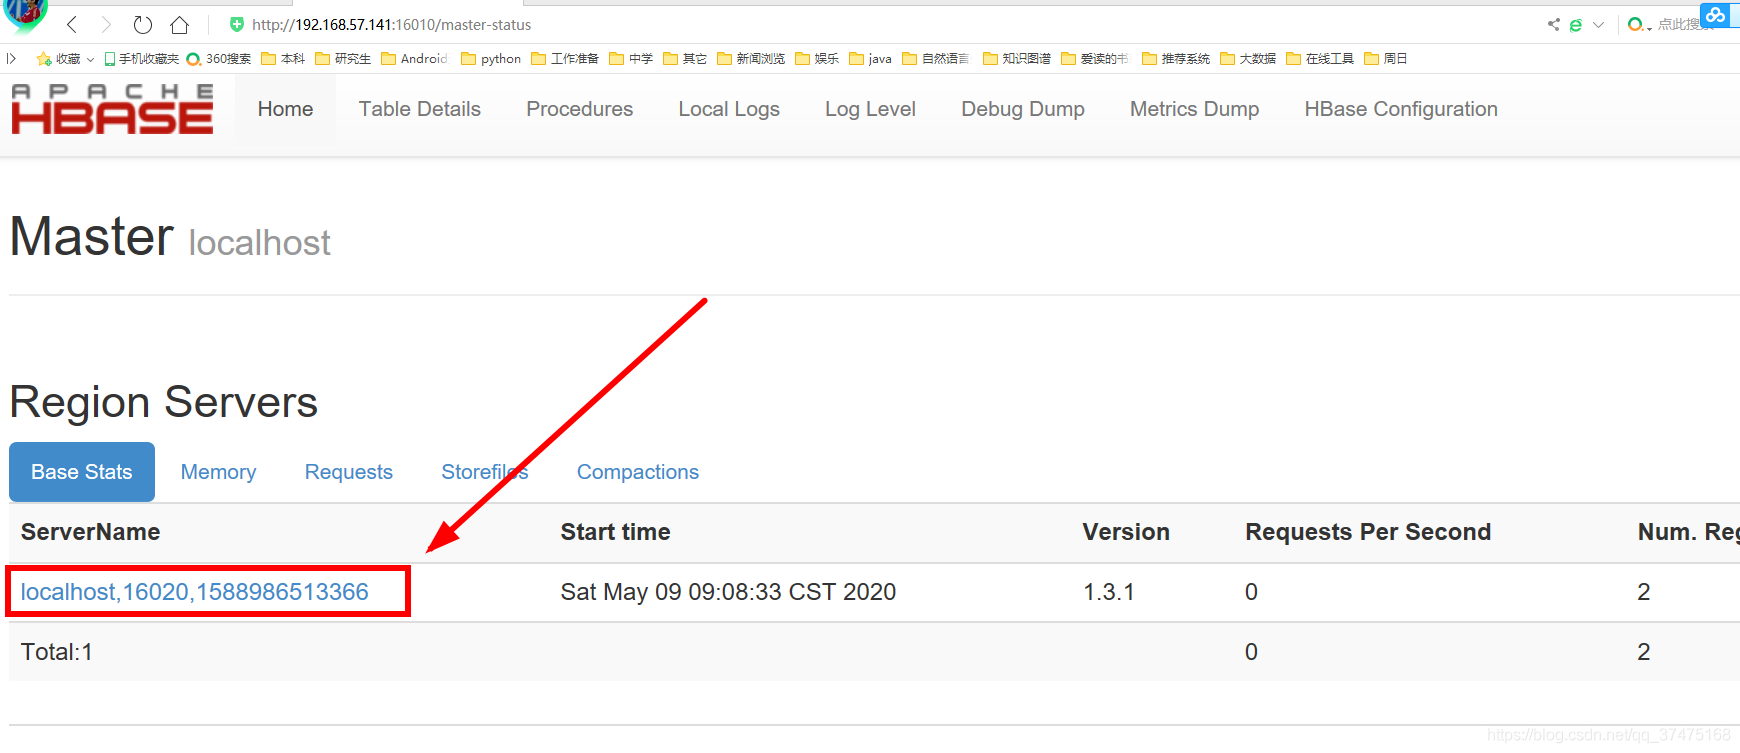
图中箭头所指,就是regionserver,用来分配表空间的。
如果要启动HBase集群,可以运行start-hbase.sh
[root@localhost hbase-1.3.1]# ./bin/start-hbase.sh关闭hbase
[root@localhost hbase-1.3.1]# ./bin/stop-hbase.sh进入hbase命令行
[root@localhost hbase-1.3.1]# ./bin/hbase shell


2020-05-09 09:19:41,328 WARN  [main] util.NativeCodeLoader: Unable to load native-hadoop library for your platform... using builtin-java classes where applicable

SLF4J: Class path contains multiple SLF4J bindings.

SLF4J: Found binding in [jar:file:/home/szc/hbase-1.3.1/lib/slf4j-log4j12-1.7.5.jar!/org/slf4j/impl/StaticLoggerBinder.class]

SLF4J: Found binding in [jar:file:/home/szc/cdh/hadoop-2.5.0-cdh5.3.6/share/hadoop/common/lib/slf4j-log4j12-1.7.5.jar!/org/slf4j/impl/StaticLoggerBinder.class]

SLF4J: See http://www.slf4j.org/codes.html#multiple_bindings for an explanation.

SLF4J: Actual binding is of type [org.slf4j.impl.Log4jLoggerFactory]

HBase Shell; enter 'help<RETURN>' for list of supported commands.

Type "exit<RETURN>" to leave the HBase Shell

Version 1.3.1, r930b9a55528fe45d8edce7af42fef2d35e77677a, Thu Apr  6 19:36:54 PDT 2017


hbase(main):001:0>
命令
创建表,指定列族
hbase(main):019:0> create 'testtable', 'colfaml';插入数据,指定行键、列族限定符和值
hbase(main):007:0> put 'testtable', 'myrow-1', 'colfaml:ql', 'value-1'

hbase(main):008:0> put 'testtable', 'myrow-2', 'colfaml:qk', 'value-2'

hbase(main):009:0> put 'testtable', 'myrow-2', 'colfaml:qj', 'value-3'
扫描表
hbase(main):010:0> scan 'testtable'


ROW                             COLUMN+CELL

myrow-1                        column=colfaml:ql, timestamp=1580287260033, value=value-1

myrow-2                        column=colfaml:qj, timestamp=1580287323632, value=value-3

myrow-2                        column=colfaml:qk, timestamp=1580287294044, value=value-2

2 row(s) in 0.0220 seconds
获取单行数据
hbase(main):011:0> get 'testtable', 'myrow-1'


COLUMN                          CELL

colfaml:ql                     timestamp=1580287260033, value=value-1

1 row(s) in 0.0220 seconds
删除数据(单元格)
hbase(main):012:0> delete 'testtable', 'myrow-2', 'colfaml:qj'禁用并删除表
hbase(main):013:0> disable 'testtable'

hbase(main):014:0> drop 'testtable'
让表支持多版本数据
hbase(main):015:0> alter 'test', { NAME => 'cf1', VERSIONS => 3 }然后查看test表的描述信息
hbase(main):016:0> describe 'test'


Table test is ENABLED

test

COLUMN FAMILIES DESCRIPTION

{NAME => 'cf1', BLOOMFILTER => 'ROW', VERSIONS => '3', IN_MEMORY => 'false', KEEP_DELETED_CELLS => 'FALSE', DATA_BLOCK_E

NCODING => 'NONE', TTL => 'FOREVER', COMPRESSION => 'NONE', MIN_VERSIONS => '0', BLOCKCACHE => 'true', BLOCKSIZE => '655

36', REPLICATION_SCOPE => '0'}

1 row(s) in 0.0110 seconds
可以看到可以支持3个版本的存储信息了,然后对row1和cf1插入两条数据
hbase(main):017:0> put 'test', 'row1', 'cf1', 'val2'

hbase(main):018:0> put 'test', 'row1', 'cf1', 'val3'
再进行多版本数据的查看,就能显示多个版本的历史数据了
hbase(main):019:0> scan 'test', { VERSIONS => 3}

ROW                             COLUMN+CELL

row1                           column=cf1:, timestamp=1580357787736, value=val3

row1                           column=cf1:, timestamp=1580357380211, value=val2

1 row(s) in 0.0120 seconds
与hive集成
首先添加环境变量HBASE_HOME,指向hbase安装目录。然后启动hbase和hive的metastore
在hive中建表
create table pokes(key string, value string) row format delimited fields terminated by ',';读取数据
load data local inpath '/home/szc/data.txt' into table pokes;再在hive中建表,使用HBaseStorageHandler转储,并指定行键、列与hive表中列的对应关系
create table hbase_table(key string, value string) stored by 'org.apache.hadoop.hive.hbase.HBaseStorageHandler' with serdeproperties('hbase.columns.mapping' = ':key, cf1:val')完成后,hive和hbase中就会同时出现名为hbase_table的表,然后在hive端插入数据
insert overwrite table hbase_table select * from pokes;等待此命令完成,运行以下命令验证内容
select * from hbase_table;与pig集成
首先把PigHome\lib\spark\netty-all-***.Final.jar复制到其上一层目录下,再启hadoop的historyserver
mr-jobhistory-daemon.sh start historyserver然后把数据文件拷贝到hdfs的/user/username下
hadoop fs -copyFromLocal /home/szc/pig/tutorial/data/excite-small.log /user/songzeceng在hbase中创建表excite后,启动pig。以下命令均在pig命令行里完成。
先加载数据文件,根据分隔符进行列的分割
raw = LOAD 'hdfs:///user/songzeceng/excite-small.log' USING PigStorage ('\t') AS (user, time, query);然后对每一行进行user、\u0000和time的拼接,拼接结果为行键,剩下的query为列值
T = FOREACH raw GENERATE CONCAT(CONCAT(user, '\u0000'), time), query;然后把T存储到HBase的excite表中,指定列
store T into 'excite' using org.apache.pig.backend.hadoop.hbase.HBaseStorage('cf1:query');然后就可以查看数据了,在pig端进行表的加载,把行键和列值存储到key和query变量中,两个变量均为字符串
R = LOAD 'excite' USING org.apache.pig.backend.hadoop.hbase.HBaseStorage('cf1:query', '-loadKey') as (key: chararray, query: chararray);查看关系R
dump R;示例输出如下
(FE785BA19AAA3CBB 970916083558,dystrophie musculaire duch?ne)

(FE785BA19AAA3CBB 970916083732,)

(FE785BA19AAA3CBB 970916083839,)

(FE785BA19AAA3CBB 970916084121,dystrophie)

(FE785BA19AAA3CBB 970916084512,dystrophie musculaire)

(FE785BA19AAA3CBB 970916084553,)

(FE785BA19AAA3CBB 970916085100,dystrophie musculaire)

(FEA681A240A74D76 970916193646,kerala)

(FEA681A240A74D76 970916194158,kerala)

(FEA681A240A74D76 970916194554,kerala)

(FEA681A240A74D76 970916195314,kerala)

(FF5C9156B2D27FBD 970916114959,fredericksburg)

(FFA4F354D3948CFB 970916055045,big cocks)

(FFA4F354D3948CFB 970916055704,big cocks)

(FFA4F354D3948CFB 970916060431,big cocks)

(FFA4F354D3948CFB 970916060454,big cocks)

(FFA4F354D3948CFB 970916060901,big cocks)

(FFA4F354D3948CFB 970916061009,big cocks)

(FFCA848089F3BA8C 970916100905,marilyn manson)
然后也可以对变量key(行键)按\u0000字符展开为user和time
S = foreach R generate FLATTEN (STRSPLIT(key, '\u0000', 2)) AS (user:chararray, time:long), query;dump S的示例输出如下
(FE785BA19AAA3CBB,970916083435,dystrophie musculaire)

(FE785BA19AAA3CBB,970916083531,dystrophie musculaire duch?ne)

(FE785BA19AAA3CBB,970916083558,dystrophie musculaire duch?ne)

(FE785BA19AAA3CBB,970916083732,)

(FE785BA19AAA3CBB,970916083839,)

(FE785BA19AAA3CBB,970916084121,dystrophie)

(FE785BA19AAA3CBB,970916084512,dystrophie musculaire)

(FE785BA19AAA3CBB,970916084553,)

(FE785BA19AAA3CBB,970916085100,dystrophie musculaire)

(FEA681A240A74D76,970916193646,kerala)

(FEA681A240A74D76,970916194158,kerala)

(FEA681A240A74D76,970916194554,kerala)

(FEA681A240A74D76,970916195314,kerala)

(FF5C9156B2D27FBD,970916114959,fredericksburg)

(FFA4F354D3948CFB,970916055045,big cocks)

(FFA4F354D3948CFB,970916055704,big cocks)

(FFA4F354D3948CFB,970916060431,big cocks)

(FFA4F354D3948CFB,970916060454,big cocks)

(FFA4F354D3948CFB,970916060901,big cocks)

(FFA4F354D3948CFB,970916061009,big cocks)

(FFCA848089F3BA8C,970916100905,marilyn manson)
行键设计原则
长度原则
最大值64KB,推荐长度10~100字节,最好是8的倍数,能短则短,长的行键会影响性能
唯一原则
行键要具有唯一性
散列原则
1)、盐值散列:在时间戳前面加上随机数,再作为行键
2)、字符串反转:把时间戳转换为字符串,然后进行反转,作为行键。这种方法常用在时间戳、电话号码行键上
3)、计算分区号:通过自定义逻辑定义分区号
协处理器的使用
协处理器在HBase中的角色类似于触发器在RDBS中的角色,使用方法如下
1、定义类,继承自BaseRegionObserver,覆写其中的preXX()或postXX()方法,方法作用顾名思义,是在XX操作执行之前和之后进行自定义的逻辑
public class InsertCoprocessor extends BaseRegionObserver {

    @Override
    public void postPut(ObserverContext<RegionCoprocessorEnvironment> e, Put put, WALEdit edit, Durability durability) throws IOException {

        Table table = e.getEnvironment().getTable(TableName.valueOf(Names.TABLE.getValue()));

        String rowKey = new String(put.getRow());
        String[] values = rowKey.split("_");
        // 5_17885275338_20200103174616_19565082510_0713_1

        CoprocessorDao dao = new CoprocessorDao();

        String from = values[1];
        String to = values[3];
        String callTime = values[2];
        String duration = values[4];

        if (values[5].equals("0")) {
            String flag = "1";
            int regionNum = dao.getRegionNumber(to, callTime);

            rowKey = regionNum + "_" + from + "_" + callTime
                    + "_" + to + "_" + duration + "_" + flag;


            byte[] family_in = Names.CF_CALLIN.getValue().getBytes();

            Put put_in = new Put(rowKey.getBytes());

            put_in.addColumn(family_in, "from".getBytes(), from.getBytes());
            put_in.addColumn(family_in, "to".getBytes(), to.getBytes());
            put_in.addColumn(family_in, "callTime".getBytes(), callTime.getBytes());
            put_in.addColumn(family_in, "duration".getBytes(), duration.getBytes());
            put_in.addColumn(family_in, "flag".getBytes(), flag.getBytes());

            table.put(put_in);

            table.close();
        }
    }


    private class CoprocessorDao extends BaseDao {

        public int getRegionNumber(String tel, String date) {
            return genRegionNum(tel, date);
        }
    }

}
以上是再插入一条put后,根据行键的第六部分决定是否再插入一条记录,插入后记得关闭表。
2、然后在创建表时,添加处理器类即可
public HBaseDao() throws Exception {
    ...
    createTable(Names.TABLE.getValue(), ValueConstant.REGION_COUNT,
            "com.szc.telcom.consumer.coprocessor.InsertCoprocessor", new String[] {
            Names.CF_CALLER.getValue(), Names.CF_CALLIN.getValue()

    });
    ...
}

protected void createTable(String name, Integer regionCount, String coprocessorClass, String[] colFamilies) throws Exception {
    ...
    createNewTable(name, coprocessorClass, regionCount, colFamilies);
}

private void createNewTable(String name, String coprocessorClass, Integer regionCount, String[] colFamilies) throws Exception {
    ...
    if (!StringUtils.isEmpty(coprocessorClass)) {
        tableDescriptor.addCoprocessor(coprocessorClass);
    }
    ....
    admin.createTable(tableDescriptor, splitKeys);
}
3、带依赖打包,相关pom的打包插件依赖
<build>
    <plugins>
        <plugin>
            <groupId>org.apache.maven.plugins</groupId>
            <artifactId>maven-compiler-plugin</artifactId>
            <version>3.6.1</version>

            <configuration>
                <source>1.8</source>
                <target>1.8</target>
            </configuration>
        </plugin>

        <plugin>
            <groupId>org.apache.maven.plugins</groupId>
            <artifactId>maven-assembly-plugin</artifactId>
            <version>3.0.0</version>

            <configuration>

                <descriptorRefs>
                    <descriptorRef>
                        jar-with-dependencies
                    </descriptorRef>
                </descriptorRefs>

                <archive>
                    <manifest>
                        <mainClass>com.szc.telcom.producer.Bootstrap</mainClass> <!-- 自定义主类 -->
                    </manifest>
                </archive>
            </configuration>

            <executions>
                <execution>
                    <id>make-assembly</id>
                    <phase>package</phase>
                    <goals>
                        <goal>single</goal>
                    </goals>
                </execution>
            </executions>
        </plugin>
    </plugins>
</build>
这里的协处理器作为工程的一个模块,所以对整个工程进行打包即可
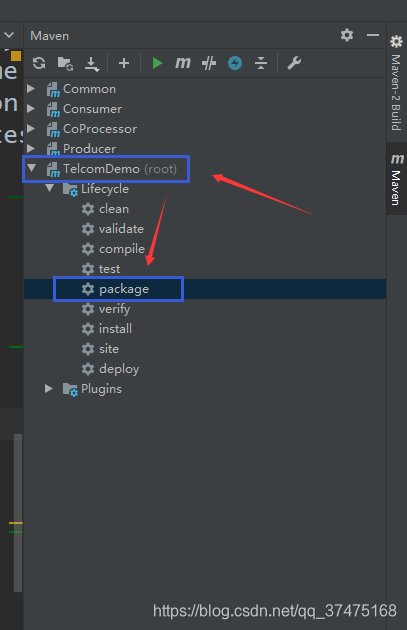
4、把带依赖的协处理器jar包放入HBase集群的lib目录下
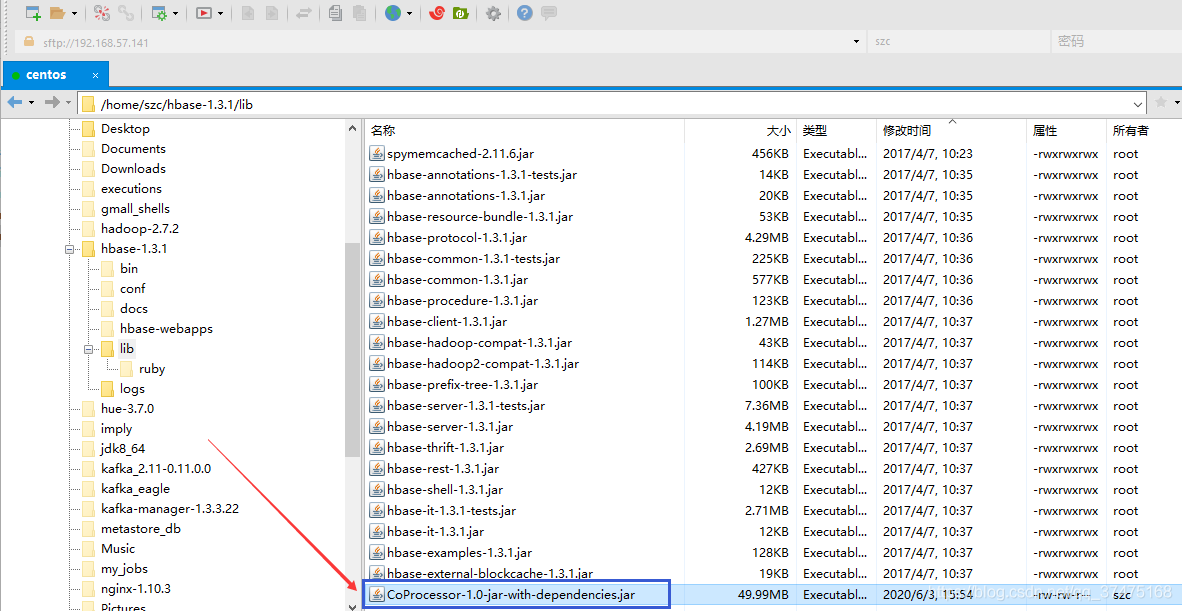
5、重启HBase集群,重新运行项目jar包即可
结语
以上,若有问题,欢迎在评论区讨论