目录
配置接:OpenStack的部署(五)------NOVA项目
一、CT控制节点
CT VM:192.168.100.10 NAT:192.168.163.10
1、创建数据库neutron,并进行授权
mysql -u root -p
CREATE DATABASE neutron;
GRANT ALL PRIVILEGES ON neutron.* TO 'neutron'@'localhost' IDENTIFIED BY 'NEUTRON_DBPASS';
GRANT ALL PRIVILEGES ON neutron.* TO 'neutron'@'%' IDENTIFIED BY 'NEUTRON_DBPASS';
flush privileges;
exit

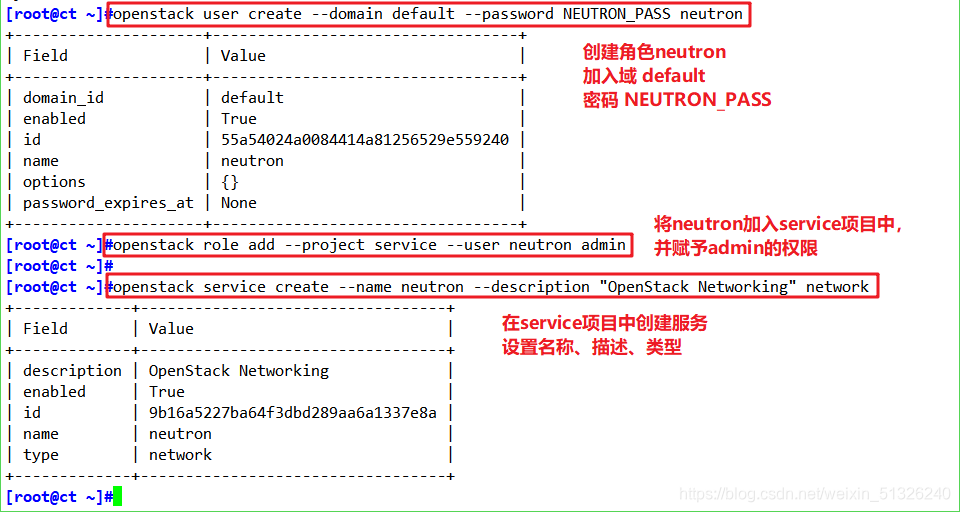
2、创建用户、服务并赋权
创建neutron用户,用于在keystone做认证
openstack user create --domain default --password NEUTRON_PASS neutron

将neutron用户添加到service项目中拥有管理员权限
openstack role add --project service --user neutron admin

创建network服务,服务类型为network
openstack service create --name neutron --description "OpenStack Networking" network
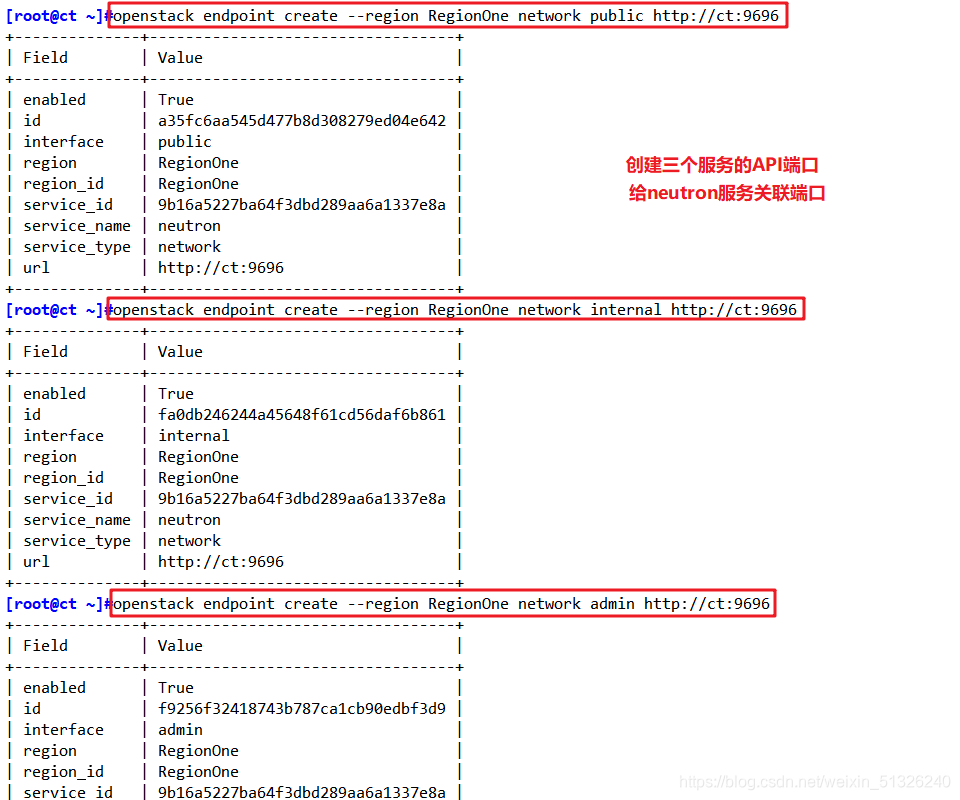
3、注册API
注册API到neutron服务,给neutron服务关联端口,即添加endpoint
openstack endpoint create --region RegionOne network public http://ct:9696
openstack endpoint create --region RegionOne network internal http://ct:9696
openstack endpoint create --region RegionOne network admin http://ct:9696
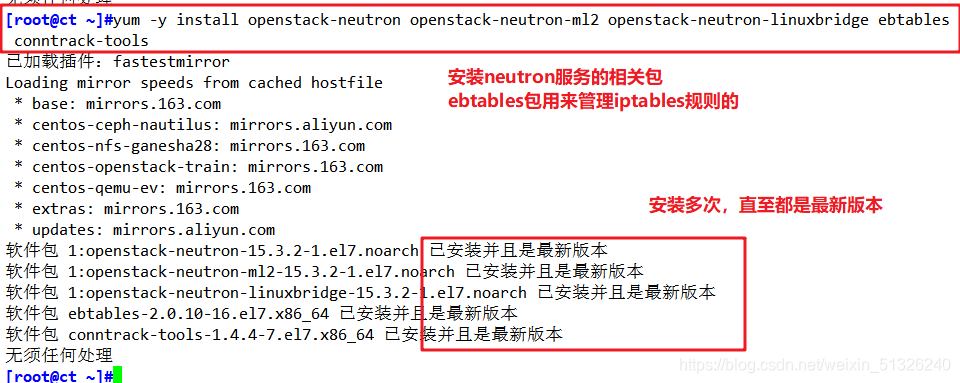
4、安装提供者网络(桥接)并修改相关配置文件
ebtables包是用来管理iptables规则的
yum -y install openstack-neutron openstack-neutron-ml2 openstack-neutron-linuxbridge ebtables conntrack-tools
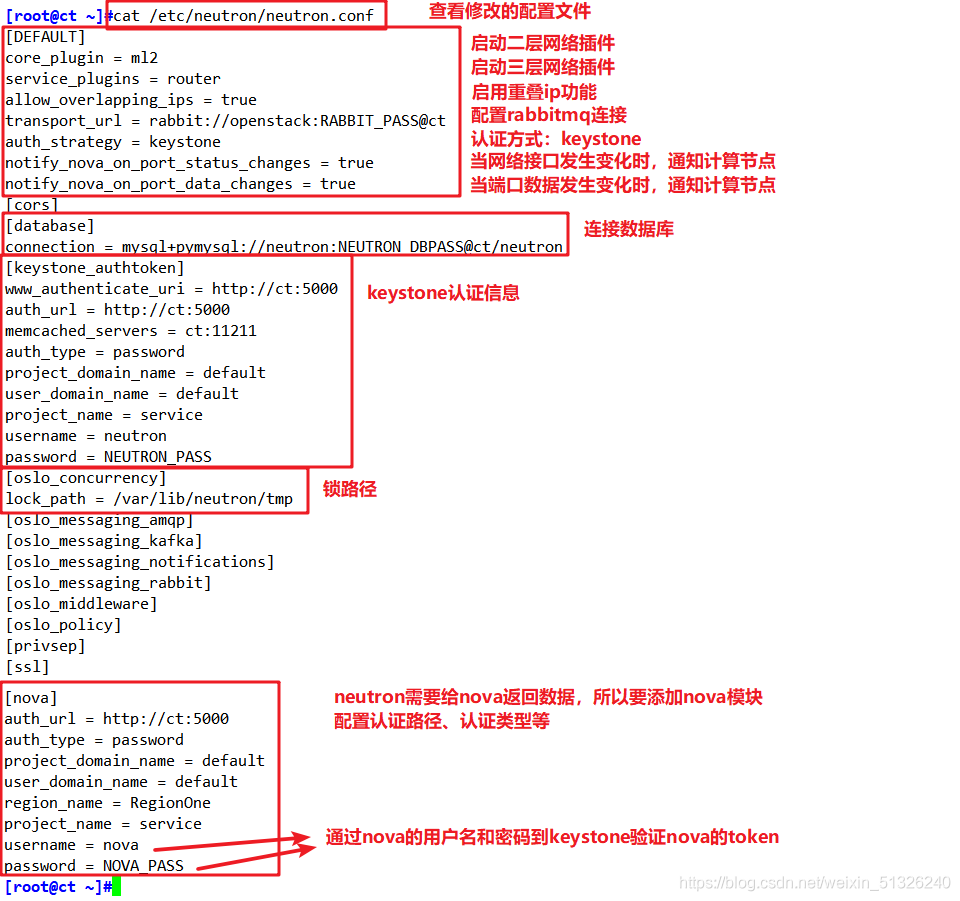
修改主配置文件neutron.conf
cp -a /etc/neutron/neutron.conf{

    ,.bak}
grep -Ev '^$|#' /etc/neutron/neutron.conf.bak > /etc/neutron/neutron.conf

传参
openstack-config --set /etc/neutron/neutron.conf database connection mysql+pymysql://neutron:NEUTRON_DBPASS@ct/neutron
openstack-config --set /etc/neutron/neutron.conf DEFAULT core_plugin ml2
openstack-config --set /etc/neutron/neutron.conf DEFAULT service_plugins router
openstack-config --set /etc/neutron/neutron.conf DEFAULT allow_overlapping_ips true
openstack-config --set /etc/neutron/neutron.conf DEFAULT transport_url rabbit://openstack:RABBIT_PASS@ct
openstack-config --set /etc/neutron/neutron.conf DEFAULT auth_strategy keystone
openstack-config --set /etc/neutron/neutron.conf DEFAULT notify_nova_on_port_status_changes true
openstack-config --set /etc/neutron/neutron.conf DEFAULT notify_nova_on_port_data_changes true
openstack-config --set /etc/neutron/neutron.conf keystone_authtoken www_authenticate_uri http://ct:5000
openstack-config --set /etc/neutron/neutron.conf keystone_authtoken auth_url http://ct:5000
openstack-config --set /etc/neutron/neutron.conf keystone_authtoken memcached_servers ct:11211
openstack-config --set /etc/neutron/neutron.conf keystone_authtoken auth_type password
openstack-config --set /etc/neutron/neutron.conf keystone_authtoken project_domain_name default
openstack-config --set /etc/neutron/neutron.conf keystone_authtoken user_domain_name default
openstack-config --set /etc/neutron/neutron.conf keystone_authtoken project_name service
openstack-config --set /etc/neutron/neutron.conf keystone_authtoken username neutron
openstack-config --set /etc/neutron/neutron.conf keystone_authtoken password NEUTRON_PASS
openstack-config --set /etc/neutron/neutron.conf oslo_concurrency lock_path /var/lib/neutron/tmp
openstack-config --set /etc/neutron/neutron.conf nova  auth_url http://ct:5000
openstack-config --set /etc/neutron/neutron.conf nova  auth_type password
openstack-config --set /etc/neutron/neutron.conf nova  project_domain_name default
openstack-config --set /etc/neutron/neutron.conf nova  user_domain_name default
openstack-config --set /etc/neutron/neutron.conf nova  region_name RegionOne
openstack-config --set /etc/neutron/neutron.conf nova  project_name service
openstack-config --set /etc/neutron/neutron.conf nova  username nova
openstack-config --set /etc/neutron/neutron.conf nova  password NOVA_PASS
修改 ML2 plugin 配置文件 ml2_conf.ini
cp -a /etc/neutron/plugins/ml2/ml2_conf.ini{

    ,.bak}
grep -Ev '^$|#' /etc/neutron/plugins/ml2/ml2_conf.ini.bak > /etc/neutron/plugins/ml2/ml2_conf.ini

传参(省略)
openstack-config --set /etc/neutron/plugins/ml2/ml2_conf.ini ml2 type_drivers  flat,vlan,vxlan
openstack-config --set /etc/neutron/plugins/ml2/ml2_conf.ini ml2 tenant_network_types vxlan
openstack-config --set /etc/neutron/plugins/ml2/ml2_conf.ini ml2 mechanism_drivers  linuxbridge,l2population
openstack-config --set /etc/neutron/plugins/ml2/ml2_conf.ini ml2 extension_drivers  port_security
openstack-config --set /etc/neutron/plugins/ml2/ml2_conf.ini ml2_type_flat flat_networks  provider
openstack-config --set /etc/neutron/plugins/ml2/ml2_conf.ini ml2_type_vxlan vni_ranges 1:1000
openstack-config --set /etc/neutron/plugins/ml2/ml2_conf.ini securitygroup enable_ipset  true
传参后查看

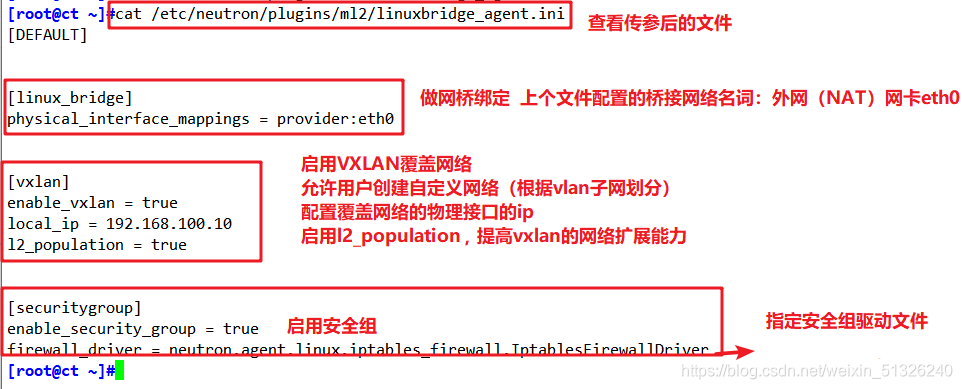
修改 linux bridge network provider 配置文件
cp -a /etc/neutron/plugins/ml2/linuxbridge_agent.ini{

    ,.bak}
grep -Ev '^$|#' /etc/neutron/plugins/ml2/linuxbridge_agent.ini.bak > /etc/neutron/plugins/ml2/linuxbridge_agent.ini

openstack-config --set /etc/neutron/plugins/ml2/linuxbridge_agent.ini linux_bridge physical_interface_mappings  provider:eth0
openstack-config --set /etc/neutron/plugins/ml2/linuxbridge_agent.ini vxlan enable_vxlan  true
openstack-config --set /etc/neutron/plugins/ml2/linuxbridge_agent.ini vxlan local_ip 192.168.100.10
openstack-config --set /etc/neutron/plugins/ml2/linuxbridge_agent.ini vxlan l2_population true
openstack-config --set /etc/neutron/plugins/ml2/linuxbridge_agent.ini securitygroup enable_security_group  true
openstack-config --set /etc/neutron/plugins/ml2/linuxbridge_agent.ini securitygroup firewall_driver  neutron.agent.linux.iptables_firewall.IptablesFirewallDriver
修改内核参数
echo 'net.bridge.bridge-nf-call-iptables=1' >> /etc/sysctl.conf
echo 'net.bridge.bridge-nf-call-ip6tables=1' >> /etc/sysctl.conf
modprobe br_netfilter
sysctl -p

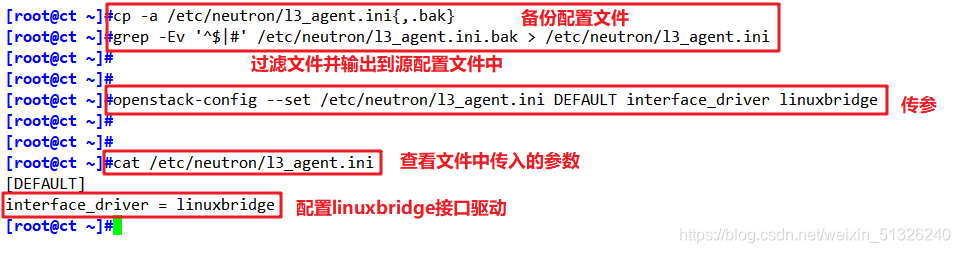
配置Linuxbridge接口驱动和外部网络网桥
cp -a /etc/neutron/l3_agent.ini{

    ,.bak}
grep -Ev '^$|#' /etc/neutron/l3_agent.ini.bak > /etc/neutron/l3_agent.ini
openstack-config --set /etc/neutron/l3_agent.ini DEFAULT interface_driver linuxbridge
修改dhcp_agent 配置文件
cp -a /etc/neutron/dhcp_agent.ini{

    ,.bak}
grep -Ev '^$|#' /etc/neutron/dhcp_agent.ini.bak > /etc/neutron/dhcp_agent.ini

openstack-config --set /etc/neutron/dhcp_agent.ini DEFAULT interface_driver linuxbridge
openstack-config --set /etc/neutron/dhcp_agent.ini DEFAULT dhcp_driver neutron.agent.linux.dhcp.Dnsmasq
openstack-config --set /etc/neutron/dhcp_agent.ini DEFAULT enable_isolated_metadata true

配置元数据代理、用于配置桥接与自服务网络的通用配置
cp -a /etc/neutron/metadata_agent.ini{

    ,.bak}
grep -Ev '^$|#' /etc/neutron/metadata_agent.ini.bak > /etc/neutron/metadata_agent.ini

openstack-config --set /etc/neutron/metadata_agent.ini DEFAULT nova_metadata_host ct
openstack-config --set /etc/neutron/metadata_agent.ini DEFAULT metadata_proxy_shared_secret METADATA_SECRET

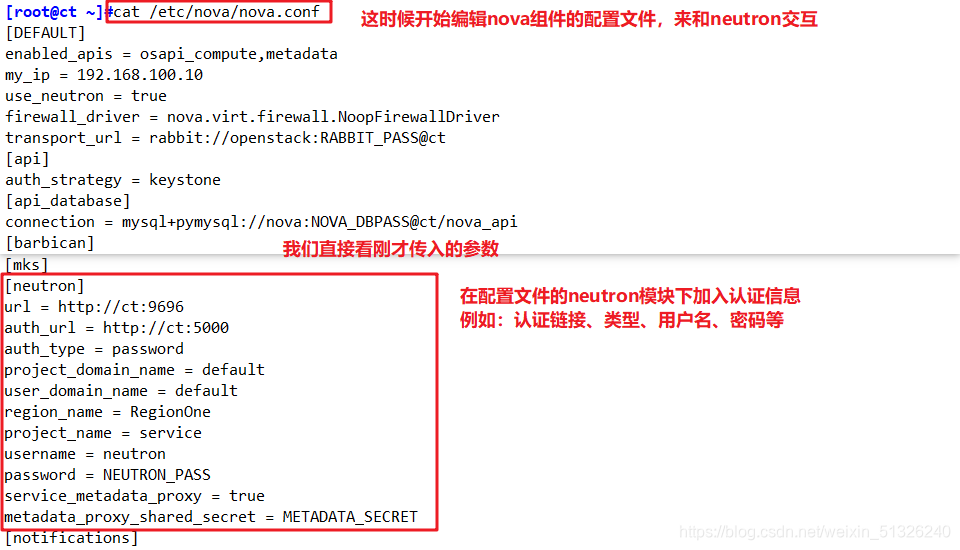
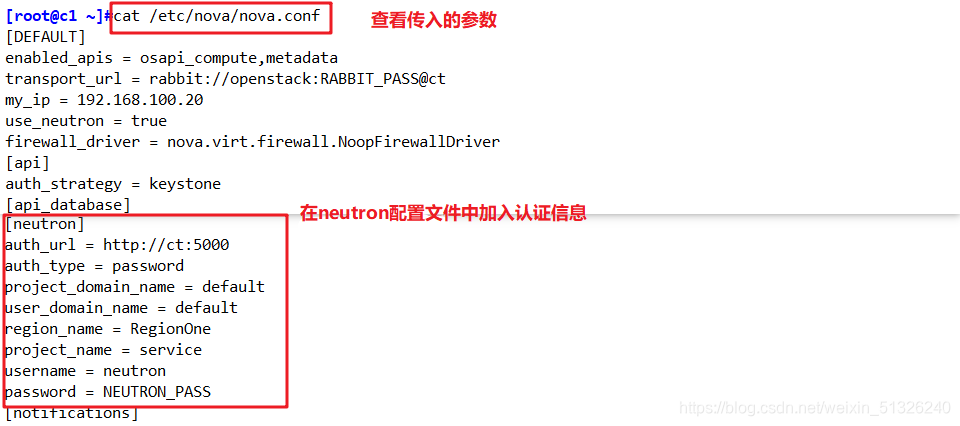
修改CT配置文件/etc/nova/nova.conf,用于neutron交互
openstack-config --set /etc/nova/nova.conf neutron url http://ct:9696
openstack-config --set /etc/nova/nova.conf neutron auth_url http://ct:5000
openstack-config --set /etc/nova/nova.conf neutron auth_type password
openstack-config --set /etc/nova/nova.conf neutron project_domain_name default
openstack-config --set /etc/nova/nova.conf neutron user_domain_name default
openstack-config --set /etc/nova/nova.conf neutron region_name RegionOne
openstack-config --set /etc/nova/nova.conf neutron project_name service
openstack-config --set /etc/nova/nova.conf neutron username neutron
openstack-config --set /etc/nova/nova.conf neutron password NEUTRON_PASS
openstack-config --set /etc/nova/nova.conf neutron service_metadata_proxy true
openstack-config --set /etc/nova/nova.conf neutron metadata_proxy_shared_secret METADATA_SECRET
创建ML2插件文件符号连接
网络服务初始化脚本需要/etc/neutron/plugin.ini指向ML2插件配置文件的符号链接
ln -s /etc/neutron/plugins/ml2/ml2_conf.ini /etc/neutron/plugin.ini

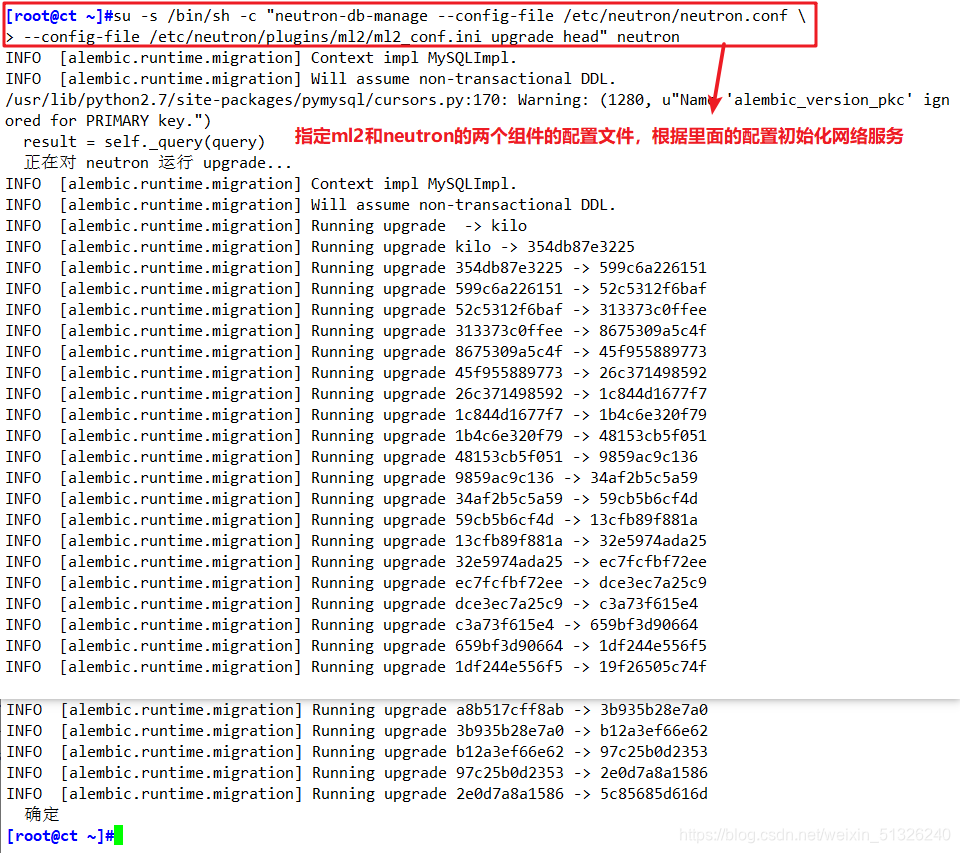
初始化数据库
su -s /bin/sh -c "neutron-db-manage --config-file /etc/neutron/neutron.conf \
--config-file /etc/neutron/plugins/ml2/ml2_conf.ini upgrade head" neutron
5、重启相关服务
重启计算节点nova-api服务
systemctl restart openstack-nova-api.service
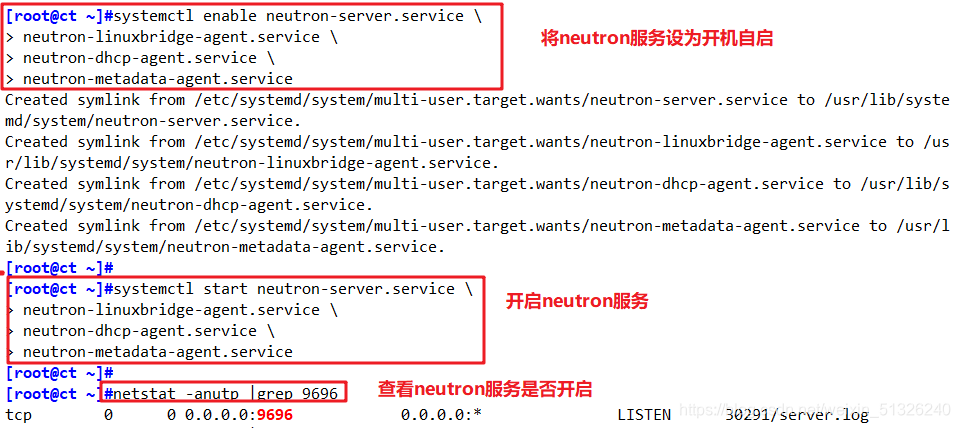
开启neutron服务、设置开机自启动
systemctl enable neutron-server.service \
neutron-linuxbridge-agent.service \
neutron-dhcp-agent.service \
neutron-metadata-agent.service

systemctl start neutron-server.service \
neutron-linuxbridge-agent.service \
neutron-dhcp-agent.service \
neutron-metadata-agent.service

netstat -anutp |grep 9696
因为配置了第三层L3网络服务、所以需要启动第三层服务
systemctl enable neutron-l3-agent.service
systemctl restart neutron-l3-agent.service

二、C1、C2计算节点操作
C1 VM:192.168.100.20 NAT:192.168.163.20
C2 VM:192.168.100.30 NAT:192.168.163.30
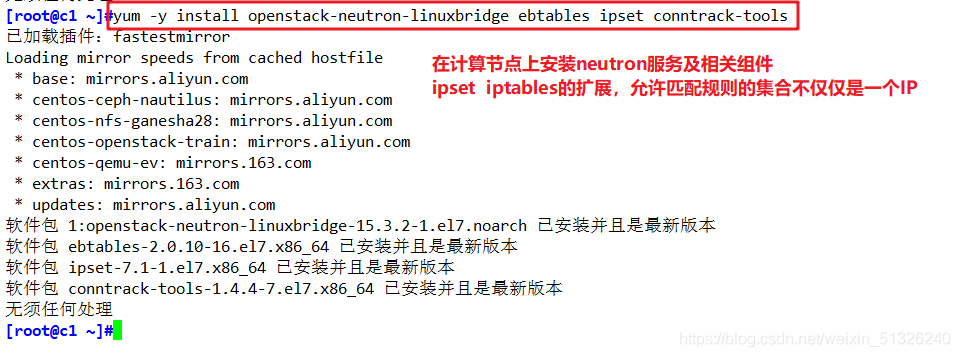
1、部署neutron服务
安装neutron即相关服务
yum -y install openstack-neutron-linuxbridge ebtables ipset conntrack-tools
#ipset:iptables的扩展,允许匹配规则的集合而不仅仅是一个IP
修改neutron.conf文件
cp -a /etc/neutron/neutron.conf{

    ,.bak}
grep -Ev '^$|#' /etc/neutron/neutron.conf.bak > /etc/neutron/neutron.conf

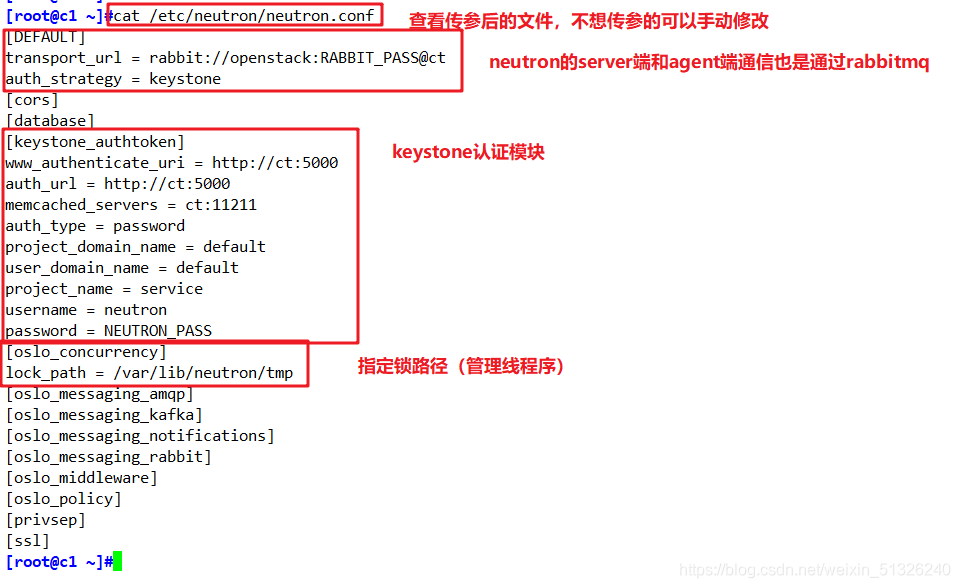
openstack-config --set /etc/neutron/neutron.conf DEFAULT transport_url rabbit://openstack:RABBIT_PASS@ct
openstack-config --set /etc/neutron/neutron.conf DEFAULT auth_strategy keystone
openstack-config --set /etc/neutron/neutron.conf keystone_authtoken www_authenticate_uri http://ct:5000
openstack-config --set /etc/neutron/neutron.conf keystone_authtoken auth_url http://ct:5000
openstack-config --set /etc/neutron/neutron.conf keystone_authtoken memcached_servers ct:11211
openstack-config --set /etc/neutron/neutron.conf keystone_authtoken auth_type password
openstack-config --set /etc/neutron/neutron.conf keystone_authtoken project_domain_name default
openstack-config --set /etc/neutron/neutron.conf keystone_authtoken user_domain_name default
openstack-config --set /etc/neutron/neutron.conf keystone_authtoken project_name service
openstack-config --set /etc/neutron/neutron.conf keystone_authtoken username neutron
openstack-config --set /etc/neutron/neutron.conf keystone_authtoken password NEUTRON_PASS
openstack-config --set /etc/neutron/neutron.conf oslo_concurrency lock_path /var/lib/neutron/tmp
2、配置Linux网桥代理
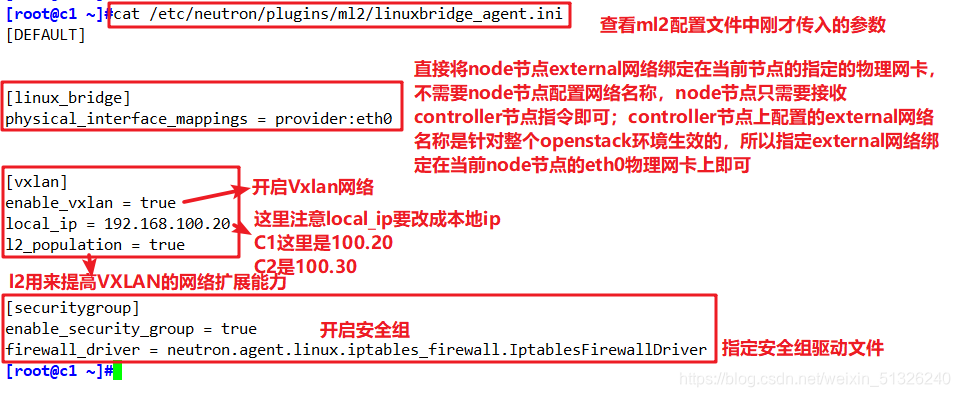
修改Linuxbridge网桥配置文件
cp -a /etc/neutron/plugins/ml2/linuxbridge_agent.ini{

    ,.bak}
grep -Ev '^$|#' /etc/neutron/plugins/ml2/linuxbridge_agent.ini.bak > /etc/neutron/plugins/ml2/linuxbridge_agent.ini

openstack-config --set /etc/neutron/plugins/ml2/linuxbridge_agent.ini linux_bridge physical_interface_mappings  provider:eth0
openstack-config --set /etc/neutron/plugins/ml2/linuxbridge_agent.ini vxlan enable_vxlan  true
openstack-config --set /etc/neutron/plugins/ml2/linuxbridge_agent.ini vxlan local_ip 192.168.100.20
openstack-config --set /etc/neutron/plugins/ml2/linuxbridge_agent.ini vxlan l2_population true
openstack-config --set /etc/neutron/plugins/ml2/linuxbridge_agent.ini securitygroup enable_security_group  true
openstack-config --set /etc/neutron/plugins/ml2/linuxbridge_agent.ini securitygroup firewall_driver  neutron.agent.linux.iptables_firewall.IptablesFirewallDriver
修改内核
echo 'net.bridge.bridge-nf-call-iptables=1' >> /etc/sysctl.conf
echo 'net.bridge.bridge-nf-call-ip6tables=1' >> /etc/sysctl.conf
#modprobe:用于向内核中加载模块或者从内核中移除模块。modprobe -r 表示移除
modprobe br_netfilter
sysctl -p

修改nova.conf配置文件
openstack-config --set /etc/nova/nova.conf neutron auth_url http://ct:5000
openstack-config --set /etc/nova/nova.conf neutron auth_type password
openstack-config --set /etc/nova/nova.conf neutron project_domain_name default
openstack-config --set /etc/nova/nova.conf neutron user_domain_name default
openstack-config --set /etc/nova/nova.conf neutron region_name RegionOne
openstack-config --set /etc/nova/nova.conf neutron project_name service
openstack-config --set /etc/nova/nova.conf neutron username neutron
openstack-config --set /etc/nova/nova.conf neutron password NEUTRON_PASS
三、 验证服务组件(ct节点)
openstack extension list --network
openstack network agent list

下一步:OpenStack的部署(七)------Dashboard组件
总结
三个节点都需要配置neutron网络,以下为部署思路:
配置neutron组件的用户、认证、endpoint
设置提供者provider网络(这里是桥接模式)
① 配置二层网络
② 配置网桥(插件)
③ 优化内核
④ 配置网桥接口与外部对接
⑤ 修改DHCP配置(修改配置文件、代理)
⑥ 配置网桥与内部组件的配置(修改配置文件、代理)
设置neutron与nova对接的配置
其中C1、C2节点配置相同