在安装Zabbix之前最好检查一下Linux系统的时间同步
[root@localhost ~]# date
2020年 07月 16日 星期四 10:35:01 CST
[root@localhost ~]# hwclock --show
2020年07月16日 星期四 10时35分32秒 -0.915536 秒
[root@localhost ~]# hwclock
2020年07月16日 星期四 10时36分03秒 -0.131135 秒
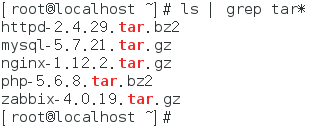
[root@localhost ~]#安装Zabbix需要提前下载准备的安装包,安装包已经用网盘分享出来了
链接:https://pan.baidu.com/s/19dkwgIsvqDds3MhqmLP8Gw 提取码:51v6
1.安装LNMP(&& LAMP)这里安装nginx和Apache其中一个都可以
1.1 安装nginx
[root@localhost ~]# yum install openssl openssl-devel pcre pcre-devel -y
已加载插件:langpacks, product-id, search-disabled-repos, subscription-manager
This system is not registered to Red Hat Subscription Management. You can use subscription-manager to register.
Repodata is over 2 weeks old. Install yum-cron? Or run: yum makecache fast
nginx                                                    | 2.9 kB     00:01
yum                                                      | 4.1 kB     00:00
nginx/x86_64/primary_db                                    |  55 kB   00:30
软件包 1:openssl-1.0.1e-42.el7_1.9.x86_64 已安装并且是最新版本
软件包 pcre-8.32-15.el7.x86_64 已安装并且是最新版本
正在解决依赖关系
--> 正在检查事务
---> 软件包 openssl-devel.x86_64.1.1.0.1e-42.el7_1.9 将被 安装
--> 正在处理依赖关系 krb5-devel(x86-64),它被软件包 1:openssl-devel-1.0.1e-42.el7_1.9.x86_64 需要
--> 正在处理依赖关系 zlib-devel(x86-64),它被软件包 1:openssl-devel-1.0.1e-42.el7_1.9.x86_64 需要
---> 软件包 pcre-devel.x86_64.0.8.32-15.el7 将被 安装
--> 正在检查事务
---> 软件包 krb5-devel.x86_64.0.1.13.2-10.el7 将被 安装
--> 正在处理依赖关系 keyutils-libs-devel,它被软件包 krb5-devel-1.13.2-10.el7.x86_64 需要
--> 正在处理依赖关系 libcom_err-devel,它被软件包 krb5-devel-1.13.2-10.el7.x86_64 需要
--> 正在处理依赖关系 libselinux-devel,它被软件包 krb5-devel-1.13.2-10.el7.x86_64 需要
--> 正在处理依赖关系 libverto-devel,它被软件包 krb5-devel-1.13.2-10.el7.x86_64 需要
---> 软件包 zlib-devel.x86_64.0.1.2.7-15.el7 将被 安装
--> 正在检查事务
---> 软件包 keyutils-libs-devel.x86_64.0.1.5.8-3.el7 将被 安装
---> 软件包 libcom_err-devel.x86_64.0.1.42.9-7.el7 将被 安装
---> 软件包 libselinux-devel.x86_64.0.2.2.2-6.el7 将被 安装
--> 正在处理依赖关系 libsepol-devel >= 2.1.9-1,它被软件包 libselinux-devel-2.2.2-6.el7.x86_64 需要
--> 正在处理依赖关系 pkgconfig(libsepol),它被软件包 libselinux-devel-2.2.2-6.el7.x86_64 需要
---> 软件包 libverto-devel.x86_64.0.0.2.5-4.el7 将被 安装
--> 正在检查事务
---> 软件包 libsepol-devel.x86_64.0.2.1.9-3.el7 将被 安装
--> 解决依赖关系完成

依赖关系解决

================================================================================
 Package                  架构        版本                       源        大小
================================================================================
正在安装:
 openssl-devel            x86_64      1:1.0.1e-42.el7_1.9        yum      1.2 M
 pcre-devel               x86_64      8.32-15.el7                yum      478 k
为依赖而安装:
 keyutils-libs-devel      x86_64      1.5.8-3.el7                yum       37 k
 krb5-devel               x86_64      1.13.2-10.el7              yum      649 k
 libcom_err-devel         x86_64      1.42.9-7.el7               yum       30 k
 libselinux-devel         x86_64      2.2.2-6.el7                yum      174 k
 libsepol-devel           x86_64      2.1.9-3.el7                yum       71 k
 libverto-devel           x86_64      0.2.5-4.el7                yum       12 k
 zlib-devel               x86_64      1.2.7-15.el7               yum       50 k

事务概要
================================================================================
安装  2 软件包 (+7 依赖软件包)

总下载量:2.6 M
安装大小:5.7 M
Downloading packages:
--------------------------------------------------------------------------------
总计                                                16 MB/s | 2.6 MB  00:00
Running transaction check
Running transaction test
Transaction test succeeded
Running transaction
  正在安装    : libcom_err-devel-1.42.9-7.el7.x86_64                        1/9
  正在安装    : pcre-devel-8.32-15.el7.x86_64                               2/9
  正在安装    : libsepol-devel-2.1.9-3.el7.x86_64                           3/9
  正在安装    : libselinux-devel-2.2.2-6.el7.x86_64                         4/9
  正在安装    : libverto-devel-0.2.5-4.el7.x86_64                           5/9
  正在安装    : keyutils-libs-devel-1.5.8-3.el7.x86_64                      6/9
  正在安装    : krb5-devel-1.13.2-10.el7.x86_64                             7/9
  正在安装    : zlib-devel-1.2.7-15.el7.x86_64                              8/9
  正在安装    : 1:openssl-devel-1.0.1e-42.el7_1.9.x86_64                    9/9
yum/productid                                            | 1.6 kB     00:00
  验证中      : zlib-devel-1.2.7-15.el7.x86_64                              1/9
  验证中      : 1:openssl-devel-1.0.1e-42.el7_1.9.x86_64                    2/9
  验证中      : keyutils-libs-devel-1.5.8-3.el7.x86_64                      3/9
  验证中      : libverto-devel-0.2.5-4.el7.x86_64                           4/9
  验证中      : libsepol-devel-2.1.9-3.el7.x86_64                           5/9
  验证中      : pcre-devel-8.32-15.el7.x86_64                               6/9
  验证中      : krb5-devel-1.13.2-10.el7.x86_64                             7/9
  验证中      : libcom_err-devel-1.42.9-7.el7.x86_64                        8/9
  验证中      : libselinux-devel-2.2.2-6.el7.x86_64                         9/9

已安装:
  openssl-devel.x86_64 1:1.0.1e-42.el7_1.9    pcre-devel.x86_64 0:8.32-15.el7

作为依赖被安装:
  keyutils-libs-devel.x86_64 0:1.5.8-3.el7
  krb5-devel.x86_64 0:1.13.2-10.el7
  libcom_err-devel.x86_64 0:1.42.9-7.el7
  libselinux-devel.x86_64 0:2.2.2-6.el7
  libsepol-devel.x86_64 0:2.1.9-3.el7
  libverto-devel.x86_64 0:0.2.5-4.el7
  zlib-devel.x86_64 0:1.2.7-15.el7

完毕!
[root@localhost ~]#
编译 && 安装 nginx
[root@localhost ~]# ls nginx-1.12.2.tar.gz
nginx-1.12.2.tar.gz
[root@localhost ~]# useradd -r -s /sbin/nologin nginx # 创建nginx用户
[root@localhost ~]# tar xf nginx-1.12.2.tar.gz # 解压
[root@localhost ~]# cd nginx-1.12.2/ #进入nginx目录
[root@localhost nginx-1.12.2]# ./configure --user=nginx --group=nginx --prefix=/usr/local/nginx --with-http_stub_status_module --with-http_ssl_module # 编译
[root@localhost nginx-1.12.2]# make && make install # 安装
[root@localhost nginx-1.12.2]# /usr/local/nginx/sbin/nginx #启动nginx
[root@localhost nginx-1.12.2]# ps -ef | grep nginx #查看nginx的服务进程
root 11220 1 0 14:15 ? 00:00:00 nginx: master process /usr/local/nginx/sbin/nginx
nginx 11222 11220 0 14:15 ? 00:00:00 nginx: worker process
root 11234 3514 0 14:15 pts/0 00:00:00 grep --color=auto nginx
[root@localhost nginx-1.12.2]#1.1安装Apache
[root@localhost ~]# yum install httpd httpd-devel -y
已加载插件:langpacks, product-id, search-disabled-repos, subscription-manager
This system is not registered to Red Hat Subscription Management. You can use subscription-manager to register.
正在解决依赖关系
--> 正在检查事务
---> 软件包 httpd.x86_64.0.2.4.6-40.el7 将被 安装
--> 正在处理依赖关系 httpd-tools = 2.4.6-40.el7,它被软件包 httpd-2.4.6-40.el7.x86_64 需要
--> 正在处理依赖关系 /etc/mime.types,它被软件包 httpd-2.4.6-40.el7.x86_64 需要
---> 软件包 httpd-devel.x86_64.0.2.4.6-40.el7 将被 安装
--> 正在检查事务
---> 软件包 httpd-tools.x86_64.0.2.4.6-40.el7 将被 安装
---> 软件包 mailcap.noarch.0.2.1.41-2.el7 将被 安装
--> 解决依赖关系完成

依赖关系解决

================================================================================
 Package              架构            版本                   源            大小
================================================================================
正在安装:
 httpd                x86_64          2.4.6-40.el7           yum          1.2 M
 httpd-devel          x86_64          2.4.6-40.el7           yum          187 k
为依赖而安装:
 httpd-tools          x86_64          2.4.6-40.el7           yum           82 k
 mailcap              noarch          2.1.41-2.el7           yum           31 k

事务概要
================================================================================
安装  2 软件包 (+2 依赖软件包)

总下载量:1.5 M
安装大小:4.6 M
Downloading packages:
--------------------------------------------------------------------------------
总计                                                16 MB/s | 1.5 MB  00:00
Running transaction check
Running transaction test
Transaction test succeeded
Running transaction
  正在安装    : httpd-tools-2.4.6-40.el7.x86_64                             1/4
  正在安装    : mailcap-2.1.41-2.el7.noarch                                 2/4
  正在安装    : httpd-2.4.6-40.el7.x86_64                                   3/4
  正在安装    : httpd-devel-2.4.6-40.el7.x86_64                             4/4
  验证中      : httpd-devel-2.4.6-40.el7.x86_64                             1/4
  验证中      : mailcap-2.1.41-2.el7.noarch                                 2/4
  验证中      : httpd-tools-2.4.6-40.el7.x86_64                             3/4
  验证中      : httpd-2.4.6-40.el7.x86_64                                   4/4

已安装:
  httpd.x86_64 0:2.4.6-40.el7         httpd-devel.x86_64 0:2.4.6-40.el7

作为依赖被安装:
  httpd-tools.x86_64 0:2.4.6-40.el7        mailcap.noarch 0:2.1.41-2.el7

完毕!
[root@localhost ~]#
1.2 安装MySQL
[root@localhost ~]# yum install -y mariadb-server
已加载插件:langpacks, product-id, search-disabled-repos, subscription-manager
This system is not registered to Red Hat Subscription Management. You can use subscription-manager to register.
正在解决依赖关系
--> 正在检查事务
---> 软件包 mariadb-server.x86_64.1.5.5.44-2.el7 将被 安装
--> 正在处理依赖关系 mariadb(x86-64) = 1:5.5.44-2.el7,它被软件包 1:mariadb-server-5.5.44-2.el7.x86_64 需要
--> 正在处理依赖关系 perl(DBI),它被软件包 1:mariadb-server-5.5.44-2.el7.x86_64 需要
--> 正在处理依赖关系 perl-DBD-MySQL,它被软件包 1:mariadb-server-5.5.44-2.el7.x86_64 需要
--> 正在处理依赖关系 perl-DBI,它被软件包 1:mariadb-server-5.5.44-2.el7.x86_64 需要
--> 正在检查事务
---> 软件包 mariadb.x86_64.1.5.5.44-2.el7 将被 安装
---> 软件包 perl-DBD-MySQL.x86_64.0.4.023-5.el7 将被 安装
---> 软件包 perl-DBI.x86_64.0.1.627-4.el7 将被 安装
--> 正在处理依赖关系 perl(RPC::PlClient) >= 0.2000,它被软件包 perl-DBI-1.627-4.el7.x86_64 需要
--> 正在处理依赖关系 perl(RPC::PlServer) >= 0.2001,它被软件包 perl-DBI-1.627-4.el7.x86_64 需要
--> 正在检查事务
---> 软件包 perl-PlRPC.noarch.0.0.2020-14.el7 将被 安装
--> 正在处理依赖关系 perl(Net::Daemon) >= 0.13,它被软件包 perl-PlRPC-0.2020-14.el7.noarch 需要
--> 正在处理依赖关系 perl(Compress::Zlib),它被软件包 perl-PlRPC-0.2020-14.el7.noarch 需要
--> 正在处理依赖关系 perl(Net::Daemon::Log),它被软件包 perl-PlRPC-0.2020-14.el7.noarch 需要
--> 正在处理依赖关系 perl(Net::Daemon::Test),它被软件包 perl-PlRPC-0.2020-14.el7.noarch 需要
--> 正在检查事务
---> 软件包 perl-IO-Compress.noarch.0.2.061-2.el7 将被 安装
--> 正在处理依赖关系 perl(Compress::Raw::Bzip2) >= 2.061,它被软件包 perl-IO-Compress-2.061-2.el7.noarch 需要
--> 正在处理依赖关系 perl(Compress::Raw::Zlib) >= 2.061,它被软件包 perl-IO-Compress-2.061-2.el7.noarch 需要
---> 软件包 perl-Net-Daemon.noarch.0.0.48-5.el7 将被 安装
--> 正在检查事务
---> 软件包 perl-Compress-Raw-Bzip2.x86_64.0.2.061-3.el7 将被 安装
---> 软件包 perl-Compress-Raw-Zlib.x86_64.1.2.061-4.el7 将被 安装
--> 解决依赖关系完成
依赖关系解决
================================================================================
Package 架构 版本 源 大小
================================================================================
正在安装:
mariadb-server x86_64 1:5.5.44-2.el7 yum 11 M
为依赖而安装:
mariadb x86_64 1:5.5.44-2.el7 yum 9.0 M
perl-Compress-Raw-Bzip2 x86_64 2.061-3.el7 yum 32 k
perl-Compress-Raw-Zlib x86_64 1:2.061-4.el7 yum 57 k
perl-DBD-MySQL x86_64 4.023-5.el7 yum 140 k
perl-DBI x86_64 1.627-4.el7 yum 802 k
perl-IO-Compress noarch 2.061-2.el7 yum 260 k
perl-Net-Daemon noarch 0.48-5.el7 yum 51 k
perl-PlRPC noarch 0.2020-14.el7 yum 36 k
事务概要
================================================================================
安装 1 软件包 (+8 依赖软件包)
总下载量:21 M
安装大小:107 M
Downloading packages:
--------------------------------------------------------------------------------
总计 58 MB/s | 21 MB 00:00
Running transaction check
Running transaction test
Transaction test succeeded
Running transaction
警告:RPM 数据库已被非 yum 程序修改。
正在安装 : 1:perl-Compress-Raw-Zlib-2.061-4.el7.x86_64 1/9
正在安装 : 1:mariadb-5.5.44-2.el7.x86_64 2/9
正在安装 : perl-Net-Daemon-0.48-5.el7.noarch 3/9
正在安装 : perl-Compress-Raw-Bzip2-2.061-3.el7.x86_64 4/9
正在安装 : perl-IO-Compress-2.061-2.el7.noarch 5/9
正在安装 : perl-PlRPC-0.2020-14.el7.noarch 6/9
正在安装 : perl-DBI-1.627-4.el7.x86_64 7/9
正在安装 : perl-DBD-MySQL-4.023-5.el7.x86_64 8/9
正在安装 : 1:mariadb-server-5.5.44-2.el7.x86_64 9/9
验证中 : perl-Compress-Raw-Bzip2-2.061-3.el7.x86_64 1/9
验证中 : perl-Net-Daemon-0.48-5.el7.noarch 2/9
验证中 : 1:mariadb-server-5.5.44-2.el7.x86_64 3/9
验证中 : perl-PlRPC-0.2020-14.el7.noarch 4/9
验证中 : 1:mariadb-5.5.44-2.el7.x86_64 5/9
验证中 : 1:perl-Compress-Raw-Zlib-2.061-4.el7.x86_64 6/9
验证中 : perl-DBD-MySQL-4.023-5.el7.x86_64 7/9
验证中 : perl-IO-Compress-2.061-2.el7.noarch 8/9
验证中 : perl-DBI-1.627-4.el7.x86_64 9/9
已安装:
mariadb-server.x86_64 1:5.5.44-2.el7
作为依赖被安装:
mariadb.x86_64 1:5.5.44-2.el7
perl-Compress-Raw-Bzip2.x86_64 0:2.061-3.el7
perl-Compress-Raw-Zlib.x86_64 1:2.061-4.el7
perl-DBD-MySQL.x86_64 0:4.023-5.el7
perl-DBI.x86_64 0:1.627-4.el7
perl-IO-Compress.noarch 0:2.061-2.el7
perl-Net-Daemon.noarch 0:0.48-5.el7
perl-PlRPC.noarch 0:0.2020-14.el7
完毕!
[root@localhost ~]#初始化数据库
[root@localhost ~]# systemctl start mariadb         # 启动 Mariadb数据库
[root@localhost ~]# systemctl enable mariadb
[root@localhost ~]#
[root@localhost ~]# mysql_secure_installation       # 初始化 Mariadb
..............省略部分安装步骤...............
Enter current password for root (enter for none):  (当前数据库密码为空,直接敲回车)
OK, successfully used password, moving on...

Set root password? [Y/n] y   (设置root管理员的数据库密码)
New password:
Re-enter new password:
Password updated successfully!
Reloading privilege tables..
 ... Success!

Remove anonymous users? [Y/n] y    (删除匿名账户)
 ... Success!

Disallow root login remotely? [Y/n] y    (禁止root从远程登录)
 ... Success!

Remove test database and access to it? [Y/n] y     (删除test数据库并取消对它的访问)
 - Dropping test database...
 ... Success!
 - Removing privileges on test database...
 ... Success!

Reload privilege tables now? [Y/n] y      (刷新授权表,使配置立即生效)
 ... Success!

Cleaning up...

Thanks for using MariaDB!
[root@localhost ~]#
安装PHP及依赖包
[root@localhost ~]# yum install -y php php-mysql httpd-manual mod_ssl php-gd php-xml php-mbstring php-ldap php-pear php-xmlrpc php-bcmath mysql-connector-odbc mysql-devel libdbi-dbd-mysql net-snmp-devel curl-devel unixODBC-devel OpenIPMI-devel java-devel libevent-devel freetype-devel

[root@localhost ~]# vim /etc/php.ini    # 修改 PHP配置文件(主要是修改时区,其它参数可以保持默认)
878 date.timezone = Asia/Shanghai
384 max_execution_time = 300
672 post_max_size = 16M
119 max_input_time = 300
405 memory_limit = 128M
1704 mbstring.func_overload = 1   (禁用这个参数)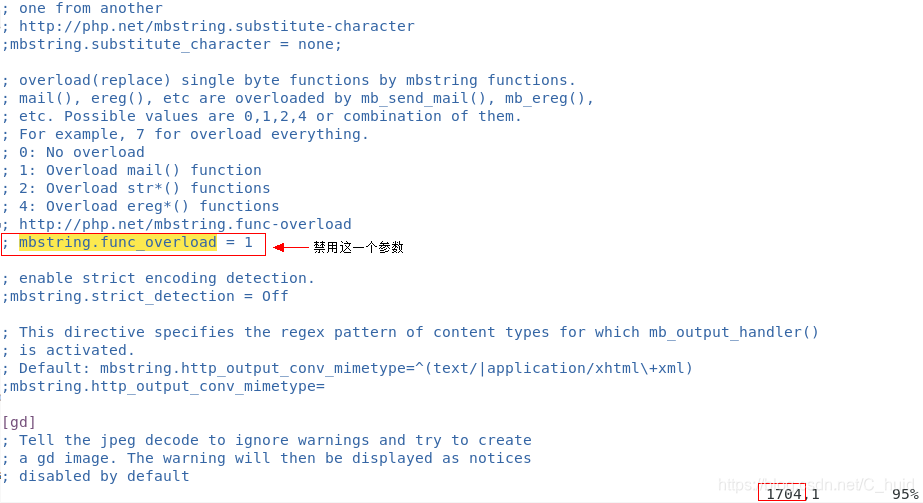
安装Zabbix依赖包
[root@localhost ~]# yum install -y curl curl-devel pcre pcre-devel libssh2-devel openldap-devel
...............省略部分安装步骤................
Installed:
  libssh2-devel.x86_64 0:1.8.0-3.el7   openldap-devel.x86_64 0:2.4.44-21.el7_6

Dependency Installed:
  cyrus-sasl-devel.x86_64 0:2.1.26-23.el7

Complete!
[root@localhost ~]#
安装Zabbix

[root@localhost ~]# rpm -ivh zabbix-server-mysql-4.4.0-1.el7.x86_64.rpm zabbix-get-3.4.4-2.el7.x86_64.rpm zabbix-agent-3.4.4-2.el7.x86_64.rpm zabbix-web-4.4.0-1.el7.noarch.rpm --nodeps --force
[root@localhost ~]# tar xf zabbix-3.4.8.tar.gz
[root@localhost ~]# cd zabbix-3.4.8/
[root@localhost zabbix-3.4.8]# ./configure --prefix=/usr/local --sysconfdir=/etc/zabbix --enable-server --enable-proxy --enable-agent --enable-ipv6 --with-mysql=/usr/bin/mysql_config --with-net-snmp --with-libcurl --with-openipmi --with-unixodbc --with-ldap --with-ssh2 --enable-java
..................省略部分安装过程................
  Enable Java gateway:   yes
  Java gateway details:
    Java compiler:         javac
    Java archiver:         jar

  LDAP support:          yes
  IPv6 support:          yes

***********************************************************
*            Now run 'make install'                       *
*                                                         *
*            Thank you for using Zabbix!                  *
*              <http://www.zabbix.com>                    *
***********************************************************

[root@localhost zabbix-3.4.8]#
[root@localhost zabbix-3.4.8]# make && make install    # 编译安装
增加services配置(默认已经添加)
[root@localhost zabbix-3.4.8]# vim /etc/services
zabbix-agent    10050/tcp               # Zabbix Agent
zabbix-agent    10050/udp               # Zabbix Agent
zabbix-trapper  10051/tcp               # Zabbix Trapper
zabbix-trapper  10051/udp               # Zabbix Trapper
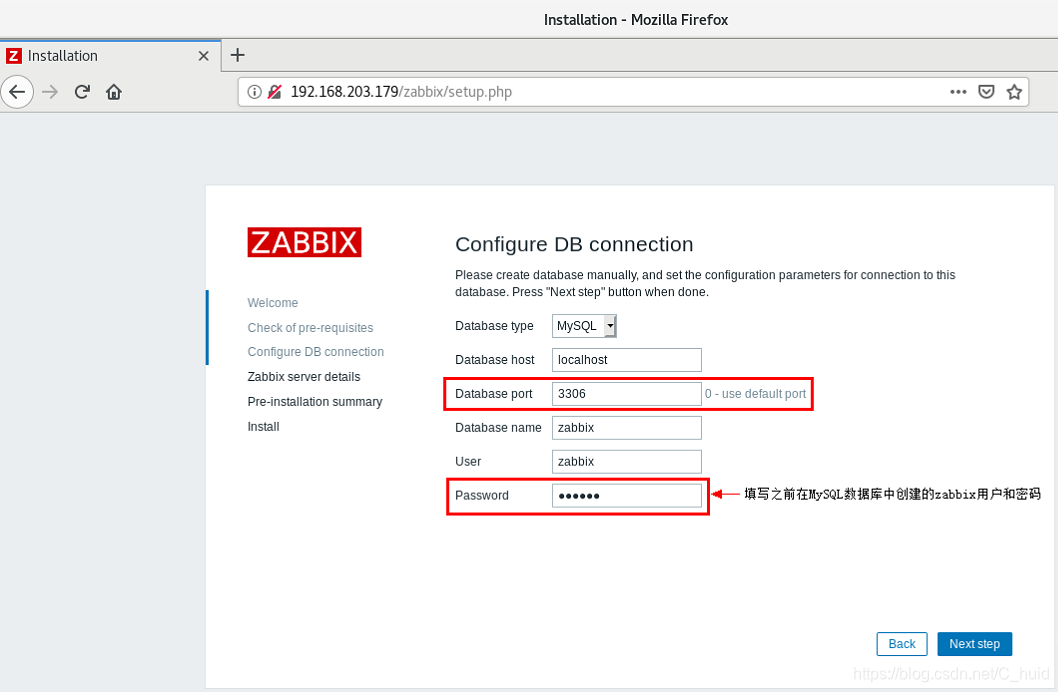
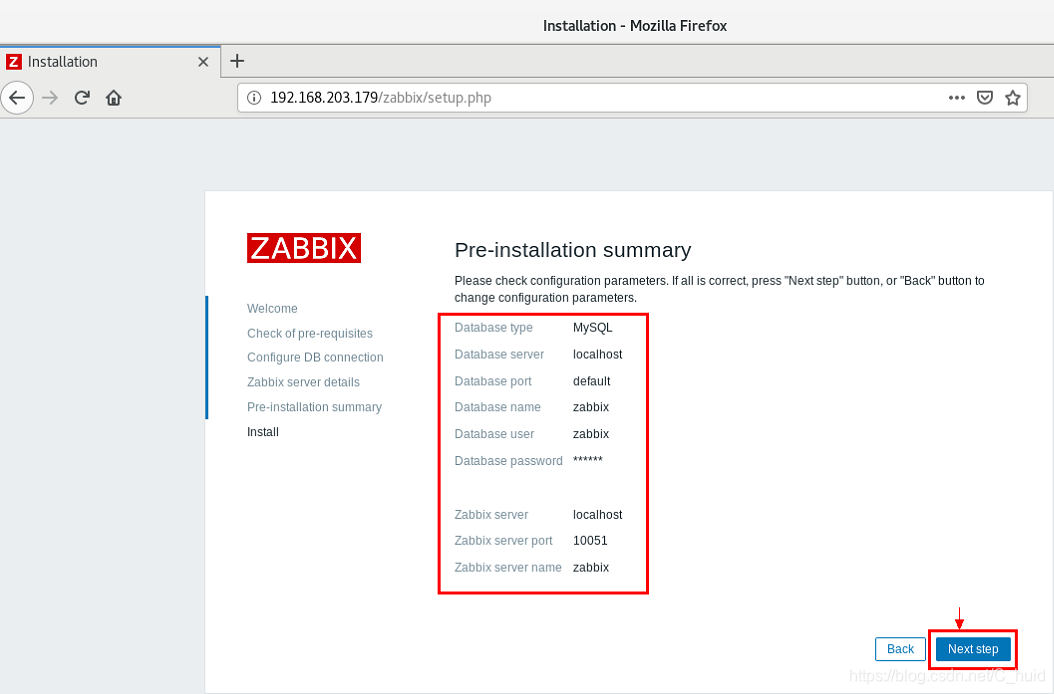
创建Zabbix数据库并配置用户名和密码
[root@localhost ~]# mysql -u root -p
Enter password:
Welcome to the MariaDB monitor.  Commands end with ; or \g.
Your MariaDB connection id is 10
Server version: 5.5.65-MariaDB MariaDB Server

Copyright (c) 2000, 2018, Oracle, MariaDB Corporation Ab and others.

Type 'help;' or '\h' for help. Type '\c' to clear the current input statement.

MariaDB [(none)]> create database zabbix character set utf8;     (创建zabbix数据库并设置utf8字符集)
Query OK, 1 row affected (0.00 sec)

MariaDB [(none)]> grant all privileges on zabbix.* to zabbix@localhost identified by 'zabbix';  (创建用户和密码均为zabbix)
Query OK, 0 rows affected (0.01 sec)

MariaDB [(none)]> flush privileges;    (刷新权限)
Query OK, 0 rows affected (0.00 sec)

MariaDB [(none)]> quit
Bye
[root@localhost ~]#
进入Zabbix目录,导入MySQL数据
[root@localhost ~]# cd zabbix-3.4.8/database/mysql/
[root@localhost mysql]# ls
data.sql  images.sql  schema.sql
[root@localhost mysql]# mysql -u root -p123456 zabbix < ./schema.sql
[root@localhost mysql]# mysql -u root -p123456 zabbix < ./images.sql
[root@localhost mysql]# mysql -u root -p123456 zabbix < ./data.sql
配置Zabbix启动脚本,并设置开机启动
[root@localhost ~]# cd zabbix-3.4.8/
[root@localhost zabbix-3.4.8]# cp misc/init.d/fedora/core/zabbix_* /etc/init.d/
[root@localhost zabbix-3.4.8]# chmod 755 /etc/init.d/zabbix_*
[root@localhost zabbix-3.4.8]# sed -i "s#BASEDIR=/usr/local#BASEDIR=/usr/#g" /etc/init.d/zabbix_server
[root@localhost zabbix-3.4.8]# sed -i "s#BASEDIR=/usr/local#BASEDIR=/usr/#g" /etc/init.d/zabbix_agentd
[root@localhost zabbix-3.4.8]#
[root@localhost zabbix-3.4.8]# chkconfig zabbix_server on
[root@localhost zabbix-3.4.8]# chkconfig zabbix_agentd on
配置Zabbix_server.conf
[root@localhost zabbix-3.4.8]# vim /etc/zabbix/zabbix_server.conf
38 LogFile=/var/log/zabbix/zabbix_server.log
91 DBHost=localhost
100 DBName=zabbix
116 DBUser=zabbix
124 DBPassword=zabbix
131 DBSocket=/var/lib/mysql/mysql.sock
139 DBPort=3306
下面的参数可以保持默认
189 StartPollers=160
228 StartTrappers=20
236 StartPingers=100
244 StartDiscoverers=120
401 MaxHousekeeperDelete=5000
410 CacheSize=1024M
426 StartDBSyncers=16
435 HistoryCacheSize=1024M
453 TrendCacheSize=1024M
516 AlertScriptsPath=/usr/lib/zabbix/alertscripts
563 LogSlowQueries=1000
配置zabbix_agentd.conf
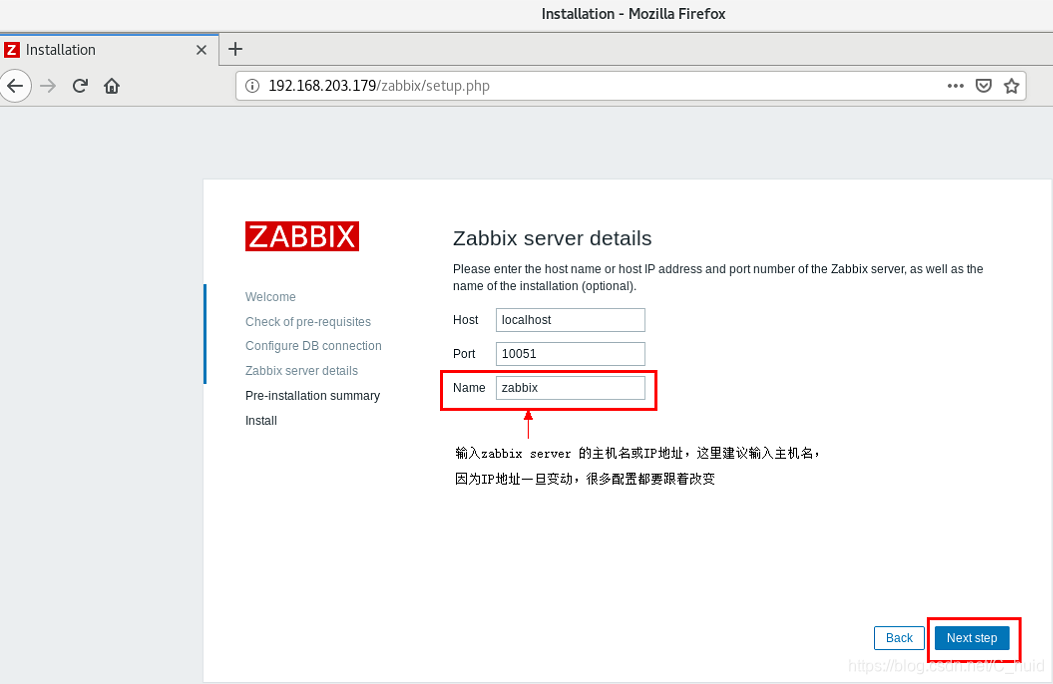
[root@localhost zabbix-3.4.8]# vim /etc/zabbix/zabbix_agentd.conf
32 LogFile=/var/log/zabbix/zabbix_agentd.log
73 EnableRemoteCommands=0
97 Server=127.0.0.1,192.168.203.179
122 StartAgents=8
138 ServerActive=192.168.203.179:10051
149 Hostname=Zabbix
238 Timeout=30
267 Include=/etc/zabbix/zabbix_agentd.d
286 UnsafeUserParameters=1
启动zabbix_server和zabbix_agentd服务
[root@localhost zabbix-3.4.8]# service zabbix_server start
Starting zabbix_server (via systemctl):                    [  OK  ]
[root@localhost zabbix-3.4.8]# service zabbix_agentd start
Starting zabbix_agentd (via systemctl):                    [  OK  ]
[root@localhost zabbix-3.4.8]#
配置zabbix frontends前端
[root@localhost zabbix-3.4.8]# cp -r ./frontends/php/ /var/www/html/zabbix   # 复制frontend页面文件
[root@localhost zabbix-3.4.8]# chown -R apache.apache /var/www/html/zabbix
[root@localhost zabbix-3.4.8]# service httpd start
配置Apache虚拟主机
[root@localhost ~]# vim /etc/httpd/conf/httpd.conf
113 <VirtualHost 192.168.203.179:80> # 这里的IP地址可以用 * 号代替
114 ServerAdmin admin@zabbix
115 DocumentRoot /var/www/html/zabbix
116 ServerName zabbix
117 ErrorLog logs/dummy-zabbix-error_log
118 CustomLog logs/dummy-zabbix-access_log common
119 </VirtualHost>
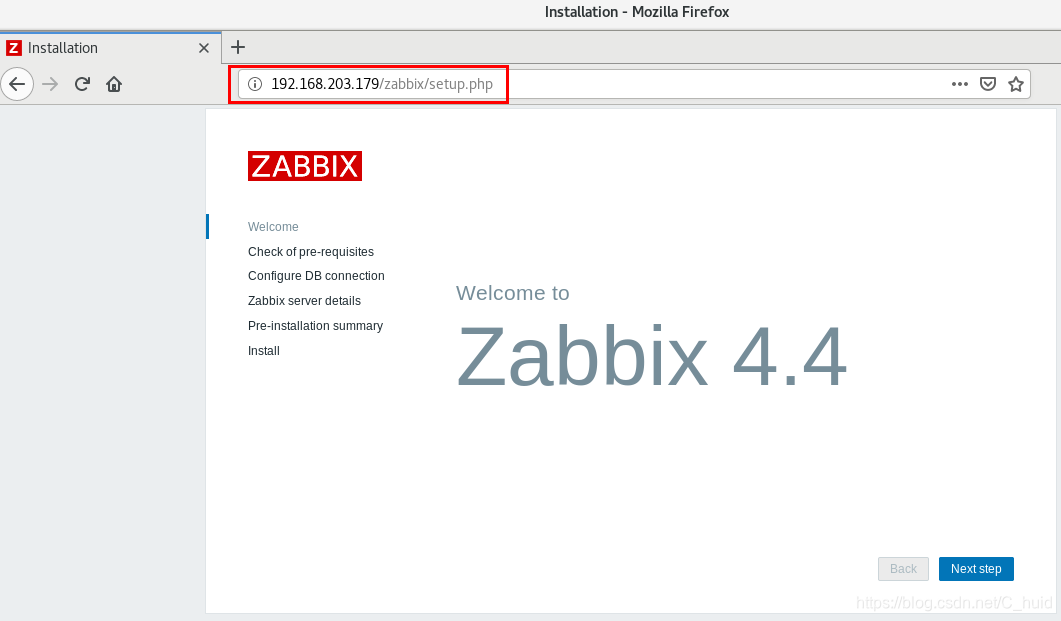
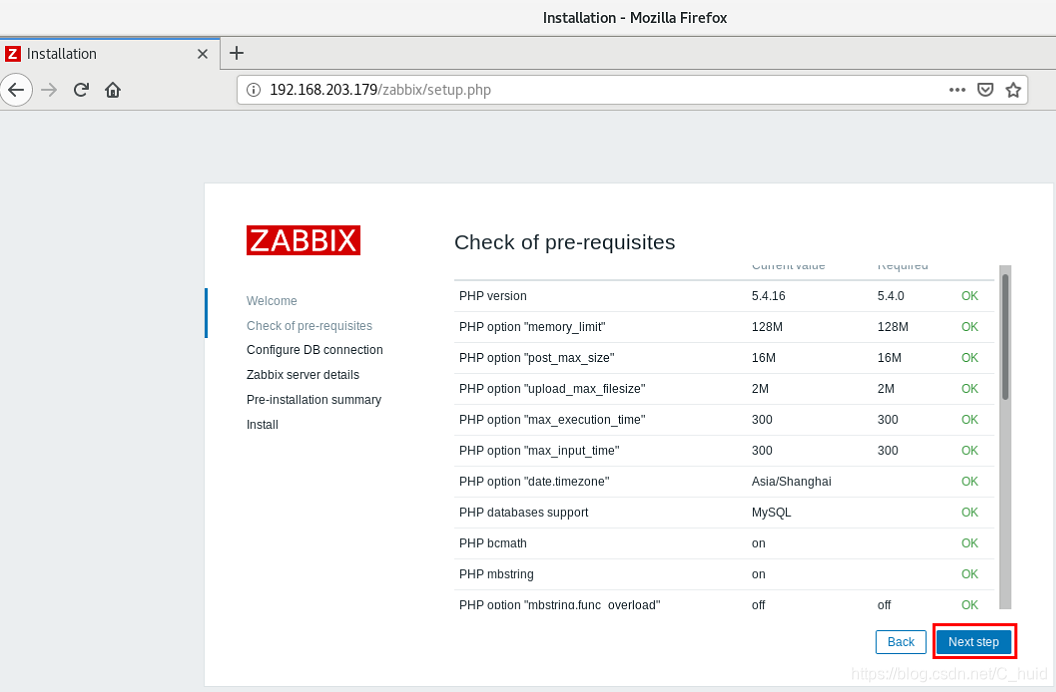
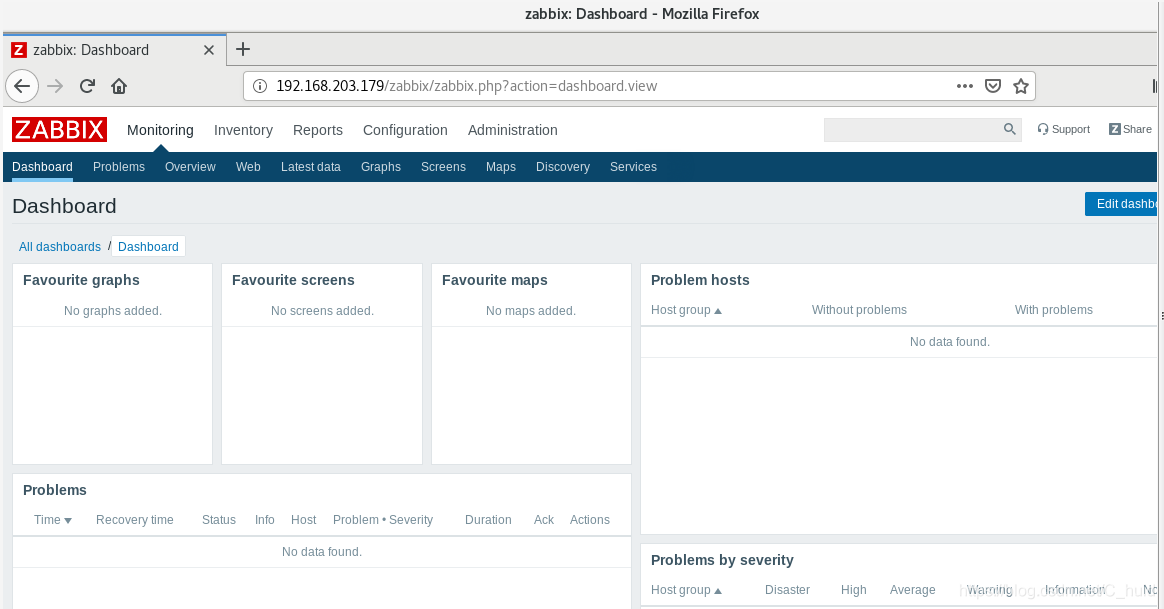
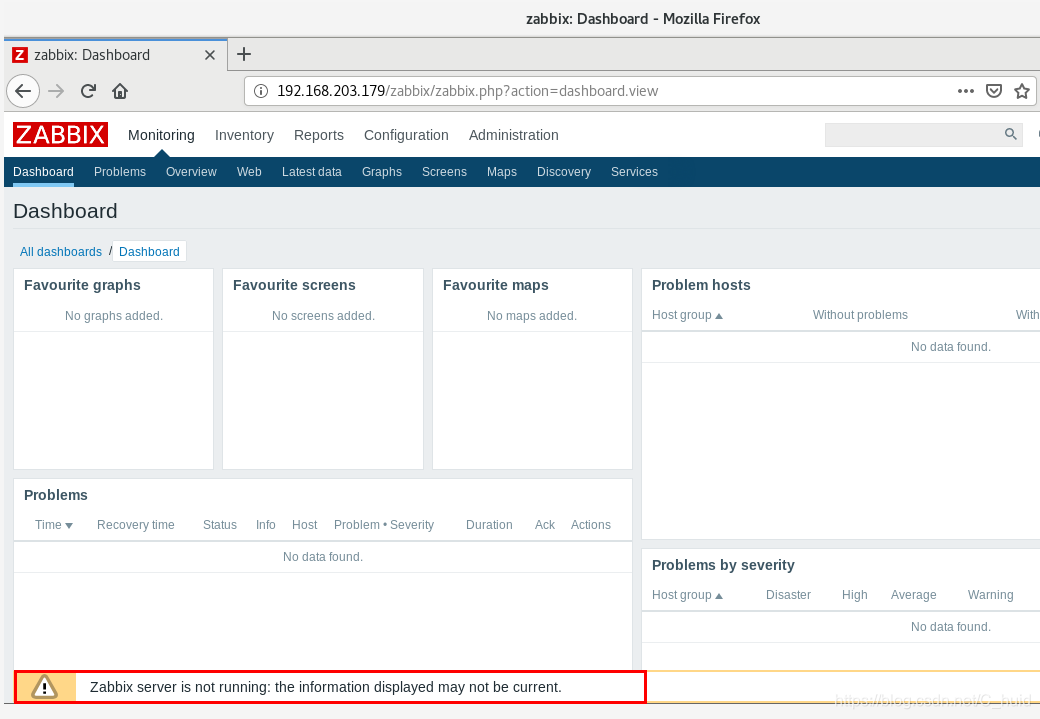
[root@localhost ~]# systemctl restart httpd # 重启 Apache在浏览器中输入上面配置的虚拟主机名,进入zabbix_frontend配置安装界面

Zabbix登录用户:Admin 密码:zabbix

在安装完成Zabbix之后,登录Zabbix界面时显示一个报错信息
zabbix server is not running:the information displayed may not be current
(翻译:zabbix服务器未运行:显示的信息可能不是最新的)
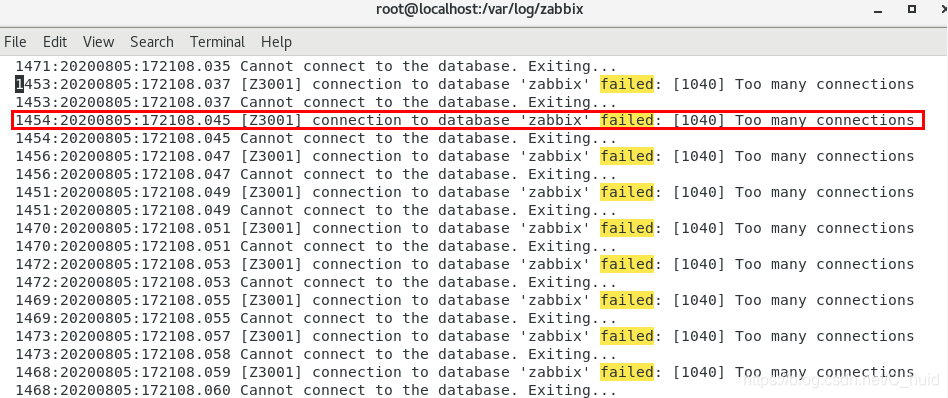
处理问题的思路:打开Zabbix_server.log日志文件之后看到一个报错信息
connection to database 'zabbix' failed: [1040] Too many connections
(翻译:与数据库“ zabbix”的连接失败:[1040]连接太多)
[root@localhost ~]# cd /var/log/zabbix/
[root@localhost zabbix]# ls
access_log  error_log  zabbix_agentd.log  zabbix_server.log
[root@localhost zabbix]# vim zabbix_server.log
用vim命令打开/var/log/zabbix/zabbix_server.log日志文件
解决方案:
1.使用vim命令打开 /etc/my.cnf配置文件,在[mysqld]区域内添加下面参数
[root@localhost ~]# vim /etc/my.cnf
[mysqld]
max_connections=10000
[root@localhost ~]# systemctl restart mariadb.service  # 重启 Mariadb数据库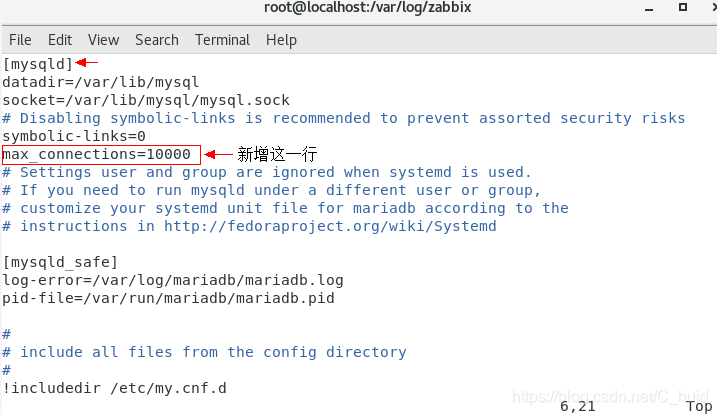
2.配置/usr/lib/systemd/system/mariadb.service来调大打开文件数目
[root@localhost ~]# mysql -u root -p
Enter password:
Welcome to the MariaDB monitor.  Commands end with ; or \g.
Your MariaDB connection id is 221
Server version: 5.5.65-MariaDB MariaDB Server

Copyright (c) 2000, 2018, Oracle, MariaDB Corporation Ab and others.

Type 'help;' or '\h' for help. Type '\c' to clear the current input statement.

MariaDB [(none)]> show variables like 'max_connections';
+-----------------+-------+
| Variable_name   | Value |
+-----------------+-------+
| max_connections | 214   |
+-----------------+-------+
1 row in set (0.00 sec)

MariaDB [(none)]> quit
Bye
[root@localhost ~]#
[root@localhost ~]# vim /usr/lib/systemd/system/mariadb.service
[Service]
LimitNOFILE=10000
LimitNPROC=10000
[root@localhost ~]# systemctl --system daemon-reload   # 重新加载系统服务
[root@localhost ~]# systemctl restart mariadb.service  # 重启 Mariadb服务
[root@localhost ~]# mysql -u root -p
Enter password:
Welcome to the MariaDB monitor.  Commands end with ; or \g.
Your MariaDB connection id is 2
Server version: 5.5.65-MariaDB MariaDB Server

Copyright (c) 2000, 2018, Oracle, MariaDB Corporation Ab and others.

Type 'help;' or '\h' for help. Type '\c' to clear the current input statement.
MariaDB [(none)]> show variables like 'max_connections';
+-----------------+-------+
| Variable_name   | Value |
+-----------------+-------+
| max_connections | 9190  |
+-----------------+-------+
1 row in set (0.01 sec)

MariaDB [(none)]> quit
Bye
[root@localhost ~]# service zabbix_server restart
Restarting zabbix_server (via systemctl):                  [  OK  ]
[root@localhost ~]# service zabbix_agentd restart
Restarting zabbix_agentd (via systemctl):                  [  OK  ]
[root@localhost ~]#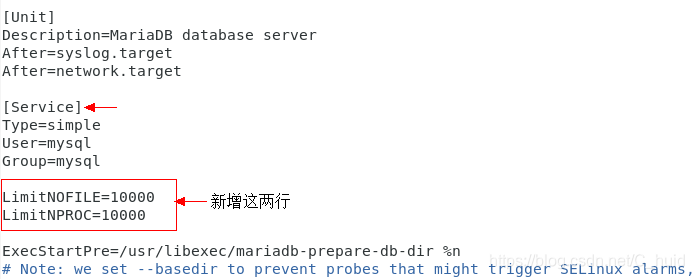
打开Zabbix服务运行正常!

至此,Zabbix监控平台搭建完成!