(一)被监控端
1、安装zabbix-agent
方法一
yum install zabbix-agent -y
方法二
rpm -ivh https://mirrors.aliyun.com/zabbix/zabbix/4.4/rhel/7/x86_64/zabbix-agent-4.4.6-1.el7.x86_64.rpm
2、修改客户端上的配置文件,里面的Server配置项为zabbix 服务器的ip地址,允许服务器过来采集数据
#修改为允许来采集数据的服务器ip,不然下面的zabbix_get命令不能去采集数据
[root@zabbix zabbix]# vim /etc/zabbix/zabbix_agentd.conf
Server=192.168.111.132
ServerActive=192.168.111.132
3、启动agent程序
[root@node1 ~]# service zabbix-agent start
4、检测服务是否启动
# 查看进程
[root@node2 ~]# ps aux|grep zabbix

#查看端口(10050)
[root@node2 ~]# netstat -anplut|grep zabbix
5、设置开机启动
[root@zabbix conf.d]#systemctl enable zabbix-agent
(二)server端
1、安装zabbix的资源仓库包
rpm -Uvh https://repo.zabbix.com/zabbix/4.4/rhel/8/x86_64/zabbix-release-4.4-1.el8.noarch.rpm
如果官方yum源不稳定,可以考虑使用阿里云的zabbix源
https://mirrors.aliyun.com/zabbix/zabbix/4.5/rhel/8/x86_64/  --》centos8
https://mirrors.aliyun.com/zabbix/zabbix/4.4/rhel/7/x86_64/  --》centos7
2、安装Zabbix部署包
先到阿里云的zabbix镜像站点下载好软件包,然后传到linux系统里,开始安装
# 进入上传到linux服务器的目录下
[root@zabbix-server-1 ~]# cd centos8-software-zabbix/
[root@zabbix-server-1 centos8-software-zabbix]# ls
zabbix-agent-4.4.6-1.el8.x86_64.rpm         zabbix-sender-4.4.6-1.el8.x86_64.rpm
zabbix-apache-conf-4.4.6-1.el8.noarch.rpm   zabbix-server-mysql-4.4.6-1.el8.x86_64.rpm
zabbix-get-4.4.6-1.el8.x86_64.rpm           zabbix-web-4.4.6-1.el8.noarch.rpm
zabbix-java-gateway-4.4.6-1.el8.x86_64.rpm  zabbix-web-japanese-4.4.6-1.el8.noarch.rpm
zabbix-js-4.4.6-1.el8.x86_64.rpm            zabbix-web-mysql-4.4.6-1.el8.noarch.rpm
zabbix-nginx-conf-4.4.6-1.el8.noarch.rpm
# centos7的系统需要安装epel-release软件,获得epel源的地址
[root@zabbix centos7-software-zabbix]# yum install epel-release -y
# 在上传rpm包的目录下开始安装zabbix
[root@zabbix-server-1 centos8-software-zabbix]# yum  install zabbix-* -y
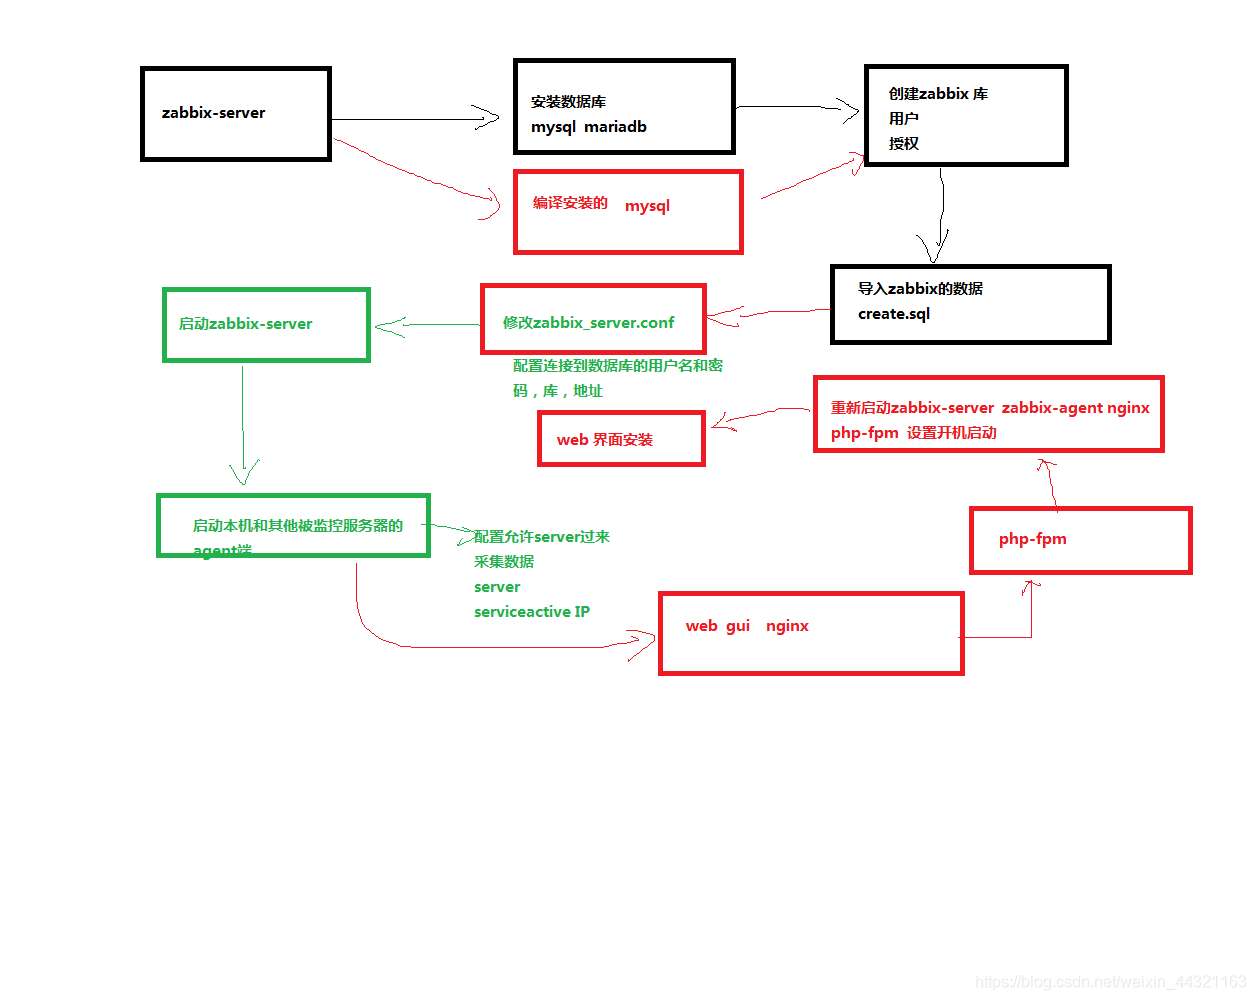
3、安装数据库,已经安装的可以不装(MySQL/mariadb)
[root@new-zabbix ~]# yum install mariadb  mariadb-server -y
# 启动mariadb
[root@zabbix-server-1 centos8-software-zabbix]# service mariadb start
检验服务是否启动
#查看mysqld进程是否启动
[root@zabbix-server-1 centos8-software-zabbix]# ps aux|grep mysql
mysql      5416  0.1  5.0 1297916 93148 ?       Ssl  15:30   0:00 /usr/libexec/mysqld --basedir=/usr
root       5487  0.0  0.0  12320  1084 pts/0    R+   15:33   0:00 grep --color=auto mysql
关闭防火墙和selinux
#设置firewalld服务开机不启动
[root@zabbix-server-1 centos8-software-zabbix]# systemctl disable firewalld
# 关闭防火墙
[root@zabbix-server-1 centos8-software-zabbix]# service firewalld stop

# 获取selinux状态
[root@zabbix-server-1 centos8-software-zabbix]# getenforce
Enforcing
# 临时禁用修改selinux
[root@zabbix-server-1 centos8-software-zabbix]# setenforce 0
# 永久禁用selinux
[root@zabbix-server-1 centos8-software-zabbix]# vi /etc/sysconfig/selinux
SELINUX=disabled

# 查看防火墙状态
[root@zabbix zabbix-server-mysql-4.0.10]# iptables -L
4、建用户,建库,建表操作
登录到mariadb或者mysql 数据库里
# 默认mariadb安装好,是没有密码的。直接回车
[root@zabbix-server-1 centos8-software-zabbix]# mysql -uroot -p
建库zabbix,指定字符集为utf8
MariaDB [(none)]> create database zabbix character set utf8 collate utf8_bin;
新建一个用户zabbix@localhost 密码为zabbix123 可以有所有的权限在zabbix这个库里的所有的表上
MariaDB [(none)]> grant all privileges on zabbix.* to zabbix@localhost identified by 'zabbix123';
mysql> create user zabbix@localhost identified by 'password';
mysql> grant all privileges on zabbix.* to zabbix@localhost;
找到create.sql.gz 文件,导入数据到MySQL数据库里的zabbix库
# 找到文件目录
[root@zabbix ~]# cd /usr/share/doc/zabbix-server-mysql-4.4.6/
[root@zabbix zabbix-server-mysql-4.4.6]# ls
AUTHORS  ChangeLog  COPYING  create.sql.gz  NEWS  README
# 方法一
[root@zabbix-server-1 zabbix-server-mysql]# gunzip create.sql.gz
root@zabbix-server-1 zabbix-server-mysql]# mysql -uzabbix -p'zabbix123' zabbix  < create.sql
# 方法二
[root@zabbix ~]# zcat /usr/share/doc/zabbix-server-mysql-4.0.10/create.sql.gz |mysql -uzabbix -pzabbix123 zabbix
5、试启动Zabbix Server进程
在zabbix_server.conf中编辑数据库配置
# vi /etc/zabbix/zabbix_server.conf
DBHost=localhost
DBName=zabbix
DBUser=zabbix
DBPassword=zabbix123

# 如果数据库是编译安装需要指定
DBSocket=/data/mysql/mysql.sock
DBPort=3306

# 或者修改MySQL配置文件更改sock文件位置
启动Zabbix Server进程
service zabbix-server start
检验服务是否启动
# 查看进程是否启动
[root@zabbix zabbix]# ps aux|grep zabbix

# 查看zabbix-server占用的端口号10051
[root@zabbix-server-1 zabbix]# netstat -anplut  |grep zabbix
并在系统启动时让它自启:
[root@zabbix zabbix]# systemctl enable zabbix-server
6、Zabbix 前端配置,编辑Zabbix前端的PHP配置
[root@zabbix zabbix]# timedatectl #查看时区
zabbix前端的Apache配置文件位于 /etc/php-fpm.d/zabbix.conf 。一些PHP设置已经完成了配置。
[root@zabbix-server-1 php-fpm.d]# vim zabbix.conf
php_value[date.timezone] = Asia/Shanghai  # 修改为Asia/Shanghai
7、启动Zabbix server和agent进程,并为它们设置开机自启
httpd 是提供web服务的apache软件
php-fpm 提供php页面解析的程序–》php解释器
# 使用apache---》LAMP环境
systemctl restart zabbix-server zabbix-agent httpd php-fpm
systemctl enable zabbix-server zabbix-agent  httpd  php-fpm

# 使用nginx --》LNMP环境
systemctl restart zabbix-server zabbix-agent nginx php-fpm
systemctl enable zabbix-server zabbix-agent  nginx  php-fpm
8、测试连通性
服务端安装zabbix-get检测工具(一个server端获取客户端数据的工具)
# 方法一
yum install zabbix-get
# 方法二
rpm -ivh  https://mirrors.aliyun.com/zabbix/zabbix/4.4/rhel/8/x86_64/zabbix-get-4.4.6-1.el8.x86_64.rpm
在服务端进行测试
[root@zabbix zabbix]# zabbix_get -s 127.0.0.1 -p 10050 -k "system.cpu.load[all,avg1]"
0.010000
[root@zabbix zabbix]# zabbix_get -s 192.168.1.126 -p 10050 -k "system.cpu.load[all,avg1]"
0.060000
-s 192.168.111.131 指定客户端的ip地址
-p 10050 zabbix-agentd程序默认开发的端口号
-k “system.cpu.load[all,avg1]” 指定获取的值(此例为获取系统里的cpu的平均负载)
9、让nginx支持zabbix的配置:单独弄一个网站来访问zabbix的数据
进入nginx的次要的配置文件目录下
[root@zabbix conf.d]# cd /etc/nginx/conf.d/
[root@zabbix conf.d]# cat zabbix.conf
server {
        listen          80;    #监听的端口号
        server_name     www.sc.com;  #虚拟主机(网站服务的域名)

        root    /usr/share/zabbix;   #网页存放的路径

        index   index.php;   #网站的首页
也可以修改端口号,直接用IP地址端口号访问
[root@zabbix conf.d]# cd /etc/nginx/conf.d/
[root@zabbix conf.d]# cat zabbix.conf
server {
        listen          8080;    #监听的端口号
        # server_name     www.sc.com;  #虚拟主机(网站服务的域名)

        root    /usr/share/zabbix;   #网页存放的路径

        index   index.php;   #网站的首页
刷新服务
[root@zabbix conf.d]# service nginx restart
修改下windows里的hosts文件里的dns解析记录:C:\Windows\System32\drivers\etc\hosts(使用记事本打开)
# 自己添加域名对应的zabbix  server的ip
192.168.0.153   www.sc.com
10、web界面里开始安装
打开浏览器输入URL:http://www.sc.com
默认的登录的用户名和密码是Admin和zabbix