Netty责任链
责任链模式
责任链模式为请求创建一个处理数据的链。
客户端发起的请求和具体处理请求的过程进行了解耦,责任链上的处理者负责处理请求,客户端只需要把请求发送到责任链就行了,不需要去关心具体的处理逻辑和处理请求在责任链中是怎样传递的。
想要深入的了解责任链模式,推荐看这篇文章:责任链模式的7种不同实现
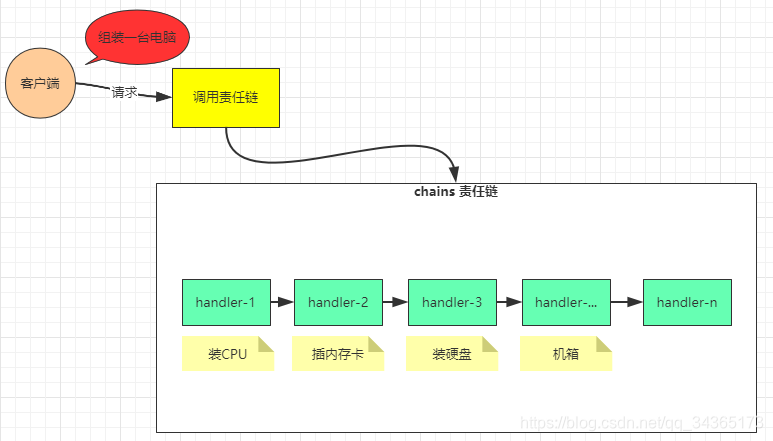
假设需要组装一台电脑,假设装CPU、插内存卡、装硬盘、机箱这个过程是按照这个顺序的,那么客户只需要发送一个请求说:我需要组装一台电脑,然后其他的就不需要管了,责任链内部怎么处理和怎么传递到下一个节点,不需要进行关心。
责任链模式的简单实现
责任链模式的实现,需要4个关键要素:
1:处理器抽象类
2:处理器抽象类的具体实现类
3:保存和维护处理器信息的类
4:处理器执行的类
下面看一个简单的demo,基于责任链模式的思想:
public class PipelineDemo {


    //初始化链的头部
    public HandlerContext head = new HandlerContext(new AbstractHandler() {


        @Override
        void doHandler(HandlerContext context, Object arg) {


            context.runNext(arg);
        }
    });

    //开始执行
    public void request(Object arg) {


        this.head.handler(arg);
    }

    //添加节点到尾部
    public void addLast(AbstractHandler handler) {


        HandlerContext context = head;
        while (context.next != null) {


            context = context.next;
        }
        context.next = new HandlerContext(handler);
    }


    public static void main(String[] args) {


        PipelineDemo pipelineChainDemo = new PipelineDemo();
        pipelineChainDemo.addLast(new Handler2());
        pipelineChainDemo.addLast(new Handler1());
        pipelineChainDemo.addLast(new Handler1());
        pipelineChainDemo.addLast(new Handler2());

        // 发起请求
        pipelineChainDemo.request("火车呜呜呜~~");
    }

}

//处理器的信息,维护处理器
class HandlerContext {


    //下一个节点
    HandlerContext next;
    AbstractHandler handler;

    public HandlerContext(AbstractHandler handler) {


        this.handler = handler;
    }

    void handler(Object arg) {


        this.handler.doHandler(this, arg);
    }

    //执行下一个
    void runNext(Object arg) {


        if (this.next != null) {


            this.next.handler(arg);
        }
    }
}

//处理器抽象类
abstract class AbstractHandler {


    abstract void doHandler(HandlerContext context, Object arg);
}

//处理器的具体实现类
class Handler1 extends AbstractHandler {


    @Override
    void doHandler(HandlerContext context, Object arg) {


        arg = arg.toString() + "Handler1的小尾巴~~";
        System.out.println("Handler1的实例正在处理:" + arg);
        //执行下一个
        context.runNext(arg);
    }
}

//处理器的具体实现类
class Handler2 extends AbstractHandler {


    @Override
    void doHandler(HandlerContext context, Object arg) {


        arg = arg.toString() + "Handler2的小尾巴~~";
        System.out.println("Handler2的实例正在处理:" + arg);
        //执行下一个
        context.runNext(arg);
    }
}
输出结果:

上面的例子只是简单的实现,为了更好的了解责任链模式,下面看下Netty中责任链的具体实现
Netty中的ChannelPipeline责任链
服务端接收客户端连接
上一篇内容说了服务端channel初始化的过程,那么当有客户端连接过来或者客户端有数据过来,服务端是怎样进行读取的呢?
@Override
    protected void run() {


        for (;;) {


            try {


                try {


                    switch (selectStrategy.calculateStrategy(selectNowSupplier, hasTasks())) {


                    case SelectStrategy.CONTINUE:
                        continue;
                    case SelectStrategy.BUSY_WAIT:
                        // fall-through to SELECT since the busy-wait is not supported with NIO
                     //轮询,当客户端连接过来或者有数据就调用select
                    case SelectStrategy.SELECT:
                        select(wakenUp.getAndSet(false));

                        if (wakenUp.get()) {


                            selector.wakeup();
                        }
                        // fall through
                    default:
                    }
                } catch (IOException e) {


                }

                cancelledKeys = 0;
                needsToSelectAgain = false;
                final int ioRatio = this.ioRatio;
                if (ioRatio == 100) {


                    try {


                        processSelectedKeys();
                    } finally {


                        // Ensure we always run tasks.
                        runAllTasks();
                    }
                } else {


                    final long ioStartTime = System.nanoTime();
                    try {


                        processSelectedKeys();
                    } finally {


                    }
                }
            } catch (Throwable t) {


                handleLoopException(t);
            }

        }
    }
上面的代码是轮询看客户端有没有连接或者数据,有的话就会调用下面的方法:
private void processSelectedKeysOptimized() {


        for (int i = 0; i < selectedKeys.size; ++i) {


            final SelectionKey k = selectedKeys.keys[i];
            // null out entry in the array to allow to have it GC'ed once the Channel close
            // See https://github.com/netty/netty/issues/2363
            selectedKeys.keys[i] = null;

            final Object a = k.attachment();

            if (a instanceof AbstractNioChannel) {


                processSelectedKey(k, (AbstractNioChannel) a);
            } else {


                @SuppressWarnings("unchecked")
                NioTask<SelectableChannel> task = (NioTask<SelectableChannel>) a;
                processSelectedKey(k, task);
            }

            if (needsToSelectAgain) {


                // null out entries in the array to allow to have it GC'ed once the Channel close
                // See https://github.com/netty/netty/issues/2363
                selectedKeys.reset(i + 1);

                selectAgain();
                i = -1;
            }
        }
    }
然后调用下面的方法:
private void processSelectedKey(SelectionKey k, AbstractNioChannel ch) {


        final AbstractNioChannel.NioUnsafe unsafe = ch.unsafe();

        try {


            // Also check for readOps of 0 to workaround possible JDK bug which may otherwise lead
            // to a spin loop
            if ((readyOps & (SelectionKey.OP_READ | SelectionKey.OP_ACCEPT)) != 0 || readyOps == 0) {


                unsafe.read();
            }
        } catch (CancelledKeyException ignored) {


            unsafe.close(unsafe.voidPromise());
        }
    }
上面的代码是源码删减后的一部分,着重看try里面的内容,就是说当有OP_ACCEPT或者OP_READ 事件的时候,就会调用unsafe.read()。

可以看到read有两个实现,NioMessageUnsafe是接收客户端连接时,调用里面的read方法,NioByteUnsafe是当客户端有数据可读时,调用里面的read方法,下面看下两个方法:
NioMessageUnsafe:
 @Override
public void read() {


    assert eventLoop().inEventLoop();
    final ChannelConfig config = config();
    final ChannelPipeline pipeline = pipeline();
    final RecvByteBufAllocator.Handle allocHandle = unsafe().recvBufAllocHandle();
    allocHandle.reset(config);

    boolean closed = false;
    Throwable exception = null;
    try {


        try {


            do {


                int localRead = doReadMessages(readBuf);
                if (localRead == 0) {


                    break;
                }
                if (localRead < 0) {


                    closed = true;
                    break;
                }

                allocHandle.incMessagesRead(localRead);
            } while (allocHandle.continueReading());
        } catch (Throwable t) {


            exception = t;
        }

        int size = readBuf.size();
        for (int i = 0; i < size; i ++) {


            readPending = false;
            pipeline.fireChannelRead(readBuf.get(i));
        }
        readBuf.clear();
        allocHandle.readComplete();
        pipeline.fireChannelReadComplete();

        if (exception != null) {


            closed = closeOnReadError(exception);

            pipeline.fireExceptionCaught(exception);
        }

        if (closed) {


            inputShutdown = true;
            if (isOpen()) {


                close(voidPromise());
            }
        }
    } finally {


        // Check if there is a readPending which was not processed yet.
        // This could be for two reasons:
        // * The user called Channel.read() or ChannelHandlerContext.read() in channelRead(...) method
        // * The user called Channel.read() or ChannelHandlerContext.read() in channelReadComplete(...) method
        //
        // See https://github.com/netty/netty/issues/2254
        if (!readPending && !config.isAutoRead()) {


            removeReadOp();
        }
    }
}
然后看下里面的doReadMessages方法:
@Override
 protected int doReadMessages(List<Object> buf) throws Exception {


     SocketChannel ch = SocketUtils.accept(javaChannel());

     try {


         if (ch != null) {


             buf.add(new NioSocketChannel(this, ch));
             return 1;
         }
     } catch (Throwable t) {


         logger.warn("Failed to create a new channel from an accepted socket.", t);

         try {


             ch.close();
         } catch (Throwable t2) {


             logger.warn("Failed to close a socket.", t2);
         }
     }

     return 0;
 }
第一行代码是NIO里的channel,接收客户端连接后,封装到了Netty的NioSocketChannel,断点调试:
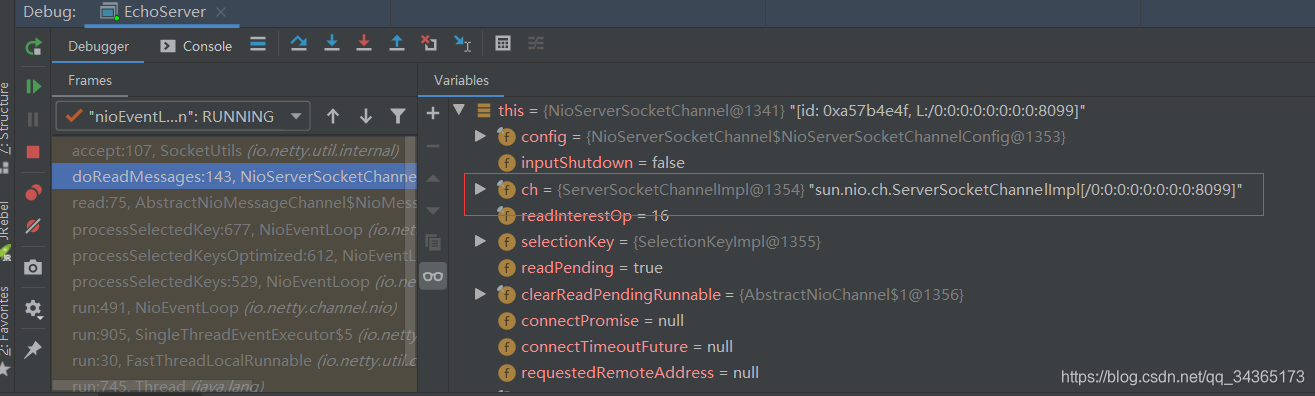
能够看到,这里接收的是客户端连接的信息,当有客户端连接过来时,就会创建一个NioSocketChannel。
NioByteUnsafe:
下面部分的代码,是客户端有数据传输过来后,进行读取的
  @Override
  public final void read() {


        final ChannelConfig config = config();
        if (shouldBreakReadReady(config)) {


            clearReadPending();
            return;
        }
        final ChannelPipeline pipeline = pipeline();
        final ByteBufAllocator allocator = config.getAllocator();
        final RecvByteBufAllocator.Handle allocHandle = recvBufAllocHandle();
        allocHandle.reset(config);

        ByteBuf byteBuf = null;
        boolean close = false;
        try {


            do {


                byteBuf = allocHandle.allocate(allocator);
                allocHandle.lastBytesRead(doReadBytes(byteBuf));
                if (allocHandle.lastBytesRead() <= 0) {


                    // nothing was read. release the buffer.
                    byteBuf.release();
                    byteBuf = null;
                    close = allocHandle.lastBytesRead() < 0;
                    if (close) {


                        // There is nothing left to read as we received an EOF.
                        readPending = false;
                    }
                    break;
                }

                allocHandle.incMessagesRead(1);
                readPending = false;
                pipeline.fireChannelRead(byteBuf);
                byteBuf = null;
            } while (allocHandle.continueReading());

            allocHandle.readComplete();
            pipeline.fireChannelReadComplete();

            if (close) {


                closeOnRead(pipeline);
            }
        } catch (Throwable t) {


            handleReadException(pipeline, byteBuf, t, close, allocHandle);
        } finally {


            // Check if there is a readPending which was not processed yet.
            // This could be for two reasons:
            // * The user called Channel.read() or ChannelHandlerContext.read() in channelRead(...) method
            // * The user called Channel.read() or ChannelHandlerContext.read() in channelReadComplete(...) method
            //
            // See https://github.com/netty/netty/issues/2254
            if (!readPending && !config.isAutoRead()) {


                removeReadOp();
            }
        }
    }
pipeline.fireChannelRead(byteBuf),先从客户端读取数据后,放到了这个pipeline里面,这个pipeline就是客户端的pipeline。
pipeline初始化
先看下类图:
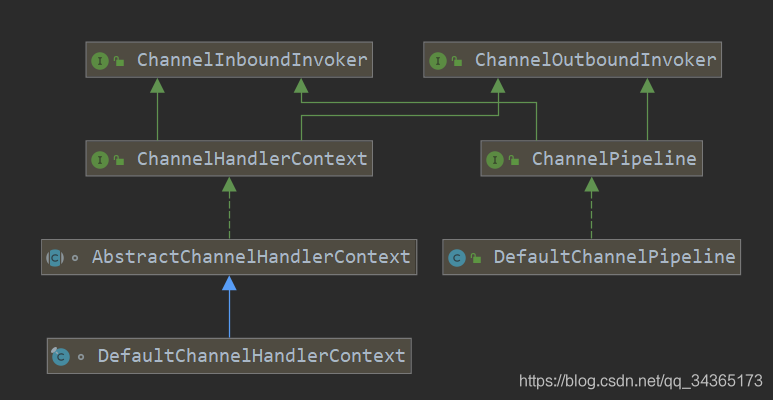
在channel进行创建初始化的时候,最终会走到AbstractChannel中,在AbstractChannel构造函数中可以看到,在初始化channel的时候,会创建一个Pipeline:
protected AbstractChannel(Channel parent) {


   this.parent = parent;
    id = newId();
    unsafe = newUnsafe();
    pipeline = newChannelPipeline();
}
protected DefaultChannelPipeline newChannelPipeline() {


    return new DefaultChannelPipeline(this);
}
创建的Pipeline是DefaultChannelPipeline,进入DefaultChannelPipeline类中查看:
final AbstractChannelHandlerContext head; //头部
final AbstractChannelHandlerContext tail; //尾部
protected DefaultChannelPipeline(Channel channel) {


     this.channel = ObjectUtil.checkNotNull(channel, "channel");
     succeededFuture = new SucceededChannelFuture(channel, null);
     voidPromise =  new VoidChannelPromise(channel, true);

     tail = new TailContext(this);
     head = new HeadContext(this);

     head.next = tail; //头部的下一个节点指向tail
     tail.prev = head; //尾部的上一个节点指向head
}
里面有head和tail,它们是AbstractChannelHandlerContext类:
volatile AbstractChannelHandlerContext next; //指向下一个节点
volatile AbstractChannelHandlerContext prev; //指向前一个节点

private final boolean inbound; //判断是否入站事件
private final boolean outbound; //判断是否出站事件
AbstractChannelHandlerContext类的子类DefaultChannelHandlerContext:
DefaultChannelHandlerContext初始化了ChannelHandler处理器
private final ChannelHandler handler;

    DefaultChannelHandlerContext(
            DefaultChannelPipeline pipeline, EventExecutor executor, String name, ChannelHandler handler) {


        super(pipeline, executor, name, isInbound(handler), isOutbound(handler));
        if (handler == null) {


            throw new NullPointerException("handler");
        }
        this.handler = handler;
    }
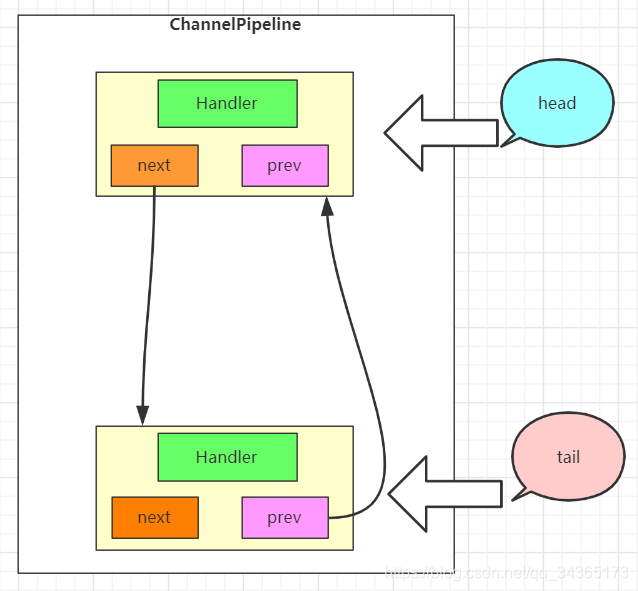
根据上面的源代码可以得到ChannelPipeline初始化后的内容,可以知道,ChannelPipeline中的处理器ChannelHandler并不是直接处在ChannelPipeline中,它还有一层ChannelHandlerContext进行包装,在ChannelPipeline中,根据源码可以知道,它有一个头部和一个尾部,都是ChannelHandlerContext,而ChannelHandlerContext中有next和prev分别指向下一个context和前一个context。
画出Pipeline初始化后的结构图:
入站事件和出站事件
pipeline保存了通道所有的处理器信息,在创建一个channel的时候,会创建一个这个channel专有的pipeline,入站事件和出站事件都会调用这个pipeline上面的处理器。

 private AbstractChannelHandlerContext findContextInbound() {


     AbstractChannelHandlerContext ctx = this;
     do {


         ctx = ctx.next;
     } while (!ctx.inbound);
     return ctx;
 }

 private AbstractChannelHandlerContext findContextOutbound() {


      AbstractChannelHandlerContext ctx = this;
      do {


          ctx = ctx.prev;
      } while (!ctx.outbound);
      return ctx;
  }
上面两个方法的作用,是判断下一个context是不是入站或者出站事件,是的话才往下传递数据
入站事件,是指I/O线程生成的入站数据,一般是服务端读取客户端数据时,会有的操作,还有客户端连接等
出站事件,一般指服务端往客户端写入数据,bind方法绑定端口也是出站事件
下面是入站事件和出站事件的具体定义:
1:入站事件inbound
| 事件 | 描述 |
|---|---|
| fireChannelRegistered | channel注册事件 |
| fireChannelUnregistered | channel解除注册事件 |
| fireChannelActive | channel活跃事件,即channel已连接就绪,可以读写数据 |
| fireChannelInactive | channel非活跃事件 |
| fireExceptionCaught | 异常事件 |
| fireUserEventTriggered | 用户自定义事件 |
| fireChannelRead | channel读取事件 |
| fireChannelReadComplete | channel读取完成事件 |
| fireChannelWritabilityChanged | channel写状态变化事件 |
2:出站事件outbound
| 事件 | 描述 |
|---|---|
| bind | 端口绑定事件 |
| connect | 连接事件 |
| disconnect | 断开连接事件 |
| close | 关闭事件 |
| deregister | 解除注册事件 |
| read | 读事件,OP_READ注册到selector |
| write | 写事件 |
| writeAndFlush | 写出数据事件 |
根据上面的表格可以看到,fire开头的都是入站事件,其他的一部分是出站事件,这里需要注意的是write写的时候,并没有写出数据到客户端,只有调用flush时,才是真正的把数据写出去。
@Override
public final ChannelPipeline fireChannelActive() {


    AbstractChannelHandlerContext.invokeChannelActive(head);
    return this;
}

@Override
public final ChannelPipeline fireChannelInactive() {


    AbstractChannelHandlerContext.invokeChannelInactive(head);
    return this;
}

 @Override
 public final ChannelFuture bind(SocketAddress localAddress) {


      return tail.bind(localAddress);
  }

  @Override
  public final ChannelFuture connect(SocketAddress remoteAddress) {


      return tail.connect(remoteAddress);
  }
根据上面的源码可以看到,入站事件都是从head头部开始,出站事件都是从tail尾部开始。
 public void channelRead(ChannelHandlerContext ctx, Object msg) throws Exception {


 System.out.println("收到客户端数据,还给客户端:" + msg);
    ctx.write(msg);
}
上面代码在入站的里面调用了write,这个时候出站,就不会从tail开始了,而是从当前的ChannelHandlerContext出站,调用ctx.channel().write()时,才会从tail开始出站。
下面说下Handler是什么,有什么用。
Pipeline中的Handler
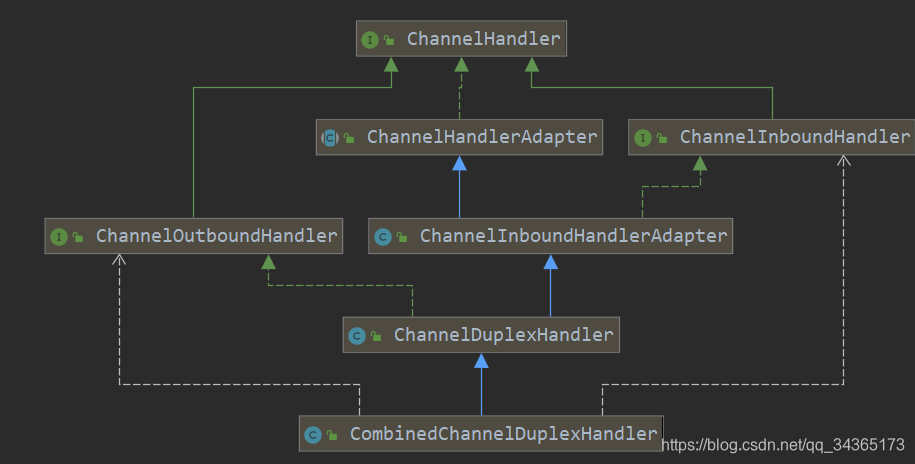
先看下类图:

 bootstrap.group(bossGroup, workerGroup)
	.channel(NioServerSocketChannel.class)
	.option(ChannelOption.SO_BACKLOG, 100)
	.childHandler(new ChannelInitializer<SocketChannel>() {


	  @Override
	  protected void initChannel(SocketChannel socketChannel) throws Exception {


	      ChannelPipeline p = socketChannel.pipeline();
	      p.addLast(handler);
	  }
});
在addLast上打断点,跟踪后进入DefaultChannelPipeline的方法:
@Override
public final ChannelPipeline addLast(EventExecutorGroup group, String name, ChannelHandler handler) {


    final AbstractChannelHandlerContext newCtx;
    synchronized (this) {


        checkMultiplicity(handler);

        newCtx = newContext(group, filterName(name, handler), handler);

        addLast0(newCtx);

        // If the registered is false it means that the channel was not registered on an eventLoop yet.
        // In this case we add the context to the pipeline and add a task that will call
        // ChannelHandler.handlerAdded(...) once the channel is registered.
        if (!registered) {


            newCtx.setAddPending();
            callHandlerCallbackLater(newCtx, true);
            return this;
        }

        EventExecutor executor = newCtx.executor();
        if (!executor.inEventLoop()) {


            callHandlerAddedInEventLoop(newCtx, executor);
            return this;
        }
    }
    callHandlerAdded0(newCtx);
    return this;
}

private AbstractChannelHandlerContext newContext(EventExecutorGroup group, String name, ChannelHandler handler) {


     return new DefaultChannelHandlerContext(this, childExecutor(group), name, handler);
}
newContext方法,把ChannelHandler封装到了AbstractChannelHandlerContext 中。
ChannelInboundHandlerAdapter和ChannelOutboundHandlerAdapter适配器类,继承这两个类,就不需要去实现所有的handler接口中的方法了,可以实现自己想要的方法就行了。
下面看下具体的维护handler的方法:
| 方法名 | 描述 |
|---|---|
| addFirst | 最前面插入,插入head的下面 |
| addLast | 最后面插入,插入tail的上面 |
| addBefore | 插入指定的处理器前面 |
| addAfter | 插入指定的处理器后面 |
| remove | 移除指定的处理器 |
| removeFirst | 移除第一个处理器 |
| removeLast | 移除最后一个处理器 |
| replace | 替换掉指定的处理器 |
下面是channelRead方法的源码:
public void channelRead(ChannelHandlerContext ctx, Object msg) {


    //创建channel
    final Channel child = (Channel) msg;
     //把处理器加入pipeline的下面
     child.pipeline().addLast(childHandler);

     setChannelOptions(child, childOptions, logger);

     for (Entry<AttributeKey<?>, Object> e: childAttrs) {


         child.attr((AttributeKey<Object>) e.getKey()).set(e.getValue());
     }

     try {


          //把Channel注册到selector
         childGroup.register(child).addListener(new ChannelFutureListener() {


             @Override
             public void operationComplete(ChannelFuture future) throws Exception {


                 if (!future.isSuccess()) {


                     forceClose(child, future.cause());
                 }
             }
         });
     } catch (Throwable t) {


         forceClose(child, t);
     }
 }
Pipeline、channel、EventLoop的关系
@Sharable注解,放在Handler类上,是指这个handler是共享的,可以重复的使用,如果不加这个注解,再次使用会报错。
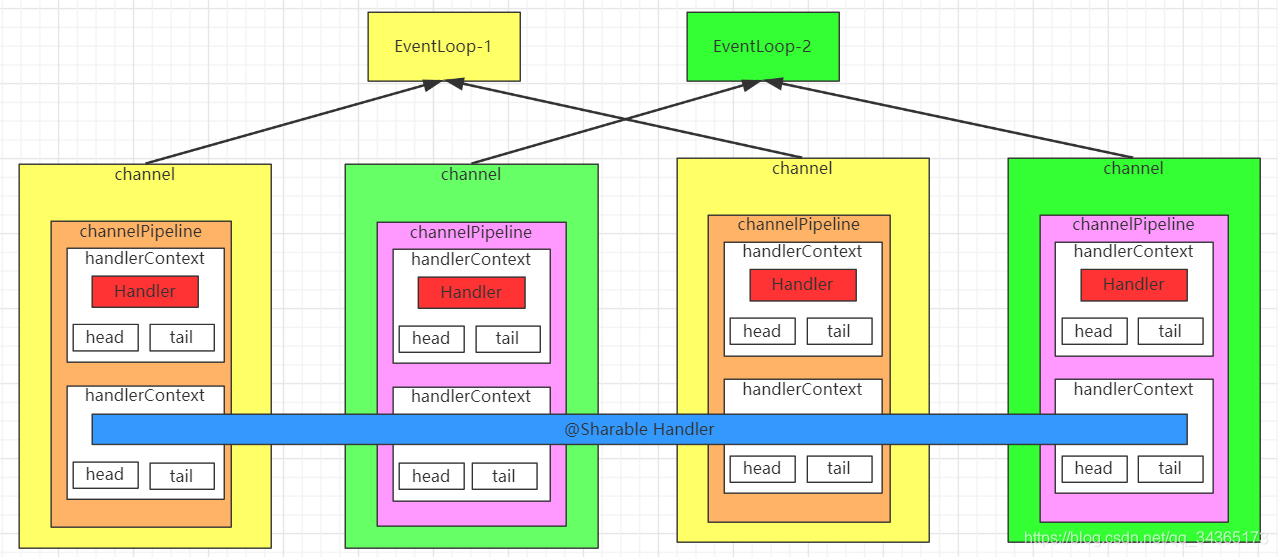
一个EventLoop中可以有多个Channel,每个Channel中都有一个专属的ChannelPipeline,ChannelPipeline中有多个节点ChannelHandlerContext,ChannelHandlerContext中都会有一个处理器,处理器可以共享,也可以自己独有,head和tail是ChannelHandlerContext的头部和尾部,里面都有两个指针next、prev,指向下一个节点和上一个节点。
结束语
上面的内容主要是介绍Netty中的责任链相关的知识,下面会继续说下Netty中的ByteBuf内容,传送门:网络编程Netty入门(四)