Netty引导
Netty的启动过程
Bootstrap
Bootstrap是Netty中负责引导服务端和客户端启动的,它将ChannelPipeline、ChannelHandler和EventLoop组织起来,让它成为一个可以实际运行的程序,引导一个应用程序,简单来说,是先对它进行配置,然后让它运行起来的过程
Netty有两个引导启动的类:
1:Bootstrap引导客户端运行
2:ServerBootstrap引导服务端运行
下面根据源码看下启动过程是怎样的:
服务端的启动
首先看下服务端的代码示例:
static final int PORT = Integer.parseInt(System.getProperty("port", "8099"));

public static void main(String[] args) {


    //1:创建EventLoopGroup
    EventLoopGroup bossGroup = new NioEventLoopGroup(1);
    EventLoopGroup workerGroup = new NioEventLoopGroup();
    final EchoServerHandler handler = new EchoServerHandler();
    try {


        //2:创建启动器
        ServerBootstrap bootstrap = new ServerBootstrap();
        //3:配置启动器
        bootstrap.group(bossGroup, workerGroup)
                .channel(NioServerSocketChannel.class)
                .option(ChannelOption.SO_BACKLOG, 100)
                .childHandler(new ChannelInitializer<SocketChannel>() {


                    @Override
                    protected void initChannel(SocketChannel socketChannel) throws Exception {


                        ChannelPipeline p = socketChannel.pipeline();
                        p.addLast(handler);
                    }
                });
        //4:启动启动器
        ChannelFuture f = bootstrap.bind(PORT).sync();
        //5:等待服务端channel关闭
        f.channel().closeFuture().sync();
    } catch (InterruptedException e) {


        e.printStackTrace();
    } finally {


        //6:释放资源
        bossGroup.shutdownGracefully();
        workerGroup.shutdownGracefully();
    }
}
写一个Netty服务端,整体来说就是上面六个步骤,前面对EventLoop、ChannelPipeline、ByteBuf相关知识进行了介绍,有不清楚的可以去之前的文章查看,下面根据源码看下Netty服务端的启动过程:
服务端通过bind方法进行启动,整个启动过程做了很多事情,下面会逐一介绍
ChannelFuture f = bootstrap.bind(PORT).sync();
首先进入的是AbstractBootstrap类下面的bind方法:
 public ChannelFuture bind(int inetPort) {


     return bind(new InetSocketAddress(inetPort));
}

public ChannelFuture bind(SocketAddress localAddress) {


     validate();
      if (localAddress == null) {


          throw new NullPointerException("localAddress");
      }
      return doBind(localAddress);
}
然后重点看下doBind方法:
//将ServerSocketChannel注册到selector并绑定端口,启动服务
private ChannelFuture doBind(final SocketAddress localAddress) {


        //初始化和注册服务端channel
        final ChannelFuture regFuture = initAndRegister();
        final Channel channel = regFuture.channel();
        if (regFuture.cause() != null) {


            return regFuture;
        }

        if (regFuture.isDone()) {


            //register注册成功后,调用doBind0
            ChannelPromise promise = channel.newPromise();
            doBind0(regFuture, channel, localAddress, promise);
            return promise;
        } else {


            //register没有注册成功,listener监听,然后回调里调用doBind0
            final PendingRegistrationPromise promise = new PendingRegistrationPromise(channel);
            regFuture.addListener(new ChannelFutureListener() {


                @Override
                public void operationComplete(ChannelFuture future) throws Exception {


                    Throwable cause = future.cause();
                    if (cause != null) {


                        promise.setFailure(cause);
                    } else {


                        //register注册成功后,调用doBind0
                        promise.registered();
                        doBind0(regFuture, channel, localAddress, promise);
                    }
                }
            });
            return promise;
        }
}
下面先看下服务端channel的初始化和注册操作:
final ChannelFuture initAndRegister() {


        Channel channel = null;
        try {


            //通过channelFactory创建一个channel
            channel = channelFactory.newChannel();
            //初始化channel
            init(channel);
        } catch (Throwable t) {


           //...
        }
        //这里的group就是bootstrap.group()方法传入的parentGroup
        //将channel注册到selector上,注册的具体解析可以看之前的文章
        ChannelFuture regFuture = config().group().register(channel);
        if (regFuture.cause() != null) {


            if (channel.isRegistered()) {


                channel.close();
            } else {


                channel.unsafe().closeForcibly();
            }
        }
        return regFuture;
}
ReflectiveChannelFactory类下的newChannel方法:
通过反射的方式创建,即是上面代码示例中的channel(NioServerSocketChannel.class)里的NioServerSocketChannel
 @Override
 public T newChannel() {


     try {


         return constructor.newInstance();
     } catch (Throwable t) {


         throw new ChannelException("Unable to create Channel from class " + constructor.getDeclaringClass(), t);
     }
 }
由于这里介绍的是服务端的启动,所以init()方法会进入ServerBootstrap里面对应的方法:
 @Override
 void init(Channel channel) throws Exception {


     final Map<ChannelOption<?>, Object> options = options0();
     synchronized (options) {


         setChannelOptions(channel, options, logger);
     }

     final Map<AttributeKey<?>, Object> attrs = attrs0();
     synchronized (attrs) {


         for (Entry<AttributeKey<?>, Object> e: attrs.entrySet()) {


             @SuppressWarnings("unchecked")
             AttributeKey<Object> key = (AttributeKey<Object>) e.getKey();
             channel.attr(key).set(e.getValue());
         }
     }
     //创建channel的时候,会创建一个ChannelPipeline
     //具体的ChannelPipeline创建过程,请查看之前的文章
     ChannelPipeline p = channel.pipeline();
     //获取childGroup和childHandler,传给ServerBootstrapAcceptor
     final EventLoopGroup currentChildGroup = childGroup;
     final ChannelHandler currentChildHandler = childHandler;
     final Entry<ChannelOption<?>, Object>[] currentChildOptions;
     final Entry<AttributeKey<?>, Object>[] currentChildAttrs;
     synchronized (childOptions) {


         currentChildOptions = childOptions.entrySet().toArray(newOptionArray(0));
     }
     synchronized (childAttrs) {


         currentChildAttrs = childAttrs.entrySet().toArray(newAttrArray(0));
     }

     p.addLast(new ChannelInitializer<Channel>() {


         @Override
         public void initChannel(final Channel ch) throws Exception {


             final ChannelPipeline pipeline = ch.pipeline();
             ChannelHandler handler = config.handler();
             if (handler != null) {


                 pipeline.addLast(handler);
             }

             ch.eventLoop().execute(new Runnable() {


                 @Override
                 public void run() {


                     //添加一个Acceptor处理器
                     //也就是把客户端的连接分配给一个EventLoop线程
                     pipeline.addLast(new ServerBootstrapAcceptor(
                             ch, currentChildGroup, currentChildHandler, currentChildOptions, currentChildAttrs));
                 }
             });
         }
     });
 }
上面源码部分很长,主要关注的点是加了注释的地方,然后看下ServerBootstrapAcceptor:

 @Override
 @SuppressWarnings("unchecked")
 public void channelRead(ChannelHandlerContext ctx, Object msg) {


     final Channel child = (Channel) msg;
     //把childHandler添加到客户端的pipeline,每个客户端都有相同的Handler
     child.pipeline().addLast(childHandler);

     setChannelOptions(child, childOptions, logger);

     for (Entry<AttributeKey<?>, Object> e: childAttrs) {


         child.attr((AttributeKey<Object>) e.getKey()).set(e.getValue());
     }

     try {


         childGroup.register(child).addListener(new ChannelFutureListener() {


             @Override
             public void operationComplete(ChannelFuture future) throws Exception {


                 if (!future.isSuccess()) {


                     forceClose(child, future.cause());
                 }
             }
         });
     } catch (Throwable t) {


         forceClose(child, t);
     }
 }
上面完成的服务端channel的初始化和注册,下面就是绑定端口:
private static void doBind0(
            final ChannelFuture regFuture, final Channel channel,
            final SocketAddress localAddress, final ChannelPromise promise) {


        // This method is invoked before channelRegistered() is triggered.  Give user handlers a chance to set up
        // the pipeline in its channelRegistered() implementation.
        channel.eventLoop().execute(new Runnable() {


            @Override
            public void run() {


                if (regFuture.isSuccess()) {


                     //绑定端口
                    channel.bind(localAddress, promise).addListener(ChannelFutureListener.CLOSE_ON_FAILURE);
                } else {


                    promise.setFailure(regFuture.cause());
                }
            }
        });
}
下面会进入AbstractChannel类下的bind方法:
@Override
public ChannelFuture bind(SocketAddress localAddress, ChannelPromise promise) {


    return pipeline.bind(localAddress, promise);
}
然后进入DefaultChannelPipeline下的bind方法:
@Override
public final ChannelFuture bind(SocketAddress localAddress, ChannelPromise promise) {


    return tail.bind(localAddress, promise);
}
之前在说pipeline的时候说过bind是出站事件,这里根据源码就可以清楚的看到了
追踪代码路径:

总结
1:初始化和注册channel,其中还初始化了pipeline
2:绑定端口
看下ServerBootstrap API的一些实现:
| 名称 | 描述 |
|---|---|
| group | 设置ServerBootstrap要用的EventLoopGroup。这个EventLoopGroup将用于ServerChannel和被接受的子Channel的I/O处理 |
| channel | 设置将要被实例化的ServerChannel类 |
| channelFactory | 如果不能通过默认的构造函数创建Channel,那么可以提供一个ChannelFactory |
| localAddress | 指定ServerChannel应该绑定到本地地址。如果没有指定,则将有操作系统使用一个随机地址。或者,可以通过bind方法来指定该localAddress |
| option | 指定要应用到创建的ServerChannel的配置项,只能在调用bind方法前设置。具体支持的配 置项取决于所使用的Channel类型。参见ChannelConfig的API文档 |
| childOption | 指定客户端的Channel被接受时,应用到客户端Channel的配置项 |
| attr | 指定ServerChannel上的属性,只能在调用bind方法前设置 |
| childAttr | 指定接收的客户端Channel上的属性 |
| handler | 设置ServerChannel的事件处理器 |
| childHandler | 设置客户端Channel上的事件处理器 |
| clone | 克隆一个设置和原始ServerBootstrap相同的ServerBootstrap |
| bind | 绑定ServerChannel并返回一个 |
客户端的启动
同样的,看下客户端Netty示例,和服务端区别不大:
public static void main(String[] args) {


        //1:创建EventLoopGroup
        EventLoopGroup group = new NioEventLoopGroup();
        try {


            //2:创建启动器
            Bootstrap bootstrap = new Bootstrap();
            //3:配置启动器
            bootstrap.group(group)
                    .channel(NioSocketChannel.class)
                    .option(ChannelOption.TCP_NODELAY, true)
                    .handler(new ChannelInitializer<SocketChannel>() {


                        @Override
                        protected void initChannel(SocketChannel socketChannel) throws Exception {


                            ChannelPipeline p = socketChannel.pipeline();
                            p.addLast(new EchoClientHandler());
                        }
                    });
            //4:启动启动器
            ChannelFuture f = bootstrap.connect(HOST, PORT).sync();
            //:5:等待客户端channel关闭
            f.channel().closeFuture().sync();
        } catch (InterruptedException e) {


            e.printStackTrace();
        } finally {


            //6:释放资源
            group.shutdownGracefully();
        }
}
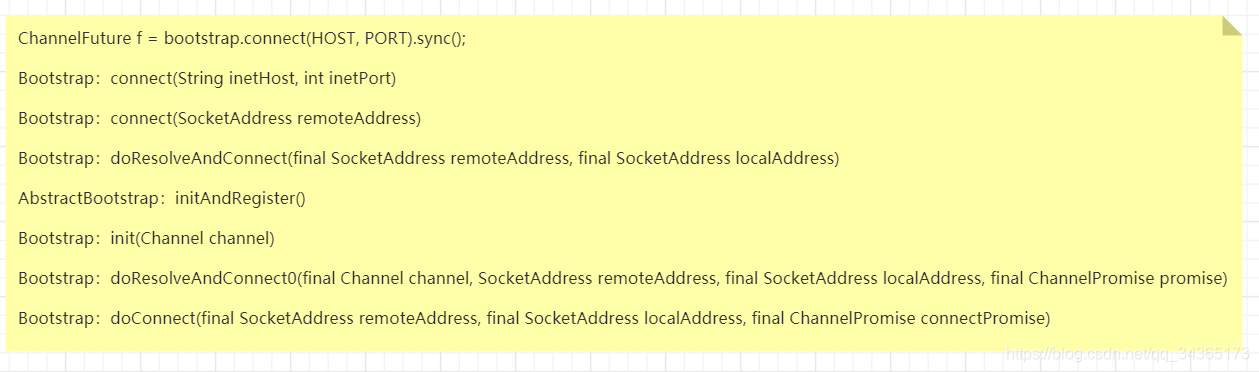
启动客户端是通过connect来操作的:
ChannelFuture f = bootstrap.connect(HOST, PORT).sync();
首先进入的是Bootstrap类中的connect方法:
//连接服务端,参数服务端IP和端口
public ChannelFuture connect(String inetHost, int inetPort) {


     return connect(InetSocketAddress.createUnresolved(inetHost, inetPort));
}

public ChannelFuture connect(SocketAddress remoteAddress) {


      if (remoteAddress == null) {


          throw new NullPointerException("remoteAddress");
      }

      validate();
      return doResolveAndConnect(remoteAddress, config.localAddress());
}

private ChannelFuture doResolveAndConnect(final SocketAddress remoteAddress, final SocketAddress localAddress) {


        //初始化和注册客户端channel
        final ChannelFuture regFuture = initAndRegister();
        final Channel channel = regFuture.channel();

        if (regFuture.isDone()) {


            if (!regFuture.isSuccess()) {


                return regFuture;
            }
            //注册成功后解析地址和连接服务端
            return doResolveAndConnect0(channel, remoteAddress, localAddress, channel.newPromise());
        } else {


            final PendingRegistrationPromise promise = new PendingRegistrationPromise(channel);
            regFuture.addListener(new ChannelFutureListener() {


                @Override
                public void operationComplete(ChannelFuture future) throws Exception {


                    Throwable cause = future.cause();
                    if (cause != null) {


                    } else {


                        promise.registered();
                        //解析地址和连接服务端
                        doResolveAndConnect0(channel, remoteAddress, localAddress, promise);
                    }
                }
            });
            return promise;
        }
}
其中初始化和注册与服务端是差不多的,这里不做赘述,下面看下doResolveAndConnect0方法:
 private ChannelFuture doResolveAndConnect0(final Channel channel, SocketAddress remoteAddress,
                                               final SocketAddress localAddress, final ChannelPromise promise) {


        try {


            final EventLoop eventLoop = channel.eventLoop();
            //服务端地址解析,因为服务端地址可能是域名而不是IP
            final AddressResolver<SocketAddress> resolver = this.resolver.getResolver(eventLoop);

            if (!resolver.isSupported(remoteAddress) || resolver.isResolved(remoteAddress)) {


                //解析成功后连接服务端
                doConnect(remoteAddress, localAddress, promise);
                return promise;
            }

            final Future<SocketAddress> resolveFuture = resolver.resolve(remoteAddress);

            if (resolveFuture.isDone()) {


                final Throwable resolveFailureCause = resolveFuture.cause();

                if (resolveFailureCause != null) {


                    // Failed to resolve immediately
                    channel.close();
                    promise.setFailure(resolveFailureCause);
                } else {


                    // Succeeded to resolve immediately; cached? (or did a blocking lookup)
                    doConnect(resolveFuture.getNow(), localAddress, promise);
                }
                return promise;
            }

            // Wait until the name resolution is finished.
            resolveFuture.addListener(new FutureListener<SocketAddress>() {


                @Override
                public void operationComplete(Future<SocketAddress> future) throws Exception {


                    if (future.cause() != null) {


                        channel.close();
                        promise.setFailure(future.cause());
                    } else {


                        doConnect(future.getNow(), localAddress, promise);
                    }
                }
            });
        } catch (Throwable cause) {


            promise.tryFailure(cause);
        }
        return promise;
}
然后是doConnect方法:
private static void doConnect(
            final SocketAddress remoteAddress, final SocketAddress localAddress, final ChannelPromise connectPromise) {


        final Channel channel = connectPromise.channel();
        channel.eventLoop().execute(new Runnable() {


            @Override
            public void run() {


                if (localAddress == null) {


                    //调用connect方法
                    channel.connect(remoteAddress, connectPromise);
                } else {


                    channel.connect(remoteAddress, localAddress, connectPromise);
                }
                connectPromise.addListener(ChannelFutureListener.CLOSE_ON_FAILURE);
            }
        });
}
追踪代码路径:
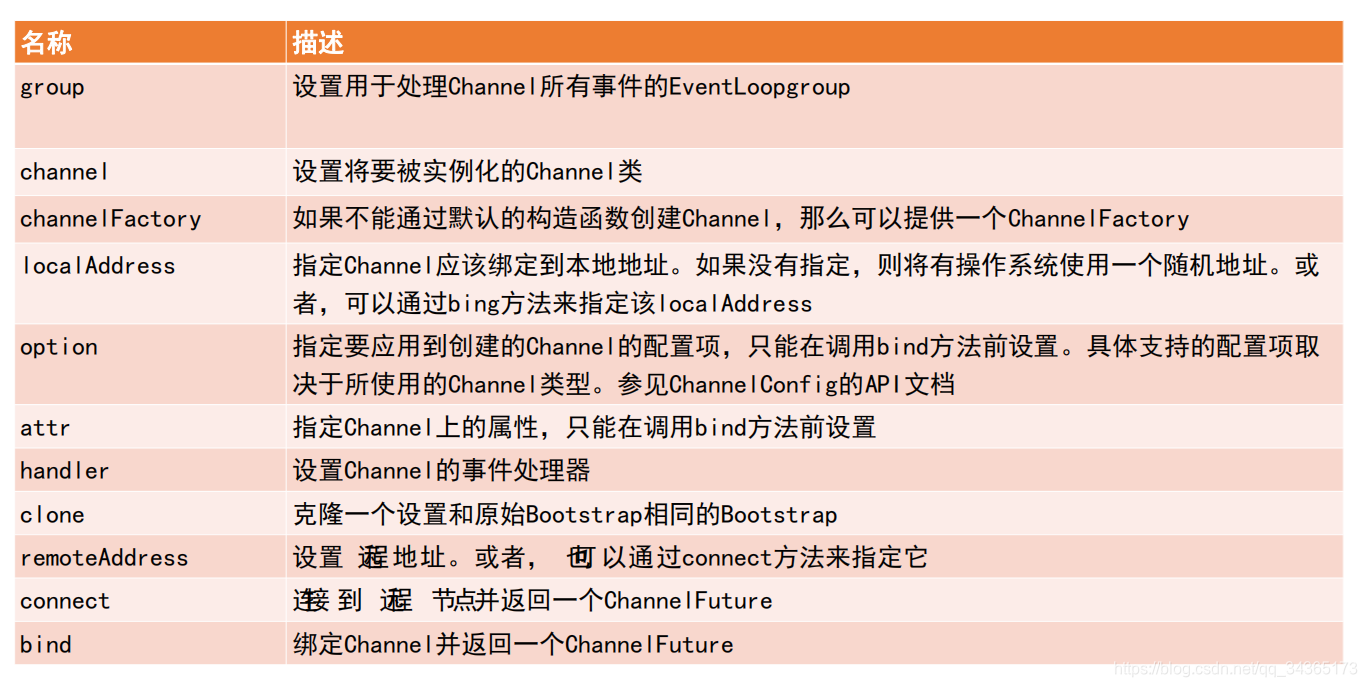
Bootstrap API:
TCP粘包、拆包
TCP底层并不了解上层应用的具体含义,它会根据TCP缓冲区的实际情况进行包的划分,所以在业务上会认为,一个完整的包可能被TCP拆分成多个包进行发送,也可能把多个小的包封装成一个大的包进行发送。这就是TCP的粘包和拆包
图示
1:粘包
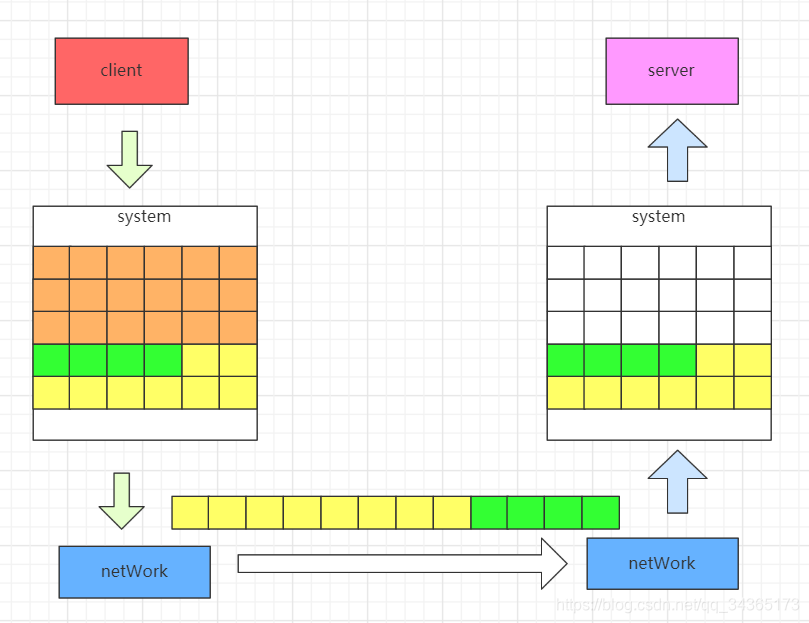
上述图示,假设上述每两行的数据包大小为1024字节,那么TCP在进行发送的时候,就会出现图中的粘包问题
2:拆包
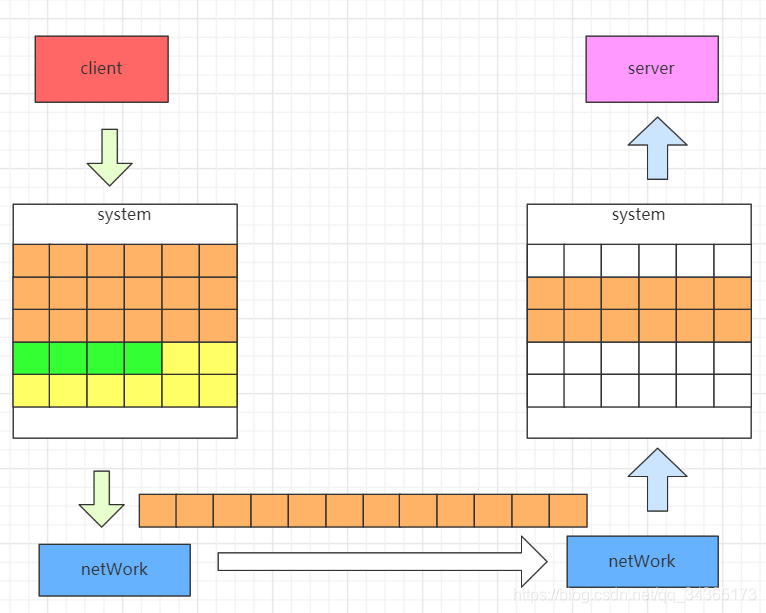
上述图示,数据传输的大小大于1024字节了,就会进行拆包
简单的例子
服务端:
public static void main(String[] args) throws Exception {


        // 1、 线程定义
        // accept 处理连接的线程池
        EventLoopGroup acceptGroup = new NioEventLoopGroup();
        // read io 处理数据的线程池
        EventLoopGroup readGroup = new NioEventLoopGroup();
        try {


            ServerBootstrap b = new ServerBootstrap();
            b.group(acceptGroup, readGroup);
            // 2、 选择TCP协议,NIO的实现方式
            b.channel(NioServerSocketChannel.class);
            b.handler(new LoggingHandler(LogLevel.INFO));
            b.childHandler(new ChannelInitializer<SocketChannel>() {


                @Override
                protected void initChannel(SocketChannel ch) throws Exception {


                    // 3、 职责链定义(请求收到后怎么处理)
                    ChannelPipeline pipeline = ch.pipeline();
//                    // TODO 3.1 增加解码器
//                    pipeline.addLast(new XDecoder());
                    // TODO 3.2 打印出内容 handdler
                    pipeline.addLast(new XHandller());
                }
            });
            // 4、 绑定端口
            System.out.println("启动成功,端口 9999");
            Channel channel = b.bind(new InetSocketAddress(9999)).sync().channel();
            System.out.println(channel.localAddress());
            channel.closeFuture().sync();

        } finally {


            acceptGroup.shutdownGracefully();
            readGroup.shutdownGracefully();
        }
    }
客户端:
public static void main(String[] args) throws Exception {


        Socket socket = new Socket("127.0.0.1", 9999);
        socket.setTcpNoDelay(true);
        OutputStream outputStream = socket.getOutputStream();

        // 消息长度固定为 220字节,包含有
        // 1. 目标用户ID长度为10, 10 000 000 000 ~ 19 999 999 999
        // 2. 消息内容字符串长度最多70。 按一个汉字3字节,内容的最大长度为210字节
        byte[] request = new byte[220];
        byte[] userId = "10000000000".getBytes();
        byte[] content = "我爱你baby你爱我吗我爱你baby你爱我吗我爱你baby你爱我吗我爱你baby你爱我吗".getBytes();
        System.arraycopy(userId, 0, request, 0, 10);
        System.arraycopy(content, 0, request, 10, content.length);

        for (int i = 0; i < 10; i++) {


            outputStream.write(request);
        }
        Thread.sleep(2000L); // 两秒后退出
        socket.close();
    }
Handller:
@Override
public void channelReadComplete(ChannelHandlerContext ctx) throws Exception {


    ctx.flush();
}

@Override
public void channelRead(ChannelHandlerContext ctx, Object msg) throws Exception {


    // 输出 bytebuf
    ByteBuf buf = (ByteBuf) msg;
    byte[] content = new byte[buf.readableBytes()];
    buf.readBytes(content);
    System.out.println(new String(content));
}

// 异常
@Override
public void exceptionCaught(ChannelHandlerContext ctx, Throwable cause) throws Exception {


    cause.printStackTrace();
    ctx.close();
}
服务端输出结果:

可以看到结果中并不是一行行打印的,就是出现了粘包问题,Netty怎么解决粘包和拆包呢,接着往下:
Netty编解码框架
TCP的粘包、拆包问题,可以通过自定义的通讯协议解决,通讯的双方约定好数据格式,发送方按照格式发送,接收方按照格式解析即可
1:编码
发送方将发送的二进制数据转换为协议规定的二进制数据流称为编码(encode),编码的功能是由编码器完成的
2:解码
接收方根据协议的格式,对二进制数据流进行解析,称为解码(decoder)解码的功能由解码器完成
3:编解码
既能编码,又能解码,称为编码解码器(codec)
Netty解码器
Netty中主要提供了抽象基类ByteToMessageDecoder和MessageToMessageDecoder。实现了ChannelInboundHandler接口。
ByteToMessageDecoder:用于将接收到的二进制数据(byte)解码,得到完整的请求报文(Message)。
MessageToMessageDecoder:将一个本身就包含完整报文信息的对象转换成另一个Java对象。
ByteToMessageDecoder实现类
1:FixedLengthFrameDecoder:定长协议解码器,可以指定固定的字节数算一个完整的报文
2:LineBasedFrameDecoder:行分隔符解码器,遇到\n或者\r\n,则认为是一个完整的报文
3:DelimiterBasedFrameDecoder:分隔符解码器,与 LineBasedFrameDecoder类似,只不过分隔符可以自己指定
4:LengthFieldBasedFrameDecoder:长度编码解码器,将报文划分为报文头/报文体,根据报文头中的Length字段确定报文体的长度,因此报文提的长度是可变的
5:JsonObjectDecoder:json格式解码器,当检测到匹配数量的"{" 、”}”或”[””]”时,则认为是一个完整的json对象或者json数组
MessageToMessageDecoder实现类
1:StringDecoder:用于将包含完整的报文信息的ByteBuf转换成字符串
2:Base64Decoder:用于Base64编码
Netty编码器
与ByteToMessageDecoder和MessageToMessageDecoder相对应,Netty提供了对应的编码器实现MessageToByteEncoder和MessageToMessageEncoder,二者都实现ChannelOutboundHandler接口。
相对来说,编码器比解码器的实现要更加简单,原因在于解码器除了要按照协议解析数据,还要处理粘包、拆包问题;而编码器只要将数据转换成协议规定的二进制格式发送即可
1:MessageToByteEncoder:是一个泛型类,泛型参数I表示将需要编码的对象的类型,编码的结果是将信息转换成二进制流放入ByteBuf中。子类通过覆写其抽象方法encode,来实现编码
2:MessageToMessageEncoder:同样是一个泛型类,泛型参数I表示将需要编码的对象的类型,编码的结果是将信息放到一个List中。子类通过覆写其抽象方法encode,来实现编码
MessageToMessageEncoder实现类
1:LineEncoder:按行编码,给定一个CharSequence(如String),在其之后添加换行符\n或者\r\n,并封装到ByteBuf进行输出,与LineBasedFrameDecoder相对应
2:Base64Encoder:给定一个ByteBuf,得到对其包含的二进制数据进行Base64编码后的新的ByteBuf进行输出,与Base64Decoder相对应
3:LengthFieldPrepender:给定一个ByteBuf,为其添加报文头Length字段,得到一个新的ByteBuf进行输出。Length字段表示报文长度,与LengthFieldBasedFrameDecoder相对应
4:StringEncoder:给定一个CharSequence(如:StringBuilder、StringBuffer、String等),将其转换成ByteBuf进行输出,与StringDecoder对应
Netty编码解码器
编码解码器同时具有编码与解码功能,特点同时实现了ChannelInboundHandler和ChannelOutboundHandler接口,因此在数据输入和输出时都能进行处理。Netty提供提供了一个ChannelDuplexHandler适配器类,编码解码器的抽象基类 ByteToMessageCodec 、MessageToMessageCodec都继承与此类