1. 数据集获取
在py文件中,使用(x_train, y_train), (x_test, y_test) = tf.keras.datasets.fashion_mnist.load_data()可以进行数据集的自动下载与自动读取。但是下载过程比较慢,且容易中断。故而就直接从控制台中打印的下载地址中直接下载,下面简单整理了其下载地址:
| 名称 | 描述 | 地址 |
|---|---|---|
train-images-idx3-ubyte.gz |
训练集图像 | here |
train-labels-idx1-ubyte.gz |
训练集标签 | here |
t10k-images-idx3-ubyte.gz |
测试集图像 | here |
t10k-labels-idx1-ubyte.gz |
测试集标签 | here |
2. 数据集读取
import os
import gzip
import numpy as np
import tensorflow as tf
from PIL import Image


# 1. 加载数据集
def load_data(path='data/fashion_mnist/'):
    def __load_mnist__(path, kind='train'):
        labels_path = os.path.join(path, '%s-labels-idx1-ubyte.gz' % kind)
        images_path = os.path.join(path, '%s-images-idx3-ubyte.gz' % kind)

        with gzip.open(labels_path, 'rb') as lbpath:
            labels = np.frombuffer(lbpath.read(), dtype=np.uint8, offset=8)

        with gzip.open(images_path, 'rb') as imgpath:
            images = np.frombuffer(imgpath.read(), dtype=np.uint8, offset=16).reshape(len(labels), 784)
        return images, labels
    train_images, train_lables = __load_mnist__(path, kind="train")
    test_images, test_lables = __load_mnist__(path, kind="t10k")
    return (train_images, train_lables), (test_images, test_lables)

(x_train, y_train), (x_test, y_test) = load_data()
# print(x_train.shape) # (60000, 784)
# print(y_train.shape) # (60000,)
# print(type(x_train)) # 'numpy.ndarray'
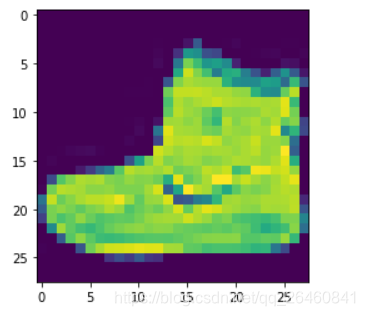
数据集读取完毕后,不妨简单的绘制一张图片:
# 不妨简单显示
import matplotlib.pyplot as plt
image_0 = np.resize(x_train[0], (int(math.sqrt(x_train.shape[1])),int(math.sqrt(x_train.shape[1]))))
plt.imshow(image_0)
然后,对数据集进行简单的处理:
# 2. 数据简单处理
x_train, x_test = x_train.astype(np.float32) / 255, x_test.astype(np.float32) / 255 # 将0-255数据简单归一化到0-1

train_x = tf.data.Dataset.from_tensor_slices(x_train) # 将array转化为tensor
# 从data数据集中按顺序抽取buffer_size个样本放在buffer中,然后打乱buffer中的样本
# buffer中样本个数不足buffer_size,继续从data数据集中安顺序填充至buffer_size,
# 此时会再次打乱
train_x = train_x.shuffle(buffer_size=512 * 3)
# 每次从buffer中抽取batch_size个样本
train_x = train_x.batch(batch_size=512)

test_x = tf.data.Dataset.from_tensor_slices(x_test).batch(batch_size=512)
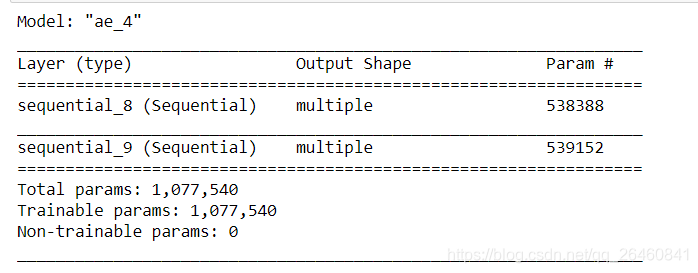
开始简单自编码器的编写:
hdim = 20

class AE(tf.keras.Model):
    def __init__(self):
        super(AE, self).__init__()

        self.encoder = tf.keras.Sequential([
            # [d, 784] => [d, 512]
            tf.keras.layers.Dense(512, activation=tf.nn.relu),
            # [d, 512] = > [d, 256]
            tf.keras.layers.Dense(256, activation=tf.nn.relu),
            # [d, 256] => [d, hdim]
            tf.keras.layers.Dense(hdim)
        ])

        self.decoder = tf.keras.Sequential([
            tf.keras.layers.Dense(256, activation=tf.nn.relu),
            tf.keras.layers.Dense(512, activation=tf.nn.relu),
            tf.keras.layers.Dense(784)
        ])

    def call(self, inputs):
        # 前向传播
        h = self.encoder(inputs)
        x_hat = self.decoder(h)
        return x_hat

# 使用
model = AE()
model.build(input_shape=(None, 784))
model.summary()
然后,就可以开始训练:
epoch = 5
lr = 1e-3
optimizer = tf.keras.optimizers.Adam(lr)

def save_images(imgs, name):
    im = Image.new("L", (280, 280))
    index = 0
    for i in range(0, 280, 28):
        for j in range(0, 280, 28):
            t_im = imgs[index]
            t_im = Image.fromarray(t_im, mode="L")
            im.paste(t_im, (i, j))
            index += 1
    im.save(name)

for epoch in range(epoch):
    for step, x in enumerate(train_x):
        with tf.GradientTape() as tape:
            # 前向传播过程
            x_rec = model(x)
            # 损失函数定义
            loss = tf.losses.binary_crossentropy(x, x_rec, from_logits=True)
            loss = tf.reduce_mean(loss)
        grads = tape.gradient(loss, model.trainable_variables)
        optimizer.apply_gradients(zip(grads, model.trainable_variables))

        if step % 200 == 0:
            print(epoch, step, float(loss))

        #evaluation
        x = next(iter(test_x))
        logits = model(x)
        x_hat = tf.sigmoid(logits)
        # 对比存储
        x_before = tf.reshape(x, [-1, 28, 28])
        x_before = x_before.numpy() * 255
        x_before = x_before.astype(np.uint8)
        save_images(x_before, "before_%d.png"%epoch)

        x_after = tf.reshape(x_hat, [-1, 28, 28])
        x_after = x_after.numpy() * 255
        x_after = x_after.astype(np.uint8)
        save_images(x_after, "after_%d.png"%epoch)
不妨打开训练前后的两张图片:
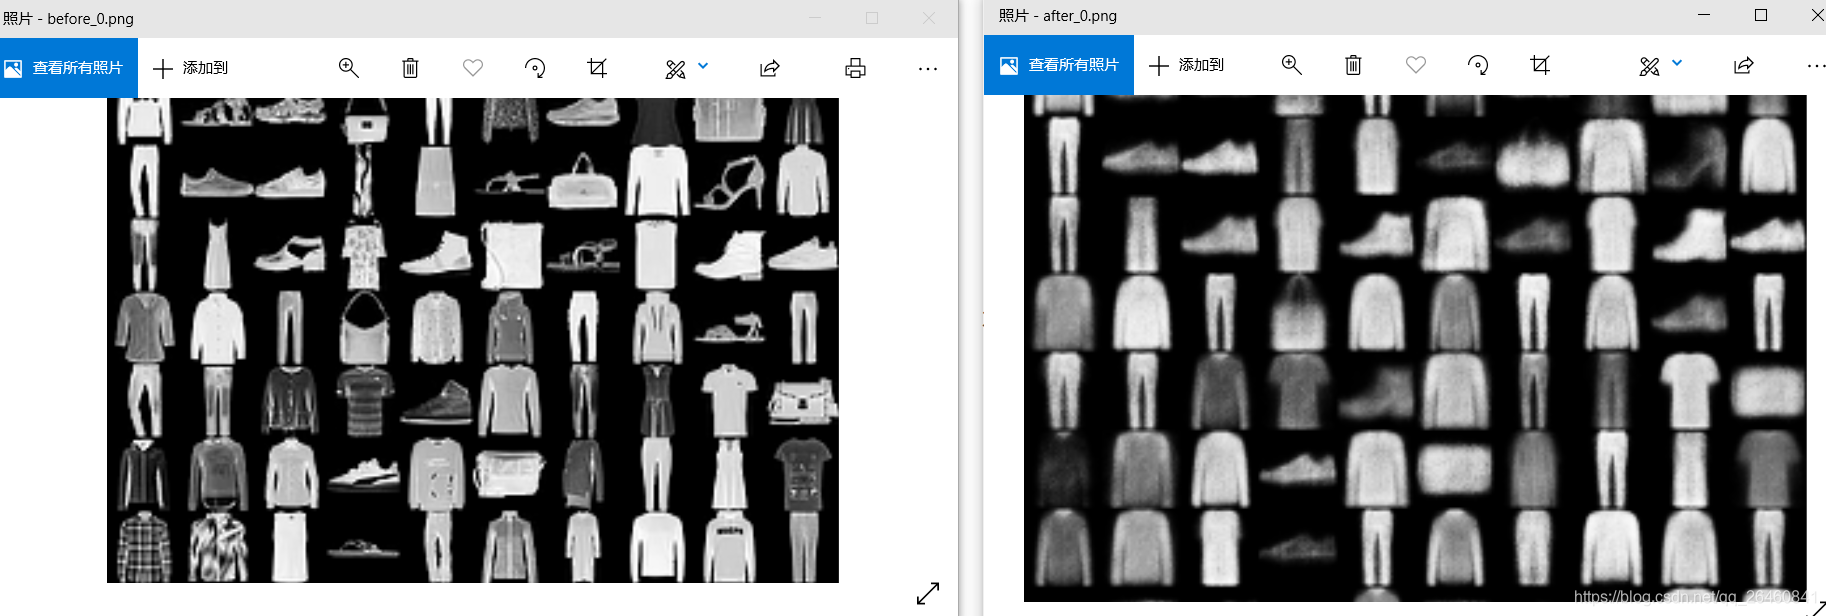
明显模糊了些。