基于云的微服务开发:
应用程序的配置与正在部署的实际代码完全分离。
构建服务器、应用程序以及一个不可变的镜像,它们在各环境中进行提升时永远不会发生变化。
在服务器启动时通过环境变量注入应用程序配置信息,或者在微服务启动时通过集中式存储库读取应用程序配置信息。
一、管理配置(和复杂性)
应用程序配置管理的4条原则:
| 配置管理原则 | 说明 |
|---|---|
| 分离 | 将服务配置信息与服务的实际物理部署完全分开。应用程序配置不应与服务实例一起部署。相反,配置信息应该作为环境变量传递给正在启动的服务,或者在服务启动时从集中式存储库中读取。 |
| 抽象 | 将访问配置数据的功能抽象到一个服务接口中。应用程序使用基于REST的JSON 服务来检索配置数据,而不是编写直接访问服务存储库的代码(也就 从文件或使用 JDBC从数据库读取数据) |
| 集中 | 因为基于云的应用程序可能会有数百个服务,所以最小化用于保存配置信息的不同存储库的数量至关重要。将应用程序配置集中在尽可能少的存储库中。 |
| 稳定 | 因为应用程序的配置信息与部署的服务完全隔离并集中存放,所以不管采用何种方案实现,至关重要的一点就是保证其高可用和冗余。 |
注:将配置信息与实际代码分开之后,将创建一个需要进行管理和版本控制的外部依赖项。
1、配置管理架构
1)当一个微服务实例出现时,它将调用一个服务端点来读取其所在环境的特定配置信息。配置管理的连接信息(连接凭据、服务端点等)将在微服务启动时被传递给微服务。
2)实际的配置信息驻留在存储库中。基于配置存储库的实现,可以选择使用不同的实现来保存配置数据。配置存储库的实现选择可以包括源代码控制下的文件、关系数据库或键值数据存储。
3)应用程序配置数据的实际管理与应用程序的部署方式无关。配置管理的更改通常通过构建和部署管道来处理,其中配置的更改可以通过版本信息进行标记,并通过不同的环境进行部署。
4)进行配置管理更改时,必须通知使用该应用程序配置数据的服务,井刷新应用程序数据的副本。
2、实施选择
用于实施配置管理系统的开源项目:
| 项目名称 | 描述 | 特点 |
|---|---|---|
| Etcd 使用 Go 开发的开源项目,用于服务发现和键值管理 使用 raft 协议作为它的分布式计算模型 | 非常快和可伸缩、可分布式、命令行驱动、易于搭建和使用 | |
| Eureka | Netflix 开发,用于服务发现键值管理 | 分布式键值存储、灵活、提供开箱即用的动态客户端刷新 |
| Consul | Hashicorp 开发,特性上类似于 tcd、Eureka,它的分布式计算模型使用了不同的算法( WTM 协议) | 快速、提供本地服务发现功能,可直接与 DNS集成、没有提供开箱即用的动态客户端刷新 |
| ZooKeeper | 一个提供分布式锁定功能的 Apache 项目,经常用作访问键值数据的配置管理解决方案。 | 使用最为复杂、可用作配置管理,但只有在其他架构中己经使用了 ZooKeeper 的时候才考虑使用它 |
| Spring Cloud Config | 提供不同后端支持的通用配置管理解决方案。它可以将 Git Eureka 和Consul 作为后端进行整合 | 非分布式键值存储、提供了对 Spring 和非 Spring 服务的紧密集成、可以使用多个后端来存储配置数据,包括共享文件系统、 Eureka Consul和 Git |
这里选择Spring Cloud 配置服务器。
 Spring Cloud 配置服务器易于搭建和使用。
 Spring Cloud 配置与 Spring Boot 紧密集成。可以使用一些简单易用的注解来读取所有应用程序的配置数据。
 Spring Cloud 置服务器提供多个后端用于存储配置数据 如果已经使用了 Eureka和 Consul等工具 ,那么可以将它们直接插入 Spring Cloud 配置服务器中。
 Spring Cloud 服务器可以直接与 Git 平台集成。 Spring Cloud 配置与 Git的集成消除了解决方案的额外依赖,并使版本化应用程序配置数据成为可能。
二、构建 Spring Cloud 配置服务器
configurationserver目录结构:
learnspringwfw
	├─docker
	│  └─common
	│  │    └─docker-compose.yml
	│  └─dev
	│  │    └─docker-compose.yml
	│  └─prod
	│ 	    └─docker-compose.yml
	└─configurationserver
	│		├─src
	│		│  ├─main
	│		│  │  ├─docker
	│		│  │  │	 └─Dockerfile
	│		│  │  │  └─run.sh
	│		│  │  ├─java
	│		│  │  │  └─com
	│		│  │  │      └─example
	│		│  │  │          └─configurationserver
	│		│  │  └─resources
	│		│  │      ├─config
	│		│  │      │  ├─licensingservice
	│		│  │      │  │	  ├─licensingservice.yml
	│		│  │      │  │	  ├─licensingservice-dev.yml
	│		│  │      │  │	  └─licensingservice-prod.yml
	│		│  │      │  └─organizationservice
	│		│  │      │  	  └─organizationservice.yml
	│		│  │      ├─static
	│		│  │      └─templates
	│		│  │      └─application.yml
	│		│  │      └─bootstrap.yml
	│		│  └─test
	│		│      └─java
	│		│          └─com
	│		│              └─example
	│		│                  └─configurationserver
	│		│
	│		└─pom.xml
	│
	│
	│
	│─ ─ licensing-service (目录结构参考上一篇spring微服务学习2。会做在原来基础做一些修改,在本篇中后文中会列出。)
	│   	└─src
	│
	│
	└─pom.xml
项目licensing-service中,修改pom.xml:
<properties>
		<!--省略其他 。docker.image.tag标签改成如下-->
        <docker.image.tag>learndemo3</docker.image.tag>
</properties>
最外层的pom.xml(即learnspringwfw目录下的pom.xml):
<?xml version="1.0" encoding="UTF-8"?>
<project xmlns="http://maven.apache.org/POM/4.0.0" xmlns:xsi="http://www.w3.org/2001/XMLSchema-instance"
         xsi:schemaLocation="http://maven.apache.org/POM/4.0.0 https://maven.apache.org/xsd/maven-4.0.0.xsd">
    <modelVersion>4.0.0</modelVersion>

    <parent>
        <groupId>org.springframework.boot</groupId>
        <artifactId>spring-boot-starter-parent</artifactId>
        <version>2.3.7.RELEASE</version>
        <relativePath/> <!-- lookup parent from repository -->
    </parent>

    <groupId>com.example</groupId>
    <artifactId>learnspringwfw</artifactId>
    <packaging>pom</packaging>
    <version>0.0.1-SNAPSHOT</version>

    <name>learnspringwfw-parent-pom</name>
    <description>Parent Pom for the learnspringwfw project</description>

    <modules>
        <module>licensing-service</module>
        <module>configurationserver</module>
    </modules>

    <properties>
        <java.version>1.8</java.version>
    </properties>

    <build>
        <plugins>
            <plugin>
                <groupId>com.spotify</groupId>
                <artifactId>docker-maven-plugin</artifactId>
                <version>1.0.0</version>
                <configuration>
                    <baseImage>java</baseImage>
                    <imageName>example</imageName>
                </configuration>
            </plugin>
        </plugins>
    </build>
</project>
configurationserver的pom.xml:
<?xml version="1.0" encoding="UTF-8"?>
<project xmlns="http://maven.apache.org/POM/4.0.0" xmlns:xsi="http://www.w3.org/2001/XMLSchema-instance"
         xsi:schemaLocation="http://maven.apache.org/POM/4.0.0 https://maven.apache.org/xsd/maven-4.0.0.xsd">
    <modelVersion>4.0.0</modelVersion>
    <parent>
        <groupId>org.springframework.boot</groupId>
        <artifactId>spring-boot-starter-parent</artifactId>
        <version>2.3.7.RELEASE</version>
        <relativePath/> <!-- lookup parent from repository -->
    </parent>
    <groupId>com.example</groupId>
    <artifactId>configurationserver</artifactId>
    <version>0.0.1-SNAPSHOT</version>
    <name>configurationserver</name>
    <description>Demo project for Config Server</description>

    <packaging>jar</packaging>

    <properties>
        <spring-cloud.version>Hoxton.SR9</spring-cloud.version>
        <!--Docker build Config-->
        <project.build.sourceEncoding>UTF-8</project.build.sourceEncoding>
        <start-class>com.example.configurationserver.ConfigurationserverApplication</start-class>
        <java.version>1.8</java.version>
        <docker.image.name>learnspringwfw/my-configurationserver</docker.image.name>
        <docker.image.tag>learndemo3</docker.image.tag>
    </properties>


    <dependencies>
        <dependency>
            <groupId>org.springframework.boot</groupId>
            <artifactId>spring-boot-starter-web</artifactId>
        </dependency>
        <dependency>
            <groupId>org.springframework.cloud</groupId>
            <artifactId>spring-cloud-config-server</artifactId>
        </dependency>

        <dependency>
            <groupId>org.springframework.cloud</groupId>
            <artifactId>spring-cloud-starter-config</artifactId>
        </dependency>

        <dependency>
            <groupId>org.springframework.boot</groupId>
            <artifactId>spring-boot-starter-test</artifactId>
            <scope>test</scope>
        </dependency>

    </dependencies>
    <dependencyManagement>
        <dependencies>
            <dependency>
                <groupId>org.springframework.cloud</groupId>
                <artifactId>spring-cloud-dependencies</artifactId>
                <version>${spring-cloud.version}</version>
                <type>pom</type>
                <scope>import</scope>
            </dependency>
        </dependencies>
    </dependencyManagement>

    <build>
        <plugins>
            <!-- We use the Resources plugin to filer Dockerfile and run.sh, it inserts actual JAR filename -->
            <!-- The final Dockerfile will be created in target/dockerfile/Dockerfile -->
            <plugin>
                <artifactId>maven-resources-plugin</artifactId>
                <executions>
                    <execution>
                        <id>copy-resources</id>
                        <!-- here the phase you need -->
                        <phase>validate</phase>
                        <goals>
                            <goal>copy-resources</goal>
                        </goals>
                        <configuration>
                            <outputDirectory>${basedir}/target/dockerfile</outputDirectory>
                            <resources>
                                <resource>
                                    <directory>src/main/docker</directory>
                                    <filtering>true</filtering>
                                </resource>
                            </resources>
                        </configuration>
                    </execution>
                </executions>
            </plugin>
            <plugin>
                <groupId>com.spotify</groupId>
                <artifactId>docker-maven-plugin</artifactId>
                <version>1.0.0</version>
                <configuration>
                    <imageName>${docker.image.name}:${docker.image.tag}</imageName>
                    <dockerDirectory>${basedir}/target/dockerfile</dockerDirectory>
                    <resources>
                        <resource>
                            <targetPath>/</targetPath>
                            <directory>${project.build.directory}</directory>
                            <include>${project.build.finalName}.jar</include>
                        </resource>
                    </resources>
                </configuration>
            </plugin>
            <plugin>
                <groupId>org.springframework.boot</groupId>
                <artifactId>spring-boot-maven-plugin</artifactId>
            </plugin>
        </plugins>
    </build>

</project>
licensing-service的pom.xml:(参考上一篇。在本篇中,会在原来pom基础加入一些依赖。)
SpringBoot和SpringCloud 之间的版本依赖项查看SpringCloud官网。
postgresql数据库请先安装好。
ConfigurationserverApplication :
package com.example.configurationserver;

import org.springframework.boot.SpringApplication;
import org.springframework.boot.autoconfigure.SpringBootApplication;
import org.springframework.cloud.config.server.EnableConfigServer;

// @EnableConfigServer 使服务成为 Spring Cloud Config 服务
@EnableConfigServer
@SpringBootApplication
public class ConfigurationserverApplication {


    public static void main(String[] args) {


        SpringApplication.run(ConfigurationserverApplication.class, args);
    }

}
run.sh:
#!/bin/sh
echo "********************************************************"
echo "Starting Configuration Server"
echo "********************************************************"
java -jar /usr/local/configurationserver/@project.build.finalName@.jar
Docker:
FROM openjdk:8-jdk-alpine
RUN  apk update && apk upgrade && apk add netcat-openbsd && apk add curl
RUN mkdir -p /usr/local/configurationserver
RUN echo $JAVA_HOME
RUN cd /tmp/ && \
    curl -k -LO "http://download.oracle.com/otn-pub/java/jce/8/jce_policy-8.zip" -H 'Cookie: oraclelicense=accept-securebackup-cookie' && \
    unzip jce_policy-8.zip && \
    rm jce_policy-8.zip && \
    yes |cp -v /tmp/UnlimitedJCEPolicyJDK8/*.jar /usr/lib/jvm/java-1.8-openjdk/jre/lib/security/
ADD  @[email protected] /usr/local/configurationserver/
ADD run.sh run.sh
RUN chmod +x run.sh
CMD ./run.sh
Dockerfile 应该处于源代码管理下。
在Dockerfile文件里可以看到硬编码加密密钥(不推荐)。
设置为系统环境变量(推荐),如:
export ENCRYPT_KEY=IMSYMMETRIC
application.yml:
####
#Git solution
####
#server:
#  port: 8888
#spring:
#  cloud:
#    config:
#      server:
#        encrypt.enabled: false
#        git:
#          uri: https://github.com/path/to/config-repo/
#          searchPaths: licensingservice,organizationservice
#          username: confsvruser
#          password: mygitpwd123


####
#Classpath and file-based solution
####

server:
   port: 8888		#springcloud 配置服务器将要监听的端口
spring:
  profiles:
    active: native			# 。Spring Cloud 配置服务器以“native“ profile 运行:
  cloud:
     config:
       server:
           native:
	           search-locations: classpath:config/,classpath:config/licensingservice
#              searchLocations: path/to/configurationserver/src/main/resources/config/licensingservice,
#                               path/to/configurationserver/src/main/resources/config/organizationservice
###              #searchLocations: classpath:config/,classpath:config/licensingservice		# 配置文件存储位置的路径。
application.yml文件告诉 Spring Cloud 服务要侦听哪个端口以及在哪里可以找到提供配置数据的后端。
配置项:searchLocations:用于存储配置的后端存储库(文件系统)。这个属性为每一个应用程序提供了用逗号分隔的文件夹列表,这些文件夹含有由配置服务器管理的属性。
Spring Cloud 配置将环境特定的属性公开为基于 HTTP 的端点。配置文件命名规则:应用程序名称-环境名称.yml。
如:
licensingservice.yml对应/licensingservice/default
licensingservice-dev.yml对应/licensingservice/dev
licensingservice-prod.yml对应/licensingservice/prod
要运行哪个服务环境,是由在命令行服务启动时传入的 Spring Boot的 profile 指定的 。如果在命令行上没有传入
profile , Spring Boot 将始终默认加载随应用程序打包的 application.yml 文件中的配置数据。
licensingservice.yml:
example:
   property: "I AM IN THE DEFAULT"
spring:
  jpa:
    database: "POSTGRESQL"
    show-sql: "true"
    properties:
      hibernate:
        dialect: "org.hibernate.dialect.PostgreSQLDialect"
  datasource:
    platform:  "postgres"
    url: "jdbc:postgresql://database:5432/mylearndemo_local"
    username: "postgres"
    password: "{cipher}30b17f6bd9d453e27248f9e089ea52adfe02051e3b526ce9c66c3c816b4adda4"
    validationQuery: "SELECT 1"
    testWhileIdle: "true"
  database:
    driverClassName: "org.postgresql.Driver"
redis:
  server: "redis"
  port: "6379"
signing:
  key: "123qwe12312"
licensingservice-dev.yml:
spring.jpa.database: "POSTGRESQL"
spring.datasource.platform:  "postgres"
spring.jpa.show-sql: "false"
spring.database.driverClassName: "org.postgresql.Driver"
spring.datasource.url: "jdbc:postgresql://database:5432/mylearndemo_dev"
spring.datasource.username: "postgres_dev"
spring.datasource.password: "{cipher}0a4ae3d9c770f94f16bcfd1605eea090b64765c680f21e17a5d336c1558c4957"
spring.datasource.testWhileIdle: "true"
spring.datasource.validationQuery: "SELECT 1"
spring.jpa.properties.hibernate.dialect: "org.hibernate.dialect.PostgreSQLDialect"
redis.server: "redis"
redis.port: "6379"
signing.key: "123qwe12312"
licensingservice-prod.yml:
example.property: "I AM A PROD PROPERTY OVERRIDE"
spring.jpa.database: "POSTGRESQL"
spring.datasource.platform:  "postgres"
spring.jpa.show-sql: "true"
spring.database.driverClassName: "org.postgresql.Driver"
spring.datasource.url: "jdbc:postgresql://database:5432/mylearndemo_prod"
spring.datasource.username: "postgres_prod"
spring.datasource.password: "{cipher}1a68580beff5224d648bcd3577cc78622c518bcf6554fef24189a7423ecb12d6"
spring.datasource.testWhileIdle: "true"
spring.datasource.validationQuery: "SELECT 1"
spring.jpa.properties.hibernate.dialect: "org.hibernate.dialect.PostgreSQLDialect"
redis.server: "redis"
redis.port: "6379"
signing.key: "123qwe12312"
organizationservice.yml:
example.organization.property: "默认 ORGANIZATION SERVICE"
创建加密密钥:
注:
在licensingservice.yml、licensingservice-prod.yml、licensingservice-dev.yml。配置中spring.datasource.password项,用到了{

    cipher}。Spring Cloud 配置服务器要求所有已加密的属性前面加上{

    cipher}。{

    cipher}会告诉 SpringCloud 配置服务器它正在处理已加密的值。
要么配置项里不使用{

    cipher}加密。如果不使用,那就是返回没有加密的配置项。这里就不在举例。
要么就使用{

    cipher}。如果使用了{

    cipher}必须以下配置,否则加密项返回错误。:
1.创建一个bootstrap.yml文件
2.配置encrypt.key。如 encrypt.key=my-secret-12312312
启动configurationserver,访问http://localhost:8888/encrypt。将生成的字符串复制到各个{

    cipher}后面。
需要local_policy.jar。US_export_policy.jar这个2个不限长度的Java加密扩展。
bootstrap.yml:
spring:
  application:
    name: configurationserver
encrypt:
  key: my-secret-12312312
在Dockerfile文件里可以看到硬编码加密密钥(不推荐)。
设置为系统环境变量(推荐),如:
export ENCRYPT_KEY=IMSYMMETRIC
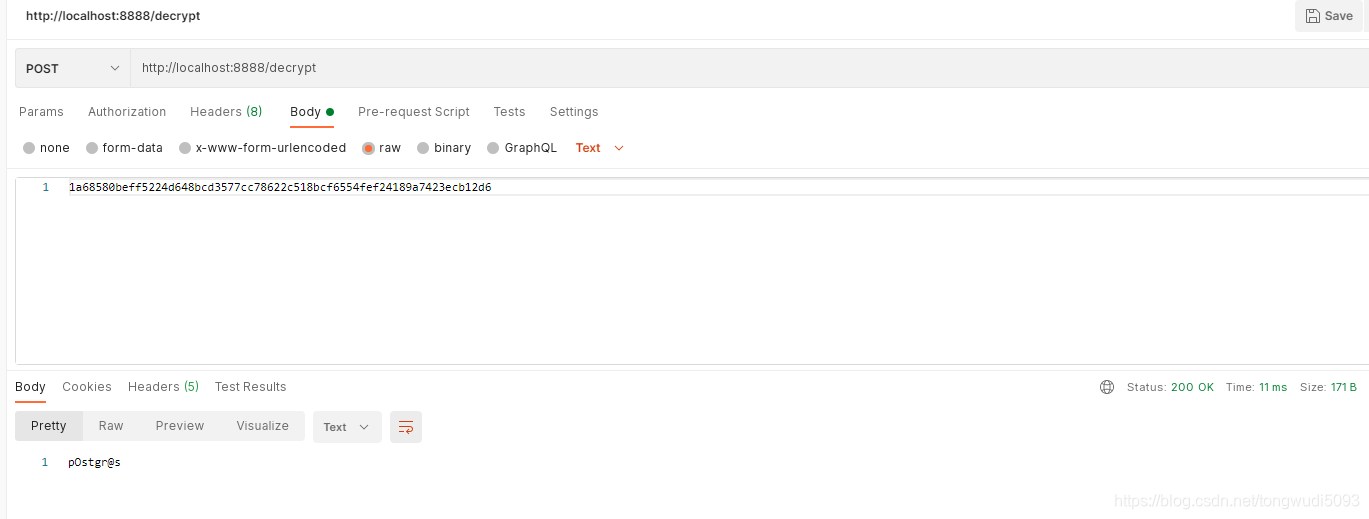
加密和解密属性。
如果要加密这个值。可用/encrypt,访问http://localhost:8888/encrypt,如下:

如果要解密这个值,可用/decrypt。访问http://localhost:8888/decrypt,如下::
在configurationserver根目录下运行命令:
mvn spring-boot run
访问地址,如获取licensingservice的默认配置(如要访问dev、prod,只需要把地址后面部分改为/dev、/prod即可。):
http://localhost:8888/licensingservice/default
返回:
{


    "name": "licensingservice",
    "profiles": [
        "default"
    ],
    "label": null,
    "version": null,
    "state": null,
    "propertySources": [
        {


            "name": "classpath:config/licensingservice/licensingservice.yml",
            "source": {


                "example.property": "I AM IN THE DEFAULT",
                "spring.jpa.database": "POSTGRESQL",
                "spring.jpa.show-sql": "true",
                "spring.jpa.properties.hibernate.dialect": "org.hibernate.dialect.PostgreSQLDialect",
                "spring.datasource.platform": "postgres",
                "spring.datasource.url": "jdbc:postgresql://database:5432/mylearndemo_local",
                "spring.datasource.username": "postgres",
                "spring.datasource.validationQuery": "SELECT 1",
                "spring.datasource.testWhileIdle": "true",
                "spring.database.driverClassName": "org.postgresql.Driver",
                "redis.server": "redis",
                "redis.port": "6379",
                "signing.key": "123qwe12312",
                "spring.datasource.password": "pOstgr@s"
            }
        }
    ]
}
虽然在属性文件中, spring.datasource.password 已经被加密,然而当这个licensingservice服务的配置被检索时,它将被解密。以纯文本形式公开 。
要解决这个问题,需要以下步骤:
配置微服务以在客户端使用加密:
1)配置 Spring Cloud Config 不要在服务器端解密属性(在这里就是项目名为configurationserver)
在Spring Cloud Config项目 中禁用服务器端的属性解密。可以通过设置 Spring Cloud Config项目中,在 src/main/resources/application.yml 文件中的 spring.cloud.config.server.encrypt.enabled属性设置为false。这就是Spring Cloud Config项目要做的所有配置。
2)在licensingservice服务器上设置对称密钥
因为licensingservice服务现在负责解密已加密的属性,所以需要先在licensingservice服务上设置对称密钥。方
法是确保 ENCRYPT_KEY 环境变量与 Spring Cloud Config 服务器使用的对称密钥相同(如my-secret-12312312 )
3)将 spring-security-rsa JAR 添加到licensingservice服务项目(可查看上一篇文章)的 pom.xml 文件中
加入spring-security-rsa依赖项, pom.xml:
<dependency>
  <groupId>org.springframework.security</groupId>
  <artifactId>spring-security-rsa</artifactId>
</dependency>
然后启动 Spring Cloud Config(在这里就是项目名为configurationserver) 和licensingservice服务了。
访问:
http://localhost:8888/licensingservice/default
响应:
{


    "name": "licensingservice",
    "profiles": [
        "default"
    ],
    "label": null,
    "version": null,
    "state": null,
    "propertySources": [
        {


            "name": "classpath:config/licensingservice/licensingservice.yml",
            "source": {


                "example.property": "I AM IN THE DEFAULT",
                "spring.jpa.database": "POSTGRESQL",
                "spring.jpa.show-sql": "true",
                "spring.jpa.properties.hibernate.dialect": "org.hibernate.dialect.PostgreSQLDialect",
                "spring.datasource.platform": "postgres",
                "spring.datasource.url": "jdbc:postgresql://database:5432/mylearndemo_local",
                "spring.datasource.username": "postgres",
                "spring.datasource.validationQuery": "SELECT 1",
                "spring.datasource.testWhileIdle": "true",
                "spring.database.driverClassName": "org.postgresql.Driver",
                "redis.server": "redis",
                "redis.port": "6379",
                "signing.key": "123qwe12312",
                "spring.datasource.password": "30b17f6bd9d453e27248f9e089ea52adfe02051e3b526ce9c66c3c816b4adda4"
            }
        }
    ]
}
可以看到spring.datasource.password这项属性是以加密形式返回。
三、将SpringCloudConfig与SpringBoot客户端集成
即将项目名为configurationserver和licensingservice集成。(licensingservice在上一篇文章)
1、建立licensingservice服务对 Spring Cloud Config 服务器的依赖。
在licensingservice项目加入依赖:
<!-- Spring Data Java Persistence API ( JPA )和 Postgres JDBC 驱动程序-->
<dependency>
    <groupId>postgresql</groupId>
    <artifactId>postgresql</artifactId>
    <version>9.1-901.jdbc4</version>
</dependency>
<dependency>
    <groupId>org.springframework.boot</groupId>
    <artifactId>spring-boot-starter-data-jpa</artifactId>
</dependency>
<!-- 它包含与 Spring Cloud 置服务器交互所需的所有类-->
<dependency>
    <groupId>org.springframework.cloud</groupId>
    <artifactId>spring-cloud-config-client</artifactId>
</dependency>
2、配置licensingservice服务以使用 Spring Cloud Config
在使用 Spring Cloud Config Spring Boot 服务中,配置信息可以在 bootstrap. yml和 application.yml这两个配置文件之一中设置。
在其他所有配置信息被使用之前, bootstrap.yml 文件要先读取应用程序属性。一般来说,bootstrap.yml 文件包含服务的应用程序名称、应用程序 profile 和连接到 Spring Cloud Config 服务器的 URI 。
在licensingrvice 项目的 src/main/resources目录下,新建一个bootstrap.yml(bootstrap.yml所在路径:src/main/resources/bootstrap.yml )
新建一个bootstrap.yml:
spring:
  application:
    name: licensingservice		# 指定服务的名称。以便Spring Cloud Config 客户端知道正在查找哪个服务。
  profiles:
    active:
      default	# 指定服务应该运行的默认profile 映射到环境
  cloud:
    config:
      uri: http://localhost:8888		# 指定 Spring Cloud Config服务器的位置。会去查找配置服务器的位置。
spring.application.name 是应用程序的名称(如 licensingservice)并且必须直接映射到SpringCloud配置服务器中的目录的名称。对于licensingservice服务,需要在Spring Cloud 配置服务器上有一个名为licensingservice的目录。
在licensingservice服务的根目录下,执行命令启动:
mvn spring-boot: run
如果要覆盖这些默认值并指向另一个环境,可以通过将licensingservice服务项目编译到 JAR ,然后使用 -D 系统属性来运行这个 JAR 来实现。 下面的命令行使用非默认 profile 启动licensingservice服务:
java -Dspring.cloud.config.uri=http://localhost:8888 -Dspring.profiles.active=dev -jar target/licensing-service-0.0.1-SNAPSHOT.jar
上面的命令行将覆盖两个参数: spring.cloud.config.uri和spring.profiles.active。 使用- Dspring.cloud.config.uri=http://localhost:8888 系统属性将指向一个本地运行的配置服务器。使用- Dspring profiles.active=dev 系统属性,可以告诉licensingservice服务使用开发环境profile (从配置服务器读取),从而连接到开发环境的数据库的实例。
3、使用 Spring Cloud 配置服务器连接数据源
修改licensing-service项目:
└─licensing-service
    └─src
        └─main
            ├─docker
            ├─java
            │  └─com
            │      └─example
            │          └─licenses
            │              ├─config
            │              │   └─ServiceConfig
            │              │   └─LicenseServiceController
            │              ├─controllers
            │              │   └─LicenseServiceController
            │              ├─model
            │              │   └─License
            │              │   └─Organization
            │              ├─repository
            │              │   └─LicenseRepository
            │              └─services
            │              │   └─LicenseService
            │              └─LicensingServiceApplication
            └─resources
License.java:
package com.example.licenses.model;


import javax.persistence.Column;
import javax.persistence.Entity;
import javax.persistence.Id;
import javax.persistence.Table;


@Entity		// @Entity 注解告诉Spring 这是一个JPA类
@Table(name = "licenses")   // @Table 映射到数据库表
public class License{


  @Id	// 将该字段标记为主键
  @Column(name = "license_id", nullable = false)  		//将该字段映射到数据库表中列
  private String licenseId;

  @Column(name = "organization_id", nullable = false)
  private String organizationId;

  @Column(name = "product_name", nullable = false)
  private String productName;

  @Column(name = "license_type", nullable = false)
  private String licenseType;

  @Column(name = "license_max", nullable = false)
  private Integer licenseMax;

  @Column(name = "license_allocated", nullable = false)
  private Integer licenseAllocated;

  @Column(name="comment")
  private String comment;


  public Integer getLicenseMax() {


    return licenseMax;
  }

  public void setLicenseMax(Integer licenseMax) {


    this.licenseMax = licenseMax;
  }

  public Integer getLicenseAllocated() {


    return licenseAllocated;
  }

  public void setLicenseAllocated(Integer licenseAllocated) {


    this.licenseAllocated = licenseAllocated;
  }


  public String getLicenseId() {


    return licenseId;
  }

  public void setLicenseId(String licenseId) {


    this.licenseId = licenseId;
  }

  public String getOrganizationId() {


    return organizationId;
  }

  public void setOrganizationId(String organizationId) {


    this.organizationId = organizationId;
  }

  public String getProductName() {


    return productName;
  }

  public void setProductName(String productName) {


    this.productName = productName;
  }

  public String getLicenseType() {


    return licenseType;
  }

  public void setLicenseType(String licenseType) {


    this.licenseType = licenseType;
  }

  public String getComment() {


    return comment;
  }

  public void setComment(String comment) {


    this.comment = comment;
  }

  public License withId(String id){


    this.setLicenseId(id);
    return this;
  }

  public License withOrganizationId(String organizationId){


    this.setOrganizationId(organizationId);
    return this;
  }

  public License withProductName(String productName){


    this.setProductName(productName);
    return this;
  }

  public License withLicenseType(String licenseType){


    this.setLicenseType(licenseType);
    return this;
  }

  public License withLicenseMax(Integer licenseMax){


    this.setLicenseMax(licenseMax);
    return this;
  }

  public License withLicenseAllocated(Integer licenseAllocated){


    this.setLicenseAllocated(licenseAllocated);
    return this;
  }

  public License withComment(String comment){


    this.setComment(comment);
    return this;
  }

}
LicenseService:
package com.example.licenses.services;


import com.example.licenses.config.ServiceConfig;
import com.example.licenses.model.License;
import com.example.licenses.repository.LicenseRepository;
import org.springframework.beans.factory.annotation.Autowired;
import org.springframework.stereotype.Service;

import java.util.List;
import java.util.UUID;

@Service
public class LicenseService {


    @Autowired
    private LicenseRepository licenseRepository;

    @Autowired
    ServiceConfig config;

    public License getLicense(String organizationId, String licenseId) {


        License license = licenseRepository.findByOrganizationIdAndLicenseId(organizationId, licenseId);
        return license.withComment(config.getExampleProperty());
    }

    public List<License> getLicensesByOrg(String organizationId){


        return licenseRepository.findByOrganizationId( organizationId );
    }

    public void saveLicense(License license){


        license.withId( UUID.randomUUID().toString());

        licenseRepository.save(license);

    }

    public void updateLicense(License license){


      licenseRepository.save(license);
    }

    public void deleteLicense(License license){


        licenseRepository.delete( license);
    }

}
LicenseRepository:
package com.example.licenses.repository;

import com.example.licenses.model.License;
import org.springframework.data.repository.CrudRepository;
import org.springframework.stereotype.Repository;

import java.util.List;

@Repository		// @Repository注解,将这个接口视为存储库并为它生成动态代理。  CrudRepository提供了基本的CRUD方法。
public interface LicenseRepository extends CrudRepository<License,String>  {


    public List<License> findByOrganizationId(String organizationId);
    public License findByOrganizationIdAndLicenseId(String organizationId,String licenseId);
}
ServiceConfig:
package com.example.licenses.config;

import org.springframework.beans.factory.annotation.Value;
import org.springframework.stereotype.Component;

@Component
public class ServiceConfig{


 // @Value注解会从Spring Cloud 配置服务器(在这就是项目名称为configurationserve)中提取。并注入。
 // example.property在licensingservice.yml中配置了。
  @Value("${example.property}")
  private String exampleProperty;

  public String getExampleProperty(){


    return exampleProperty;
  }
}
LicenseServiceController :
package com.example.licenses.controllers;


import com.example.licenses.config.ServiceConfig;
import com.example.licenses.model.License;
import com.example.licenses.services.LicenseService;
import org.springframework.beans.factory.annotation.Autowired;
import org.springframework.web.bind.annotation.RequestBody;
import org.springframework.web.bind.annotation.RequestMapping;
import org.springframework.http.HttpStatus;
import org.springframework.web.bind.annotation.RestController;
import org.springframework.web.bind.annotation.RequestMethod;
import org.springframework.web.bind.annotation.PathVariable;
import org.springframework.web.bind.annotation.ResponseStatus;

import java.util.List;

@RestController
@RequestMapping(value="v1/organizations/{organizationId}/licenses")
public class LicenseServiceController {


    @Autowired
    private LicenseService licenseService;

    @Autowired
    private ServiceConfig serviceConfig;

    @RequestMapping(value="/",method = RequestMethod.GET)
    public List<License> getLicenses(@PathVariable("organizationId") String organizationId) {


        return licenseService.getLicensesByOrg(organizationId);
    }

    @RequestMapping(value="/{licenseId}",method = RequestMethod.GET)
    public License getLicenses( @PathVariable("organizationId") String organizationId,
                                @PathVariable("licenseId") String licenseId) {


        return licenseService.getLicense(organizationId,licenseId);
    }

    @RequestMapping(value="{licenseId}",method = RequestMethod.PUT)
    public String updateLicenses( @PathVariable("licenseId") String licenseId) {


        return String.format("This is the put");
    }

    @RequestMapping(value="/",method = RequestMethod.POST)
    public void saveLicenses(@RequestBody License license) {


       licenseService.saveLicense(license);
    }

    @RequestMapping(value="{licenseId}",method = RequestMethod.DELETE)
    @ResponseStatus(HttpStatus.NO_CONTENT)
    public String deleteLicenses( @PathVariable("licenseId") String licenseId) {


        return String.format("This is the Delete");
    }
}
4、使用 Spring Cloud 配置服务器和 Git
目前是用文件系统作为 Spring Cloud 配置服务器(项目名为configurationserver)的后端存储库。
configurationserver的application.yml,如下:
application.yml:
####
#Git solution
####
#server:
#  port: 8888
#spring:
#  cloud:
#    config:
#      server:
#        encrypt.enabled: false
#        git:
#          uri: https://github.com/path/to/config-repo/
#          searchPaths: licensingservice,organizationservice
#          username: confsvruser
#          password: mygitpwd123


####
#Classpath and file-based solution
####

server:
   port: 8888		#springcloud 配置服务器将要监听的端口
spring:
  profiles:
    active: native			# 。Spring Cloud 配置服务器以“native“ profile 运行:
  cloud:
     config:
       server:
           native:
	           search-locations: classpath:config/,classpath:config/licensingservice
#              searchLocations: path/to/configurationserver/src/main/resources/config/licensingservice,
#                               path/to/configurationserver/src/main/resources/config/organizationservice
###              #searchLocations: classpath:config/,classpath:config/licensingservice		# 配置文件存储位置的路径。
改成用Git:配置管理属性置于源代码管理下。
application.yml:
####
#Git solution
####
server:
  port: 8888
spring:
  cloud:
    config:
      server:
        encrypt.enabled: false
        git:  # 告诉Spring Cloud Config 使用Git作为后端存储库
          uri: https://github.com/path/to/config-repo/		# 告诉Spring Cloud Git服务器和Git存储库的URL
          searchPaths: licensingservice,organizationservice		# 	告诉 Spring Cloud Config 在Git中查找配置文件的路径。属性中的值是以“,”逗号分隔的由配置服务托管的服务列表
          username: confsvruser
          password: mygitpwd123


####
#Classpath and file-based solution
####

#server:
#   port: 8888		#springcloud 配置服务器将要监听的端口
#spring:
#  profiles:
#    active: native			# 。Spring Cloud 配置服务器以“native“ profile 运行:
#  cloud:
#     config:
#       server:
#           native:
#	           search-locations: classpath:config/,classpath:config/licensingservice
#              searchLocations: path/to/configurationserver/src/main/resources/config/licensingservice,
#                               path/to/configurationserver/src/main/resources/config/organizationservice
###              #searchLocations: classpath:config/,classpath:config/licensingservice		# 配置文件存储位置的路径。
5、使用 Spring Cloud 配置服务器刷新属性
Spring Boot Actuator 提供了一个,@RefreshScope 注解 ,允许开发访问 /refresh 端点。这会强制 Spring Boot 应用程序重新读取应用程序配置。
@RefreshScope 注解只会重新加载应用程序配置中的自定义 Spring 属性。Spring Data 使用的数据库配置等不会被@RefreshScope 注解重新执行刷新,可以访问 http //serverurl:8080/refresh 。如:http://localhost:8080/refresh。
LicensingServiceApplication :
package com.example.licenses;

import org.springframework.boot.SpringApplication;
import org.springframework.boot.autoconfigure.SpringBootApplication;
import org.springframework.cloud.context.config.annotation.RefreshScope;

@SpringBootApplication
@RefreshScope
public class LicensingServiceApplication {


    public static void main(String[] args) {


        SpringApplication.run(LicensingServiceApplication.class, args);
    }

}
将微服务与 Spring Cloud 配置服务一起使用时,在动态更改属性之前需要注意的是,可能会有同一服务的多个实例正在运行,
需要使用新的应用程序配置刷新所有这些服务。
有以下几种方法解决:
1. Spring Cloud Bus 的“推送”机制。需要一个额外的中间件( RabbitMQ )运行。并不是所有的 Spring Cloud 配置后
端都支持这种“推送”机制(也就是 Consul 服务器)。
2. Spring Service Discovery 和 Eureka 来注册所有服务实例。
3. 重新启动所有服务器或容器来接收新的属性
四、使用Docker容器来运行可以如下配置:
1)在configurationserver的src/main/docker目录下的dockerfile文件,run.sh文件以下配置:
dockerfile:
FROM openjdk:8-jdk-alpine
RUN  apk update && apk upgrade && apk add netcat-openbsd && apk add curl
RUN mkdir -p /usr/local/configurationserver
RUN echo $JAVA_HOME
RUN cd /tmp/ && \
    curl -k -LO "http://download.oracle.com/otn-pub/java/jce/8/jce_policy-8.zip" -H 'Cookie: oraclelicense=accept-securebackup-cookie' && \
    unzip jce_policy-8.zip && \
    rm jce_policy-8.zip && \
    yes |cp -v /tmp/UnlimitedJCEPolicyJDK8/*.jar /usr/lib/jvm/java-1.8-openjdk/jre/lib/security/
ADD  @[email protected] /usr/local/configurationserver/
ADD run.sh run.sh
RUN chmod +x run.sh
CMD ./run.sh
run.sh:
#!/bin/sh
echo "********************************************************"
echo "Starting Configuration Server"
echo "********************************************************"
java -jar /usr/local/configurationserver/@[email protected]
2)在名为licensingservice项目(目录结构可查看上一篇spring微服务学习2)的src/main/docker目录下的dockerfile文件,run.sh文件修改成以下配置:
dockerfile:
FROM openjdk:8-jdk-alpine
RUN  apk update && apk upgrade && apk add netcat-openbsd
RUN mkdir -p /usr/local/licensingservice
ADD @[email protected] /usr/local/licensingservice/
ADD run.sh run.sh
RUN chmod +x run.sh
CMD ./run.sh
run.sh:
#!/bin/sh

echo "********************************************************"
echo "Waiting for the configuration server to start on port $CONFIGURATIONSERVER_PORT"
echo "********************************************************"
while ! `nc -z configurationserver $CONFIGURATIONSERVER_PORT `; do sleep 3; done
echo ">>>>>>>>>>>> Configuration Server has started"

echo "********************************************************"
echo "Waiting for the database server to start on port $DATABASESERVER_PORT"
echo "********************************************************"
while ! `nc -z database $DATABASESERVER_PORT`; do sleep 3; done
echo ">>>>>>>>>>>> Database Server has started"

echo "********************************************************"
echo "Starting License Server with Configuration Service :  $CONFIGURATIONSERVER_URI";
echo "********************************************************"
java -Dspring.cloud.config.uri=$CONFIGURATIONSERVER_URI -Dspring.profiles.active=$PROFILE -jar /usr/local/licensingservice/@[email protected]
注:
$DATABASESERVER_PORT、$CONFIGURATIONSERVER_URI、$DATABASESERVER_PORT、$PROFILE
从外部传入,如docker容器或者VM实例
3)配置docker-compose.yml
可以通过特定环境的 docker-compose 文件来模拟不同的环境,从而协调所有服务的启动。容器所需的特定环境值作为环境变量传递到容器。
learnspringwfw目录下的docker文件夹。
目录结构,省略其他目录:
learnspringwfw
	├─docker
	│  └─common
	│  │    └─docker-compose.yml
	│  └─dev
	│  │    └─docker-compose.yml
	│  └─prod
	│ 	    └─docker-compose.yml
common目录下的docker-compose.yml:
version: '3'
services:
  configurationserver:
    image: learnspringwfw/my-configurationserver:learndemo3
    ports:
       - "8888:8888"
    environment:
      ENCRYPT_KEY:       "IMSYMMETRIC"
  database:
    image: postgres:9.5
    ports:
      - "5432:5432"
    environment:
      POSTGRES_USER: "postgres"
      POSTGRES_PASSWORD: "p0stgr@s"
      POSTGRES_DB:       "mylearndemo_local"
  licensingservice:
    image: learnspringwfw/my-licensing-service:learndemo3
    ports:
      - "8080:8080"
    environment:
      PROFILE: "default"
      CONFIGURATIONSERVER_URI: "http://configurationserver:8888"
      CONFIGURATIONSERVER_PORT :   "8888"
      DATABASESERVER_PORT: "5432"
      ENCRYPT_KEY:       "IMSYMMETRIC"
注:
PROFILE 环境变量被传递给 Spring Boot命令行,告诉Spring Boot应该运行哪个profile。
dev目录下的docker-compose.yml:
version: '3'
services:
  database:
    extends:
      file: ../common/docker-compose.yml
      service: database
    environment:
      POSTGRES_USER: "postgres_dev"
      POSTGRES_PASSWORD: "p0stgr@s_dev"
      POSTGRES_DB:       "mylearndemo_dev"
  configurationserver:
    extends:
      file: ../common/docker-compose.yml
      service: configurationserver
  licensingservice:
     image: learnspringwfw/licensing-service
     ports:
       - "8080:8080"
     environment:
       PROFILE: "dev"
       CONFIGURATIONSERVER_URI: "http://configurationserver:8888"
       CONFIGURATIONSERVER_PORT:   "8888"
       DATABASESERVER_PORT: "5432"
prod目录下的docker-compose.yml:
version:  '3'
services:
  database:
    extends:
      file: ../common/docker-compose.yml
      service: database
    environment:
      POSTGRES_USER: "postgres_prod"
      POSTGRES_PASSWORD:  "p0stgr@s_prod"
      POSTGRES_DB: "mylearndemo_prod"
  configurationserver:
    extends:
      file: ../common/docker-compose.yml
      service: configurationserver
  licensingservice:
      image: learnspringwfw/licensing-service
      ports:
        - "8080:8080"
      environment:
        PROFILE: "prod"
        CONFIGURATIONSERVER_URI: "http://configurationserver:8888"
        CONFIGURATIONSERVER_PORT:   "8888"
        DATABASESERVER_PORT: "5432"
然后用docker-compose相关命令启动即可。