1.介绍
古语有云:一夫当关,万夫莫开。
网关Zuul就在系统中起到同样的作用,它是系统的门户、城市的关隘、公园的检票口。
服务网关API Gateway可以有很多实现方法,如Nginx、Zuul,甚至是一个Node.js的服务端。它们最重要的作用是为前台提供后台服务的聚合,提供一个统一的服务出口,
解除它们之间的耦合,同时负责鉴权、认证、安全和跳转等作用。
Zuul是边缘服务,用来提供动态路由、监控、鉴权、安全、调度等功能,将权限控制等一些业务逻辑抽离出来,单独放到Zuul里,使得服务组件更简单,具有更好的可复用
性。
Zuul是反向代理工具,代理了后台的所有服务端,前端请求不需要知道真正的服务端是谁,只要交给Zuul就可以了,Zuul负责路由到真正的服务商。
2.如何使用
首先需要一个 eureka server 用于服务发现,然后需要两个不同的服务来验证 zuul 的路由功能。两个服务分别是 order service 和 product service,还需要路由 zuul service。
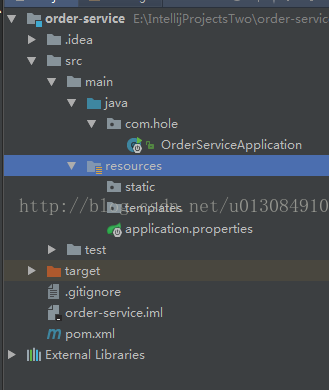
第一步:创建 order-service 工程。
项目结构如图:
(1)程序代码如下。
package com.hole;

import org.springframework.boot.SpringApplication;
import org.springframework.boot.autoconfigure.SpringBootApplication;
import org.springframework.cloud.client.discovery.EnableDiscoveryClient;
import org.springframework.http.HttpStatus;
import org.springframework.http.ResponseEntity;
import org.springframework.web.bind.annotation.RequestMapping;
import org.springframework.web.bind.annotation.RequestMethod;
import org.springframework.web.bind.annotation.RestController;

@EnableDiscoveryClient
@SpringBootApplication
@RestController
public class OrderServiceApplication {

	public static void main(String[] args) {
		SpringApplication.run(OrderServiceApplication.class, args);
	}

	@RequestMapping(value = "/hello",method = RequestMethod.GET)
	public ResponseEntity<String> hello(){
		return new ResponseEntity<String>("hello order service!", HttpStatus.OK);
	}
}
(2)application.properties配置如下。
spring.application.name=order-service
server.port=3331
eureka.client.serviceUrl.defaultZone=http://localhost:8761/eureka/
eureka.instance.lease-renewal-interval-in-seconds=50
eureka.instance.lease-expiration-duration-in-seconds=30
其中spring.application.name 配置的是服务ID,对应在Eureka监控界面看到的服务名称,相当于服务的别名,被调用时会被引用,如在 Zuul中配置路由就会用到这个名称。
(3)pom.xml 配置同 上一节 Eureka 客户端配置,不再赘述。
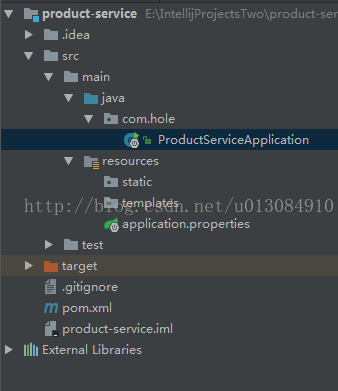
第二步:创建 product-service 工程。
工程结构如图所示:
(1)程序代码如下。
package com.hole;

import org.springframework.boot.SpringApplication;
import org.springframework.boot.autoconfigure.SpringBootApplication;
import org.springframework.cloud.client.discovery.EnableDiscoveryClient;
import org.springframework.http.HttpStatus;
import org.springframework.http.ResponseEntity;
import org.springframework.web.bind.annotation.RequestMapping;
import org.springframework.web.bind.annotation.RequestMethod;
import org.springframework.web.bind.annotation.RestController;

@EnableDiscoveryClient
@SpringBootApplication
@RestController
public class ProductServiceApplication {

	public static void main(String[] args) {
		SpringApplication.run(ProductServiceApplication.class, args);
	}

	@RequestMapping(value = "/hello",method = RequestMethod.GET)
	public ResponseEntity<String> hello(){
		return new ResponseEntity<String>("hello product service!", HttpStatus.OK);
	}
}
(2)application.properties配置如下:
spring.application.name=product-service
server.port=2221
eureka.client.serviceUrl.defaultZone=http://localhost:8761/eureka/
eureka.instance.lease-renewal-interval-in-seconds=50
eureka.instance.lease-expiration-duration-in-seconds=30
第三步:创建 zuul-service 工程。
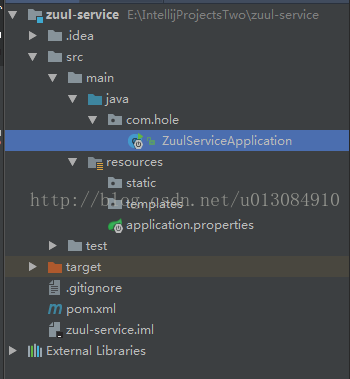
目录结构如下图所示:
(1)工程增加 Zuul 依赖,pom.xml增加。
<dependency>
			<groupId>org.springframework.cloud</groupId>
			<artifactId>spring-cloud-starter-zuul</artifactId>
		</dependency>
(2)启动类增加一行注解 @EnableZuulProxy,这样就开启了Zuul 的功能。
package com.hole;

import org.springframework.boot.SpringApplication;
import org.springframework.boot.autoconfigure.SpringBootApplication;
import org.springframework.cloud.client.discovery.EnableDiscoveryClient;
import org.springframework.cloud.netflix.zuul.EnableZuulProxy;

@EnableZuulProxy
@SpringBootApplication
@EnableDiscoveryClient
public class ZuulServiceApplication {

	public static void main(String[] args) {
		SpringApplication.run(ZuulServiceApplication.class, args);
	}
}
(3)application.properties 增加路由的配置。
spring.application.name=zuul-service
server.port=8765
eureka.client.serviceUrl.defaultZone=http://localhost:8761/eureka/
# routes to serviceId
zuul.routes.product-service.path=/product-service/**
zuul.routes.product-service.serviceId=product-service
zuul.routes.order-service.path=/order-service/**
zuul.routes.order-service.serviceId=order-service
# routes to url
zuul.routes.product-service-url.path=/product-service-url/**
zuul.routes.product-service-url.url=http://localhost:2221/
zuul.routes..order-service-url.path=/order-service-url/**
zuul.routes..order-service-url.url=http://localhost:3331/
其中 order-service替换成任何名称都可以,只要path 和 serviceId 成对出现即可。这样所有 /product-services/** 过来的请求都会转发到 product-service 服务上;所有
/order-service/** 过来的请求都被转发到 order-service服务上。
还可以通过 url 来做映射,相对于 serviceId 的方式来说更复杂一些,因为需要知道具体的 IP地址,不如直接饮用示例名方便。
第四步:启动
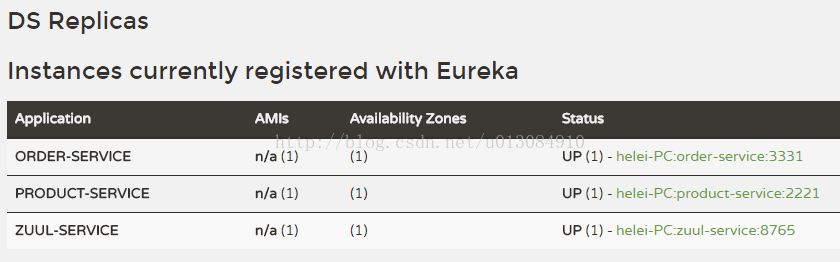
将 eureka-server、zuul-service、product-service、order-service 四个工程启动,在监控界面可以看到启动成功。
第五步:验证。
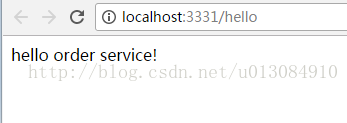
分别单独验证两个服务 product-service、order-service 是否可以正常使用,经验证都可以访问。如图:

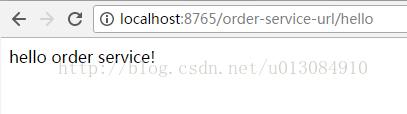
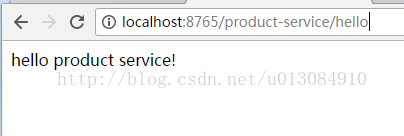
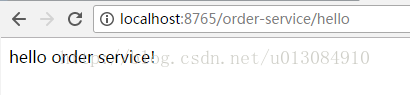
接下来验证Zuul 路由功能。如图可以看出路由功能已经生效,可以正常的通过服务ID映射的方式进行跳转。
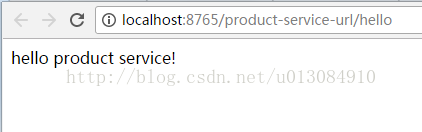
同样可以通过URL映射的方式进行跳转,结果是一样的,如下图。