Spring Boot 中采用了大量的自动化配置,但是对开发者而言,在实际项目中不可避免会有一些需要自己手动配置,承载这些自定义配置的文件就是resources目录下的application.properties文件(也可以使用 application.yaml 文件替代 application.properties 文件)。
一、配置文件的优先级
Spring Boot项目中的 application.properties 配置文件一共可以出现在如下4个位置:
- 项目根目录下的config文件夹中。
- 项目根目录下。
- classpath下的config文件夹中。
- classpath下。
这四个位置的加载优先级依次为 1 > 2 > 3 > 4。如果这4个位置中都有application.properties文件,那么加载的优先级从1到4依次降低,如下图所示。Spring Boot将按照这个优先级查找配置信息,并加载到Spring Environment 中。

二、引用外部的配置文件
默认情况下,Spring Boot 查找 application.properties 并加载。如果开发者不想使用 application.properties 作为配置文件名,也可以自己定义。在打包启动时指定文件的路径或名称。
1、项目打包好以后,我们可以使用命令行参数的形式,启动项目的时候来指定文件名。
java -jar xxx.jar --spring.config.name=filename2、项目打包好以后,我们可以使用命令行参数的形式,启动项目的时候来指定外部配置文件的位置。
java -jar xxx.jar --spring.config.location=classpath:/app.properties 3、当然我们也可以指定外部配置所在的文件夹,启动时会搜索并使用该文件夹下的配置文件:
java -jar xxx.jar --spring.config.location=classpath:/config/4、我们还可以同时配置多个路径,比如下面样例先加载外部配置文件,如果不存在外部配置文件的话则使用包内默认的配置文件:
java -jar xxx.jar --spring.config.location=classpath:/,classpath:/config/三、使用命令行参数指定属性
除了可在配置文件中配置属性参数外,还可以通过例如在二中指定配置文件路径的形式指定启动参数,比如在集群环境下,在配置文件中指定了 端口为 8080,如果想再启动一个 8081 端口的服务,就可以通过 --server.port指定启动端口。其他参数同理
java -jar xxx.jar --server.port=8081如果 application.properties 文件中已经存在了同名的参数,将会覆盖 application.properties 中配置的。
四、自定义配置属性
在项目中经常会遇到肯定自定义的配置属性,比如 Token 过期时间、调度任务的定时时间等信息。我们可以在 application.properties 中配置自己的属性。
1、我们可以在 application.properties 中添加类似如下这样简单的常量配置:
book.name=红楼梦
book.author=曹雪芹
book.price=299.9
2、配置属性之间也可以相互引用使用:
book.name=红楼梦
book.author=曹雪芹
book.price=299.9

# book.info 属性引用了以上三个属性
book.info=${book.name}-${book.author}-${book.price}
3、将配置属性数据注入到类属性上。
(1)、在需要使用地方通过 @Value 注解就可以将数据注入到属性上,如下所示我们创建一个 BookController 把 book.info 注入到 bookInfo 属性上。
@RestController
public class BookController {
@Value("${book.info}")
private String bookInfo;
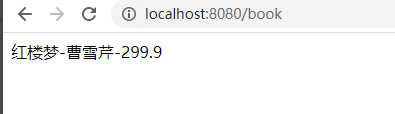
@GetMapping("/book")
public String boolInfo(){
return bookInfo;
}
}(2)、重启项目,访问 http://localhost:8081/book。

4、将属性数据注入到Bean上。
在项目开发中可能存在一个或多个配置在多个类中都会使用到,如果在每个使用到的类中都加上同一一个属性,或者每个属性都散落在项目中的类中,维护起来相对比较麻烦,我们也单独定义一个配置类,把自定义的属性都注入到这个配置类中,其他使用的属性直接引用这个类即可。
(1)、定义一个 名为 Book 的 Bean,并将前面的配置数据注入到这个 Bean 中
@ConfigurationProperties(prefix = "book")
@Component
public class Book {

    private String name;

    private String author;

    private Double price;

    private String info;

    // 省略 getter 和 setter 方法
}
说明:
(1)@ConfigurationProperties 中的 prefix 属性描述了要加载的配置文件的前缀。
(2)Spring Boot 采用了一种宽松的规则来进行属性绑定:
- 假设 Bean 中的属性名为 authorName,那么配置文件中的属性可以是 my.author_name、my.author-name、my.authorName 或者 my.AUTHORNAME
(2)、在 BookController 中注入 Book
@RestController
public class BookController {

    @Resource
    private Book book;

    @GetMapping("/book")
    public String boolInfo(){

        return book.getInfo();
    }
}
(3)、重启访问
五、多环境配置
开发者在项目发布之前,一般需要频繁地在开发环境、测试环境以及生产环境之间进行切换,这个时候大量的配置需要频繁更改,(比如:数据库、redis、mongodb,MQ等配置)。频繁修改带来了巨大的工作量,Spring Boot中约定的不同环境下配置文件名称规则为:
- application-{profile}.properties,profile占位符表示当前环境的名称。
具体配置步骤如下。
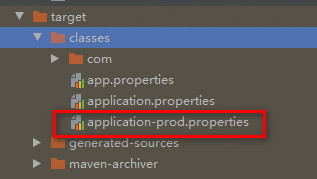
1、创建配置文件
首先在 resources 目录下创建两个配置文件:application-dev.properties 和 application-prod.properties,分别表示开发环境和生产环境中的配置。
#application-dev.properties
book.name=红楼梦
book.author=曹雪芹
book.price=299.9
# book.info 属性引用了以上三个属性
book.info=${book.name}-${book.author}-${book.price}


#application-prod.properties
book.name=MySQL从删库到跑路
book.author=佚名
book.price=299.9
# book.info 属性引用了以上三个属性
book.info=${book.name}-${book.author}-${book.price}
2、在 application.properties 中配置环境
(1)在 application.properties 中进行如下配置,则表示 加载 application-dev.properties
spring.profiles.active=dev(2)在 application.properties 中进行如下配置,则表示 加载 application-prod.properties
spring.profiles.active=prod(3)修改配置重启后则会访问,则会看到不同的结果
3、在代码中配置
对于第二步在application.properties中添加的配置,我们也可以在代码中添加配置来完成,在启动类的main方法上添加如下代码,可以替换第二步的配置:
@SpringBootApplication
public class Springdemo3Application {

    public static void main(String[] args) {
        SpringApplicationBuilder builder =
                 new SpringApplicationBuilder(Springdemo3Application.class);
        builder.application().setAdditionalProfiles("dev");
        builder.run(args);
    }
}
4、项目启动时配置
我们也可以在项目打包成 jar 包后启动时,在命令行中动态指定当前环境:
java -jar xxx.jar --spring.profiles.active=dev5、通过 Maven 指定
上述所说的三种配置,都需要在打包前修改配置或者在启动时指定启动参数,我们还可以通过 Maven 指定配置,在打包时直接打入指定的配置。
(1)、修改 pom.xml 文件中添加如下配置
    <build>
        <plugins>
            <plugin>
                <groupId>org.springframework.boot</groupId>
                <artifactId>spring-boot-maven-plugin</artifactId>
            </plugin>
            <plugin>
                <groupId>org.apache.maven.plugins</groupId>
                <artifactId>maven-resources-plugin</artifactId>
            </plugin>
        </plugins>

        <resources>
            <resource>
                <directory>src/main/resources</directory>
                <filtering>true</filtering>
                <excludes>
                    <exclude>application-dev.properties</exclude>
                    <exclude>application-prod.properties</exclude>
                </excludes>
            </resource>
            <resource>
                <directory>src/main/resources</directory>
                <filtering>false</filtering>
                <includes>
                    <include>application-${profiles.active}.properties</include>
                    <include>application.properties</include>
                </includes>
            </resource>
        </resources>

    </build>
    <profiles>
        <!--开发环境-->
        <profile>
            <id>dev</id>
            <properties>
                <profiles.active>dev</profiles.active>
                <maven.test.skip>true</maven.test.skip>
            </properties>
            <activation>
                <activeByDefault>true</activeByDefault>
            </activation>
        </profile>

        <!--生产环境-->
        <profile>
            <id>prod</id>
            <properties>
                <profiles.active>prod</profiles.active>
                <maven.test.skip>true</maven.test.skip>
            </properties>
        </profile>
    </profiles>
</project>
(2)、修改 application.properties 文件,添加如下配置:
[email protected]@(3)、在 maven 打包时指定 profile。
mvn clean package -P prod这样打包后的文件就只有 指定 profile 对应的文件,如下所示: